If you need to fasten a cable to a wall, you might be tempted to use a plastic cable clamp like one of these.
These are fine if you need to fasten just one cable to an interior wall. If you need to fasten a cable outside where it can be exposed to the sun or if you need to fasten multiple cables, then these plastic clamps won’t work. The sun will make them crack. What you can do instead is use zip ties with a zip tie base. There are even releasable zip ties.
Releasable zip ties
You can find zip tie base mounts with 4.5mm openings and 9mm openings to accommodate zip ties of different widths.
Zip tie base mount
Just screw the base mount to a wall.
Slide a zip tie through the opening.
and fasten some cables. Trim the zip tie if desired.
The cables will be tight, and the zip ties should last longer than those flimsy plastic cable clamps.
Things have definitely moved around and look different in the UI for GA4 (Google Analytics v4) vs UA (Universal Analytics). If you’re looking how to find pages that link to a particular page (previous page path), then you need to use Path Exploration.
Explore > Path Exploration
If you see an existing path exploration, click “Start Over”. Then, click “Ending Point” and choose an option. I prefer to choose “Page path and screen class” since page paths are easy and unique to get.
You can then choose one of the available paths or click the magnifying glass to type in a path, e.g. /resources/.
You will then see how often people click on a link on a page that takes them to your ending point (page) within a particular time range.
In the Variables section on the left, you can change the date range and other variables.
Are you currently employed? If so, why are you looking for another job?
What have been your key responsibilities as a web designer?
Describe your experience designing websites.
How familiar are you with HTML and CSS?
Do you have a portfolio of web designs?
Have you created any websites yourself, whether from scratch or from WYSIWYG tools like Webflow?
On a scale of 1-10, with 10 being the most proficient, rate your proficiency in Photoshop.
On a scale of 1-10, with 10 being the most proficient, rate your proficiency in Figma.
Do you have a portfolio of websites you’ve designed?
Do you use a grid system when you create designs?
What is a responsive web design?
Are you familiar with website breakpoints?
What are some bad examples of web design?
An outdated or inadequate web design.
Poor website navigation.
Convoluted or unclear user journeys.
Excessive use of images, icons, colors, and textures.
Poor quality images.
Mobile optimization is not available.
What’s the web design project you’re most proud of?
Describe your end-to-end process when working on a web design task.
Have you ever been involved in a complete website redesign project?
Describe what UX is and why it is important.
Describe your experience with website animation.
Do you have experience designing icons from scratch or editing existing icons or do you rely solely on a library of premade icons?
Do you have experience creating vector images from scratch, e.g. using Adobe Illustrator?
Have you created any animations using Adobe AfterEffects?
When designing for web, have you leveraged any website component libraries like Tailwind UI and Flowbite?
A common workflow we have is to take a Word document containing web page content and turn it into a web design in Figma. Is this something you can do?
Unlike print designs, websites are living documents, meaning that the content, whether text or images, often changes. As such web designs need to be versatile to accommodate such changes. For example, if a design calls for a box containing paragraph with 5 lines of text, e.g. a customer quote, that same design may not look good the customer was replaced with one spanning 10 lines of text. Do you have experience facing such web designs issues?
Have you worked with any website templates before?
Describe your level of passion for web design.
How do you keep abreast of web design trends, e.g. do you follow certain groups, attend conferences, read certain blogs, etc?
The marketing department at Qualys is very fast-paced with many last-minute requests. Do you have experience in and would you be comfortable in such an environment?
Do you have experience designing marketing websites and/or landing pages to drive signups?
Do you have experience designing websites with SEO in mind?
Qualys is a multi-national company with offices around the world. Sometimes, you may need to work outside of normal business hours. Is that okay for you or do you have a strict 9-5 schedule?
Where do you go for design inspiration?
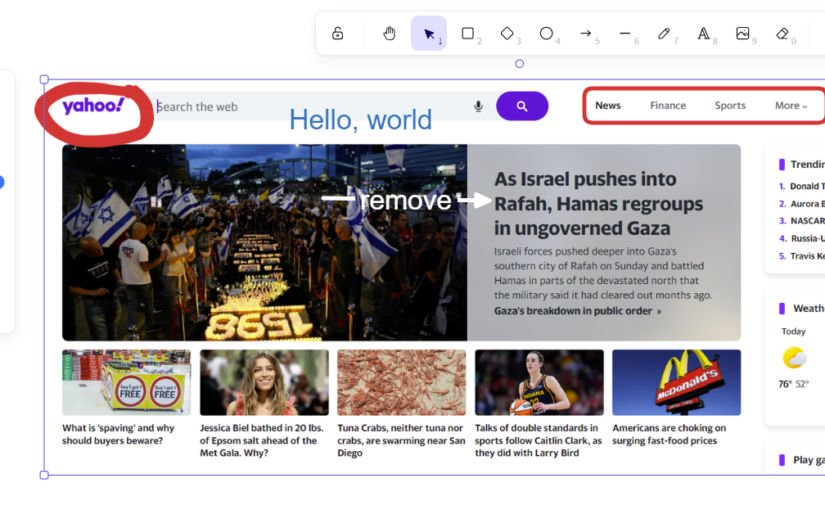
Are there certain websites that you particularly like the design of, e.g. apple.com, yahoo.com, etc?
Please take 15 mins to make a list of design choices you like and dislike on www.qualys.com and explain why.
Describe a web design project you worked on that didn’t go as planned. What could you have done better?
Do you have experience with ADA compliance as it pertains to web design, e.g.
Color contrast
Accessibility of web forms
Etc
What tools do you use the most when designing?
Some designs are full-width. How do you handle such designs if a user’s monitor is very wide?
When designing for web, do you prefer to start with a mobile design (mobile-first design) or a desktop design?
Let’s say you’ve inherited a large website that uses some home-grown static site generator (SSG) and there’s no documentation. Your build and release infrastructure is fragile and also custom. Your git repo is massive with content from two decades, including lots of binary files. You want to migrate this massive piece of shit to a popular SSG like Eleventy and you want to use a reliable deployment system like GitHub + Netlify. Let’s say you can’t migrate all source files because there’s no easy way to do so between your custom SSG and Eleventy. If you’re willing to sacrifice most of your layouts and partials (includes) and just migrate everything all of the built static files to Eleventy with one partial for the header and one for the footer, then here’s one way to do it.
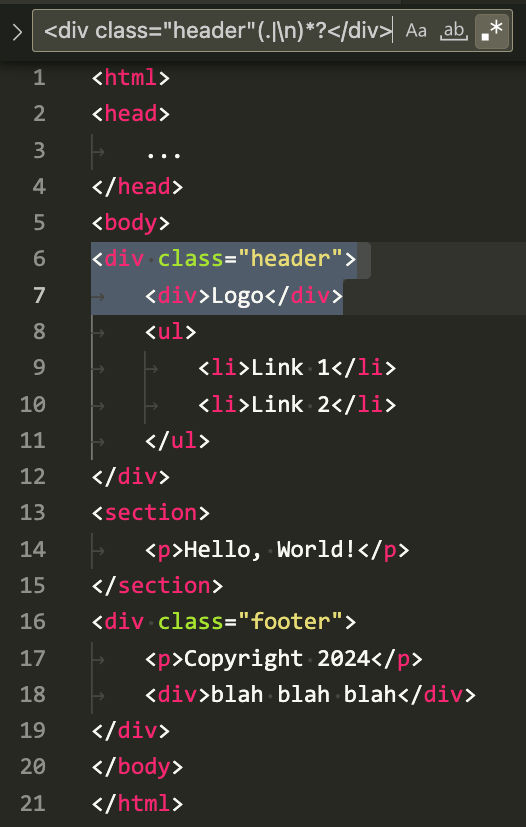
If your header and footer code blocks don’t use unique HTML tags like “header” and “footer”, then you may have a problem searching and replacing these code blocks. For example, in VS Code, if I try to select the header block beginning with <div class="header">, I can’t do so due to the nested div tag.
Using the regex
<div class="header"(.|\n)*?</div>
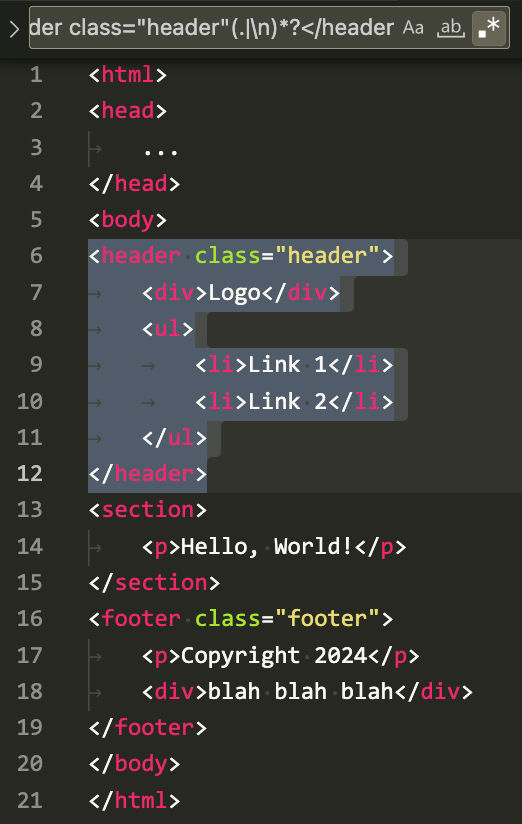
notice how the selection ends prematurely at the closing nested div tag. In this situation, you can update your source code to replace the open and closing div tags with the standard <header> tag. You can do the same with the footer by using the <footer> tag. After updating the source code, you can rebuild your static HTML pages and then use a regex like
to search and replace the header and footer code blocks with a code reference that includes those code blocks using whatever template engine you want to use.
If you want to use the Nunjucks template engine, for example, then you can replace those code blocks with something like
{% include "header.njk" %}
{% include "footer.njk" %}
4. Rename file extensions
Rename all HTML files so their extensions are .njk instead of .html.
5. Install an SSG
Create a new folder and install an SSG. In this case, I’ll install Eleventy.
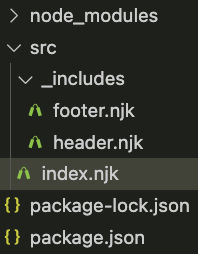
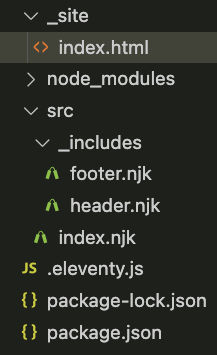
Move your website files to your new Eleventy project. To follow Eleventy’s default conventions, your folder structure should look something like this.
Note that we put the header and include partials in the “_includes” folder under the “src” folder. Therefore, our header and footer include references should be updated to look like this
<html>
<head>
	<title>Home Page</title>
</head>
<body>
{% include "src/_includes/header.njk" %}
<section>
	<p>Hello, World!</p>
</section>
{% include "src/_includes/footer.njk" %}
</body>
</html>
6. Test
If you don’t create an Eleventy config file, then Eleventy will use all of its defaults and output built files to a “_site” folder and it will build the partials as well.
Since we don’t want to build the partials, let’s create an Eleventy config file.
7. Create an Eleventy config file
In the project root, create a file called .eleventy.js with the following content.
module.exports = function(eleventyConfig) {
	eleventyConfig.addPassthroughCopy("src", {
		//debug: true,
		filter: [
			"404.html",
			"**/*.css",
			"**/*.js",
			"**/*.json",
			"!**/*.11ty.js",
			"!**/*.11tydata.js",
		]
	});

	// Copy img folder
	eleventyConfig.addPassthroughCopy("src/img");

	eleventyConfig.setServerPassthroughCopyBehavior("copy");

	return {
		dir: {
			input: "src",
			// ⚠️ These values are both relative to your input directory.
			includes: "_includes",
			layouts: "_layouts",
		}
	}
};
If you rerun Eleventy, you’ll see that the partials are not built and copied to the output folder.
8. Create a layout (optional)
If you want your page content to be wrapped in other content, you can create a layout. This is called template inheritance. Both Nunjucks and 11ty have their own template inheritance mechanism. With Nunjucks, you inherit a parent template using
{% extends "parent.njk" %}.
With 11ty, you inherit a parent template using front matter, e.g.
Recently, I needed to clone a website and make a few minor changes to it. I wanted to publish a slightly modified copy of the website. Luckily, it’s easy to do that using wget. Here’s how I did it.
Since I downloaded a bunch of HTML files, if I wanted to replace a common element on multiple pages, the easiest way was to do a search and replace. Using VisualStudio Code, you can easily find all HTML blocks within a particular tag using a multi-line regex. Here are some example regexes:
<footer(.|\n)*?</footer>
<script(.|\n)*?</script>
<a class="popup(.|\n)*?</a>
Note: these regexes only work if the tags don’t have any nested tags with the same name.
In some companies, some people have way too many meetings. Of course, some meetings are necessary, like when you need to discuss an issue. But some meetings are pretty much just status updates. For example, within a marketing department, you will have many teams, including public relations, events, web, design, content, campaigns, etc. Within each team, you’ll have a team lead and other people of varying ranks. What some companies or departments do is they have long meetings every month or so where everyone attends. Then, the team lead from each unit takes turns giving a status update. While this may seem like a good use of everyone’s time, it’s actually dumb as hell. Many, if not most, people will not care about what other teams are doing because the activities of other teams are simply irrelevant to them. They may try to pay attention, but because much of what is said doesn’t matter to them, they will likely forget what was said within a few days if not hours, resulting in a complete waste of many people’s time. Another problem is time management. If each speaker is given 5 minutes to talk, most likely they will talk for much longer and not everyone will be able to share their updates or the meeting will just last for much longer than it needs to. If your team is spread across multiple time zones, e.g., the US and India, then people will inconveniently have to attend these pointless meetings early in the morning or late in the evening. Interestingly, some people are in so many meetings that they don’t even have time to do any of the actual work that they’ve discussed in the meetings. Another problem with these types of periodic (weekly or monthly) status update meetings is people are forced to try to remember their activities or accomplishments, put them in a few Powerpoint slides, and then wait till the meeting happens, only for the activities to become old news because they happened too long ago.
For a live meeting to be effective, it should meet the following criteria:
only relevant people should attend
there should be a clear agenda with an issue that needs to be discussed or one that involves something that is easier said and shown rather than written.
if a live discussion is required, the issue to discuss should be sufficiently complex, important or urgent.
For discussions that don’t need to be in real time (asynchronous discussions), then communicating via chat where only relevant people are involved is usually effective.
For status updates, they are actually more effective when they are written, e.g, via group chat, as long as they are concise and formatted well so that people can easily consume all of it or just the parts that are relevant to them. This also gives people time to think about a particular update and follow up with relevant people if needed. It also allows anyone, not just team leads, to post important updates as soon as they happen.
Following are some quotes from various sources on the topic of providing status updates. Many of these quotes are from companies that provide communication and collaboration tools. Regardless, they do have a point.
Status updates don’t belong in meetings. Status updates are ineffective team meetings, says Baker. “A round-robin of what people are working on can be handled over email or a collaboration tool.”
Status updates are the hallmark of a poorly run meeting. Let’s say every week, each person on your team goes around in a circle and provides a high-level update of what they are working on. Without fail, many of these items are ONLY relevant to a few people.
Sitting through another status meeting where the project manager reads through a spreadsheet list or flips through slides on a presentation isn’t a productive use of anyone’s time. In fact, 56% of US workers get irritated by meetings that could’ve been an email. To make the best use of your team’s time, switch to asynchronous meetings where possible.
When updates or discussions aren’t relevant for the entire team, some people can end up disengaging. Inviting too many people who don’t need to be there can also cause meetings to become irrelevant. Set a high bar for whole-team meetings. Reserve meetings involving the entire team or a larger group for topics that truly require collective discussion and decision-making.
To be plain, many status meetings don’t need to happen. Instead, many status update meetings could be emails, memos, threads on collaboration platforms like Slack, or quick check-ins between colleagues on their own. Many status meetings happen by tradition: “We always do a Monday morning status meeting.” “Wednesday are for team updates.”
One of the worst kinds of status meetings to attend is the type in which everyone goes around the room and states what they accomplished the prior week. This practice is a colossal waste of time. If this is the entire point of the meeting, then don’t call one. An effective PM can get these updates prior to a meeting, distribute them and then discuss issues at the meeting.
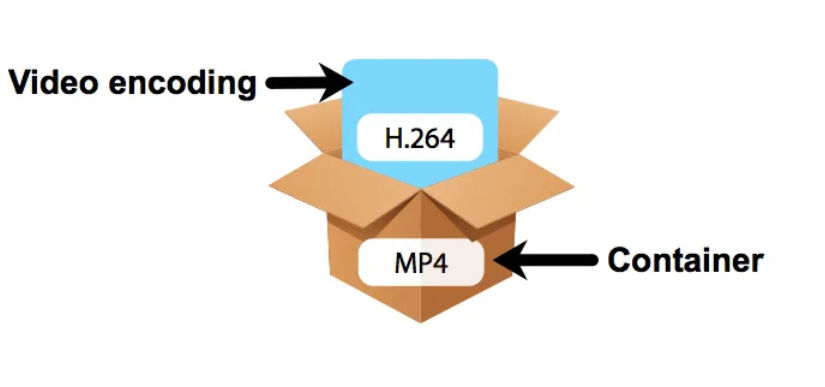
With so many video codecs and containers, it’s easy to get confused. Here’s a simple explanation.
Codec (Video Format)
Codec stands for coder-decoder. Video codecs are algorithms for encoding and decoding video data.
An encoder compresses video streams, which reduces the amount of data for storage and transmission.
A decoder reverses the conversion for playing or editing a video stream.
For simplicity, you can think of a video codec as the video format.
Examples of video codecs are H.261, H.263, VC-1, MPEG-1, MPEG-2, MPEG-4, AVS1, AVS2, AVS3, VP8, VP9, AV1, AVC/H.264, HEVC/H.265, VVC/H.266, EVC, LCEVC
Currently, the most popular codec is AVC/H.264.
Container (File Format)
With respect to video, a container is a data storage. It can include compressed video and audio sequences, subtitles, service information and metadata. It is a package or bundle.
For simplicity, you can think of a media container as the file format.
Examples of media containers are MPEG-1 System Stream, MPEG-2 Program Stream, MPEG-2 Transport Stream, MP4, MOV, MKV, WebM, AVI, FLV, IVF, MXF, HEIC