


Let’s say you’ve inherited a large website that uses some home-grown static site generator (SSG) and there’s no documentation. Your build and release infrastructure is fragile and also custom. Your git repo is massive with content from two decades, including lots of binary files. You want to migrate this massive piece of shit to a popular SSG like Eleventy and you want to use a reliable deployment system like GitHub + Netlify. Let’s say you can’t migrate all source files because there’s no easy way to do so between your custom SSG and Eleventy. If you’re willing to sacrifice most of your layouts and partials (includes) and just migrate everything all of the built static files to Eleventy with one partial for the header and one for the footer, then here’s one way to do it.
1. Copy Your Static Site to a New Folder
If you don’t have access to the SSG and the web servers, you can download the whole website from the internet using wget.
2. Copy the Header and Footer Code Blocks to Separate Files
Let’s say your HTML looks something like this.
<html>
<head>
	...
</head>
<body>
<header class="header">
	<div>Logo</div>
	<ul>
		<li>Link 1</li>
		<li>Link 2</li>
	</ul>
</header>
<section>
	<p>Hello, World!</p>
</section>
<footer class="footer">
	<p>Copyright 2024</p>
	<div>blah blah blah</div>
</footer>
</body>
</html>
In this case, you can create separate files like this:
/includes/header.njk
<header class="header">
	<div>Logo</div>
	<ul>
		<li>Link 1</li>
		<li>Link 2</li>
	</ul>
</header>
/includes/footer.njk
<footer class="footer">
	<p>Copyright 2024</p>
	<div>blah blah blah</div>
</footer>
3. Search and Replace the Header Code Block with a Include
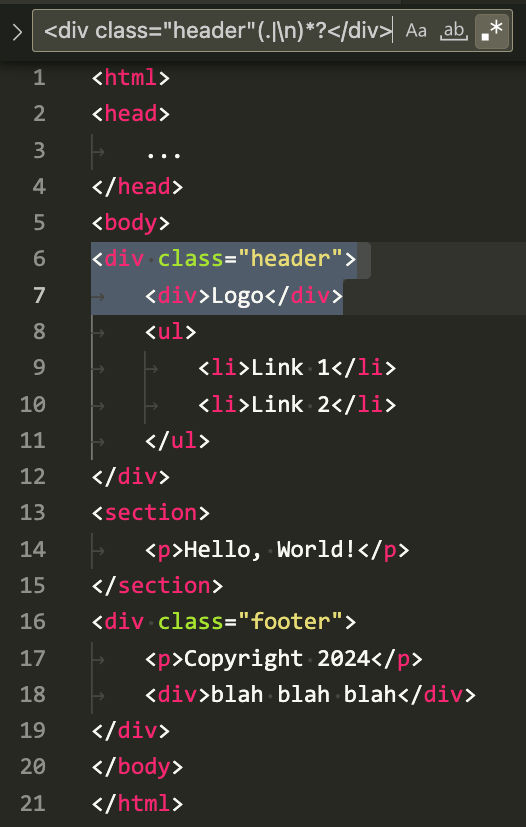
For simplicity, let’s say that your HTML looks something like this:
<html>
<head>
	...
</head>
<body>
<div class="header">
	<div>Logo</div>
	<ul>
		<li>Link 1</li>
		<li>Link 2</li>
	</ul>
</div>
<section>
	<p>Hello, World!</p>
</section>
<div class="footer">
	<p>Copyright 2024</p>
	<div>blah blah blah</div>
</div>
</body>
</html>
If your header and footer code blocks don’t use unique HTML tags like “header” and “footer”, then you may have a problem searching and replacing these code blocks. For example, in VS Code, if I try to select the header block beginning with <div class="header">, I can’t do so due to the nested div tag.
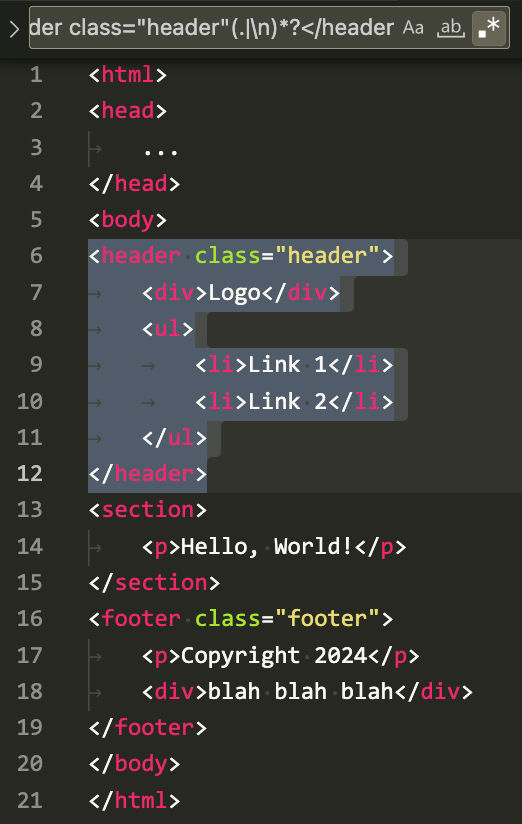
Using the regex
<div class="header"(.|\n)*?</div>notice how the selection ends prematurely at the closing nested div tag. In this situation, you can update your source code to replace the open and closing div tags with the standard <header> tag. You can do the same with the footer by using the <footer> tag. After updating the source code, you can rebuild your static HTML pages and then use a regex like
<header class="header"(.|\n)*?</header>
<footer class="footer"(.|\n)*?</footer>
to search and replace the header and footer code blocks with a code reference that includes those code blocks using whatever template engine you want to use.
If you want to use the Nunjucks template engine, for example, then you can replace those code blocks with something like
{% include "header.njk" %}
{% include "footer.njk" %}
4. Rename file extensions
Rename all HTML files so their extensions are .njk instead of .html.
5. Install an SSG
Create a new folder and install an SSG. In this case, I’ll install Eleventy.
mkdir mysite
cd mysite
npm init -y
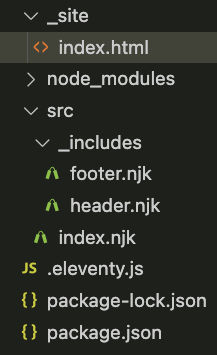
npm install --save-dev @11ty/eleventyMove your website files to your new Eleventy project. To follow Eleventy’s default conventions, your folder structure should look something like this.
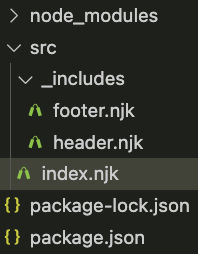
Note that we put the header and include partials in the “_includes” folder under the “src” folder. Therefore, our header and footer include references should be updated to look like this
<html>
<head>
	<title>Home Page</title>
</head>
<body>
{% include "src/_includes/header.njk" %}
<section>
	<p>Hello, World!</p>
</section>
{% include "src/_includes/footer.njk" %}
</body>
</html>
6. Test
If you don’t create an Eleventy config file, then Eleventy will use all of its defaults and output built files to a “_site” folder and it will build the partials as well.

Since we don’t want to build the partials, let’s create an Eleventy config file.
7. Create an Eleventy config file
In the project root, create a file called .eleventy.js with the following content.
module.exports = function(eleventyConfig) {
	eleventyConfig.addPassthroughCopy("src", {
		//debug: true,
		filter: [
			"404.html",
			"**/*.css",
			"**/*.js",
			"**/*.json",
			"!**/*.11ty.js",
			"!**/*.11tydata.js",
		]
	});

	// Copy img folder
	eleventyConfig.addPassthroughCopy("src/img");

	eleventyConfig.setServerPassthroughCopyBehavior("copy");

	return {
		dir: {
			input: "src",
			// ⚠️ These values are both relative to your input directory.
			includes: "_includes",
			layouts: "_layouts",
		}
	}
};
If you rerun Eleventy, you’ll see that the partials are not built and copied to the output folder.

8. Create a layout (optional)
If you want your page content to be wrapped in other content, you can create a layout. This is called template inheritance. Both Nunjucks and 11ty have their own template inheritance mechanism. With Nunjucks, you inherit a parent template using
{% extends "parent.njk" %}. With 11ty, you inherit a parent template using front matter, e.g.
---
layout: parent.njk
---
Nunjucks supports template blocks natively, but it doesn’t support front matter. 11ty supports front matter, but it doesn’t support template blocks natively. Learn more about creating a layout using 11ty’s template inheritance mechanism.