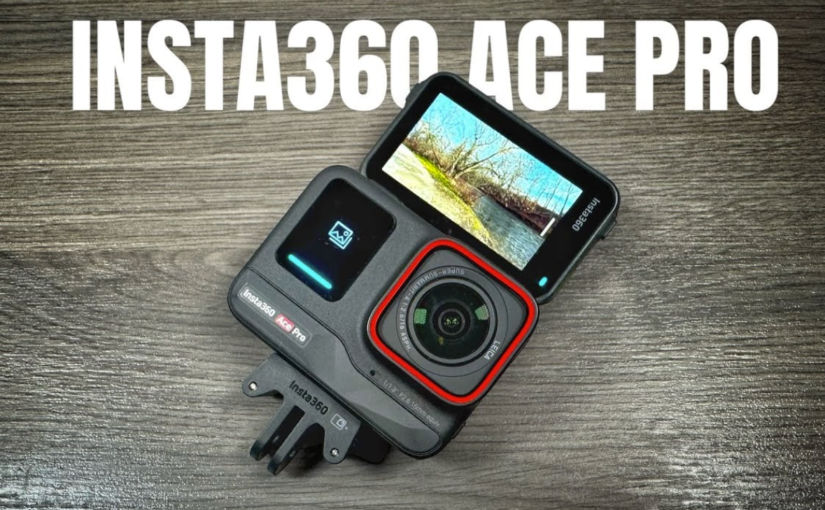
Use this magnetic chest mount for hands-free FPV (first-person view) filming. The camera should be positioned upside down to lay flat on your chest.
Daytime Video Recording
Choose “Freeframe video” mode.
Ratio: 4:3 (in the Studio app, change it to 16:9)
Active HDR: On
Resolution: 4K (this is the only option)
Frame Rate: 30 fps is good enough (this is the highest frame rate that supports HDR)
Horizon lock: choose 360-degree horizon lock
Slow Motion Video Recording
Choose “slow motion” mode to record a video with a high frame rate. Allows you to shoot in 240 frames per second in 1080P, or up to 120 frames per second in 4K.
Night Shots and Low-Light Scenes
Choose “Pure Video” mode.
FlowState Stabilization
There are 3 stabilization options: Off, Low, Standard, and High. Choose High for very shaky situations. Note that the high setting will result in more cropping.
Field of View (FOV)
Choose Dewarp to experience a wide FOV with minimal distortion. This is ideal for scenarios such as skiing and vlogging.
Quickly cancel a recording
You can quickly cancel a recording if you’ve messed up by long-holding the shutter button while recording.
Pause recording
If you have some downtime during a shot, for example, you’re waiting at an intersection or for something to happen, tap the screen while recording (at the bottom) to pause your recording. You can then tap to resume at any time.
Quick Capture
When the camera is off, press the shutter button to start shooting with QuickCapture. The camera will start shooting using the last-used shooting mode.
Pre-recording
Save 15 or 30 seconds of footage before you start recording. This can be handy if you want to catch something on film that is imminent.
Interval (long period)
Take a series of single photos over a long period of time. The photos can then be combined into a timelapse.
Burst (short period)
Take a series of photos in a short period of time (up to 10s). One use case is if you are alone and want to take a selfie or if you are with someone who is not good at taking photos. You can set the burst setting to 30p/10s, meaning 30 pictures in 10 seconds. Then, you can stand, smile, try different poses, etc, and later pick the best shots.
Timelapse (for static, fixed-position shots)
Create a timelapse video that condenses a long scene into a short video by taking a photo at a set interval. Use a tripod or fix the camera in one spot.
Shoot length: infinite, 3m, 5m, 10m, … 10h
Interval: 0.5s, 1s, 2s, … 120s
For example, let’s say you want to film yourself having dinner on an airplane. You expect you will take 30 minutes to eat, so you choose 30m for “shoot length”. Then, you can adjust the interval to see how long the timelapse video will be. For example,
interval = 0.5s, => timelapse duration = 2m
interval = 10s, => timelapse duration = 6s
The timelapse duration is shown on the screen.
Timeshift (for moving shots)
This is like a moving time-lapse.
Auto-stop Recording
If you want to shoot a video and have the camera auto-stop recording, you can set the duration to one of the preset values. The default is infinity (until the battery dies). Other options include 15s, 30s, … 3h, etc.
Inconspicuous shooting
If you want to film without people knowing that you’re filming, you can do the following to make people think that the camera is turned off.
Turn off the indicator light so there’s no flashing red light on the camera.
Turn off “Front Screen Display”
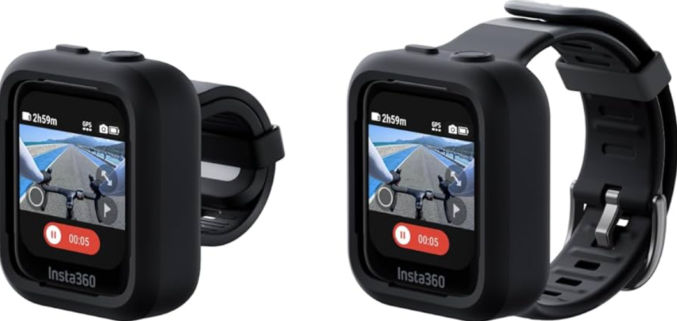
Use the GPS remote to start and stop shooting without touching the camera.
Disclaimer: I have not tested these methods yet, but theoretically they should work.
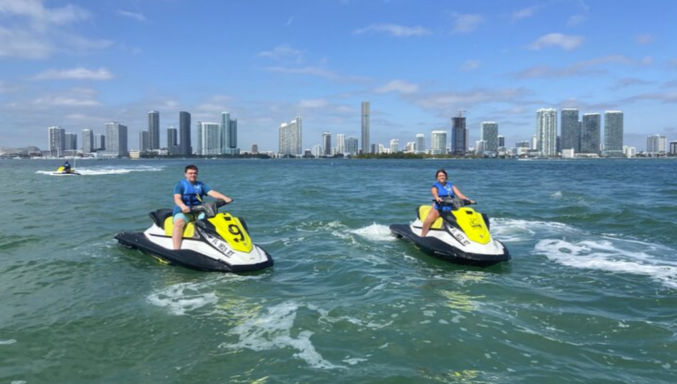
On Steering Handle
Use a U-bolt mount on the left handle grip. Use a selfie stick so you can see more of the driver in your shots. You can have the camera positioned in front of the driver or to the left or right of the driver.
If you have the selfie stick going over the steering unit, you may need to secure it in place using endless ratchet straps. You may need to loop the ratchet strap around the selfie stick once or twice to keep it from moving around.
If you have a life vest with straps, you can secure your camera with selfie stick between the vest and the straps.
However, if you want to extend the selfie stick to get a bird’s-eye-view shot, then you’ll need to do more. One way is by inserting the long selfie stick between your body next and the vest next to your shoulder. To prevent the bottom of the stick from moving around, wear a belt that has a stick holder. To prevent the stick from moving around near your shoulder, hold it against the vest using a reusable rubber twist tie. If you use the 10′-long Insta360 selfie stick, the bottom of the stick is too large to fit in the stick holder in the belt. As a workaround, you can connect the Insta360 tripod attachment to the selfie stick and then insert that attachment into the belt. Another option is to remove the stick holder in the belt and screw the selfie stick to the belt using a 1/4″ male-to-male camera screw.
On Arm
You can rig together a selfie stick mount on your arm as pictured below. The benefit of this is you can move the camera around hands-free. Learn more.
Other Spots
Depending on the jet ski, you may be able to use endless ratchet straps to secure a selfie stick to other areas like the front, where the rear-view mirrors are, and the rear passenger handle. You can also use a suction mount, as pictured below, but you may want to tether it to the jet ski using a lanyard in case the suction mount fails while riding.
Since I have the following cameras
two Insta360 X3 (360-degree action cameras)
one Insta360 Ace Pro (traditional, single-direction action camera)
I would use the following setup on a rented jet ski:
When speeding, keep the selfie stick retracted to avoid it breaking due to rough motion. You can get an FPV (first-person view) facing the direction of motion.
When not speeding, you can turn the camera on and then extend the stick upwards. This will allow you to get a bird’s eye view of everything around you.
Usage: Screw the U-bolt mount around the left handle. Screw the camera to the 10′-long selfie stick and screw the selfie stick to the U-bolt mount. Position the U-bolt mount so that the selfie stick lays over the right handle. Secure the stick to the steering unit using a ratchet strap. Wear the GPS action remote on your wrist and push the shutter button to start/stop shooting.
Views:
When speeding, don’t extend the stick fully to avoid it breaking due to rough motion. You can get a 3rd-person view of yourself and a partial view of the jet ski.
When not speeding, you can fully extend the stick and get a complete 3rd-person view of yourself and the jet ski.
Usage: Mount the suction mount somewhere on the front of the jet ski such that the camera can face you. Attach a lanyard to the camera and secure the lanyard to the jet ski so that you can retrieve the camera from the water in case it falls in. Wear the GPS action remote on your wrist and push the shutter button to start/stop shooting.
Views: Whether you are speeding or not, you can get a 3rd-person view facing you from the front of the jet ski. Since the Ace Pro is not a 360-degree camera, you can only film in the direction of the single lens.
Note: you can use one GPS Action Remote with both the X3 and the Ace Pro.
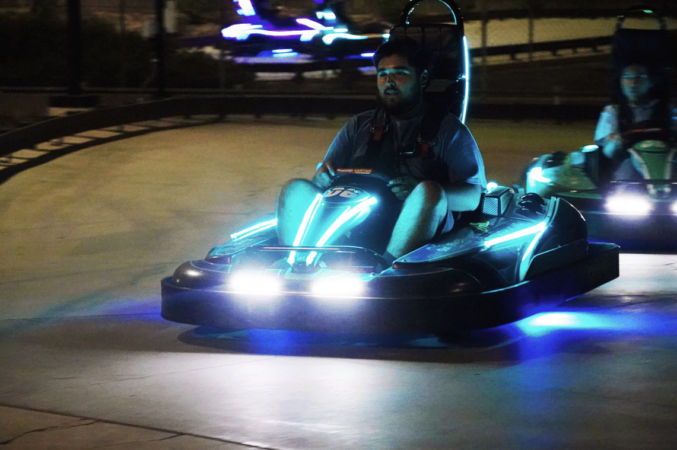
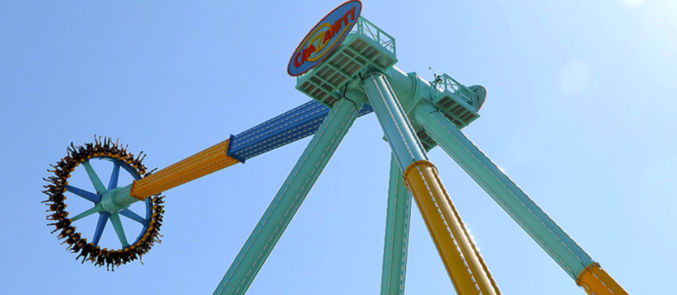
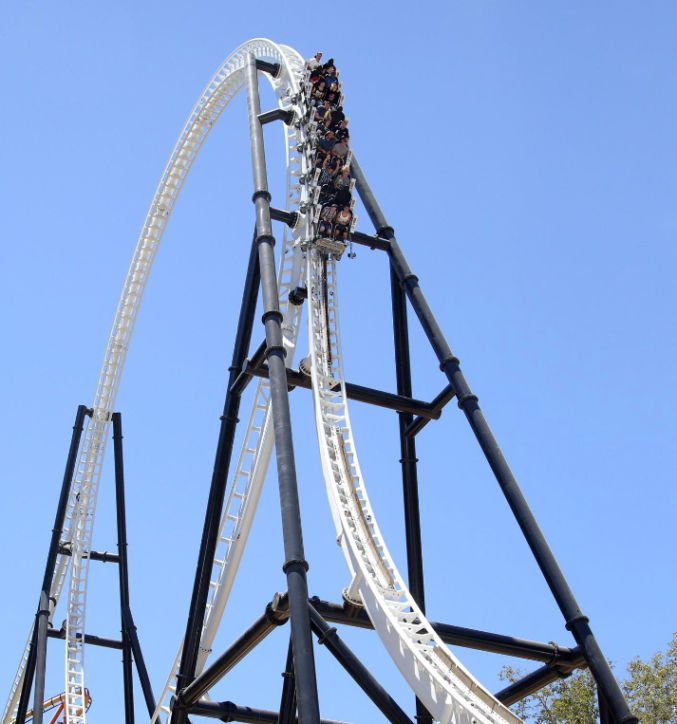
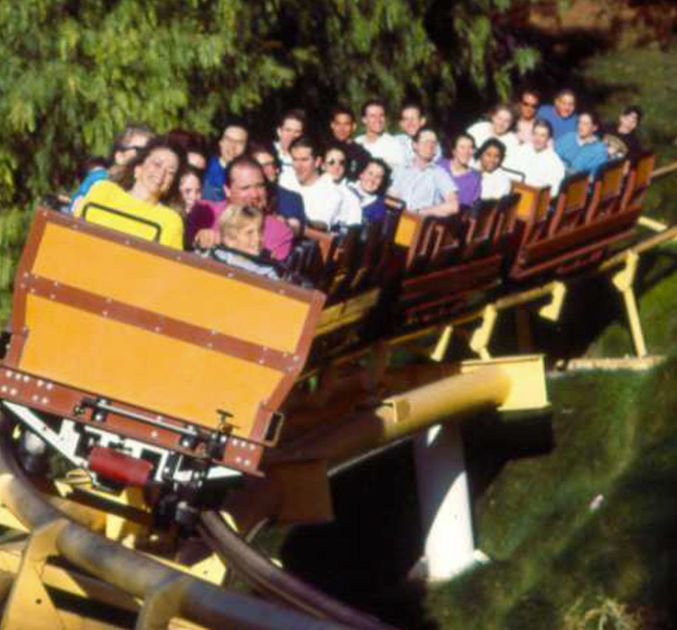
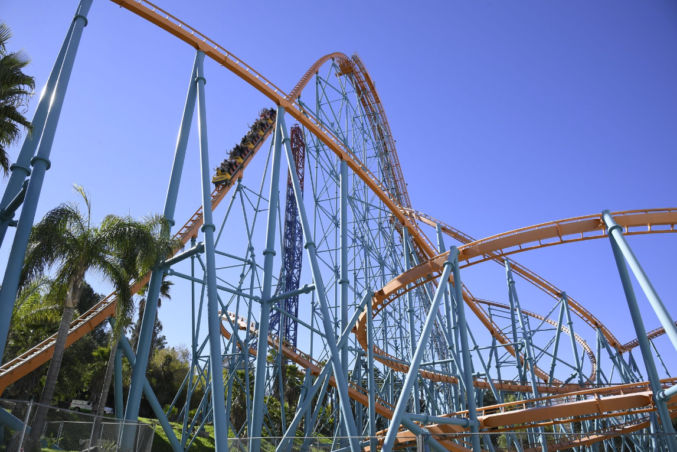
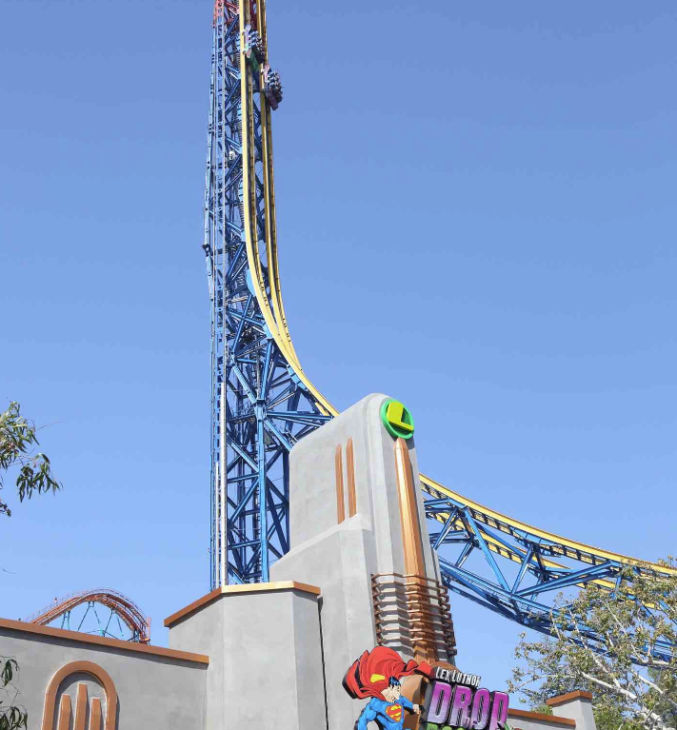
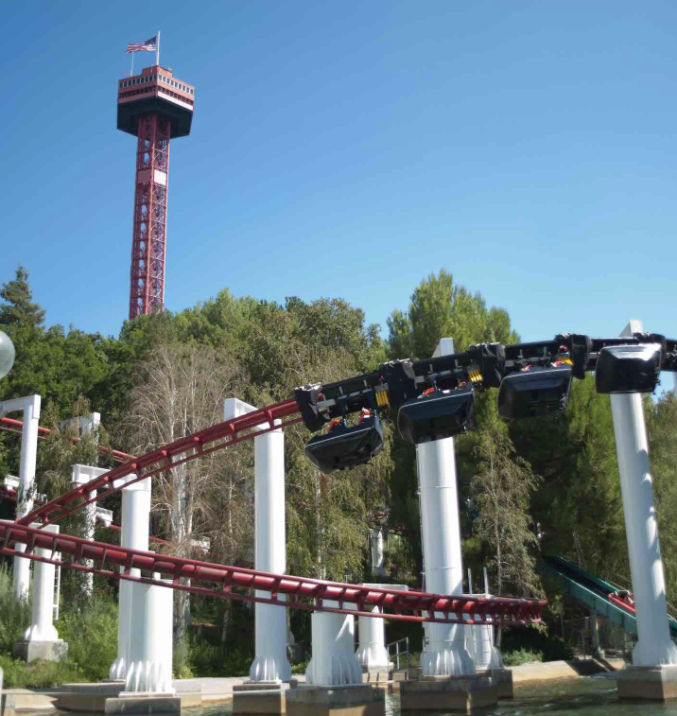
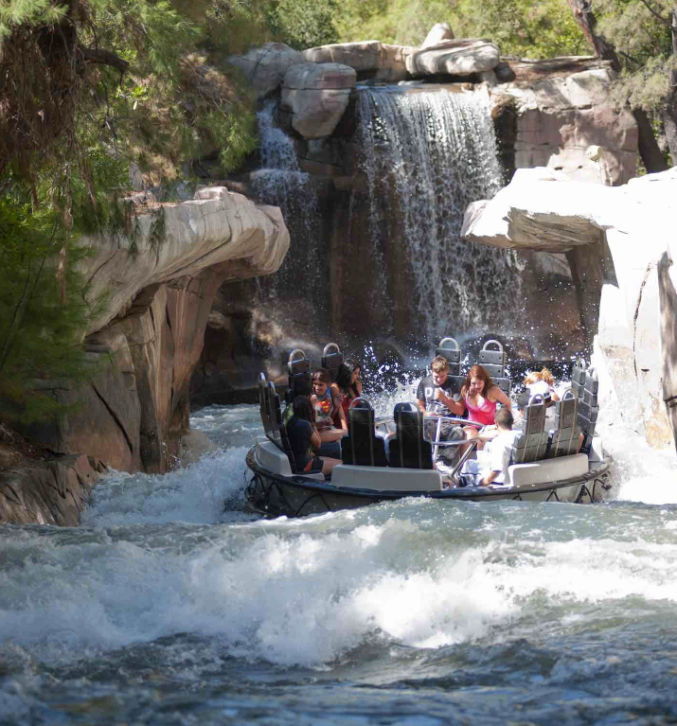
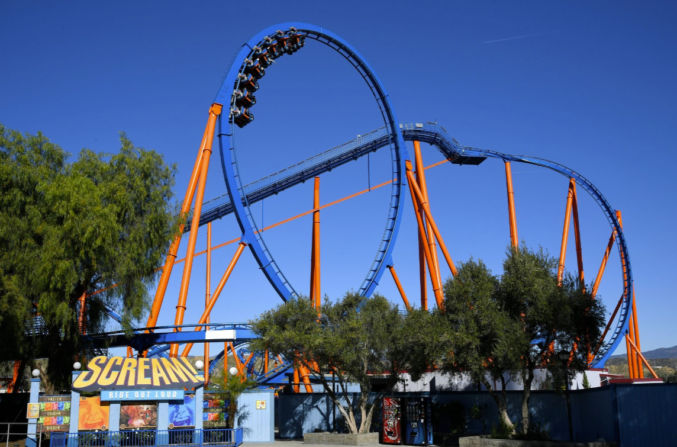
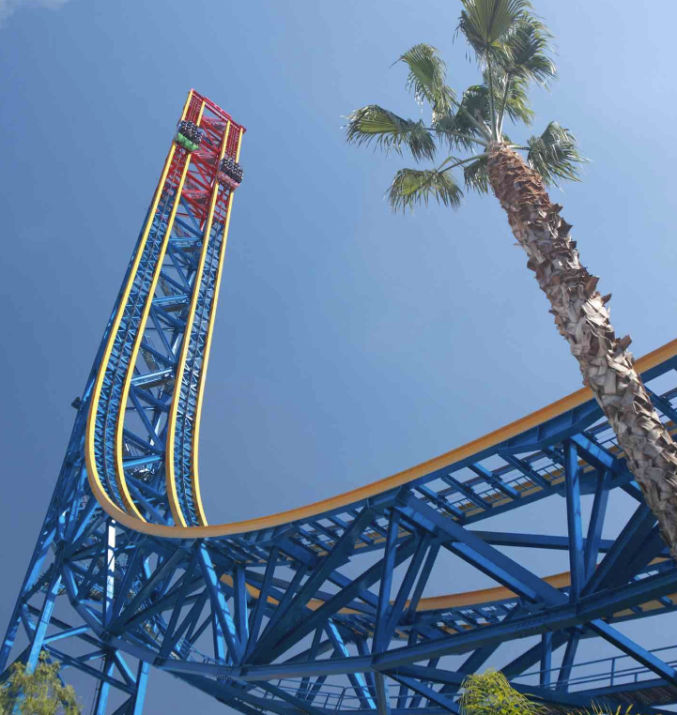
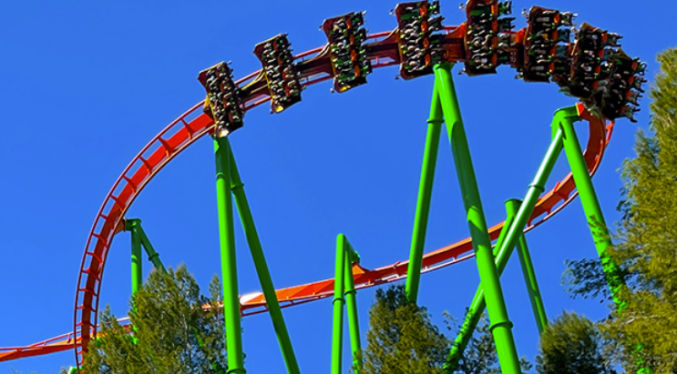
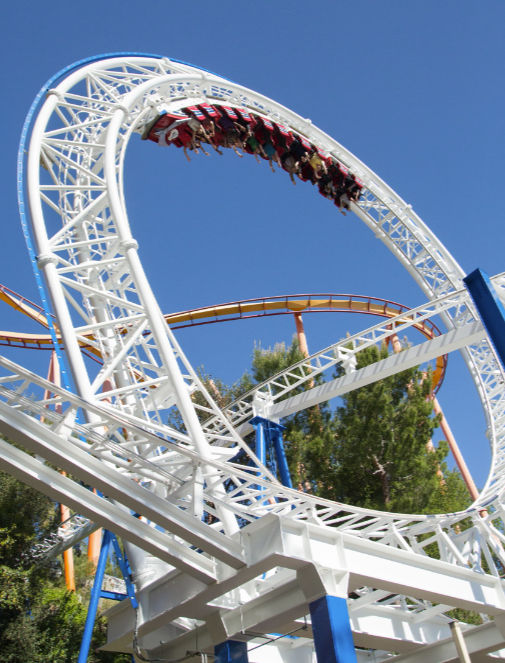
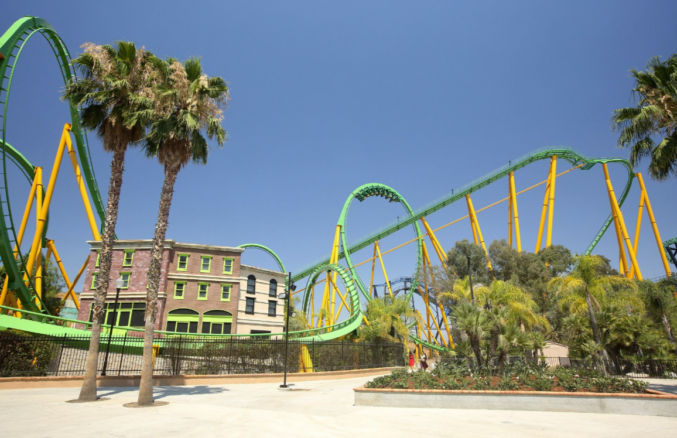
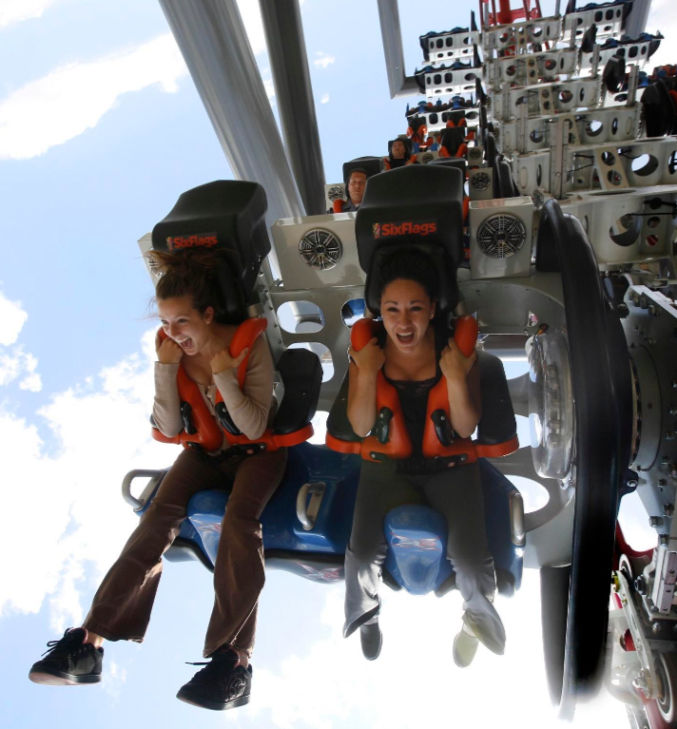
Sunday: Catalina Island – the Amalfi Coast of Orange County Monday: Six Flags Hurricane Harbor (Water Park) Tuesday: Six Flags Magic Mountain (Amusement Park) Wednesday: Six Flags Magic Mountain (Amusement Park)
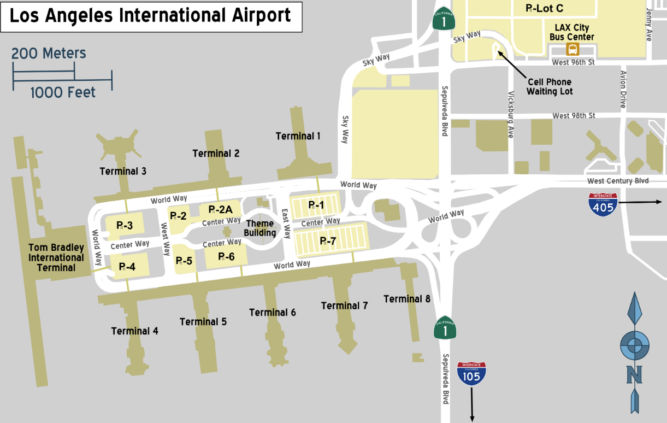
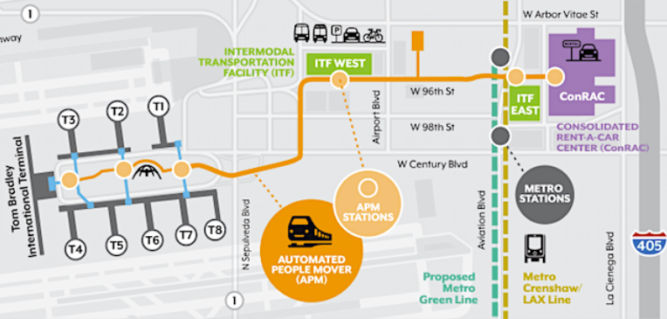
When exiting the airport, follow the signs to “ground transportation”
Stand under the purple sign marked “car rental companies” to await shuttle pick-up
Board the Dollar shuttle bus
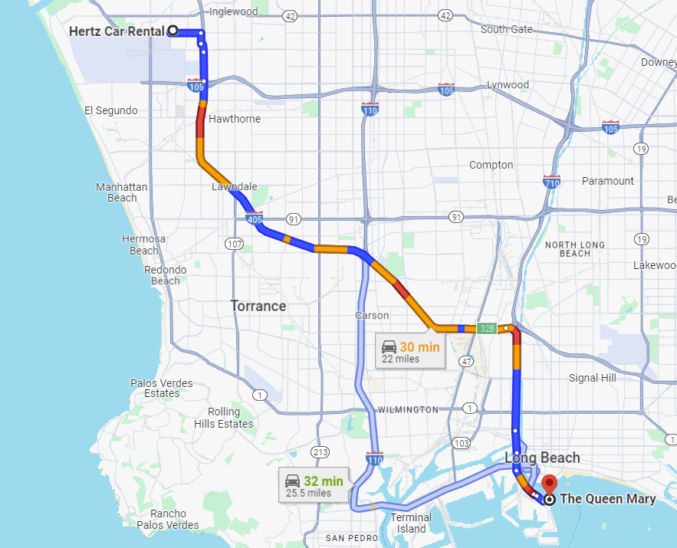
Dollar Rent a Car Booking.com # 789858762 Toyota RAV4 or similar $316.94 for 5 days
3:00 PM
Drive to Hotel
30 minutes
3:45 PM
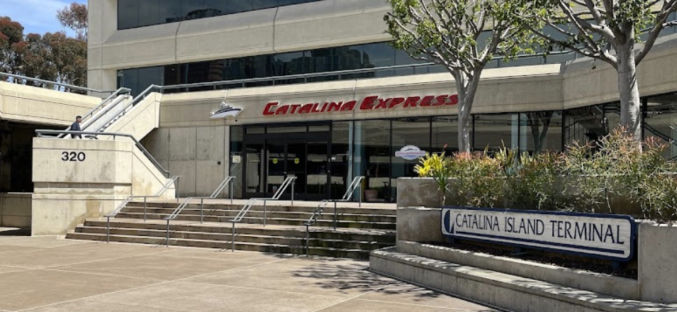
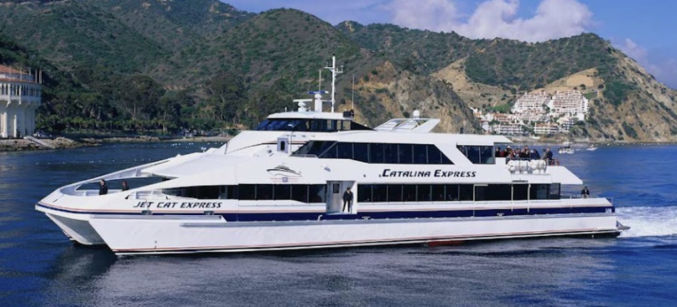
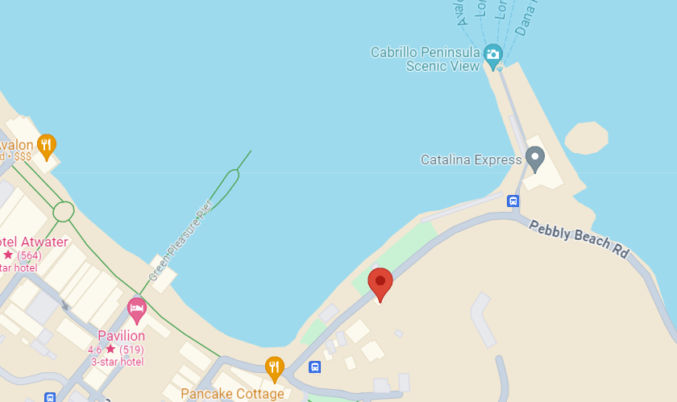
Stop by Catalina Express
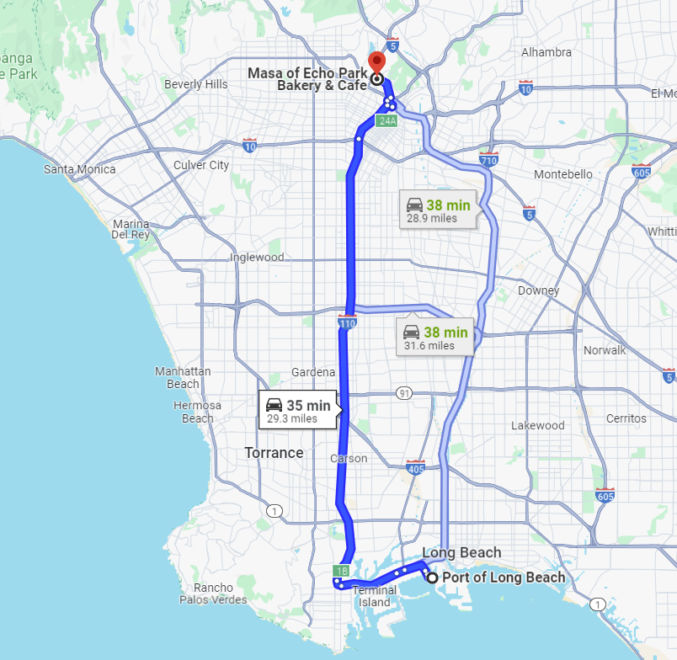
320 Golden Shore, Long Beach, CA 90802
3:45 PM
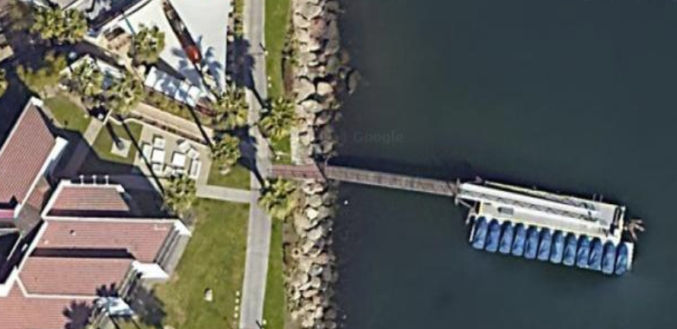
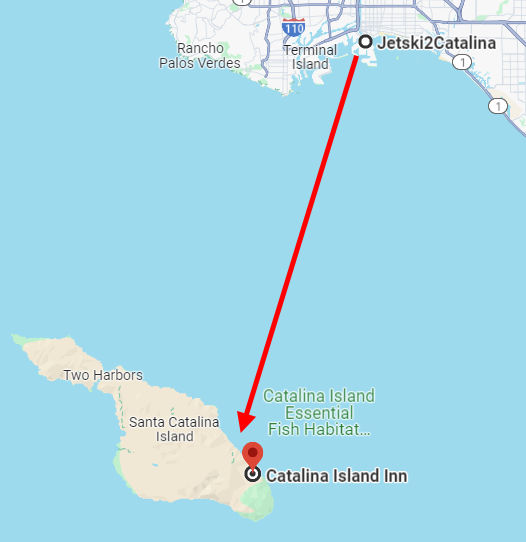
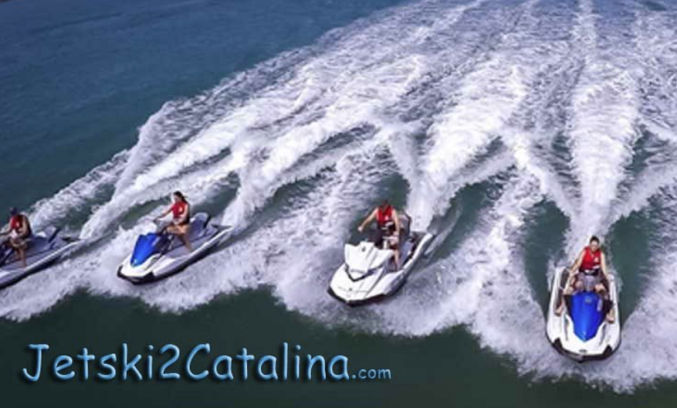
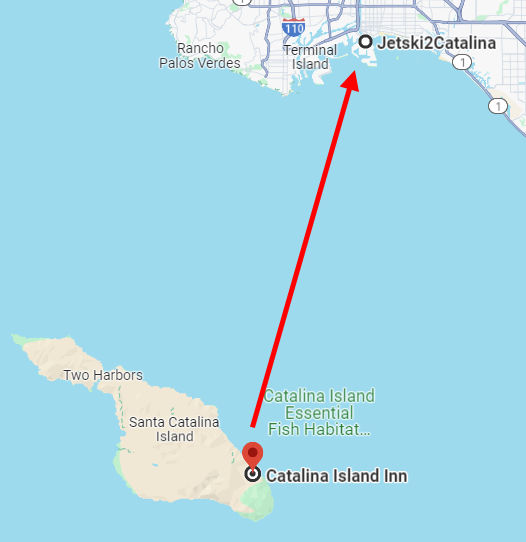
Stop by Jetski2Catalina nearby
Check out the jet skis.
Drive to Hotel Maya 700 Queensway Dr Long Beach, CA 90802
4:00 PM
Check in to Hotel
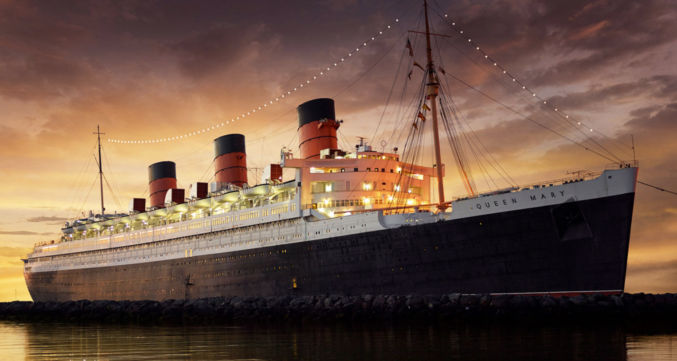
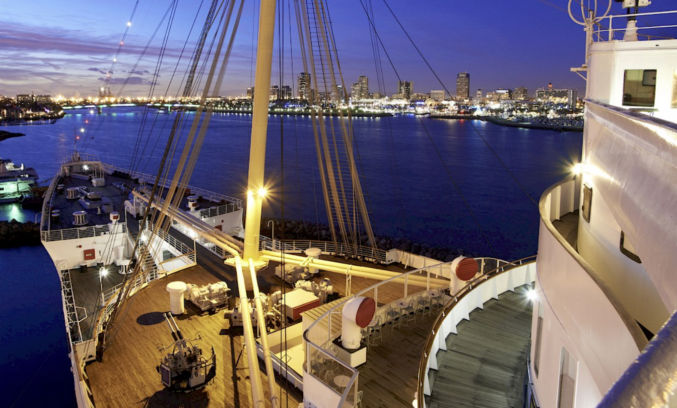
Queen Mary – a cruise ship turned into a hotel 1126 Queens Highway, Long Beach, California 90802, United States $265 / night Check-in is at 4:00 PM and Checkout is at 11:00 AM Hotel guest self-parking is $30/night Built in 1930 Map of the Queen Mary
Park at Hotel Maya by building 3 or 4. Normal parking is $31. We will stamp your parking ticket and the Jetski2Catalina rate is $14.
7:40 AM
Walk to JetSki2Catalina
After parking at the Maya Hotel parking lot by building 3 or 4, walk through the buildings, and you will see the marina on the water. Turn right at the sidewalk and go past the Pool. We are on the water in the marina.
8:00 AM
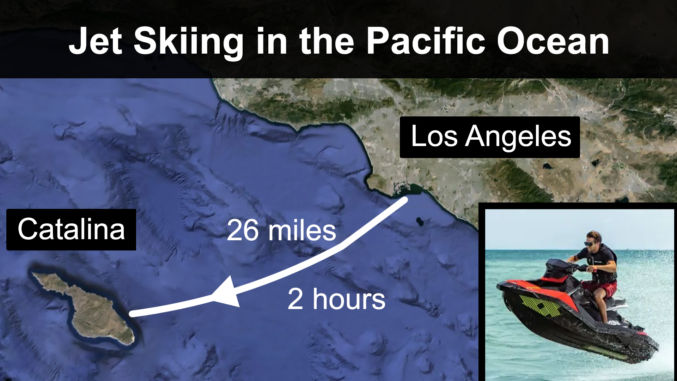
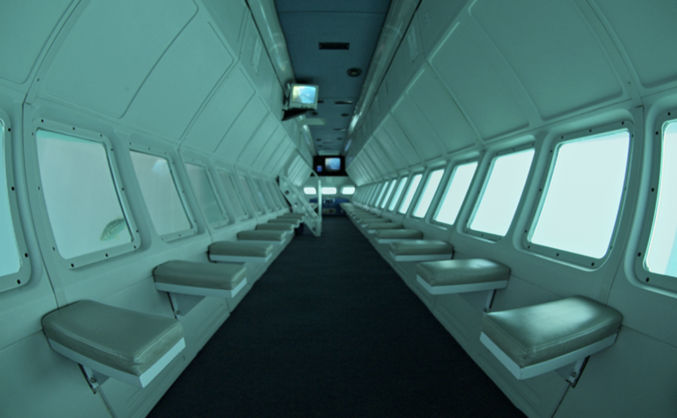
Check in for Jet Ski Ride from Long Beach to Catalina
2 hours
8:15 AM
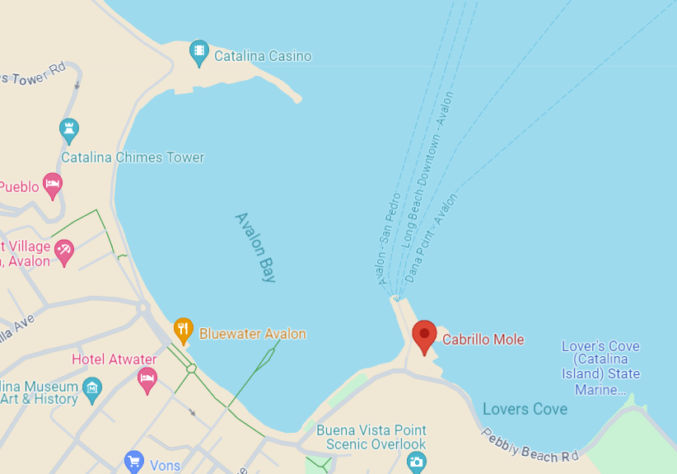
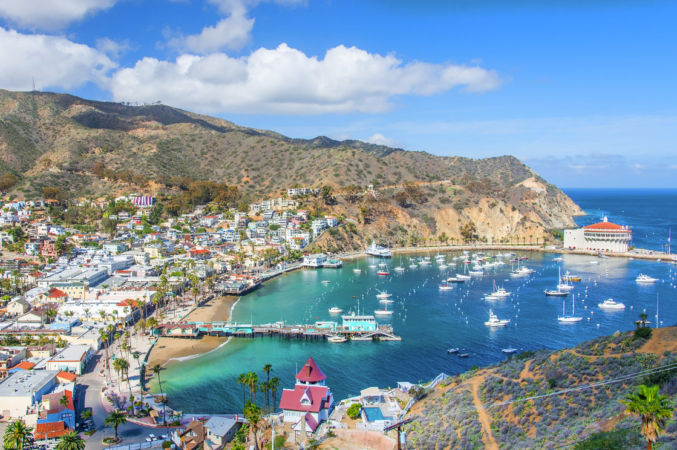
Catalina Express ferry arrives at Avalon, Catalina Island
The Catalina Express ferry drops off at the Cabrillo Mole in Avalon, Catalina Island.
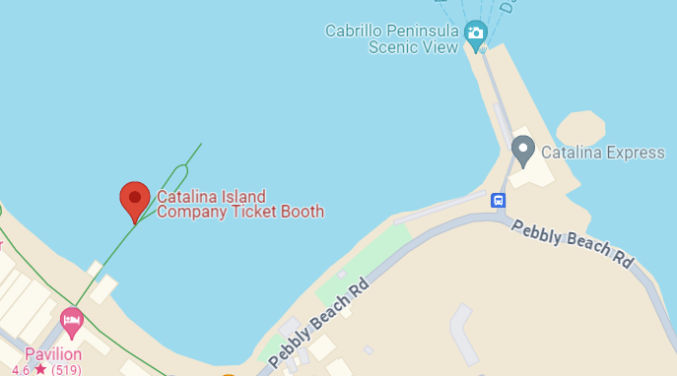
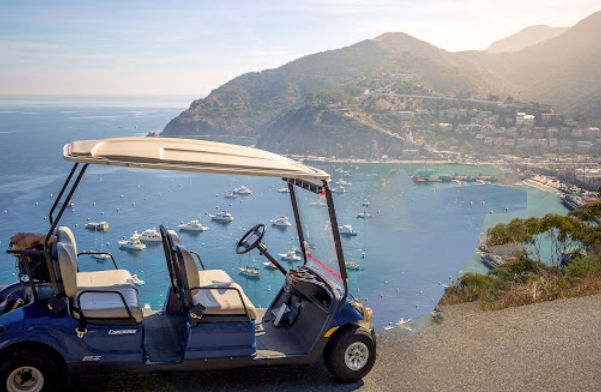
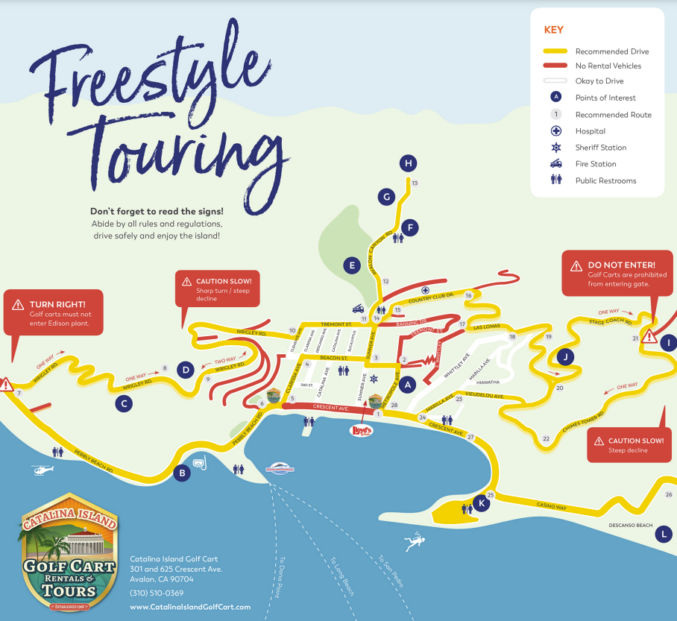
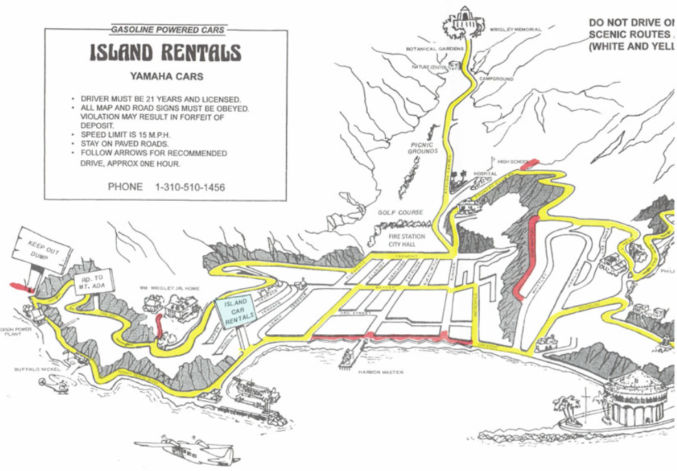
Explore Catalina by golf cart for 1 hour. Scenic tour. Island Rentals 125 Pebbly Beach Road, Avalon, CA 90704, Phone 310.510.1456 NO RESERVATIONS. First come, first serve. $60 / cart / hour We have a one-hour scenic route through the beautiful hills around Avalon and if you want to go longer we will pro-rate the second hour (the time you use is the time you pay for). We have a pre-planned 12-mile scenic route that may be completed in 1 hour without stops.
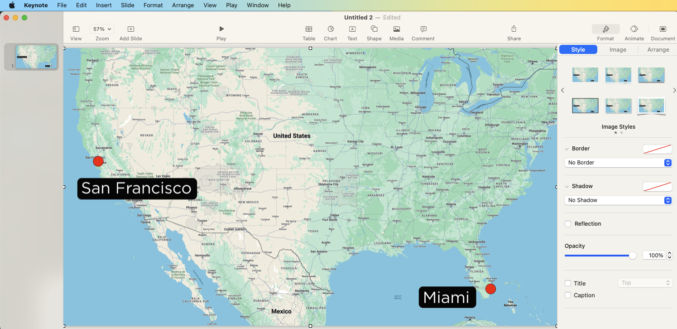
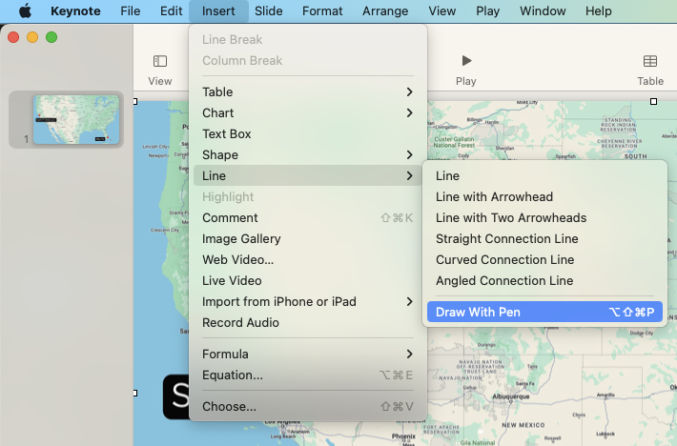
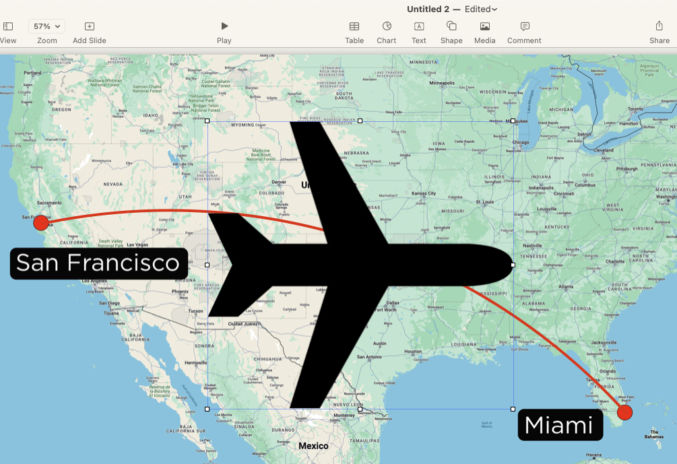
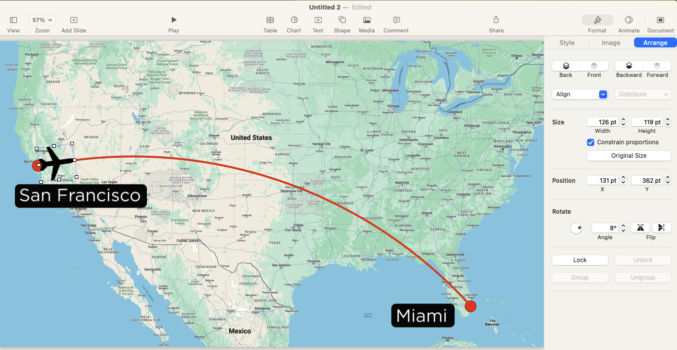
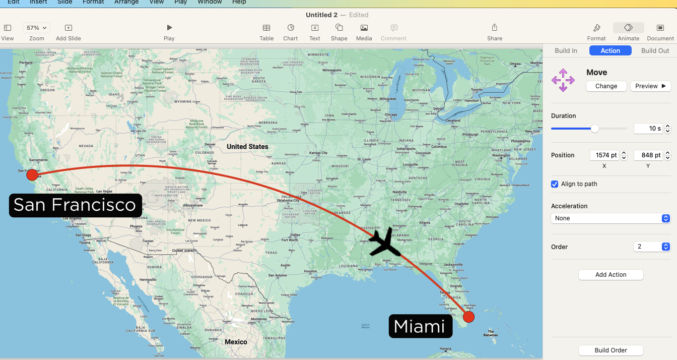
In this post, I’ll show you how to make an animated travel map like the one below using Apple Keynote.
1. Get an image of a map
I usually just go to Google Maps, zoom in/out to the area I want to show, then take a screenshot. In this example, I took a screenshot of the USA because I want to show an animated flight path from San Francisco to Miami.
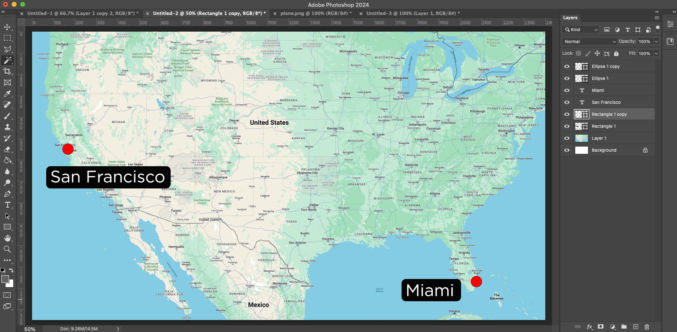
2. Crop map and optionally add labels
Open the screenshot in an image editor (I use Photoshop) and crop to your target video resolution. My target resolution is 1920 x 1080 (standard HD). I also added some red dots where the start and end points will be as well as some city labels.
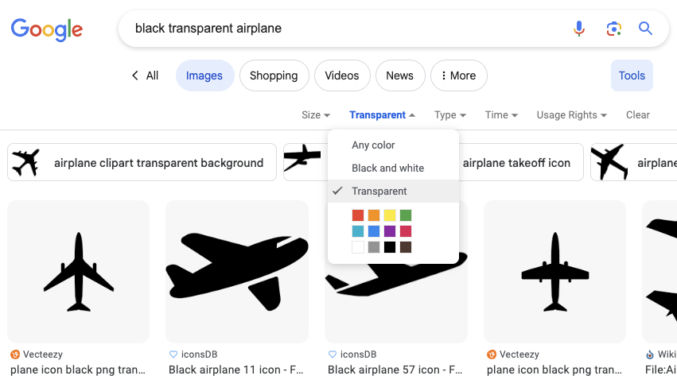
3. Get a transparent image of a plane, car, train, boat, etc
Since I want to show an airplane animate along a path, I looked for an image of one in Google Images. The background should be transparent. In Google Images, you can choose Tools > Color > Transparent to find images on a transparent background.
I chose this image.
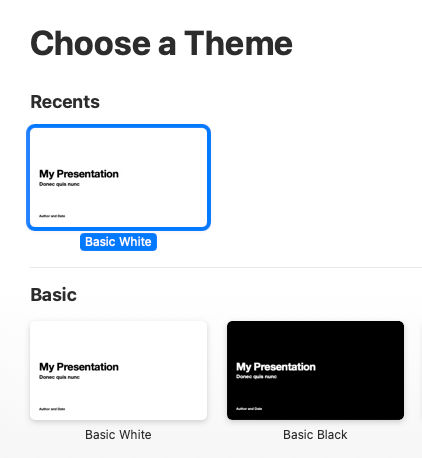
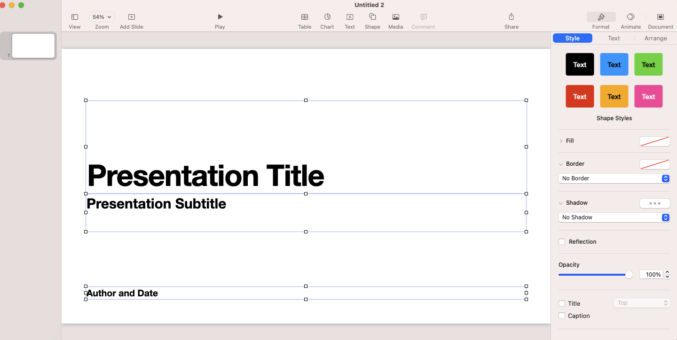
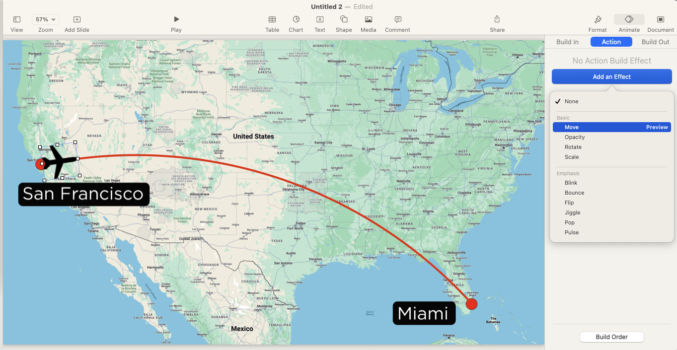
4. Create a blank Keynote presentation
Open Apple Keynote and choose the basic white theme.
You will get a single slide. Select and delete everything in the slide.
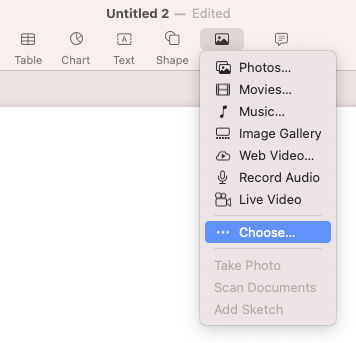
5. Insert background map
Go to Media > Choose and select the background map.
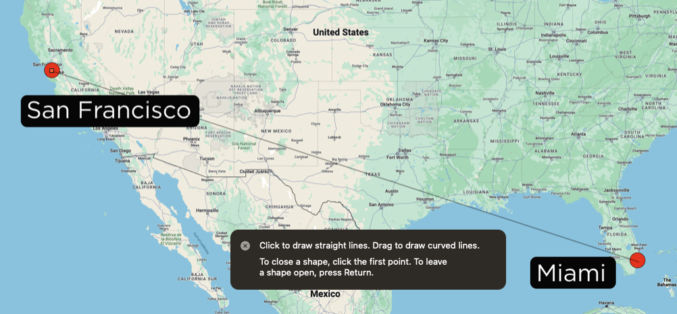
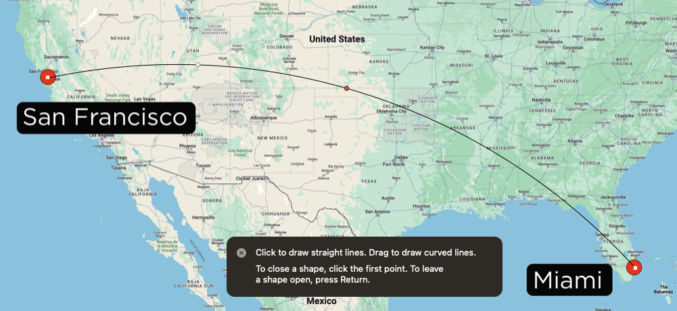
6. Draw a path
Go to Insert > Line > Draw With Pen and draw your travel path.
Click on the start point then click on the end point. You will get a straight line.
In the middle of the line, there will be a point. Click and drag it up if you want to create a curve. Repeat with other midpoints as necessary.
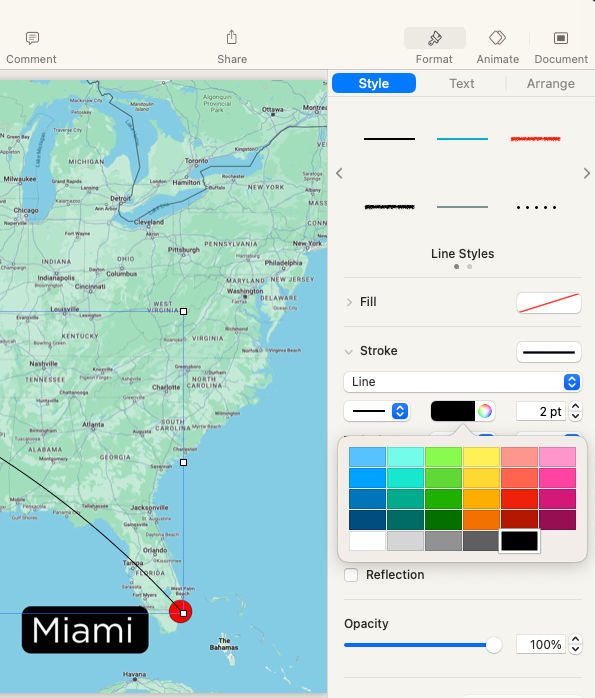
When you’re done, hit the ESC key. We now have our travel path. Let’s change the style of the path. I’m going to make it red and thick. In the right pane, under Format > Style, you can edit the style of the element (curve). I choose a red color that is 7 pt thick.
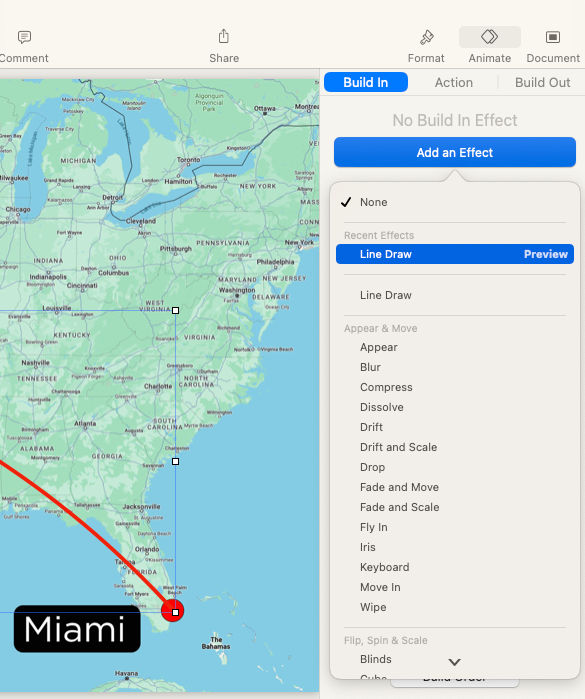
7. Animate the path
In the top right corner, choose the Animate tab and then “Add an Effect” > “Line Draw”.
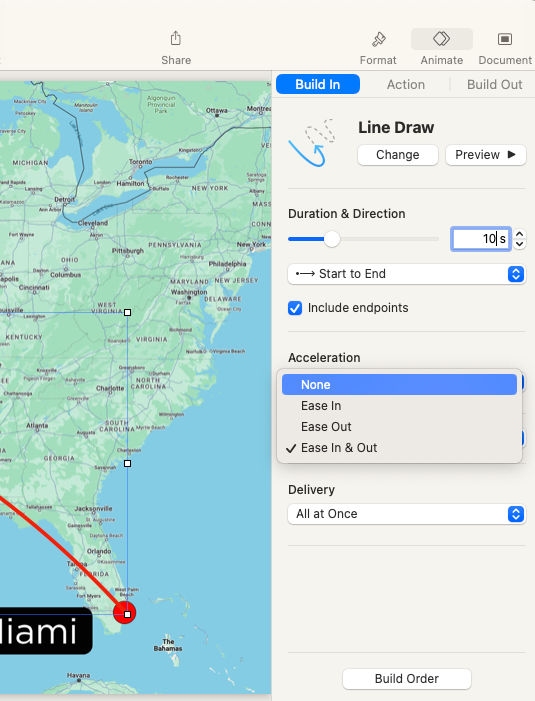
You can then change the default animation from 2 seconds. I changed the duration to 10 seconds so that in my video editor, I can slow it down without it appearing jumpy. I also changed the acceleration to “None”.
Click the “Preview” button to preview the path animation.
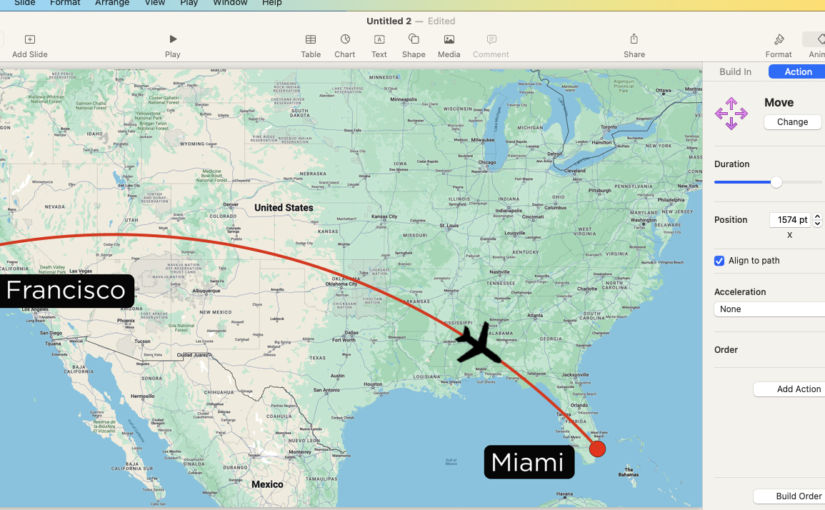
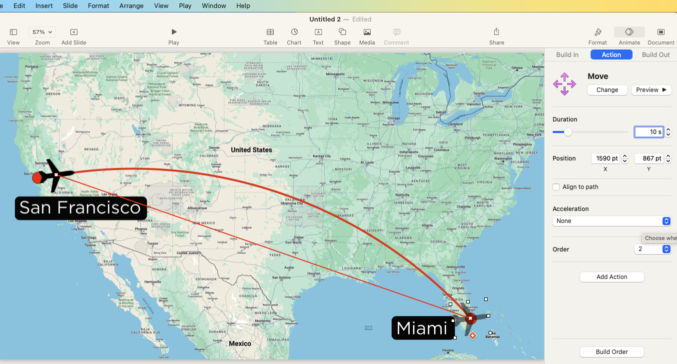
8. Add the airplane image
As in step 5, go to Media > Choose and select the airplane image.
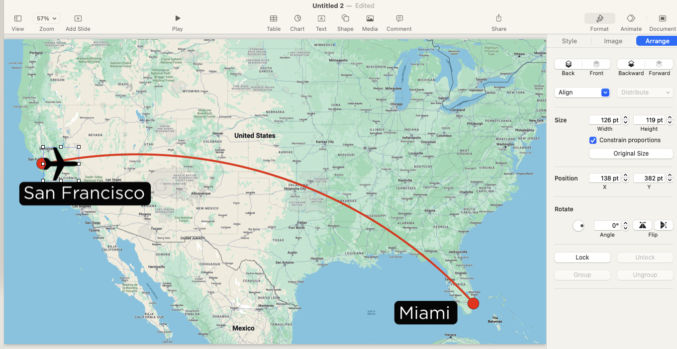
Scale the airplane by dragging one of the corners. Drag the airplane to position it at the start point.
Rotate the airplane. In the top right choose Format > Arrange and adjust the rotation value such that the nose of the plane is aligned with the flight path.
9. Animate the airplane
In the top right, click Animate > Action > Add an Effect > Move.
Drag the airplane to the end point. Set the duration and acceleration to match that of the flight path (10 sec, None).
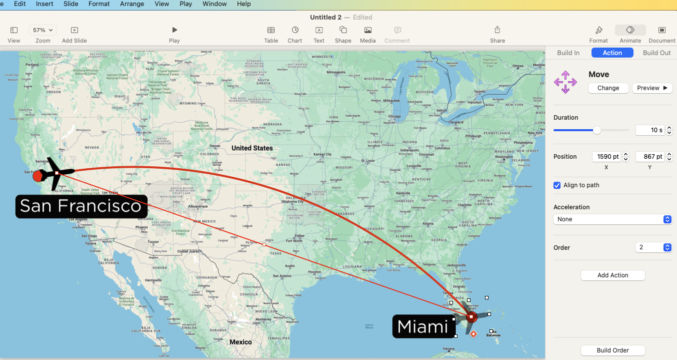
Click Preview to preview the animation. The airplane doesn’t yet follow the flight path. Check the “Align to path” checkbox. A point will appear along the line between the airplane’s start and end points. Drag that middle point to where the flight path is.
Click Preview again. You will see the airplane animate along the flight path.
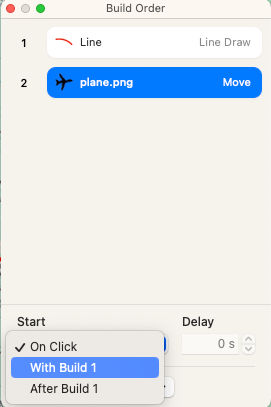
10. Animate the flight path and airplane at the same time
In the top right, click Animate > Build Out > Build Order.
You will see a list of all animation effects. The first animation is the line (flight path). The second is the plane. Choose te second animation and then under “Start”, select “With Build 1”.
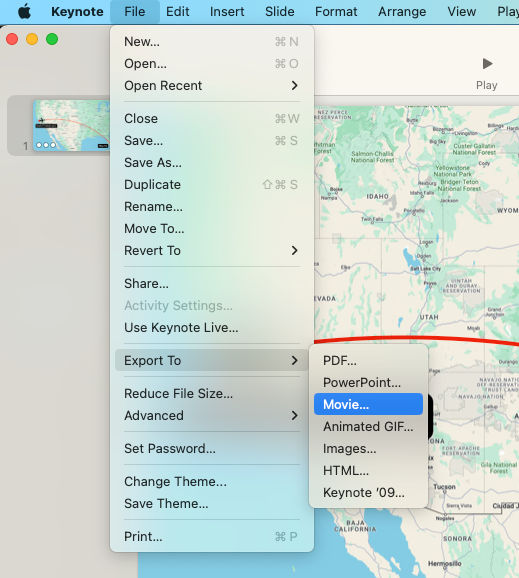
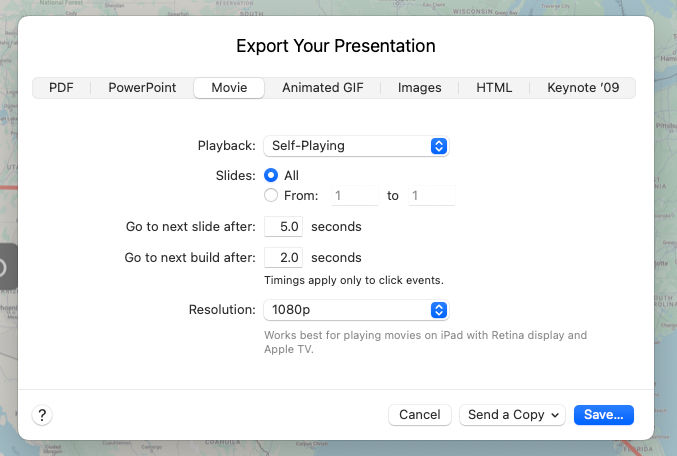
11. Export the animation
Choose File > Export To > Movie.
Since there’s only 1 slide, you can leave “Slides” to “All. The resolution should match that of the background image (1080p).
Here’s a collection of mounts for action cameras like the Insta360 X3 that I’ve found useful. These accessories can mostly be used with other cameras as well.
This clamp is lightweight. Since it’s curved, it’s ideal for clamping to cylindrical objects like bike handlebars. You can connect it to a long selfie stick or a 1/4″ rod that accepts a 1/4″ screw.
Example Use Cases
Clamp to a bike handlebar with or without a short selfie stick or rod
This clamp is designed for fishing poles, but it can be used for selfie sticks because selfie sticks are like fishing poles. You can adjust the angle of the stick.
Example Use Cases
Secure to cruise ship railing and insert 10′ selfie stick to get drone-like footage.
Medium (3.4′) Invisible Selfie Stick With Tripod and Invisible Quick Release Adapter
This selfie stick is invisible when used with the Insta360 X3 camera. To quickly attach and remove an Insta360 X3 camera, use the invisible quick release adapter designed specifically for the Insta360 X3.
Example Use Cases
Walking around
Placing it on the floor / ground using the tripod while you perform an activity, e.g. painting a room
When walking, I find it best to keep the camera at face level, unless you want to create some interesting perspectives like positioning the camera near your feet.
If you’re worried about dropping your selfie stick and losing it, you can attach a 1/4″ camera screw to the bottom of it and a wrist lanyard to the screw.
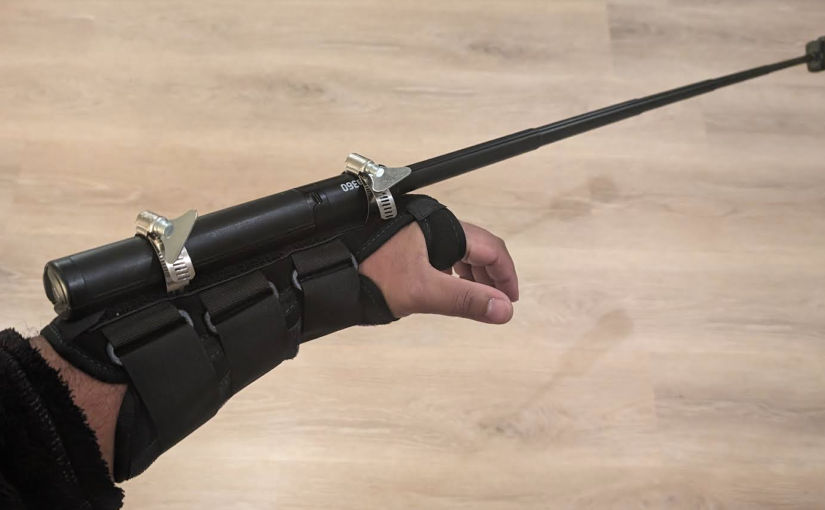
Having a selfie stick extended away from you allows you to get shots that look as if someone is filming you. You can also get more of yourself in the shot. In certain situations, however, you may not be able to hold the stick in your hand. That’s when having a forearm mount comes in handy. Since no one makes these, I had to engineer one myself using a forearm brace and an adjustable clamp.
The brace comes with a thin aluminum bar that is inserted in a pocket at the top of the brace. Using a utility knife, I had to make minor incisions to be able to insert the clamp into and underneath the aluminum bar.
At the front of the brace, I wasn’t able to slide the clamp underneath the bar, so I trimmed the bar to make it a bit narrower.
Like this.
This is the finished product.
The metal bar and clamp can cause discomfort on the top of your hand, especially when the selfie stick is extended and is shaking up and down. To address this, you can simply slide a dishwashing sponge above your hand as shown below to act as a cushion.
Example Use Cases
Any time you want to extend the selfie stick and you can’t mount it on something else and you need your hands free, e.g.
when you are driving a jet ski
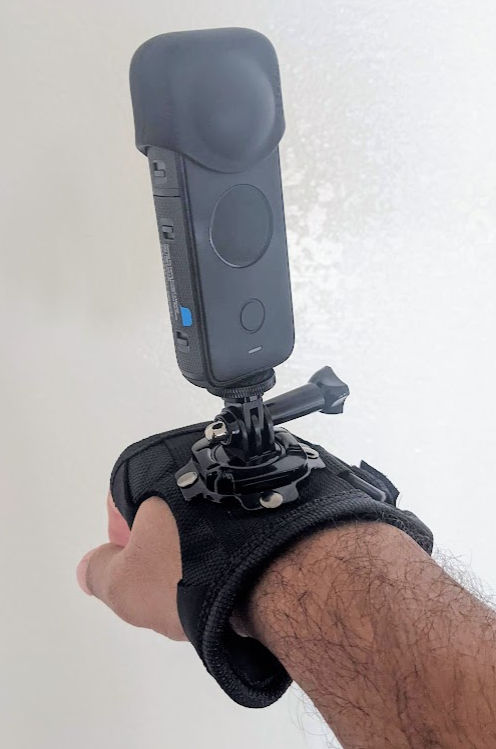
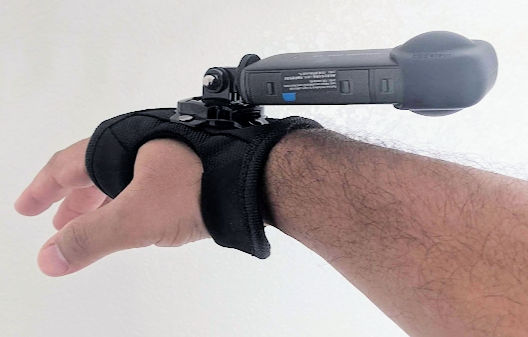
Wrist Mount
If the forearm mount is unavailable or can’t be used, then you can use a wrist mount. This is not as good as the forearm mount because the distance from the camera to your face is just the length of your arm extended.
This mount is very sturdy, but the handlebar clamp opening may be too big for some handlebars. In that situation, you can wrap some rubber around the handlebar, which will also protect it from damage. This mount includes the selfie stick.
This mount has a small footprint and includes a very strong magnet. You can add one or more 1/4″ rods to it. I find this setup particularly useful when eating at a restaurant. The mount doesn’t take a lot of space and it positions the camera high enough that you can film everyone’s food and their faces.
This mount can also stick to any metal surface like the side of a refrigerator.
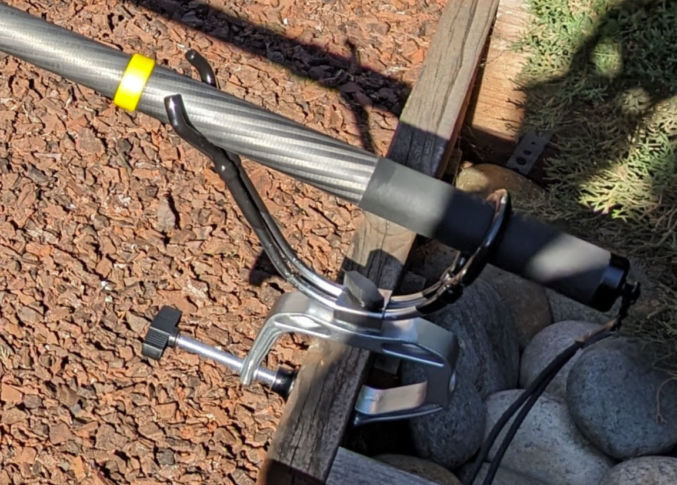
If you’re out and about and want to stand your selfie stick on the ground, you can easily do that with the 3.4′ stick with built-in tripod. But, if you try that with 10′-long selfie stick extended at max length, then there’s the risk of it falling and destroying your camera. In this case, one thing you can do is strap the stick against an object like a rail. You can also try to use a c-clamp to clamp onto something flat and then strap the selfie stick to the clamp.
There are many adjustable and removable straps you can use, including
According to the Insta360 ONE X2 manual, you must use a UHS-I Micro SD card with a V30 or above speed class and exFAT format. UHS-II and UHS-III Micro SD/TF cards are not compatible with ONE X2. You can find V30 cards on Amazon. Note that the U3 symbol in the image below doesn’t mean UHS-III but rather U3. According to Wikipedia, U3 has to do with software rather than speed.
The cards below have been tested to work well with ONE X2 and X3.
SD Card
Model Number
Capacity
Speed Class
Sandisk Extreme V30 A1
SDSQXVF-032G-GN6MA
32G
V30
Sandisk Extreme Pro V30 A1
SDSQXCG-032G-GN6MA
32G
V30
Sandisk Extreme Pro V30 A1
SDSQXCG-064G-GN6MA
64G
V30
Sandisk Extreme V30 A1
SDSQXAF-128G-GN6MA
128G
V30
Sandisk Extreme V30 A2
SDSQXAF-128G-GN6MA
64G
V30
Sandisk Extreme V30 A2
SDSQXA1-256G-ZN6MA
256G
V30
Sandisk Extreme Pro V30 A2
SDSQXCZ-1T00-ZN6MA
1TB
V30
The first character of the 3rd part of the model number may differ, e.g. “G” in GN6MA vs “Z” in ZN6MA. According to this forum, that just identifies a different manufacturer.
The last character of the 3rd part of the model number may differ, e.g. “A” in GN6MA vs “N” in GN6MN. “A” means it comes with an adapter and “N” means it doesn’t.
SanDisk MobileMate USB 3.0 microSD Card Reader
Transferring video files from the Insta360 ONE X2 to your computer can be really slow. To speed this up, use a USB 3 card reader. I use this one: SanDisk MobileMate USB 3.0 microSD Card Reader- SDDR-B531-GN6NN. It supports transfer speeds of up to 170 MB/s. With USB 3.0, move content up to 10x faster than USB 2.0 readers.
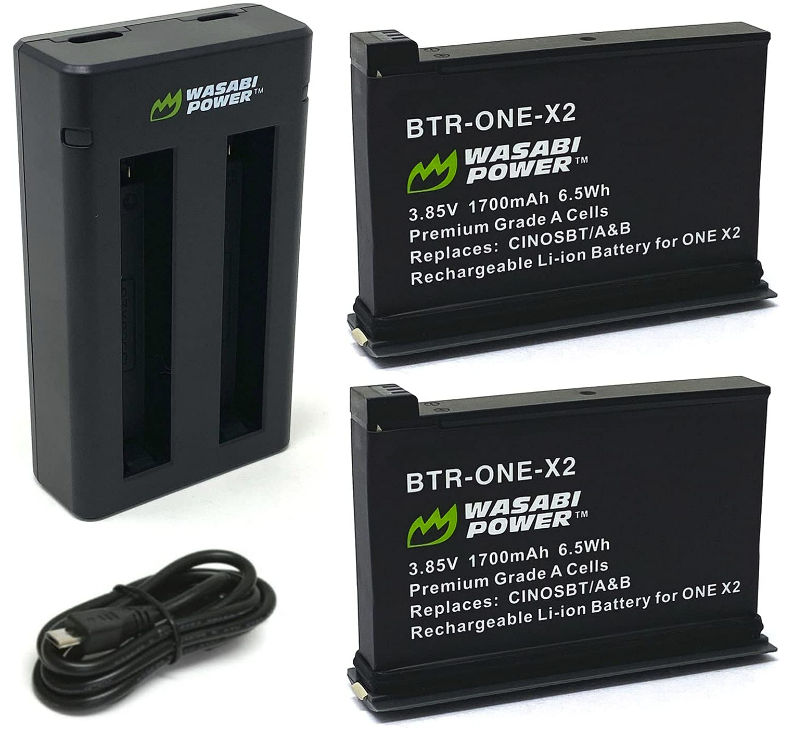
Extra Batteries + External Charger
The battery that comes with the Insta360 ONE X2 is good for 80 minutes. It may be a good idea to buy additional batteries just in case. I bought a pack of 2 batteries on Amazon. It comes with a charger and the batteries work.
Mount Adapter
For the adapters, this one is better because you can tighten it with the camera facing any direction you want.
Waterproof Pouches
When you’re swimming, having a waterproof pouch to keep your camera dry can give you peace of mind. Though the pouches pictured below are for phones, they fit the Insta360 X2/3 cameras as well.
Española Way is a historic street in Miami Beach, Florida. It’s located between 14th and 15th Streets, between Washington Avenue and Pennsylvania Avenue. It’s a pedestrian-only street with shops, galleries, restaurants, and bars.
Miami Beach’s Lincoln Road is one of the most unique shopping districts in the world, full of stunning architecture, world-class culture and destination retail stores spanning 8 blocks.
Must check in no later than 3 PM to board the cruise
3:30 PM
Board Cruise and Go to Stateroom (with Balcony)
Stateroom # 6236
4:30 PM
Cruise Departs to CocoCay, Bahamas
4:30 PM
Sailaway Spots
Go to the bow (front) of the ship where the helipad is.
There are 2 ways there:
Go outside on deck 4, walk forward, climb up a set of stairs and continue walking forward until you reach the helicopter pad.
Walk all the way forward on Deck 5, enter the Star Lounge, take an immediate right just past the DJ booth. There’s a set of unmarked doors to the helipad.
Middle (Midship): Studio B Ice Rink, Photo Studio, Art Gallery
Back (Aft): Main Dining Hall
Rooms: Ocean-View Rooms, Interior Rooms
Deck 4
Front (Forward): Royal Theater
Middle (Midship): Izumi Hibachi & Sushi, Schooner Bar, Casino Royale, Playmakers Sports Bar & Arcade, Boleros, Centrum
Back (Aft): Main Dining Hall
Deck 5
Front (Forward): Outdoor Deck
Middle (Midship): Star Lounge, Library Card Room, Sorrento’s, Bull& Bear Pub, Promenade Shops, Royal Promenade, Ben & Jerry’s Ice Cream, Cafe Promenade, Next Cruise, Shore Excursions, Guest Services, R Bar
Middle (Midship): Solarium, Whirlpool, The Lime & Coconut, Main Pool, Sports Pool, Splashaway Bay, El Loco Fresh, PADI, Chops Grille, Giovanni’s Italian Kitchen
Back (Aft): The Plaza Bar, Windjammer Cafe
Deck 12
Front (Forward): Spa
Middle (Midship): The Lime & Coconut, Running Track, Movie Screen
Back (Aft): Nursery, Adventure Ocean, Arcade, Johnny Rockets
Deck 13
Front (Forward): Freedom Dunes
Back (Aft): Rock Climbing Wall, Sports Court, The Perfect Storm Waterslides, Flowrider
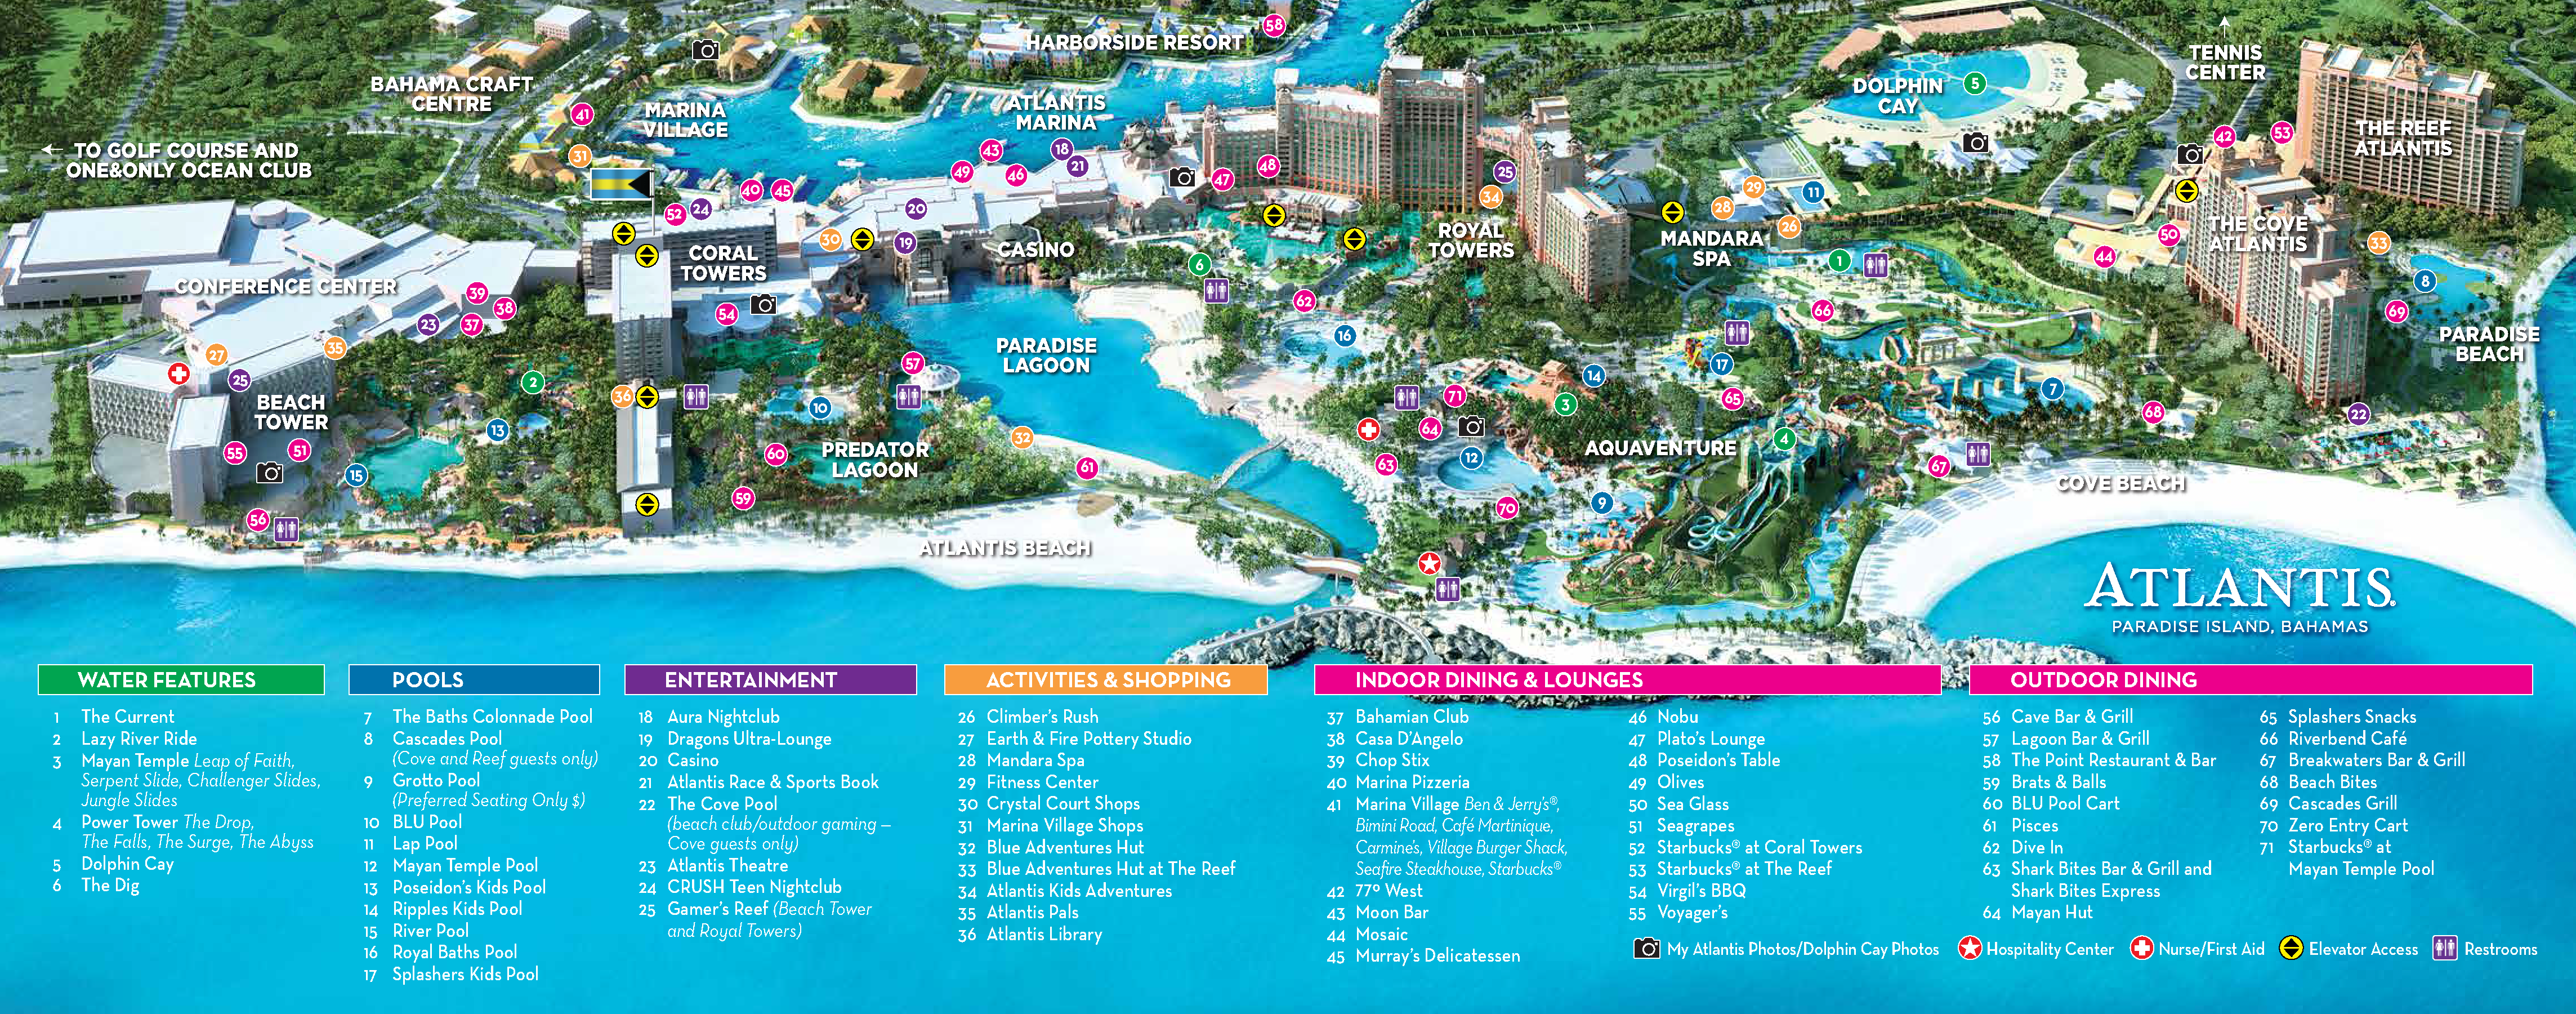
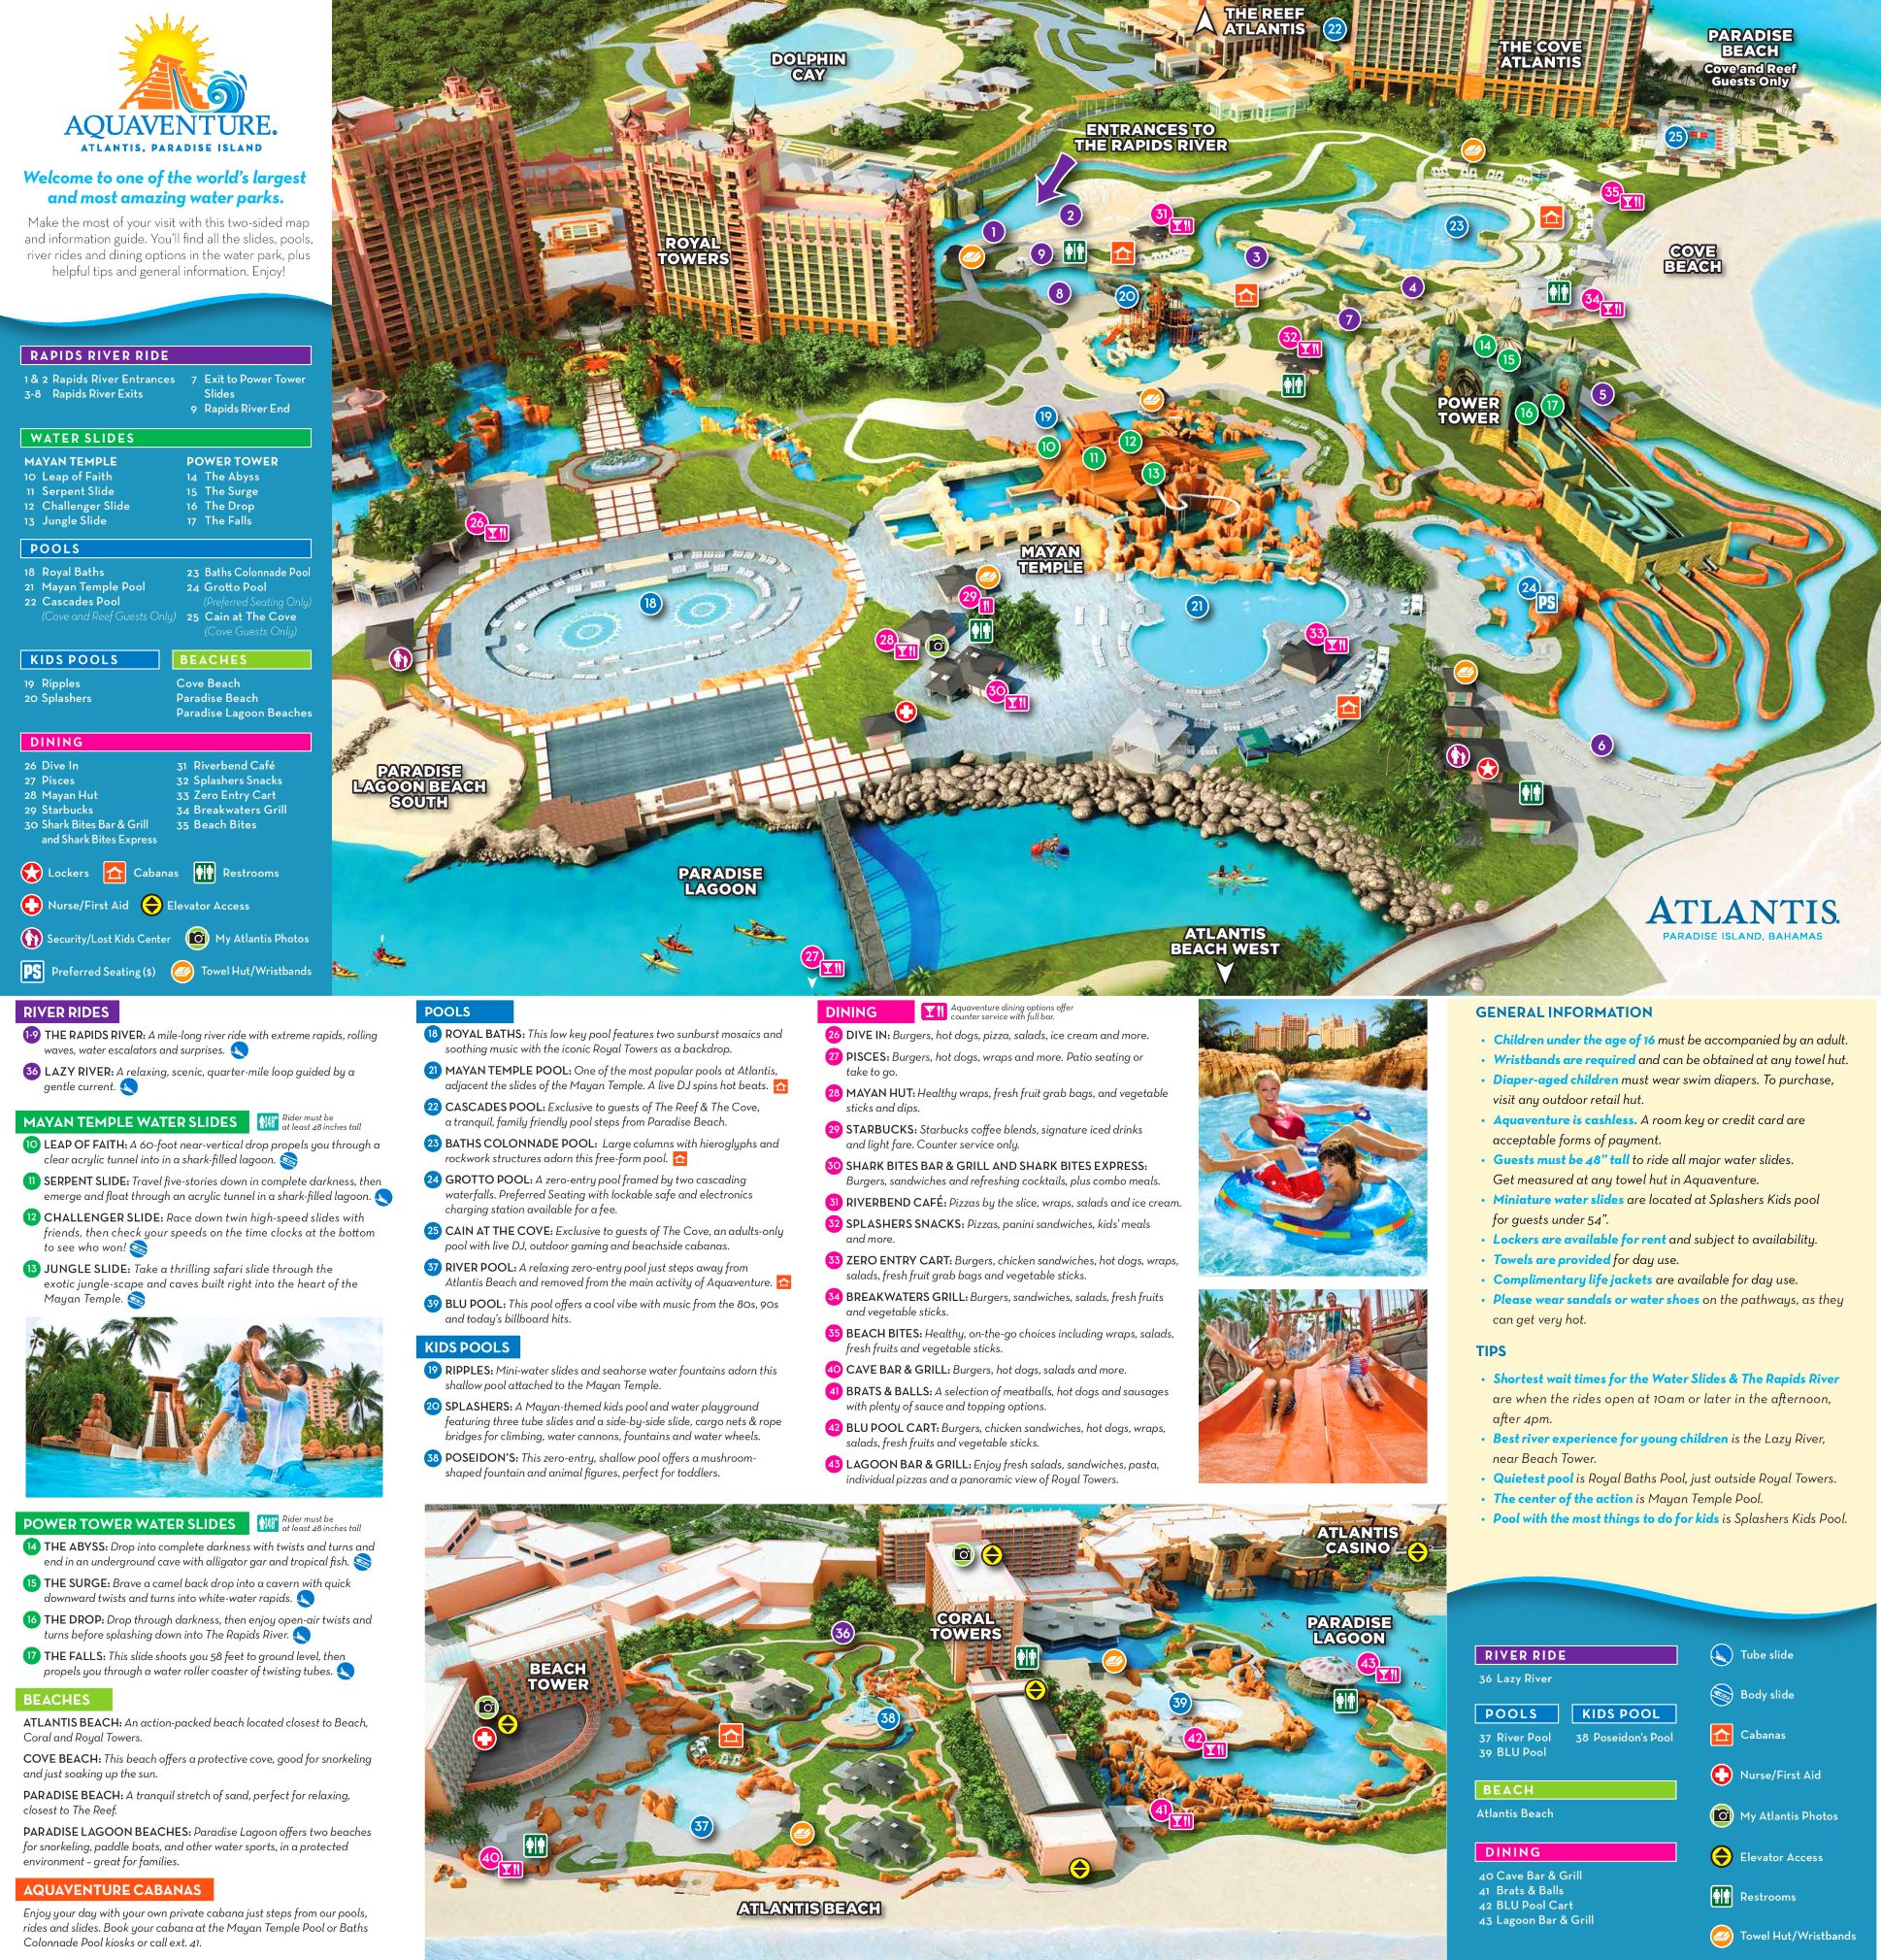
Wristbands are required and can be obtained at any towel hut
Aquaventure is cashless. Pay by credit card.
Lockers are available and subject to availability
Towers are provided for day use
Complimentary life jackets are provided for day use
Wear sandals or water shoes because the pathways can get very hot
Shortest wait times for the water slides and the rapids river are when the rides open at 10 AM
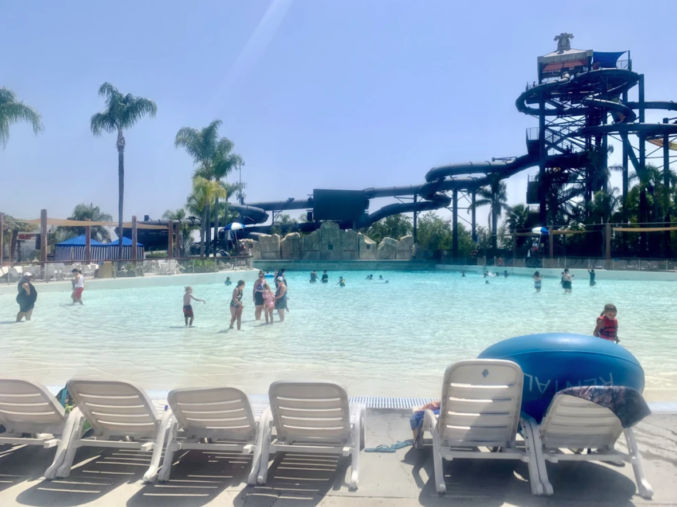
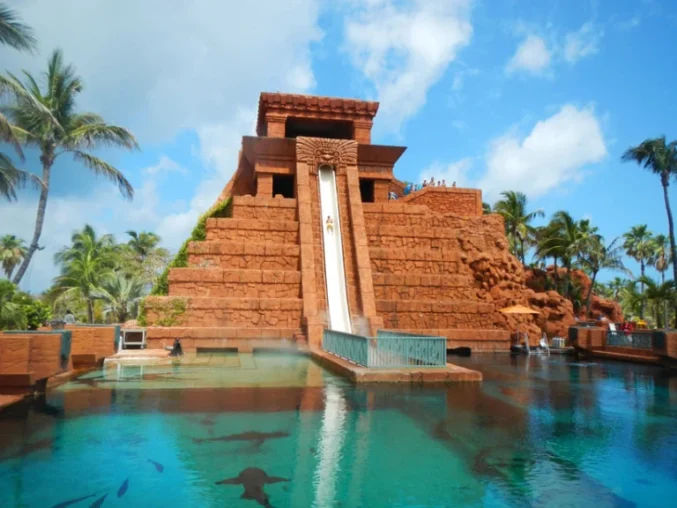
The center of the action is the Mayan Temple Pool
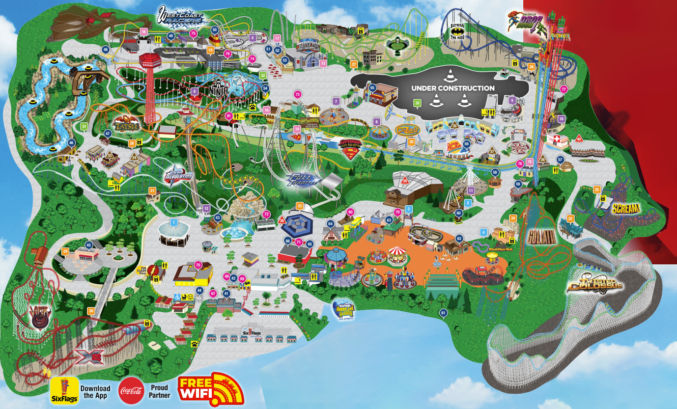
Action Plan
Get a locker
Go on Mayan Temple water slides (bring short and 3.4″selfie stick)
Go on Power Tower water slides (bring short and 3.4″selfie stick)
Go on river rides (bring short and 3.4″selfie stick)
Have lunch
Go to pools (bring 3.4′ and 10′ selfie stick)
Go to the beaches (bring 3.4′ and 10′ selfie stick)
Take photos at vista points (bring dry bag)
Explore the Royal Towers (bring dry bag)
Visit the Dig
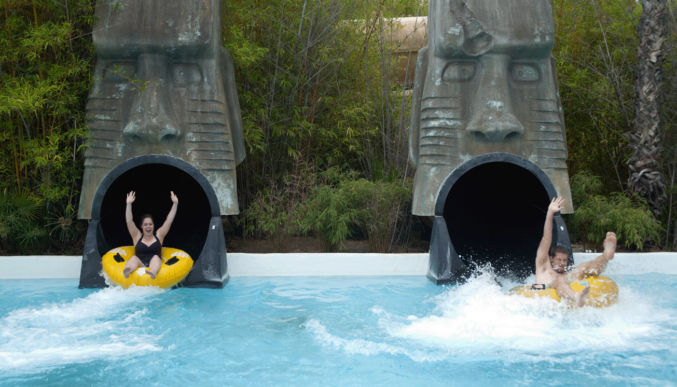
Mayan Temple Water Slides
Leap of Faith: a near 60-foot near-vertical drop propels you through a clear acrylic tunnel into a shark-filled lagoon [video]
Serpent Slide: travel 5-stories down in complete darkness, then emerge and float through an acrylic tunnel in a shark-filled lagoon [video]
Challenger Slide: race down twin high-speed slides with friends, then check your speeds on the time clocks at the bottom to see who won [video]
Jungle Slide: take a thrilling safari slide through the exotic jungle-scape and caves built right into the heart of the Mayan temple [video]
Power Tower Water Slides
The Abyss: Drop into complete darkness with twists and turns and end in an underground cave with alligator gar and tropical fish. [video]
The Surge: Brave a camel back drop into a cavern with quick downward twists and turns into white-water rapids. [video]
The Drop: Drop through darkness, then enjoy open-air twists and turns before splashing down into the Rapids River [video]
The Falls: This slide shoots you 58 feet to ground level, then propels you through a water roller coaster of twisting tubes. [video]
River Rides
The Rapids River: A mile-long river ride with extreme rapid, rolling waves, water escalators and surprises. [video]
Lazy River: A relaxing, scenic, quarter-mile loop guided by a gentle current. [video]
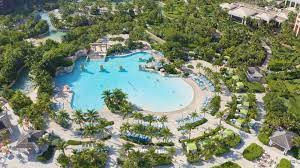
Pools
Royal Baths: This low key pool features two sunburst mosaics and soothing music with the iconic Royal Towers as a backdrop.
Mayan Temple Pool: One of the most popular pools at Atlantis, adjacent the slides of the Mayan Temple. A live DJ spins hot beats.
Baths Colonnade Pool: Large columns with hieroglyphs and rockwork structures adorn this free-form pool.
Grotto Pool: A zero-entry pool framed by two cascading waterfalls. Preferred seating with lockable safe and electronics charging station available for a fee.
River Pool: A relaxing zero-entry pool just steps away from Atlantis Beach and removed from the main activity of Aquaventure.
Blu Pool: This pool offers a cool vibe with music from the 80s, 90s, and today’s billboard hits.
Beaches
Atlantis Beach: An action-packed beach located closest to Beach, Coral and Royal Towers.
Cove Beach: This beach offers a protective cove, good for snorkeling and just soaking up the sun.
Paradise Beach: A tranquil stretch of sand, perfect for relaxing closest to the Reef.
Paradise Lagoon Beaches: Paradise Lagoon offer two beaches for snorkeling, paddle boats, and other water sports, in a protected environment – great for families.
Other
The Dig: Polished marine life & aquarium exhibits in a series of tunnels at the posh Atlantis resort.
2:00 PM
Take Shuttle Back to Ship
2:30 PM
Explore Downtown – Straw Market
3:00 PM
Explore Downtown – Queen’s Staircase
4:00 PM
Go Back to Ship
5:00 PM
Depart Nassau Back to Miami
5:30 PM
Pack Bags
Cruise staff will pick up luggage at night. Keep a foldable overnight / duffle bag to store night clothes and toiletries.
After purchase, you will receive a voucher via email.
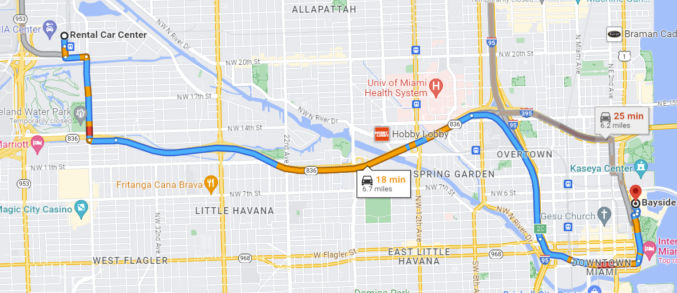
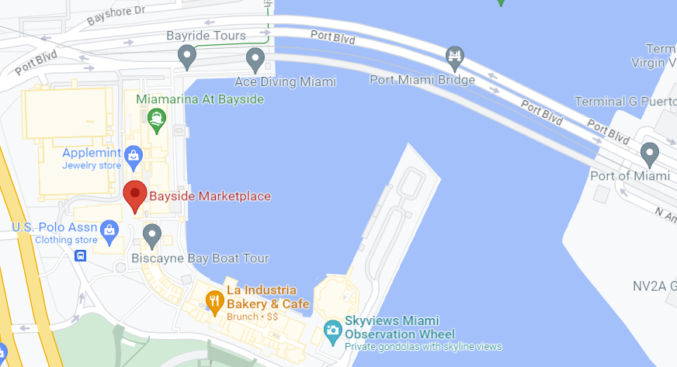
You must EXCHANGE this voucher at least 45 minutes prior to scheduled departure time at one of our ticket booths at Bayside Marketplace (NOT in the line where you will board) for a physical boarding pass.
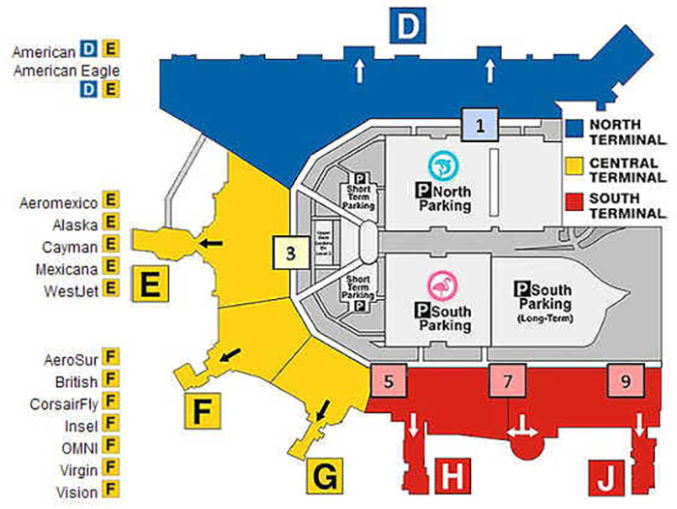
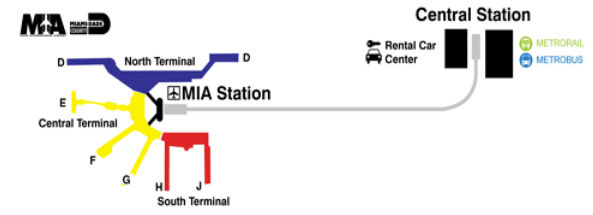
There’s no free food on the plane. Eat at the airport. Bring trail mix. American Airlines is in the north terminal (concourse D, 2nd Level Departures).
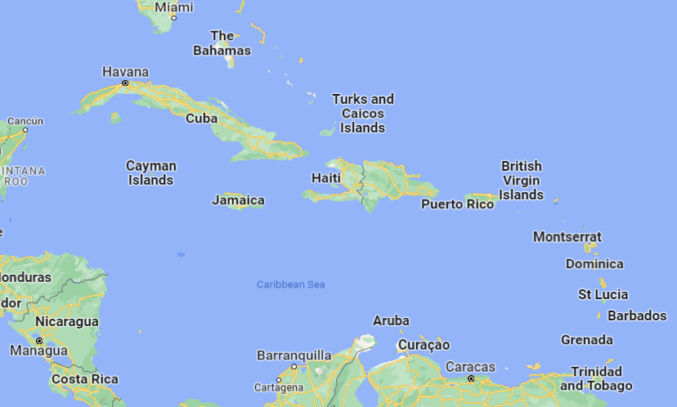
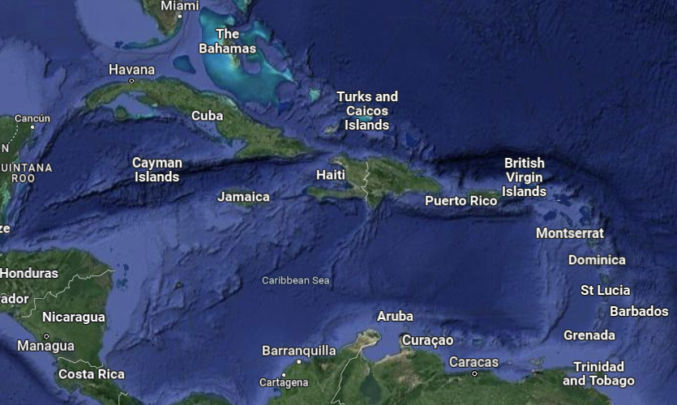
The Caribbean is a subregion of the Americas that includes the Caribbean Sea and its islands.
Best Beaches
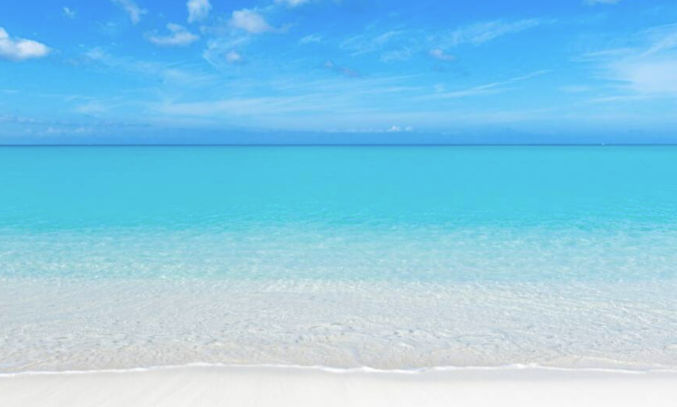
If your idea of the best beach is like mine, which are beaches that have
shallow turquoise or clear water,
fine white sand,
no garbage, seaweed, rocks and corral
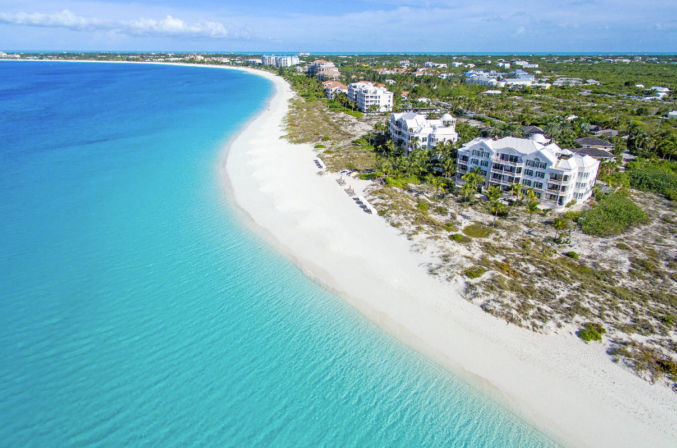
like this
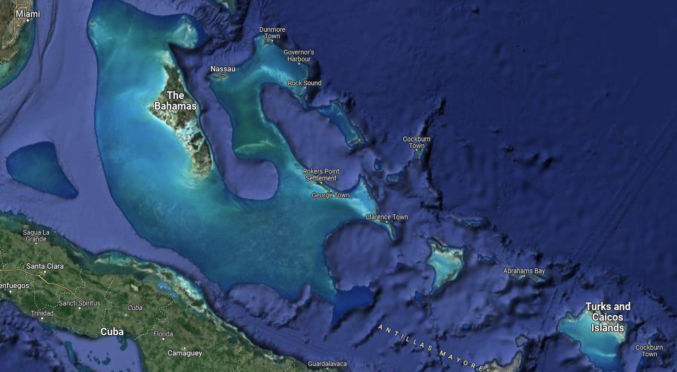
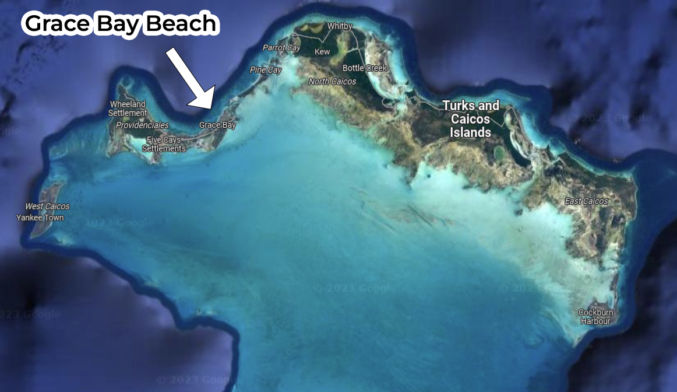
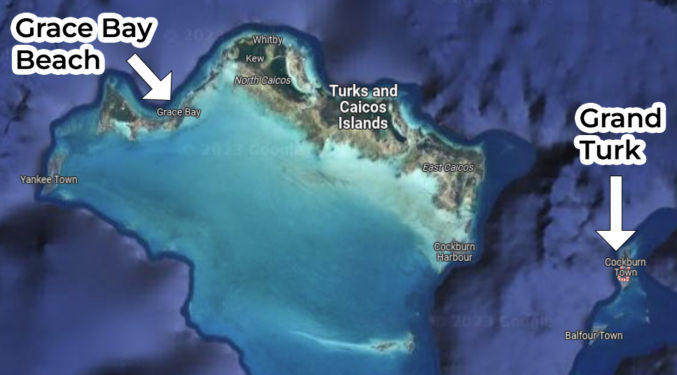
then, looking at the Google satellite image above, it should be evident that one spot stands out: The Bahamas! Actually, if we zoom in on that area, we’ll find that the Turks and Caicos Islands also have that same turquoise color.
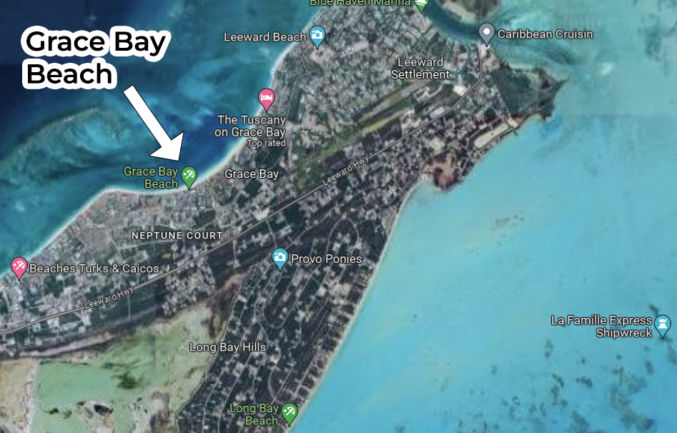
Grace Bay Beach is located on the west side of Providenciales island. As you can see in the picture above, it looks amazing. But, the beach and water on the eastern side looks even better according to the zoomed-out photo below.
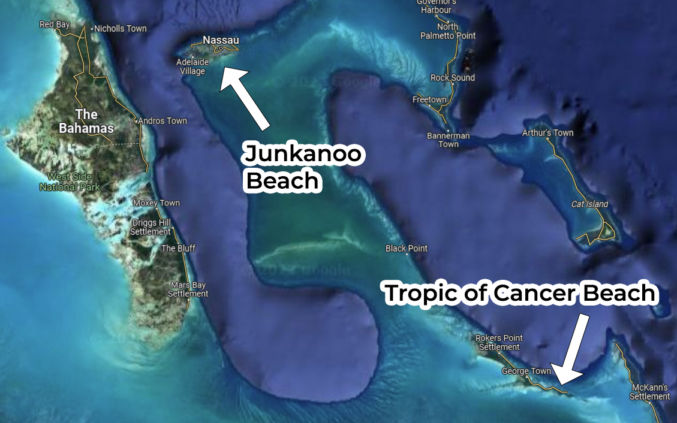
So, what about the Bahamas? According to Lonely Planet, two beaches that meet the criteria above are
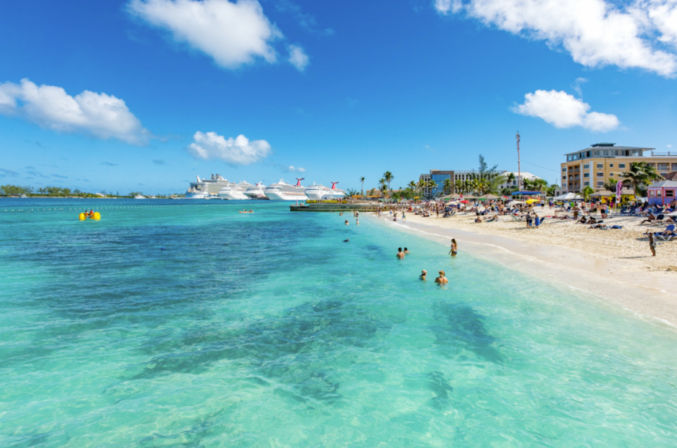
Junkanoo beach Located in the city of Nassau on the island of New Providence and near the cruise port, this beach gets really crowded.
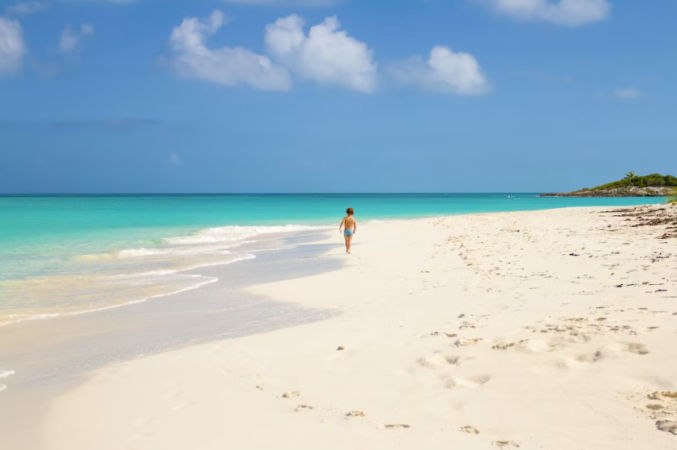
Tropic of Cancer Beach This beach is located in a small town far from Nassau. You may feel lonely at this beach.
Junkanoo BeachTropic of Cancer Beach
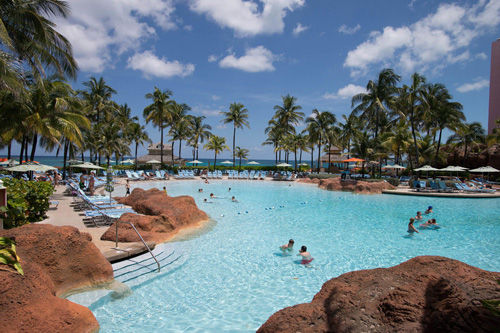
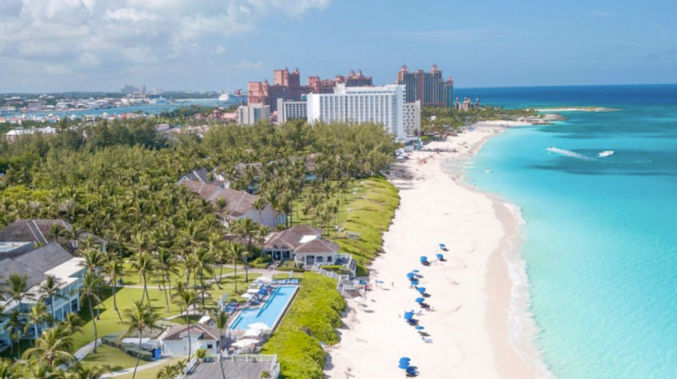
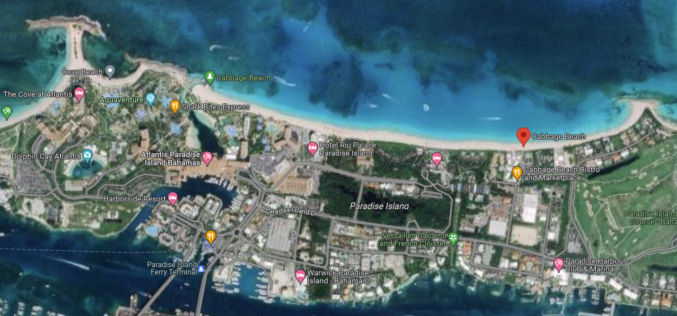
Another popular beach is Cabbage beach on Paradise Island where the Atlantis resort is in Nassau, Bahamas.
Best Luxury Island Destination
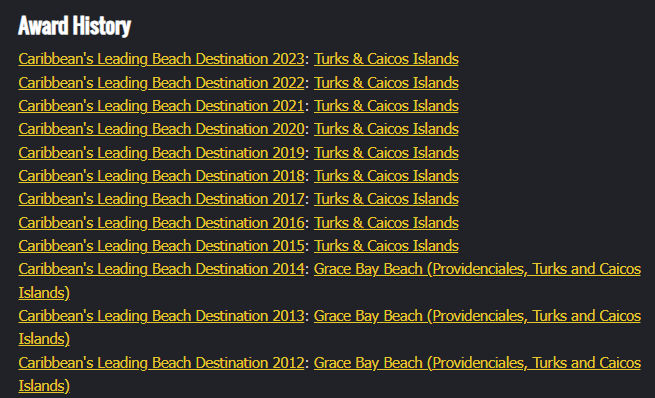
Though the Bahamas may not have won the record for having the best beach, it did consistently win for being the best luxury island destination in the Caribbean.
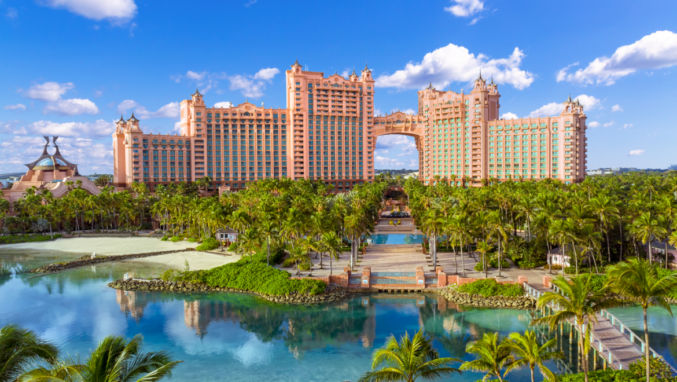
Probably the most notable luxury spot in the Bahamas is the Atlantis resort on Paradise island.
Other Islands
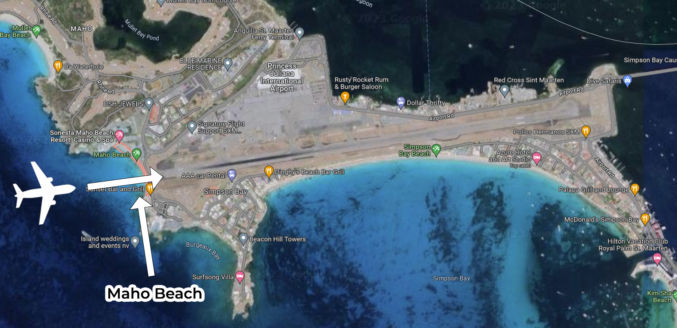
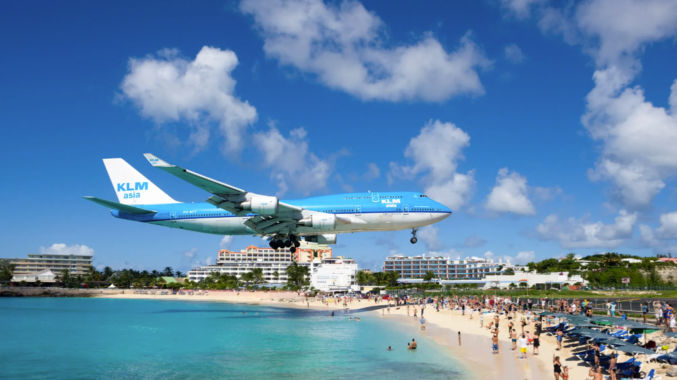
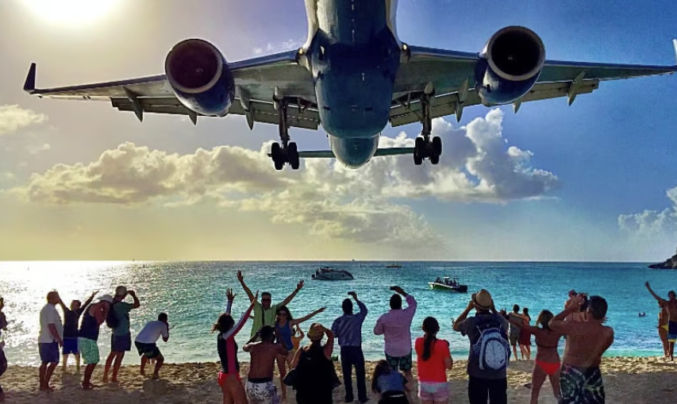
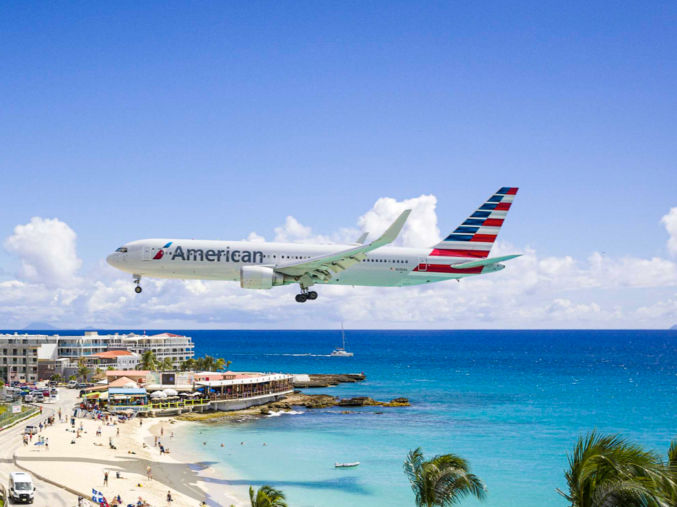
I’m sure there are many other islands with very nice beaches. Some may even be better than the ones mentioned above, but they may be so remote that they would be difficult to get to. You may think that the U.S. and British Virgin Islands (U.S.V.I and B.V.I.) have nice beaches, but from my personal experience visiting them, they are nowhere as nice as the ones mentioned above. There is one beach on Sint Maarten however that is nice and very unique and attractive among tourists. It’s the Sint Maarten Airport Beach or Maho Beach, where the airport landing strip is literally right next to the beach.
The airport runway is half the length of typical runways, so airplanes have to land close to the start of it to avoid overrunning the landing strip.
Tourists love taking photos of themselves standing right below a plane coming in for a landing.
Weather
The best time to go to the Caribbean is during the winter months when the temperature isn’t too high and rainfall is low. Below are average temperatures and rainfall by month for the Bahamas, Turks & Caicos, and Sint Maarten.
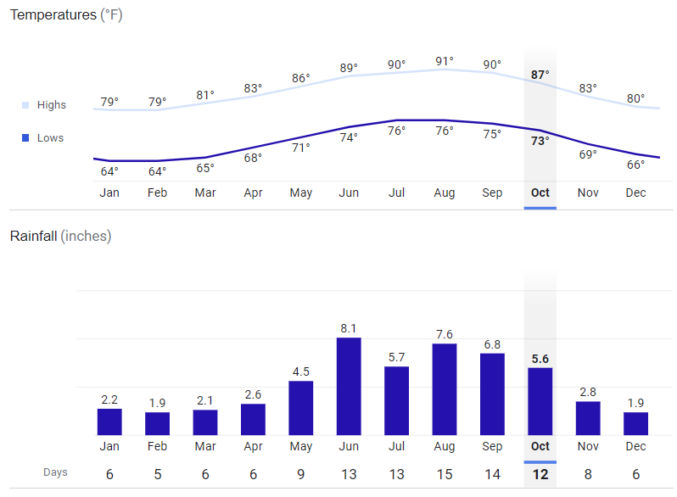
The Bahamas
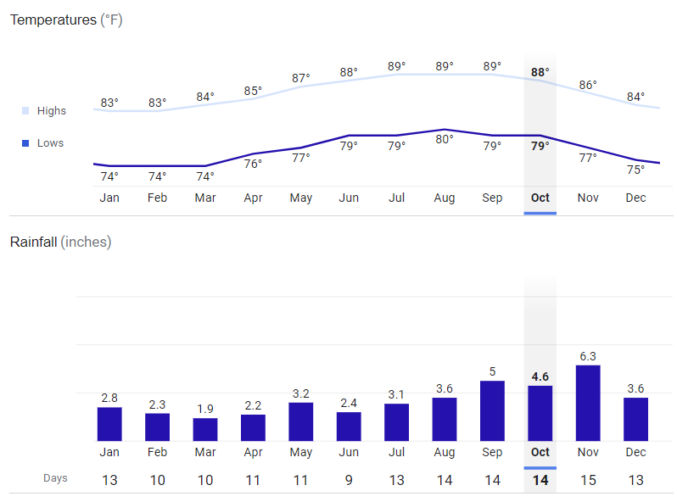
Turks & Caicos
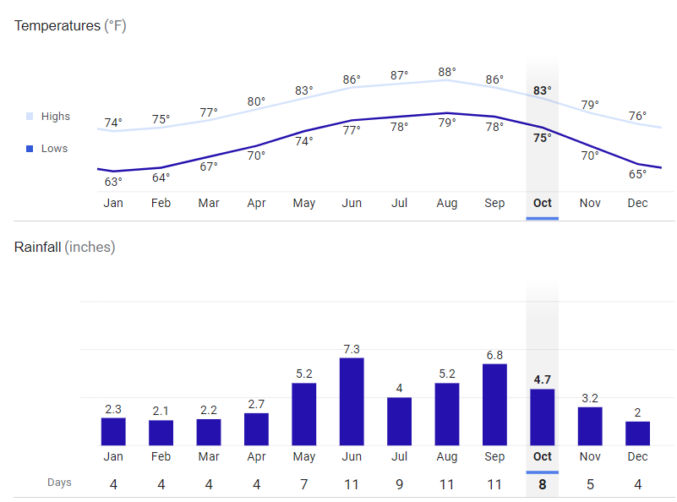
Sint Maarten
And since many cruises depart from Miami, it may be worth it to spend a few days in Miami before or after the cruise. The weather is Miami similar to that in the Caribbean.
Miami
Based on the graphs above, it would appear that February is the best time to go.
Humidity and Heat Index
Note that the Caribbean has a humid climate, and high humidity actually makes you feel hotter than in low humidity climates. The heat index is a measure of how hot you feel when taking into both temperature and humidity into consideration. Learn more.
In Nassau, Bahamas,
On average, September is the most humid month, at 81.0%.
On average, April is the least humid month, at 74.0%.
The average annual percentage of humidity is: 78%
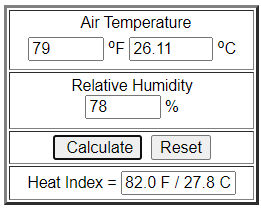
According to this heat index calculator, if the temperature is 79 degrees and the humidity is 78%, then the heat index is 82 degrees Fahrenheit.
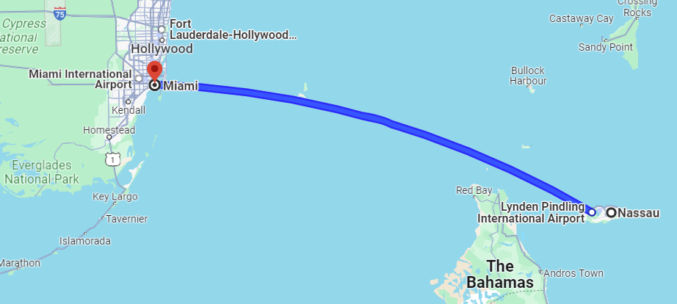
Flights
You can easily find flights from Miami to the Bahamas, Turks and Caicos, and Sint Maarten. Below are non-stop flights to each country, flight time, and cost for travel in February 2024.
Destination
Travel Time
Cost
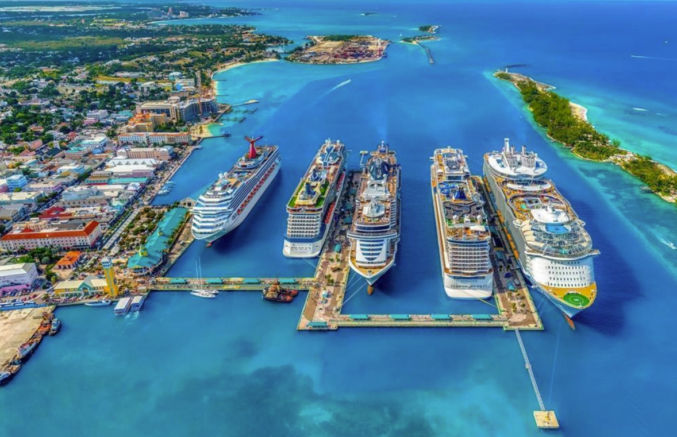
Nassau, Bahamas
1 hr 10 min
$262
Sint Maarten
3 hr
$400
Turks and Caicos
2 hr
$200
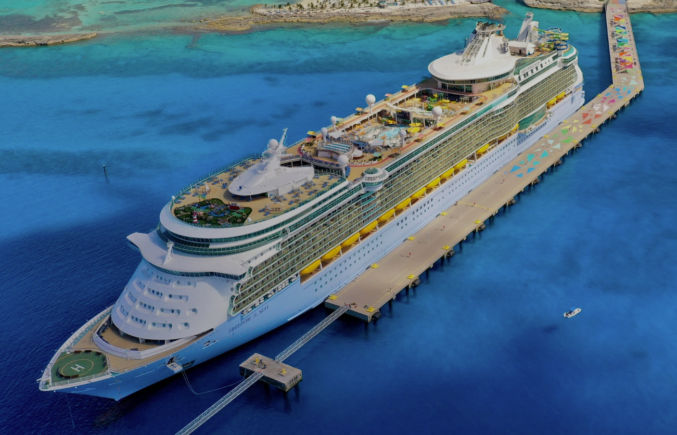
Cruises
The Caribbean is a popular region for cruises. Many cruise lines go to all 3 countries mentioned above. But, cruise ships don’t necessarily dock at the specific islands mentioned above. Here are the cruise ship ports of call for each country.
Country
Port of Call
The Bahamas
Nassau City, New Providence Island
The Bahamas
Princess Cays
Turks & Caicos
Grand Turk
Sint Maarten
Sint Maarten
In particular, note that Grand Turk is an island in Turks & Caicos that is very far from Providenciales island where the best beach (Grace Bay Beach) is. You’d have to fly from Grand Turk to Grace Bay Beach.
If you are looking for a cruise ship that goes to these islands, you can do a search from sites like Cruiseweb.com where you can specify search criteria like
month (January, February)
ports of call (Nassau and Grand Turk)
etc
The cruise line that primarily goes to Grand Turk is Carnival. Following are some cruise itineraries that meet the criteria above.
Ship: Carnival Magic – 6-Night Cruise
Sun Feb 18, 2024 – Sat Feb 24, 2024
Date
Port
Arrival
Departure
Feb 18, 2024
Miami
—
3:30 PM
Feb 19, 2024
Fun Day At Sea
—
—
Feb 20, 2024
Grand Turk, Turks & Caicos
8:00 AM
5:00 PM
Feb 21, 2024
Amber Cove, Dominican Republic
8:00 AM
5:00 PM
Feb 22, 2024
Fun Day At Sea
—
—
Feb 23, 2024
Nassau
8:00 AM
4:00 PM
Feb 24, 2024
Miami
—
8:00 AM
Ship: Princess Cruises – 14-Night Cruise
Date
Port
Arrival
Departure
Feb 11, 2024
Fort Lauderdale (Port Everglades), Florida
—
3:00 PM
Feb 12, 2024
Princess Cays, Bahamas
9:00 AM
4:00 PM
Feb 13, 2024
Cruising
—
—
Feb 14, 2024
Ocho Rios, Jamaica
8:00 AM
4:00 PM
Feb 15, 2024
Georgetown, Grand Cayman, Cayman Islands
7:00 AM
4:00 PM
Feb 16, 2024
Cozumel, Mexico
10:00 AM
7:00 PM
Feb 17, 2024
Cruising
—
—
Feb 18, 2024
Fort Lauderdale (Port Everglades), Florida
7:00 AM
3:00 PM
Feb 19, 2024
Princess Cays, Bahamas
9:00 AM
4:00 PM
Feb 20, 2024
Cruising
—
—
Feb 21, 2024
San Juan, Puerto Rico
9:00 AM
10:00 PM
Feb 22, 2024
St. Thomas, U.S. Virgin Islands
8:00 AM
5:00 PM
Feb 23, 2024
Cruising
—
—
Feb 24, 2024
Cruising
—
—
Feb 25, 2024
Fort Lauderdale (Port Everglades), Florida
7:00 AM
—
Cruise Line Private Islands
Some cruise lines bought or made islands just for their passengers. Since the islands were custom-made for tourists, they have many tourist benefits that you may not find on other islands. Following are some notable islands.
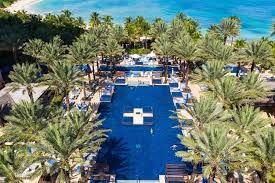
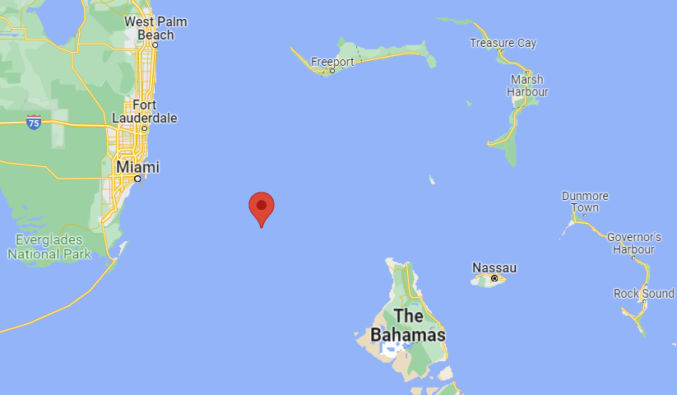
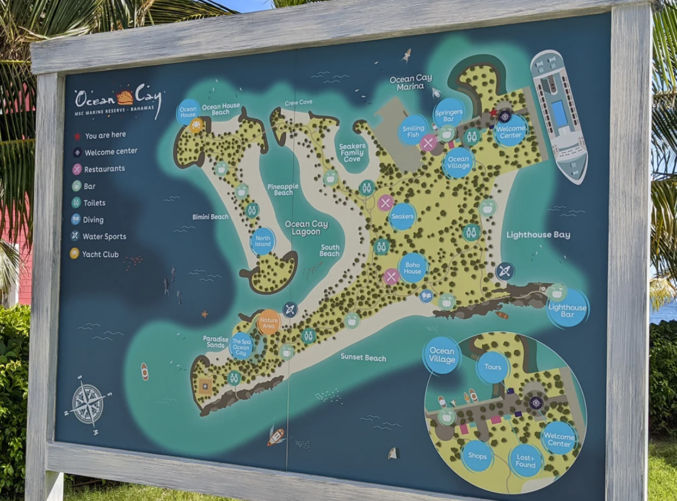
Ocean Cay, The Bahamas: MSC Cruises
This island is located on a former sand extraction site. MSC Cruises owns it. It’s located pretty close to Miami.
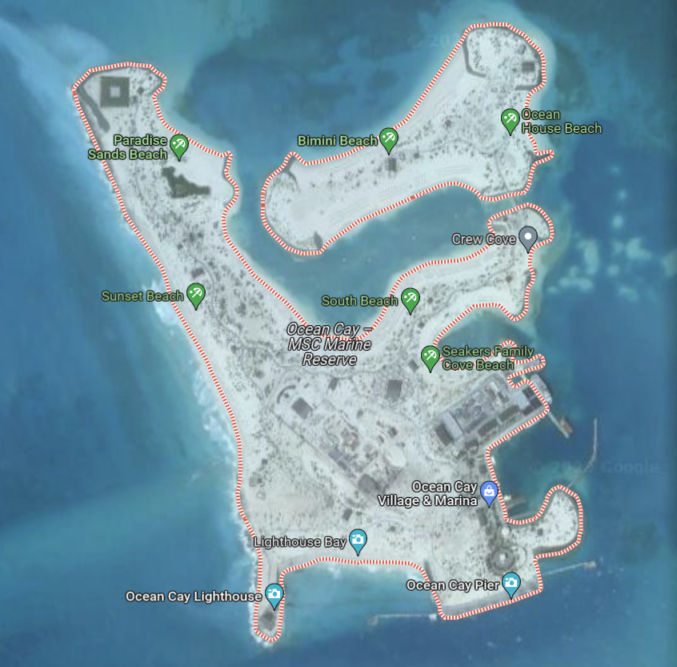
Google Maps’ satellite view shows a lot of beaches with turquoise water.
There’s a beach right by the port where the cruise ship docks. If you want calm water and are afraid of accidentally being pulled out to sea, you can swim between the two beaches at the lagoon.
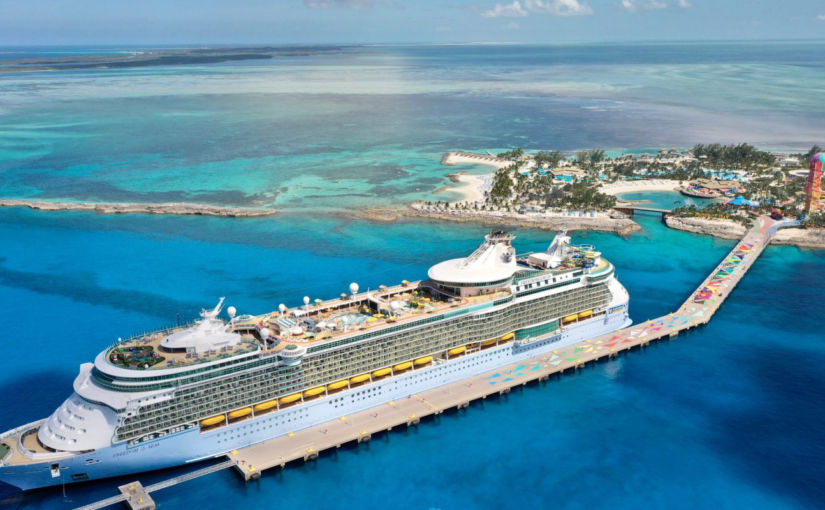
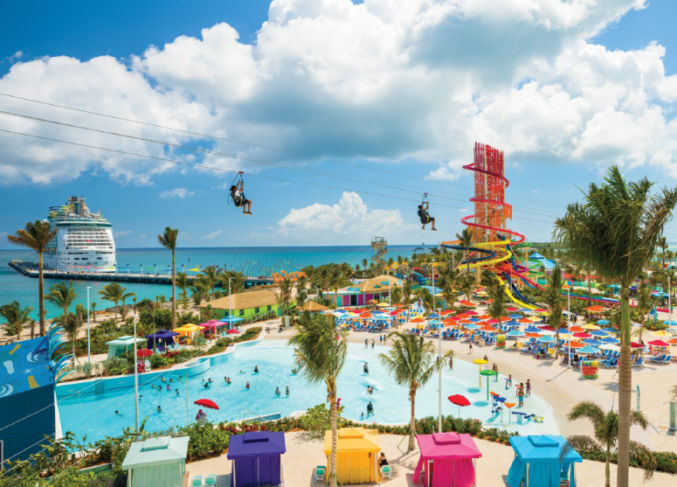
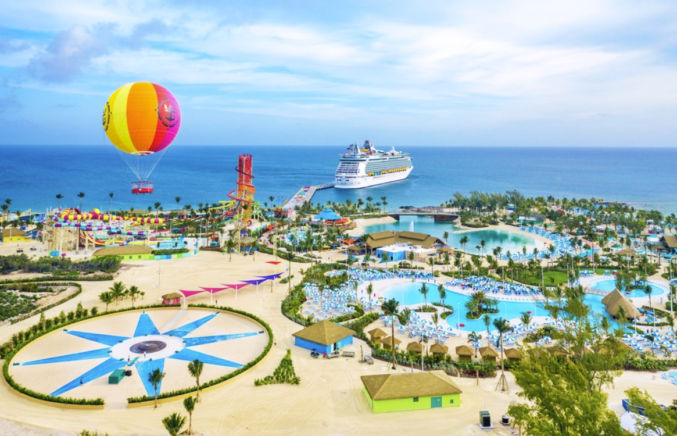
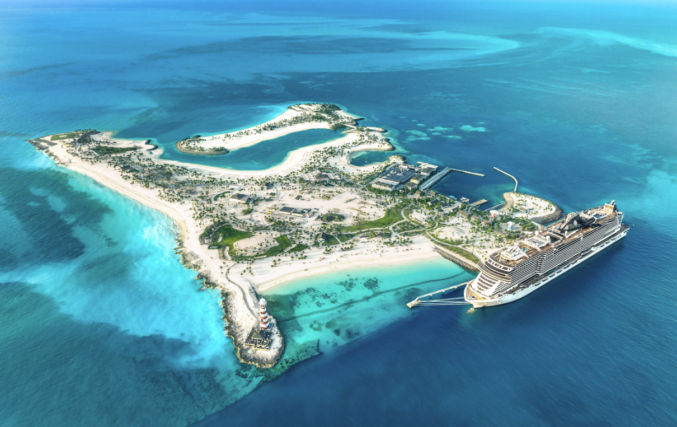
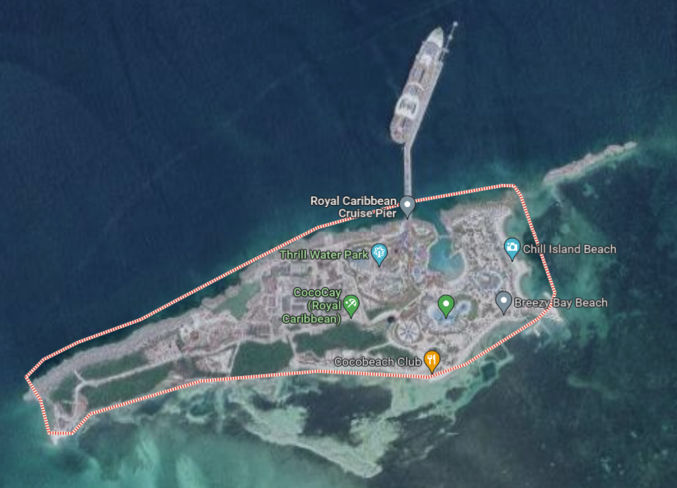
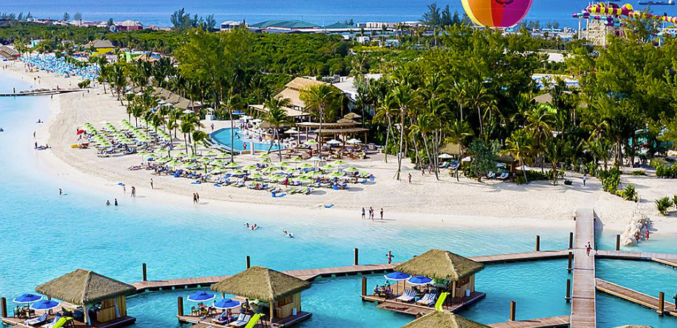
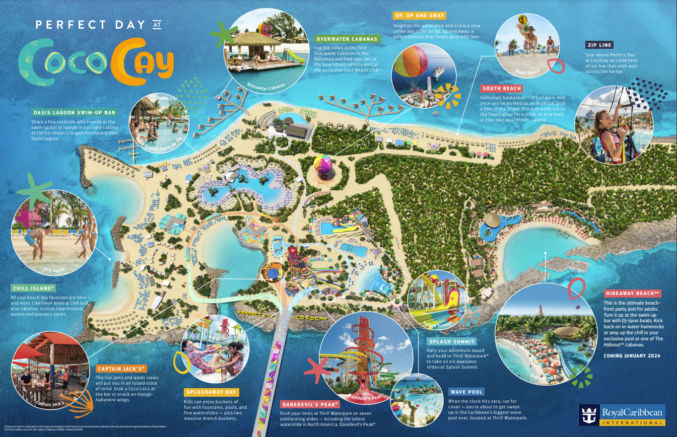
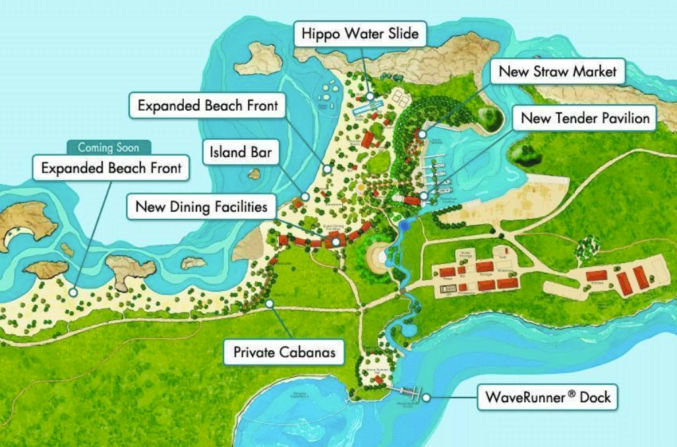
This island is owned by Royal Caribbean and is exclusively for Royal Caribbean guests. The Google Maps satellite view may make you think the water isn’t turquoise, but it’s deceiving. Many photos show that the water is actually very turquoise. Note that the pier can accommodate two ships, so if you want to avoid crowds, try to find a trip when only your ship will dock there.
With so many activities and attractions, CocoCay looks more like an amusement park. Some activities and amenities include
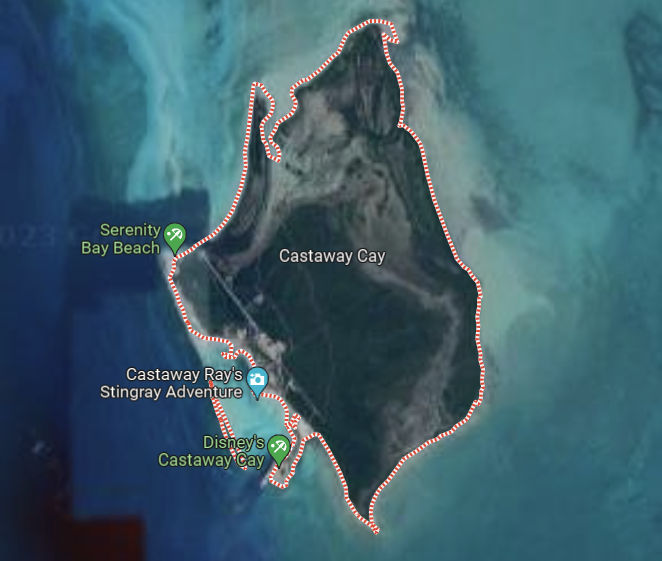
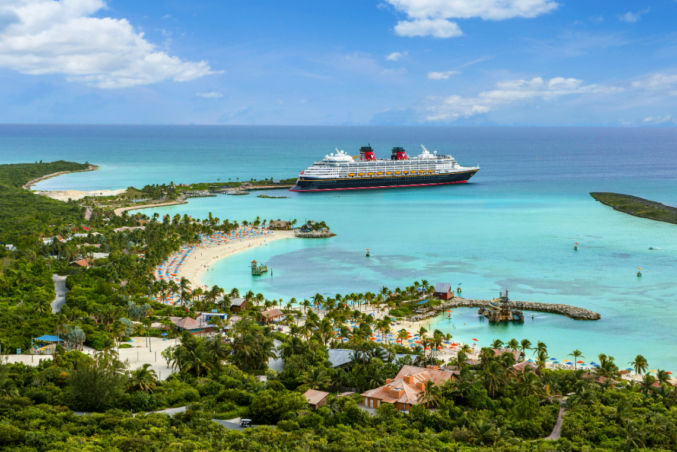
Castaway Cay is owned by Disney. Most of the island appears undeveloped. The water by the pier seems to be pretty turquoise.
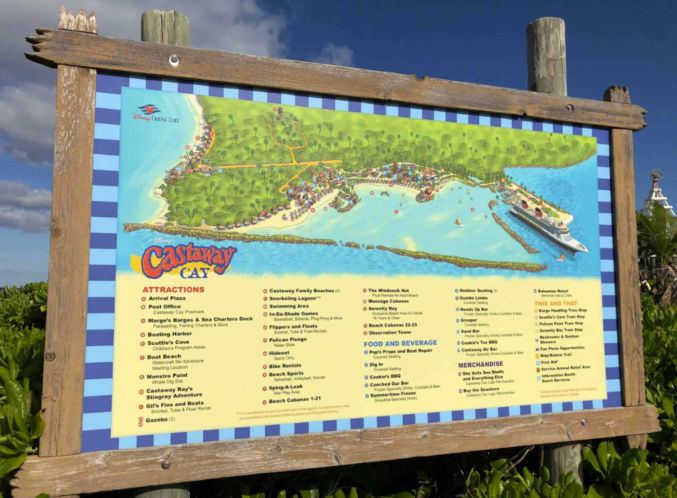
According to the Disney map, the only developed area is by the pier. It’s nice how they have a breakwater barrier to keep the water calm and to block you from accidentally getting pulled out to sea.
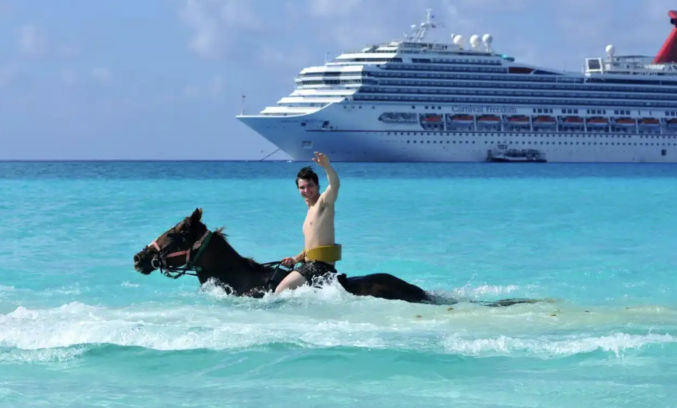
Half Moon Cay, Bahamas: Holland America Line
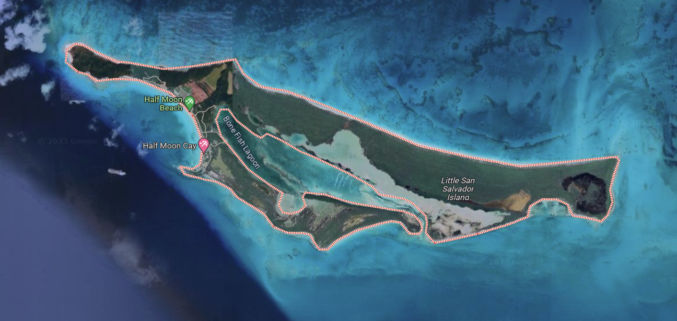
Below is a satellite view of Half Moon Cay, also called Little San Salvador. Only 3% of the island has been developed for cruise passengers. The color of the water looks pretty good. You will find a 2-mile-long powdery white sand beach and a rugged coastline beyond. There is a natural lagoon called Bone Fish Lagoon that is a breeding ground for sharks, turtles and bonefish.
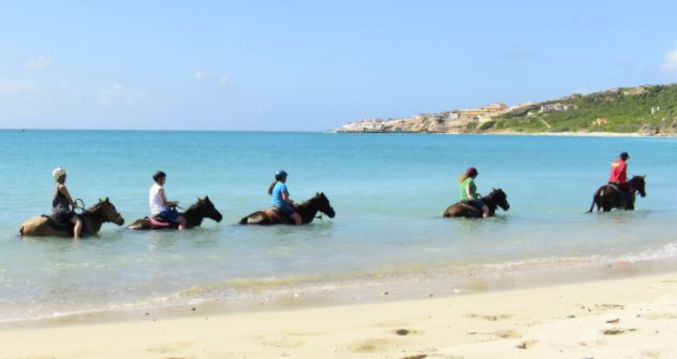
One interesting activity you can do there is ride a horse in the water.
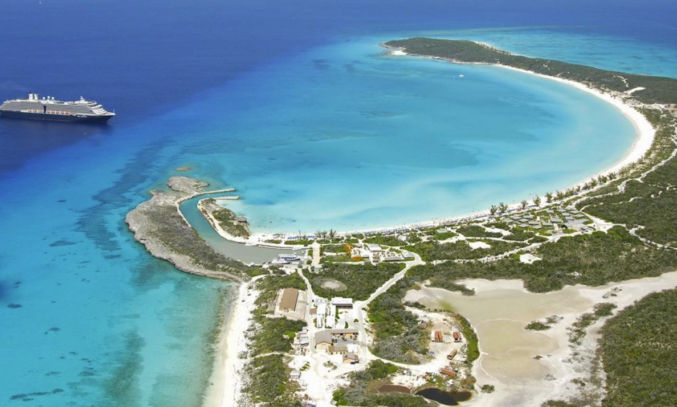
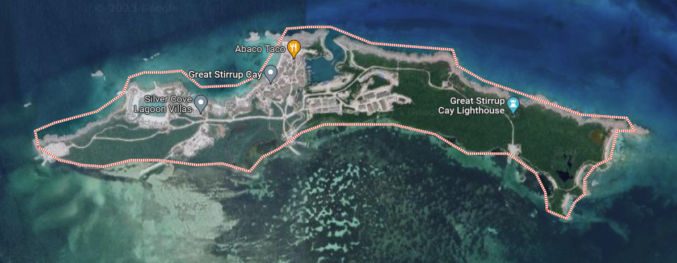
Great Stirrup Cay, Bahamas: Norwegian Cruise Line
Great Stirrup Cay is located next to Perfect Day CocoCay.
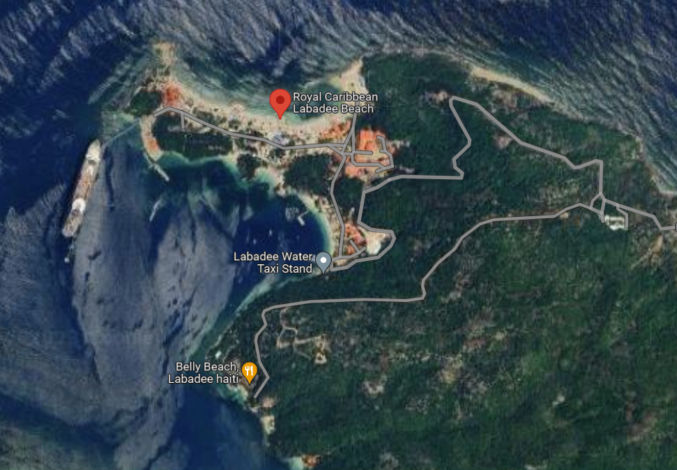
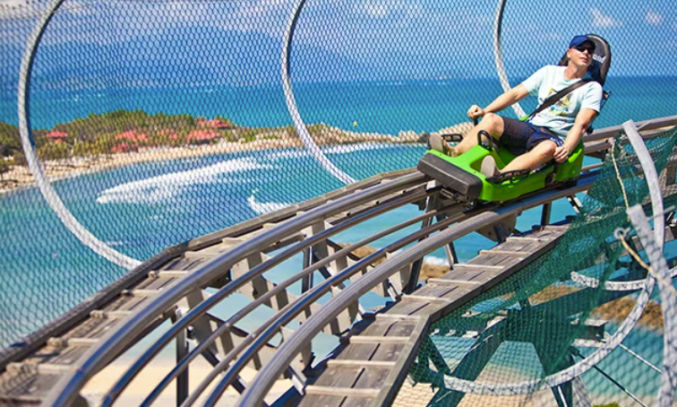
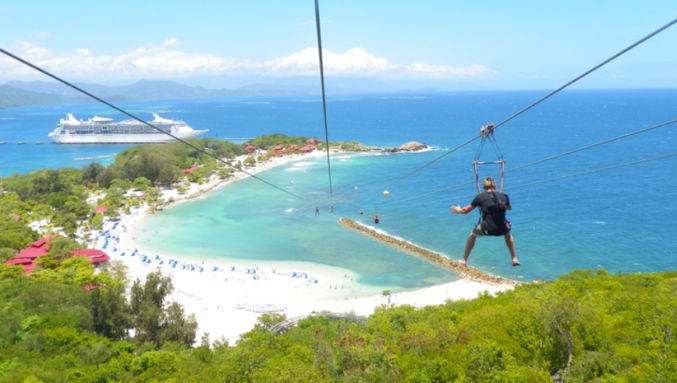
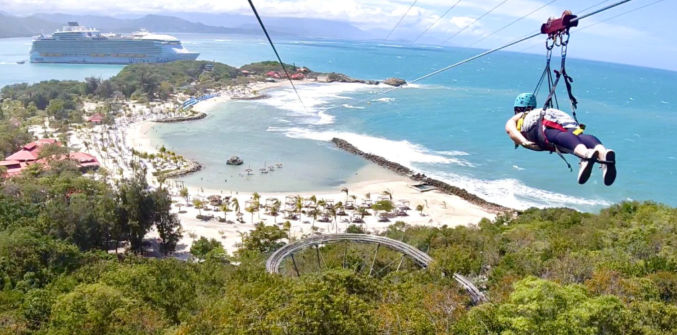
Labadee, Haiti: Royal Caribbean
This destination offers some interesting activities. You can go to the mountaintop for a ride on the alpine Dragon’s Tail Coaster. The thrilling descent begins with panoramic views of Labadee from 680 feet above the coastline atop Santa Maria’s lookout mountain. On the way down you’ll reach speeds of 30 miles per hour and zip through 360-degree twists and turns.
There is also a zip line and Superman-style flight line that both let you soar a half mile over the water.
Superman-style
Activities
There are many activities you can do when visiting Caribbean islands, including
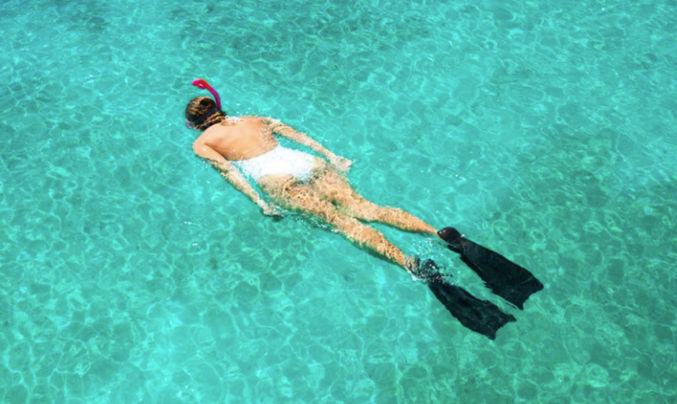
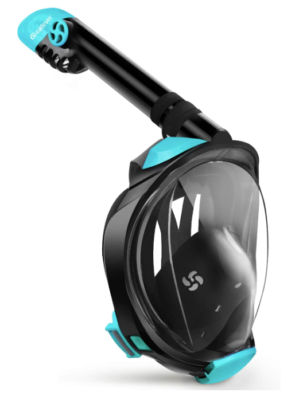
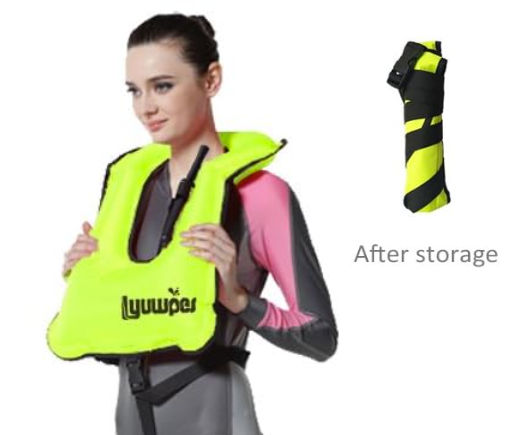
Snorkeling
When snorkeling, it would seem better to wear a full-face snorkel mask and a snorkel vest. The mask will give you better visibility and you don’t have to keep your mouth closed. The snorkel vest will easily keep you afloat while allowing your face to be submerged in the water. A life jacket, unlike a snorkel vest, will keep your head above the water, which is not what you want for snorkeling.
Full-face snorkel maskSnorkel vest
Power snorkeling
Lounging in the water
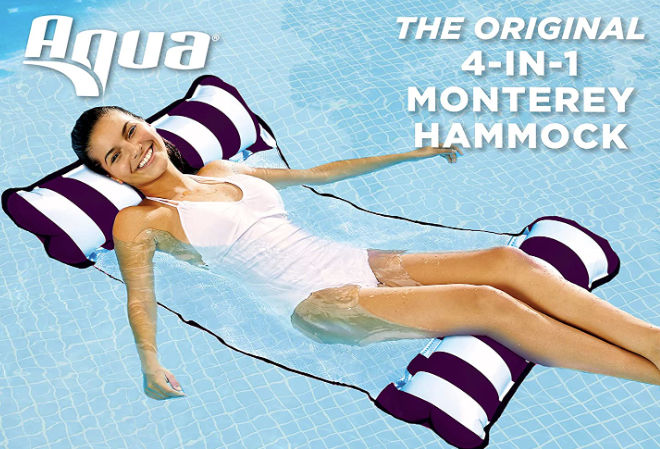
Whether in a swimming pool or at the beach, these inflatable hammocks are great as they keep your head above the water but your body in it.
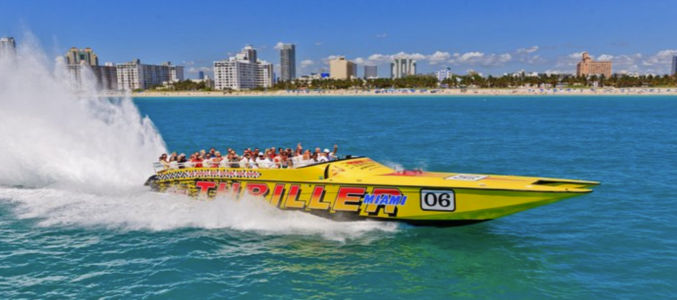
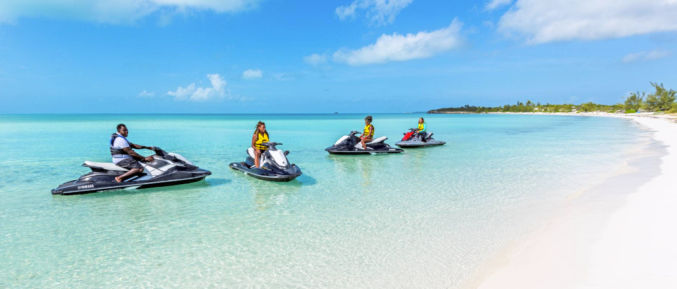
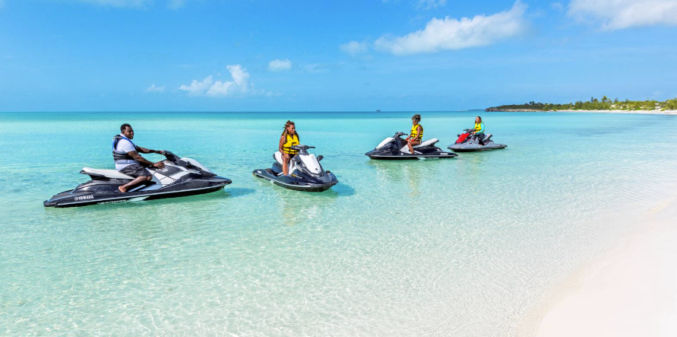
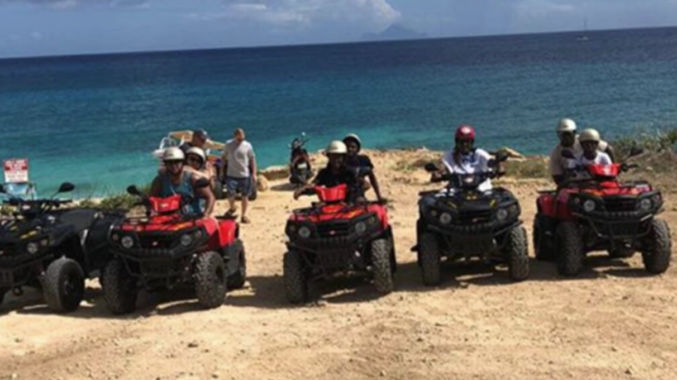
Jet ski tour
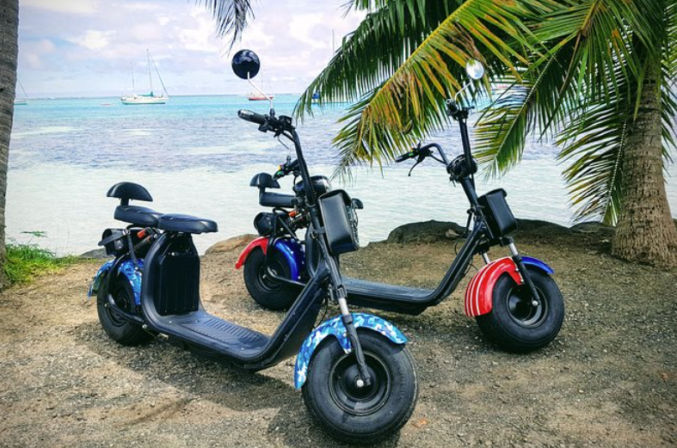
Explore the island by scooter
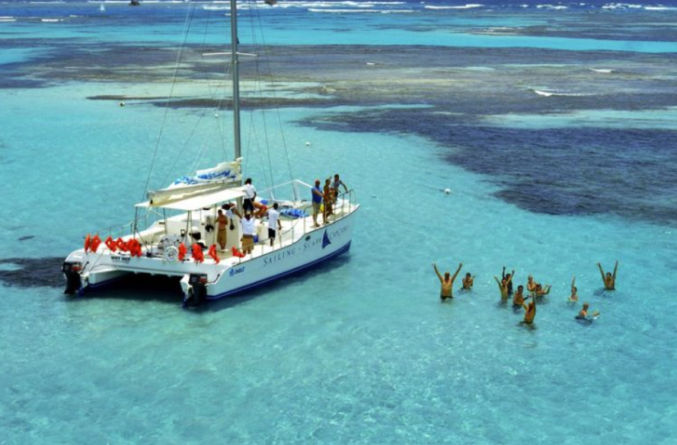
Catamaran tour
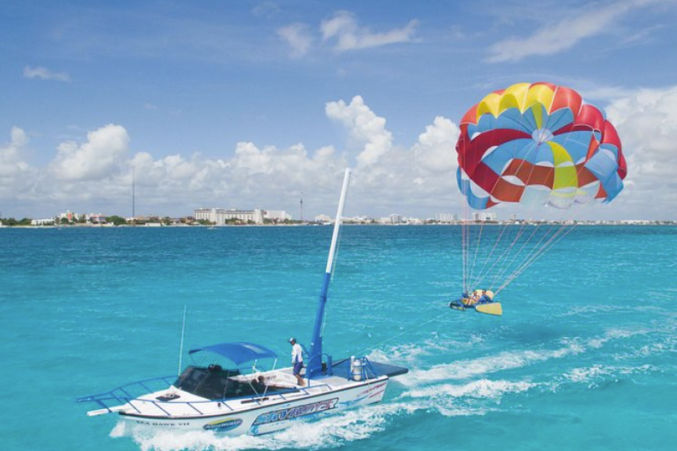
Parasailing
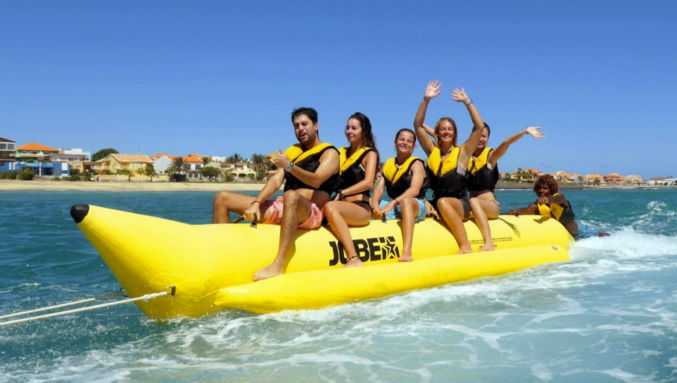
Ride a banana boat
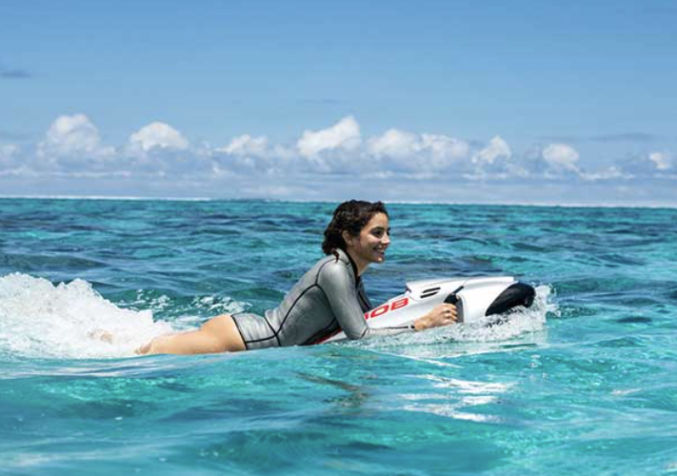
Cruise around in a seabob
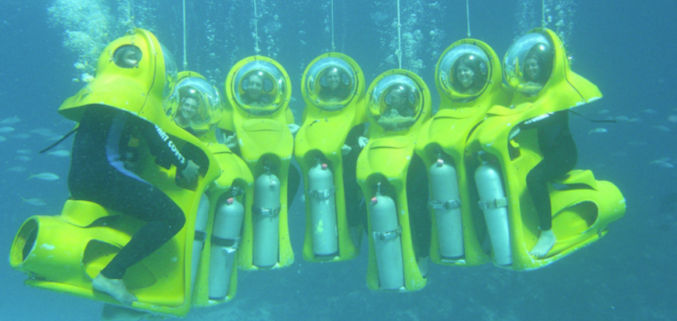
Mini Personal SUB
Other activities include
Snuba (with an “n”) diving
Scuba diving
Fishing
Horseback riding in the water
Dune buggy tour
Swimming
Playing at a water park with slides and wave pool
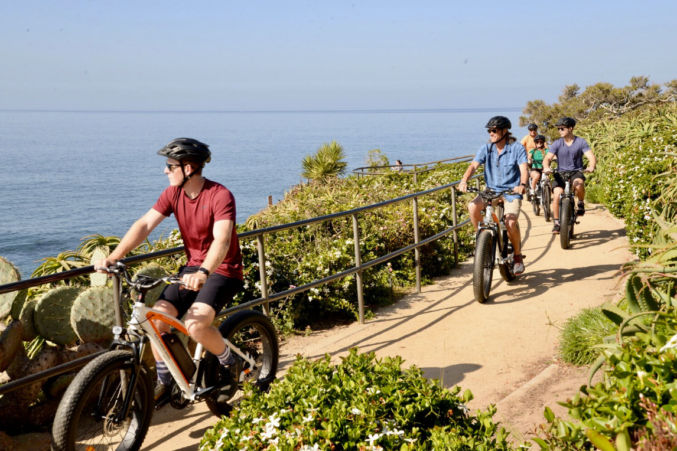
Exploring the island by foot, bike, scooter
Ziplining
Kayaking
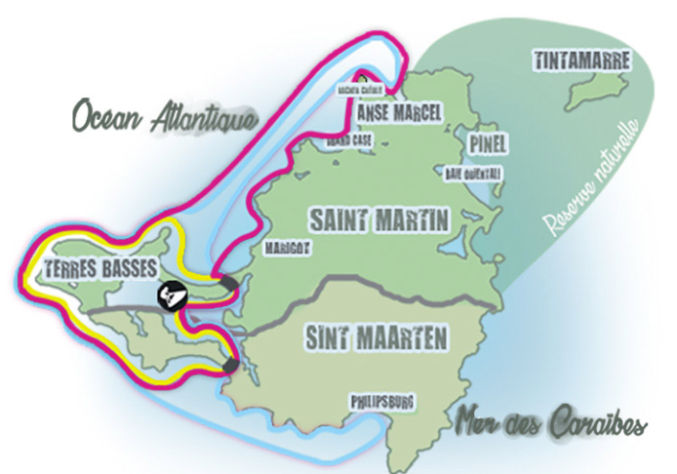
Sint Maarten/Saint Martin
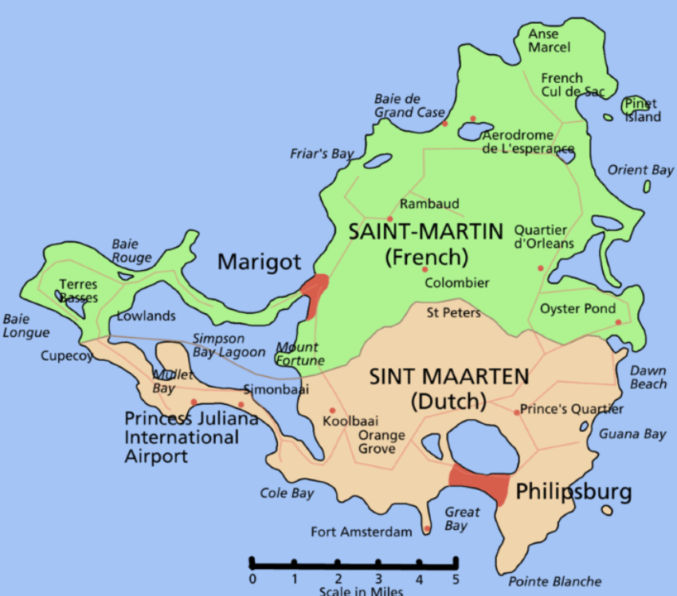
This island of Sint Maarten/Saint Martin is shared by 2 nations. Sint Maarten is Dutch and Saint Martin is French. It is the smallest inhabited island in the world. The entire island is just 37 square miles.
Some things to do there include
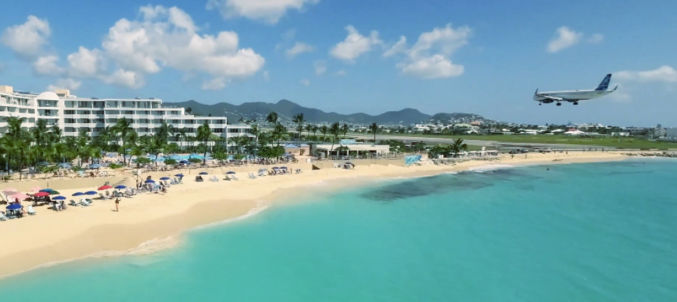
Planespotting
At Maho beach, you can watch commercial jet planes fly really low over your head as they come in for a landing.
The Royal Islander Club Resort La Plage is located next to the airport landing strip and has access to the beach where planes directly fly over.
Soualiga Sky Explorer
The Sky Explorer is a chairlift attraction in St. Maarten. The ride is approximately 25 minutes long and takes riders to the top of Sentry Hill, the highest elevation in St. Maarten. The ride spans 2,997 feet and includes two lifts.
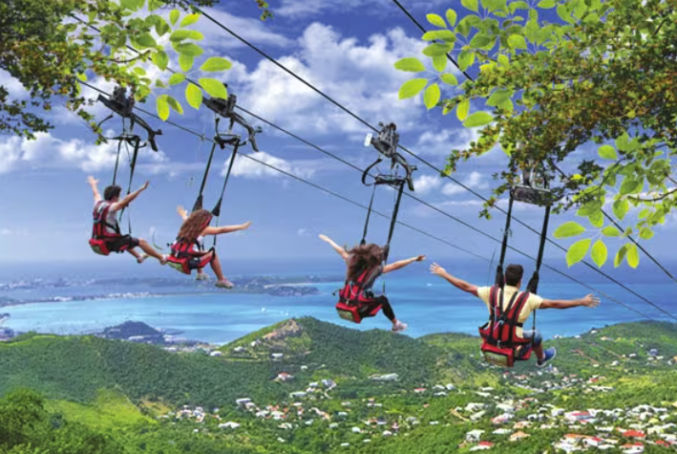
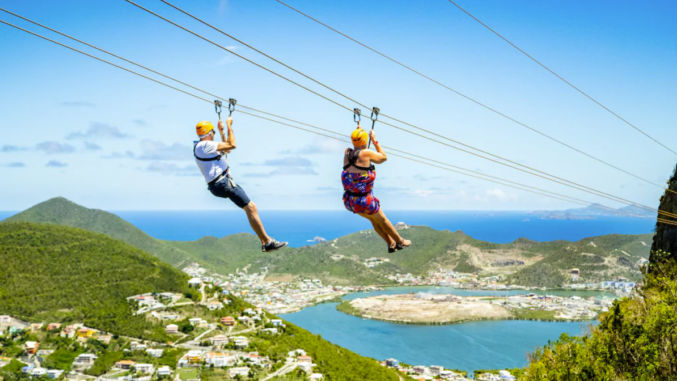
Flying Dutchman
The Flying Dutchman is the world’s steepest zip line! You’ll be attached to a flight line in a secure harnessed chair, launching you on the 1050-foot drop in elevation over 2800 feet to experience the ride of a lifetime.
Sentry Hill Zip Line
Schooner Ride
Melange Grill
This restaurant is similar to Brazilian BBQ and Korean BBQ.
Select your Appetizer
Choose your Salad
Enjoy a continuous flow of grilled meats and Seafood right at your table with an assortment of sauces and sides !!
Horseback Riding (1-hour tour)
Lucky Stables at Seaside Nature Park offers a wide variety of tours and trail rides. Ride horses peacefully along one of the many trails that span this beautiful island. Or, ride into the sea with your horse and treat the animals to a cooling swim in the ocean!
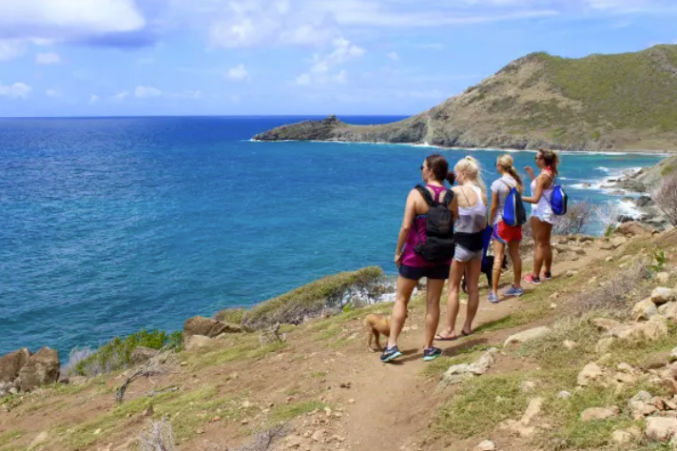
Hiking Tour
The many trails at Seaside Nature Park can be explored easily with some water and sturdy hiking shoes while sharing in the extensive knowledge of a professional guide about the flora, fauna and history of the park.
People have different preferences when it comes to vacation. Some may want to just be a beach bum. Others may want to just do casual sightseeing. For me, I want maximum activity options and clean, turquoise beaches with fine white sand. I also want to go on a cruise because that in and of itself is an experience full of on-board fun activities. Since it’s not possible to cruise to the best beach in the world, Grace Bay Beach in Turks and Caicos, and since Perfect Day at CocoCay is the most developed cruise-owned island full of convenient vacation activities, I think my preferred itinerary would include Perfect Day at CocoCay. And since Nassau is nearby, is a common cruise port of call, and is a popular destination, it would also be on my itinerary. Sint Maarten is one particular island with a lot of fun activities as well, but it may not be possible to find a cruise that goes to all 3 locations. Plus, spending one day at Sint Maarten is likely not long enough. So, I think my preferred itinerary would be
Flight: Home > Miami (spend 0 to 3 nights)
Cruise:
Miami
Nassau (Atlantic AquaVenture, Cottage Beach, Downtown)
Perfect Day at CocoCay
Day at Sea
Miami
Flight: Miami > Sint Maarten (2 or 3 nights) > Miami
Flight: Miami > Home (spend 0 to 3 nights)
Here’s one actual itinerary.
4 Night Bahamas & Perfect Day Cruise
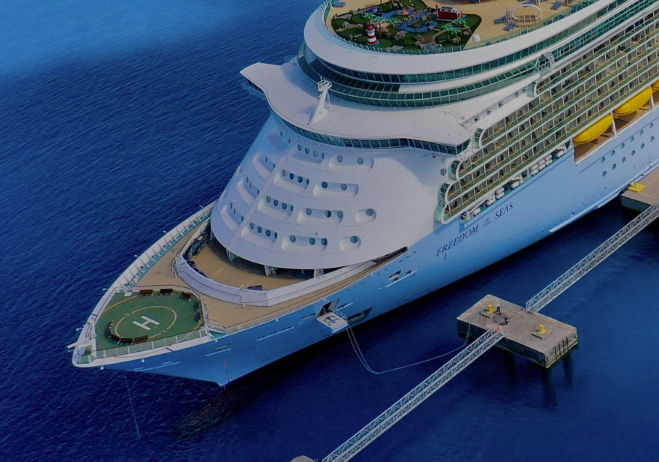
Ship: Royal Caribbean Freedom of the Seas
Date
Port
Arrival
Departure
Mon, Feb 12, 2024
Miami
—
4:30 PM
Tue, Feb 13, 2024
Perfect Day at CocoCay
7:00 AM
5:00 PM
Wed, Feb 14, 2024
Cruising Day at Sea
Thu, Feb 15, 2024
Nassau, Bahamas
8:00 AM
5:00 PM
Fri, Feb 16, 2024
Miami
6:00 AM
—
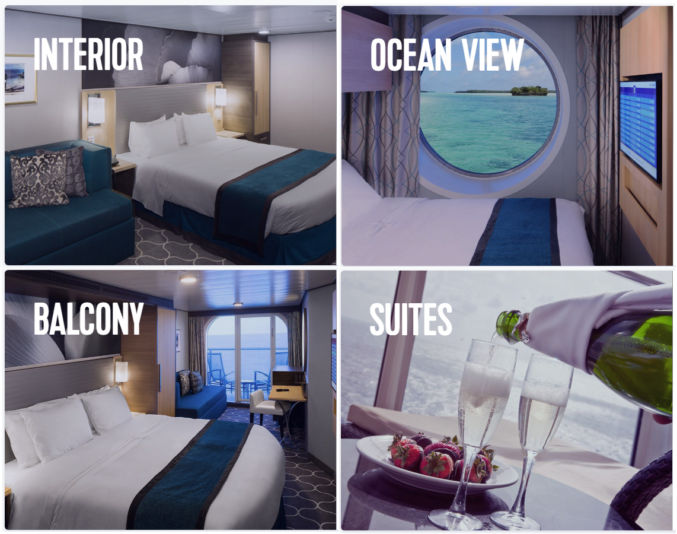
Pricing by Room Category:
Interior
$293
Outside View
$422
Balcony
$595
Suite
$961
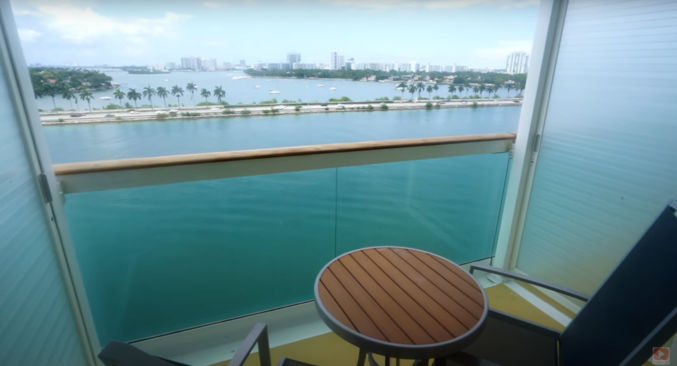
Note that the balcony is pretty small.
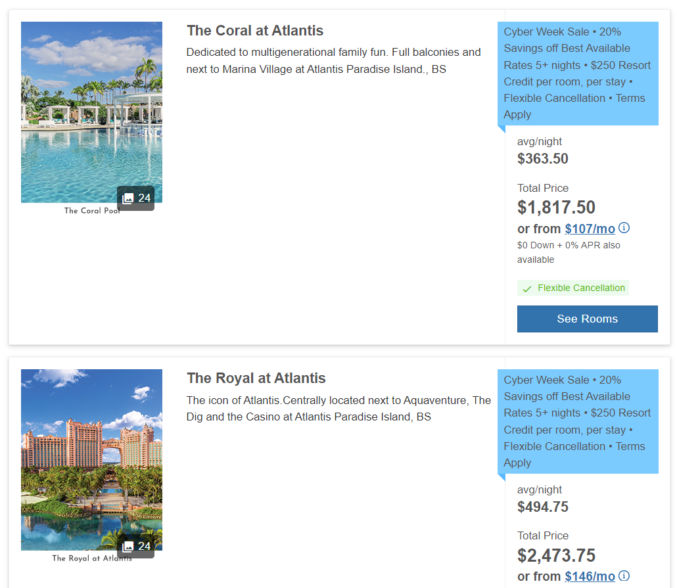
Atlantis Resort
Hotel room: Minimum 2-night stay: $270 – $359 / night.
Day Pass: $190 / person
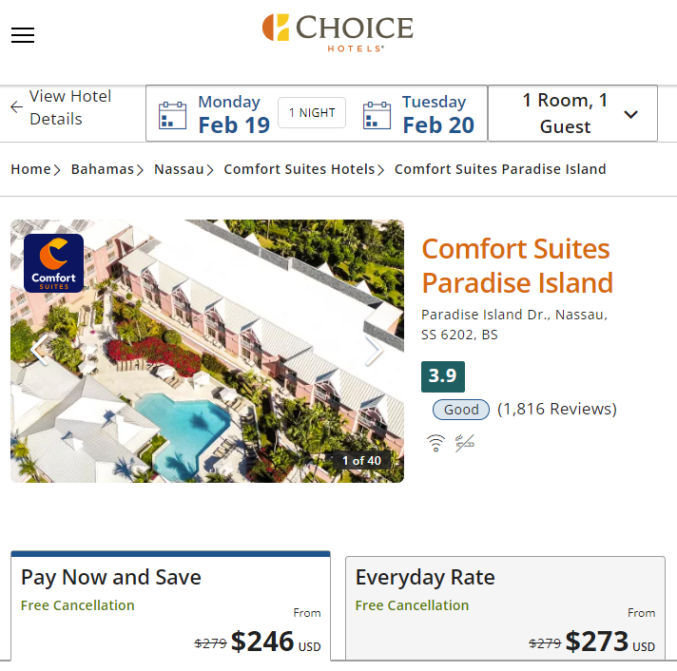
There’s a hack to get access to Atlantis without spending 2 nights and paying a high price. If you stay at the Comfort Suites on Paradise Island, Bahamas, you’ll have full access to Atlantis, which is just a 3-minute drive away. As an example, the cheapest cost to stay at Atlantis on February 19. 2024 is $363 / night with a minimum 4-night stay. The cost to stay at Comfort Suites on the same dates is just $246 with no 4-night-minimum restriction.
Cruise Ports
Some cruise ports can accommodate multiple ships at the same time. The more ships there are, the more crowded the place will be. Therefore, it’s preferable to choose a trip with the fewest ships at your scheduled ports of call.
Nassau
As you can see, the port at Nassau can accommodate up to 5 ships.
For the itinerary above, the ship “Freedom of the Seas” is scheduled to dock on Feb 14, 2024. The Nassau, Bahamas cruise terminal website shows the schedule by month. Here’s the schedule for February 2024. Unfortunately, it looks like the terminal will be full of ships that day.
Perfect Day at CocoCay
Perfect Day at CocoCay is owned by Royal Caribbean, so only their ships can dock there. The port is smaller. It can accommodate a maximum of 2 ships. For the itinerary above, the ship “Freedom of the Seas” is scheduled to dock on February 13, 2024. According to CruiseMapper.com, there will be 2 ships that day.
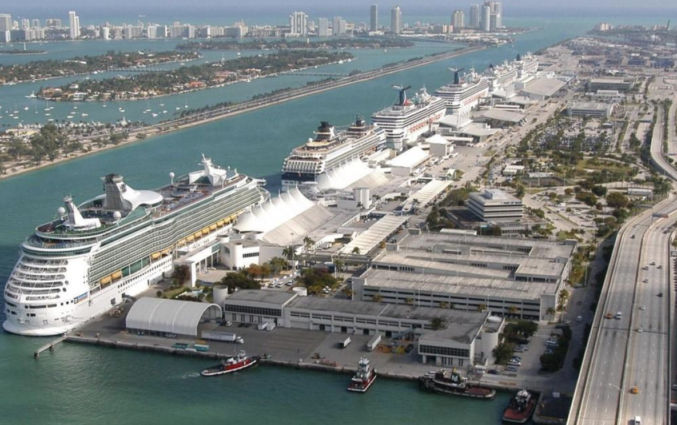
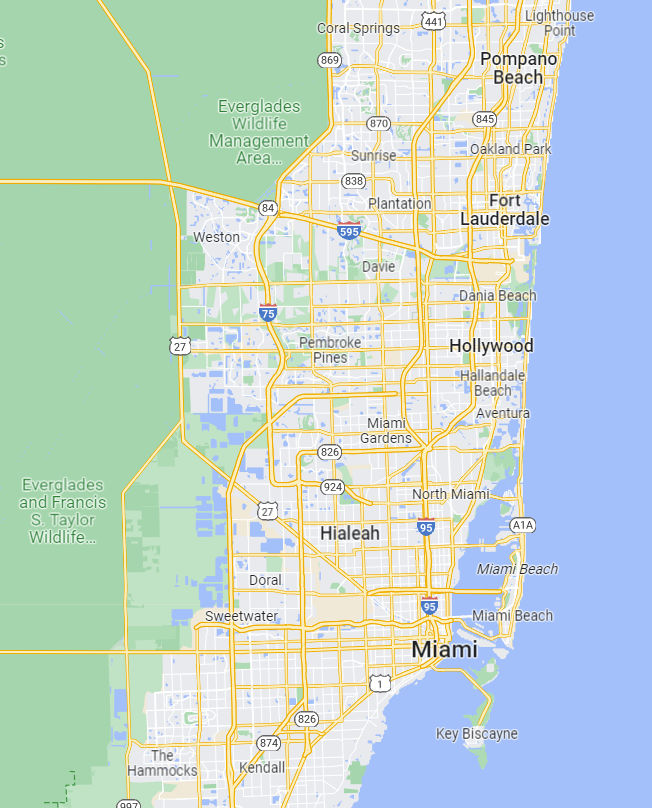
Miami
Since many cruises depart from Miami and Miami itself is an interesting destination, it makes sense to spend some time there before or after going on a cruise.
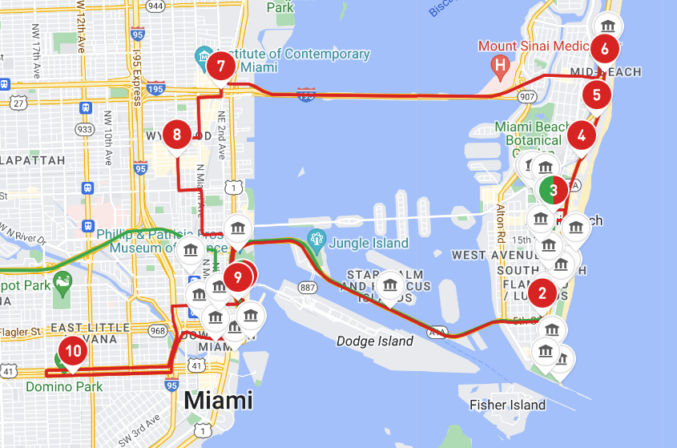
Following are some things to do when visiting Miami.
Miami Hop-On-Hop-Off Bus
Go on a double-decker, open-air hop-on-hop-off bus and be taken around many of the tourist spots. This is an easy way to see a lot and get a sense of the area. Afterwards, you can spend time at individual spots you are interested in. There are many tour bus operators. BigBus, shown below, is just one of them.
Unique outdoor destination featuring huge, colorful street murals by artists from around the globe.
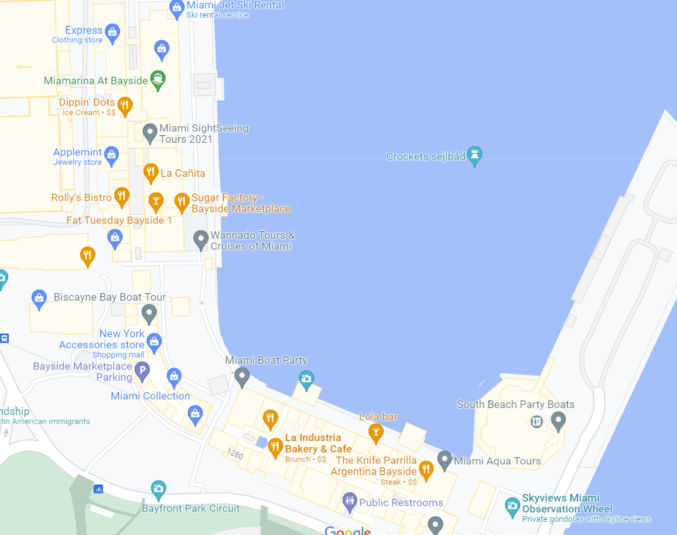
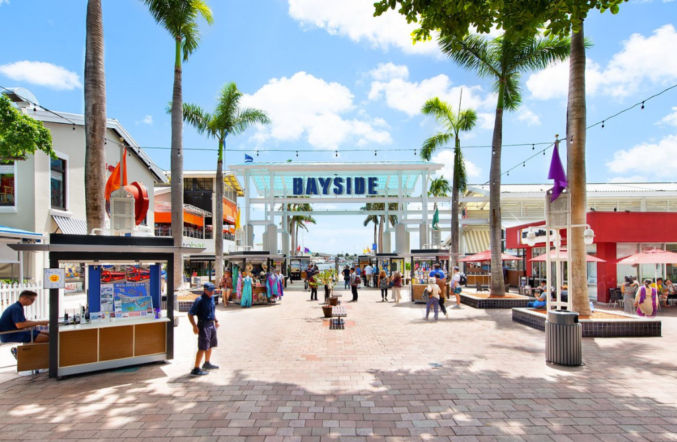
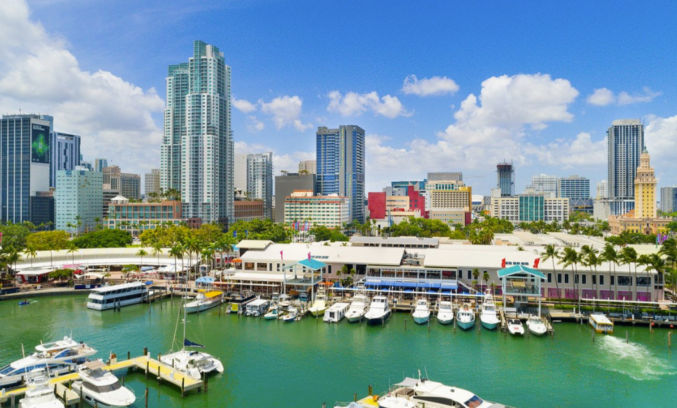
Bayside Marketplace
Enjoy a drink along the water (or on it), snagging a seat at one of Bayside Marketplace’s big-name restaurants or setting off on a sunset cruise touring Biscayne Bay’s islands.
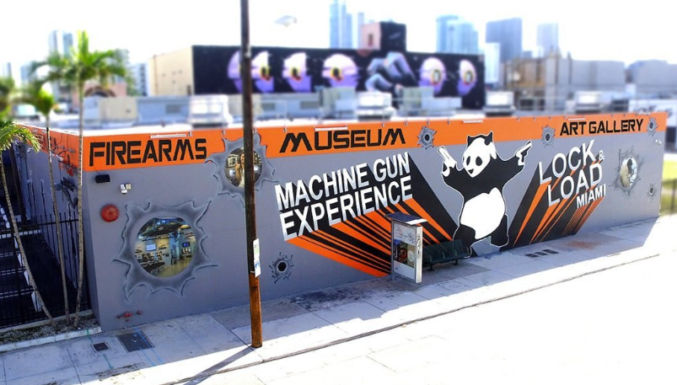
Lock & Load Museum
Look at all sorts of guns and practice shooting some.
ARTECHOUSE MIAMI
Art + Technology Museum
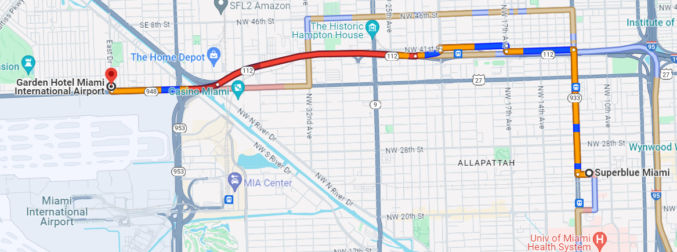
Superblue Miami Immersive Art Experience
Explore a mirrored labyrinth, see digital worlds immersed in seasonal flowers and waterfalls, and watch your own heartbeat as it glows with 3,000 lights.
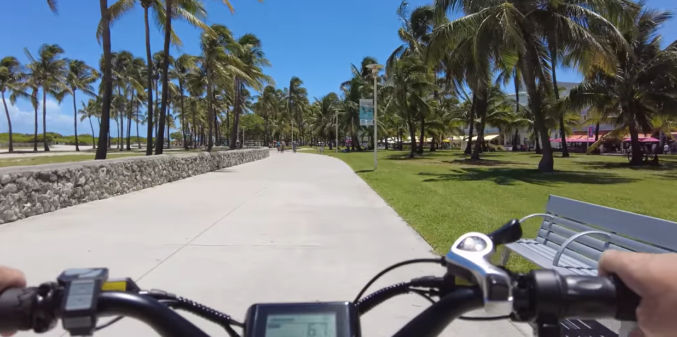
E-bikes are prohibited on all sidewalks in Miami Beach, including along the Beachwalk. They are also prohibited on South Pointe Park and Pier, Marina Baywalk, and Lincoln Road Mall.
However, Florida state law allows e-bikes to be operated in the same locations as regular bicycles. This means they can be ridden on: Roads, Bike lanes, Bike paths, Multi-use paths, Sidewalks.
If your e-bike is class 1 (or maybe 2) and limited to 20mph, you should be legally allowed on the beach.
Florida allows all classes of e-bikes, including Class 3 e-bikes — provided they don’t exceed speeds of 28 mph. The bike also can’t have an electric motor power with a wattage exceeding 750.
Miami Beach also has 11 miles of green bicycle lanes.
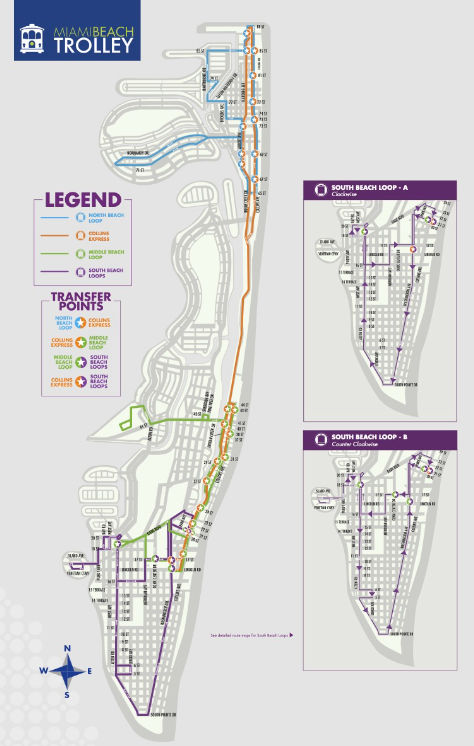
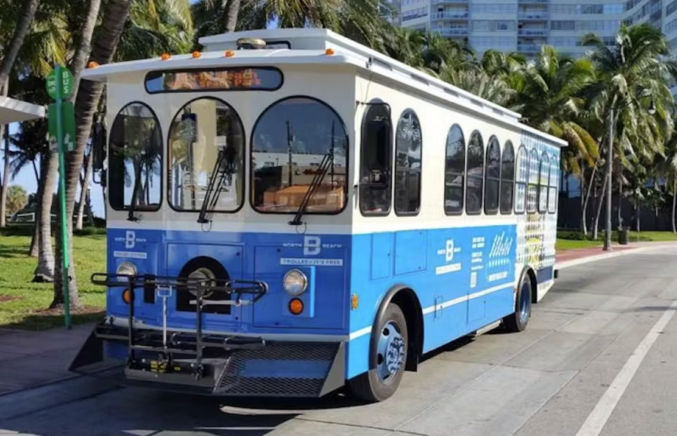
Free Miami Beach Trolley
From 8 a.m. to 11 p.m., 7 days a week at approximately 20-minute average service frequency along each route.
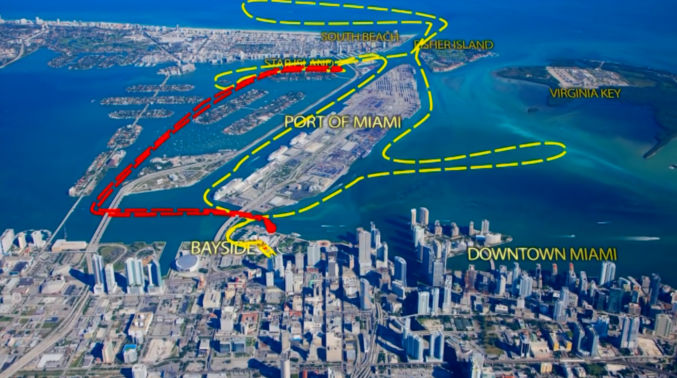
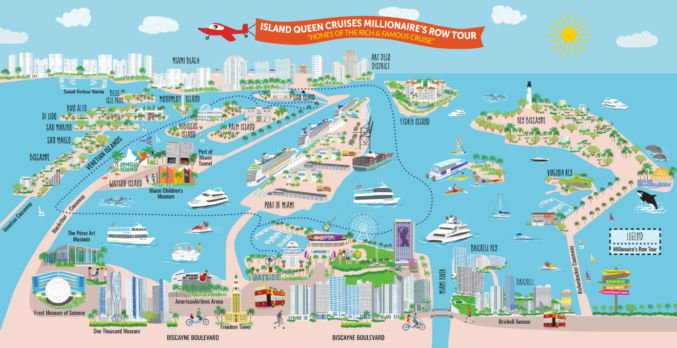
Explore Miami aboard a fully-narrated bilingual sightseeing cruise along scenic Biscayne Bay – a top-rated thing to do in Miami! Cruise around Biscayne Bay and see the spectacular coastal sites including the beautiful downtown Miami skyline, the Port of Miami, Fisher Island, Miami Beach and “Millionaire’s Row™” – the Homes of the Rich and Famous™.
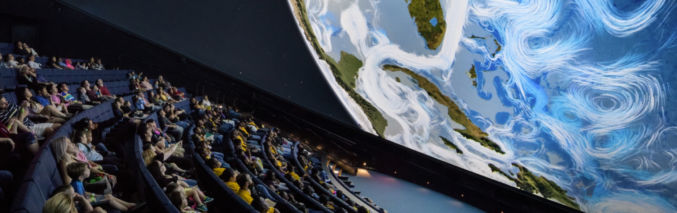
This is a science museum, aquarium and planetarium. The cutting-edge 250-seat Frost Planetarium takes you on visual joyrides that both thrill and educate. Though it might seem like you’re really hurtling through space or weaving through a coral reef or DNA strand, that ultra-real immersive experience is the result of a 16-million-color 8K visual system using six 3D-capable projectors and surround sound. The dome is tilted forward at 23.5 degrees, allowing its 67-foot span to fill your field of vision as if you’re flying—imagery comes at you from above, below and the peripheral edges, creating a nearly 360-degree view of whatever world you’re in.
Española Way is a historic street in Miami Beach, Florida. It’s located between 14th and 15th Streets, between Washington Avenue and Pennsylvania Avenue. It’s a pedestrian-only street with shops, galleries, restaurants, and bars.
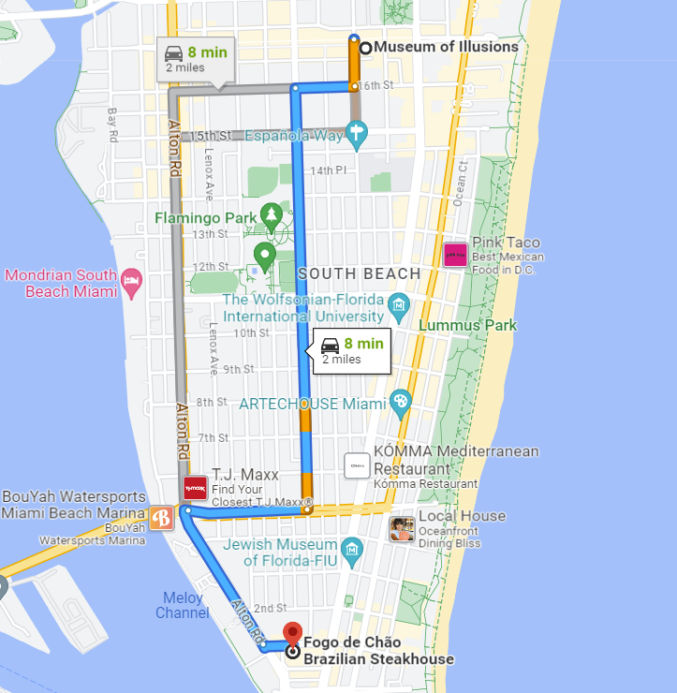
Experience stunning 3D illusions and art at the Museum of Illusions in Miami. Capture memorable, interactive photos and have fun with friends and family.
Lincoln Road Shopping District
Miami Beach’s Lincoln Road is one of the most unique shopping districts in the world, full of stunning architecture, world-class culture and destination retail stores spanning 8 blocks.
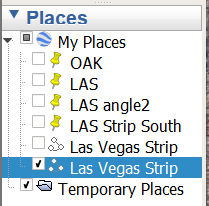
In Google Earth Pro for Desktop, you can record a tour in real time by clicking the navigation controls or by clicking on saved placemarks. However, unless you are just moving from one point to another, the resulting tour may not be as smooth as you’d like. For example, if you have three placemarks, then as you click each placemark while recording the tour, the transition between placemarks will not be smooth.
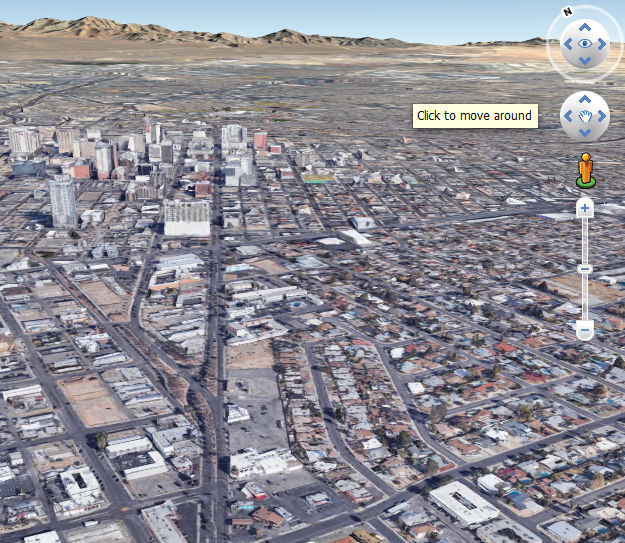
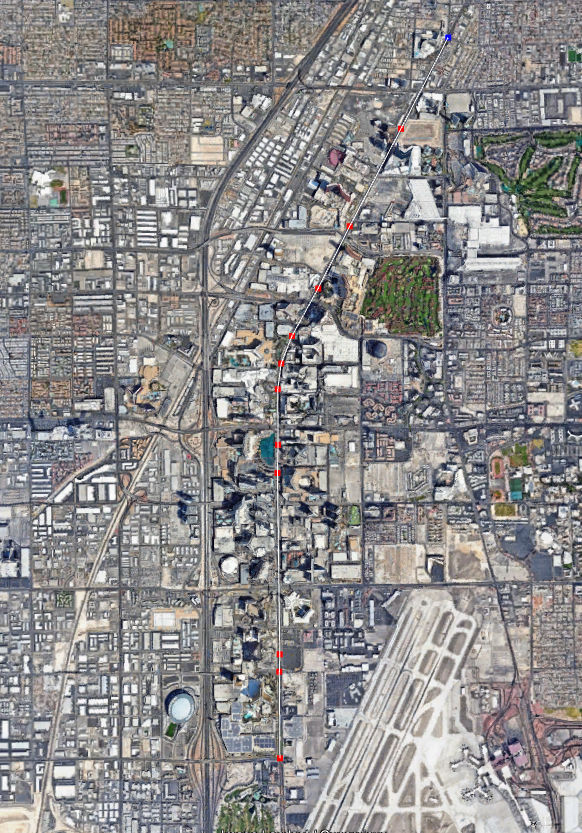
To create a smooth tour that appears as if you are flying a plane or drone at a fixed altitude along a multipoint path, you need to create a path in Google Earth. Here’s an example. Let’s say we want to fly along the Las Vegas Strip.
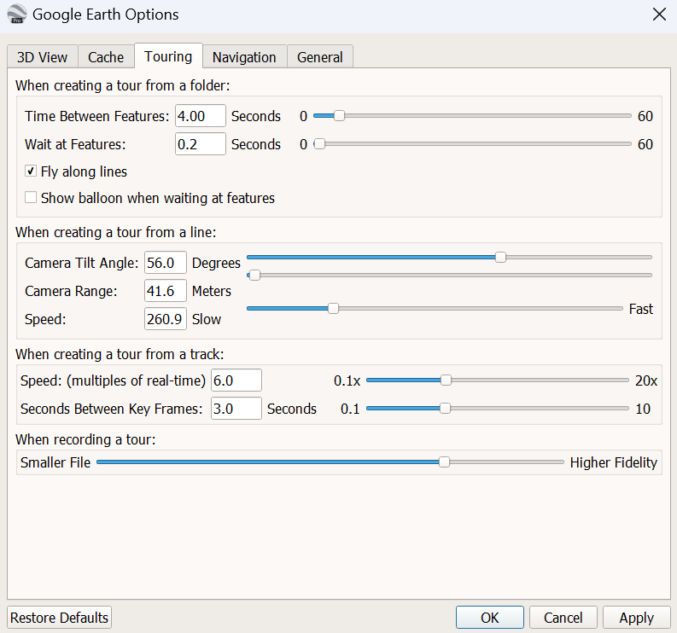
Change Settings
Go to Tools > Options > Touring and change the settings as in this screenshot. Make sure to click the “Apply” button and the “OK” button to save your changes.
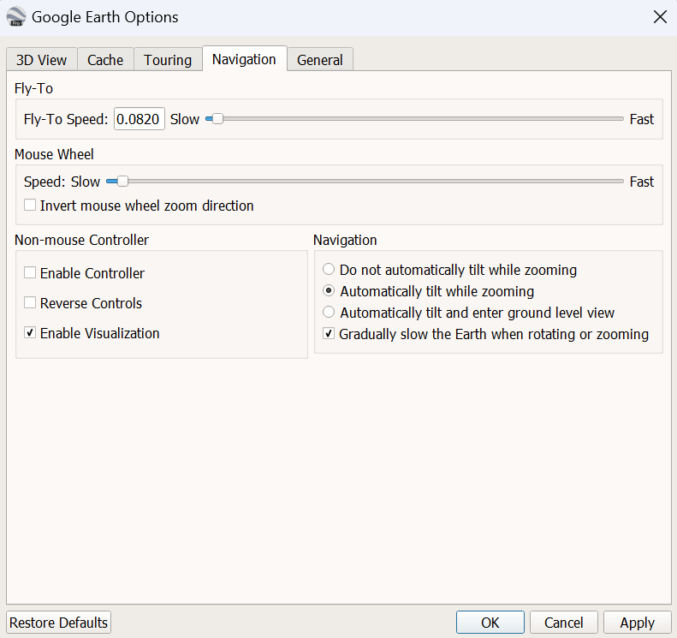
Now, click the “Navigation” tag and change the settings to match this screenshot.
Create Path
When adding a path, your mouse pointer will turn into a crosshair and you will need click to add points along your desired path. In this mode, you will not be able to zoom, change altitude, direction or pan by clicking on the screen because doing so would add path points. If you need to move around, you’ll need to use the navigation controls.
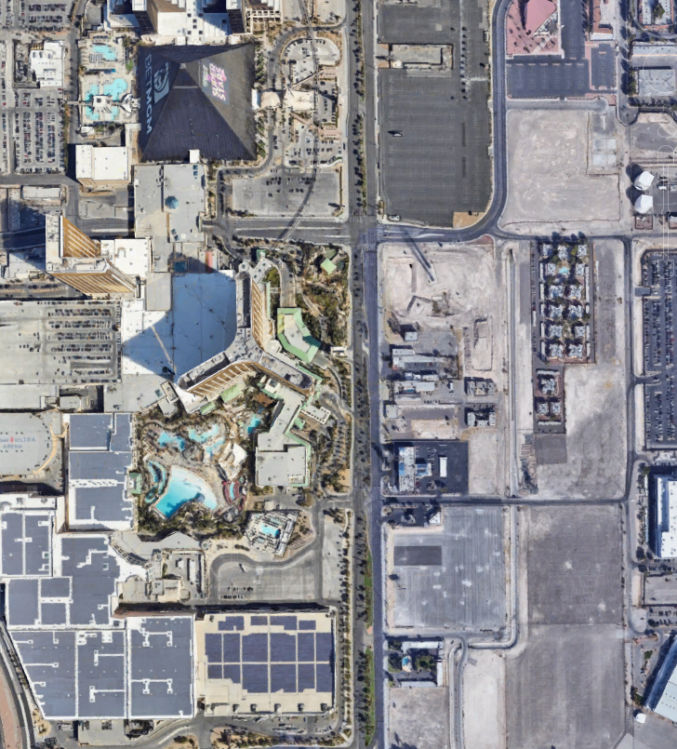
When creating a path, I find it easier to have your view facing straight down to the ground like this. In this example, my starting point will be just south of the south end of the Strip before the Mandalay Bay.
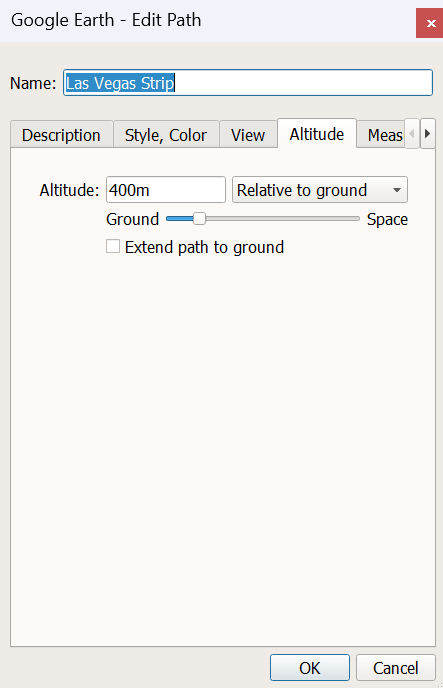
Click Add > Path
A dialog window will pop up. We’ll name the path “Las Vegas Strip”. Let’s also specify the altitude we want our flight path to be from the ground.
Click the “Altitude” tab.
Set Altitude to “400m” for 300 meters.
Make sure “Relative to ground” is selected.
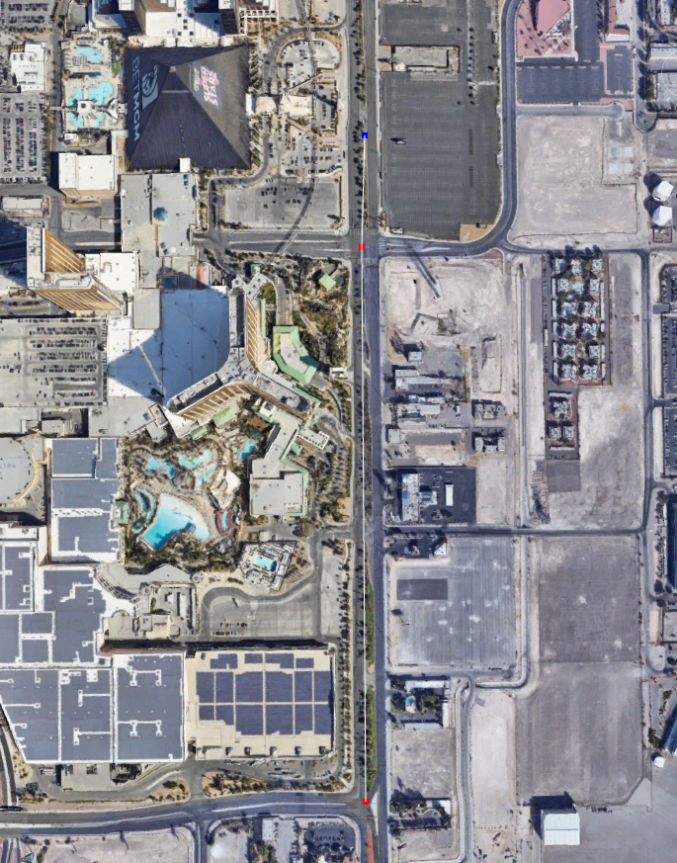
Click to add path points
In the screenshot below, you’ll see that I created 3 points. From bottom to top, there’s 2 red points and 1 blue point.
Since I need to pan to the north to add more points along the Strip, I will use the navigation control up arrow to do so.
After adding all the last point (just north of the STRAT), I zoomed out to check the entire path. As you can see, all but the last point are red and the path curves to the right as it goes north.
Now that my path is done, I’ll click the OK button in the path dialog window. That adds the path to My Places.
Since I don’t want to see the white path line / curve, I’ll uncheck the checkbox next to the path name.
To play the path tour, just click the path Play Tour button, as shown below.
If you’re happy with how the tour looks, you can record it by clicking the “Record a Tour” button and then click the Play Tour button.
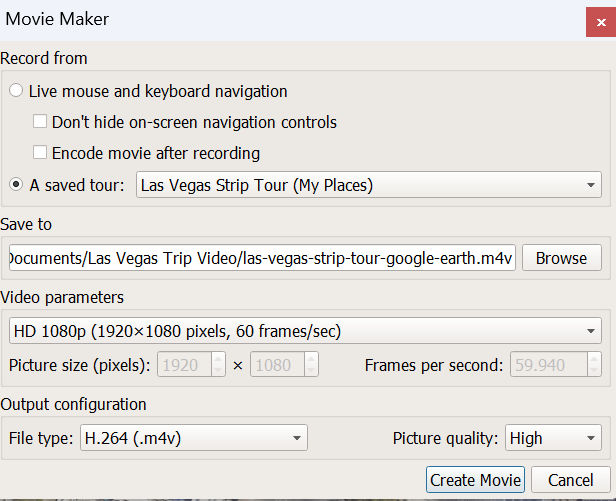
Then click Tools > Movie Maker to export the video.
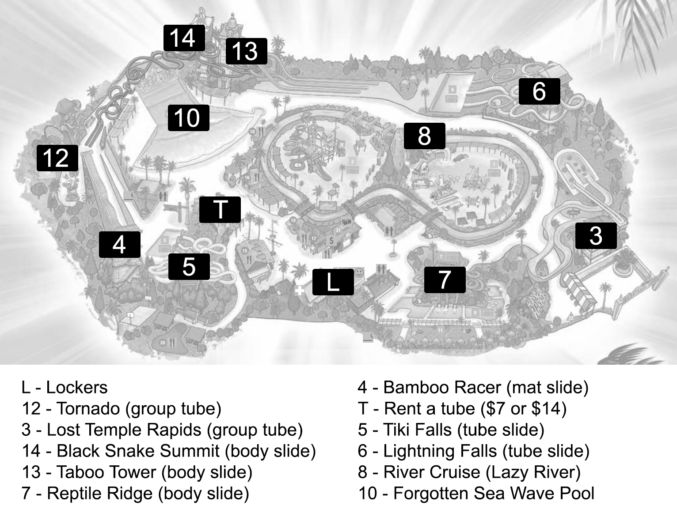
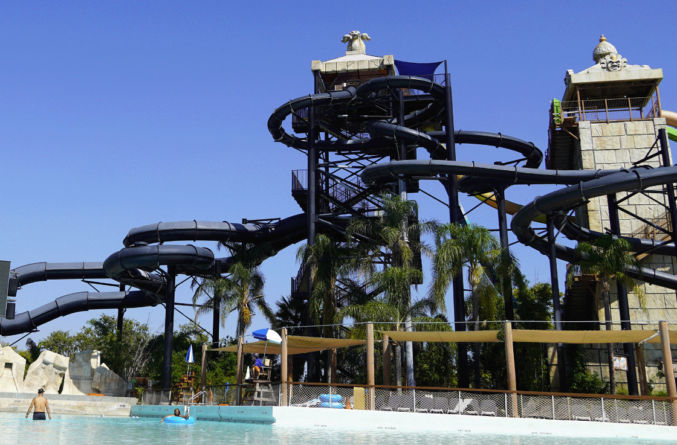
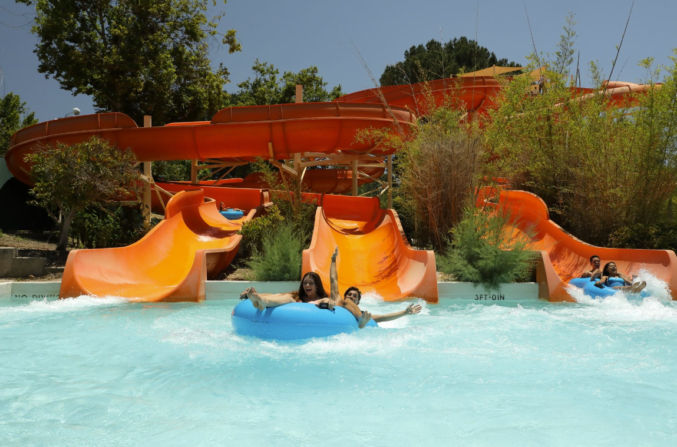
Personal opinion: the wave pool isn’t impressive. There’s only one wave every few minutes. The lazy river is small, but it has a strong current, which is nice.
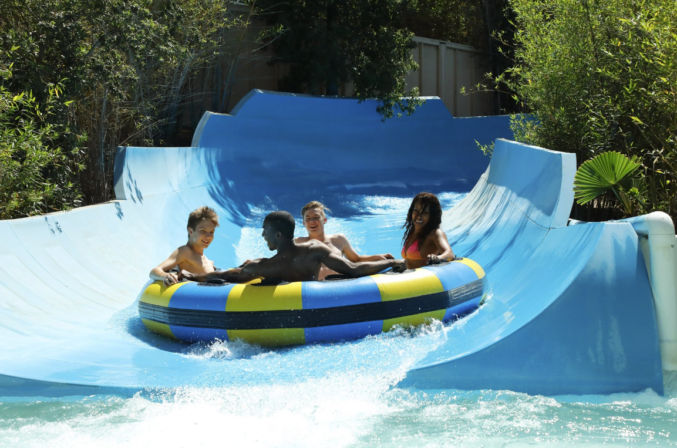
Personal Opinion: This is a relatively small waterpark compared to the ones I’ve tried in Orlando, FL. However, it wasn’t crowded, which meant lines were short. There was a decent variety of rides and they were all fun. The wave pool creates large waves every 5 minutes and they last for maybe 5 minutes. Definitely a lot of fun as the strong waves can push you towards the beach. The lazy river is of decent length, however, the current wasn’t very strong.
Take free tram to Luxor and Excalibur or walk through the enclosed walkway
Luxor
Opened in 1993
4400 rooms
Take pictures of Egyptian architectural theme
Titanic Artifact Exhibition Apr 27 – Sep 4 | 11 AM – 8 PM; Last admission 7 PM Sep 8 – Nov 12 | 11 AM – 6 PM; Last admission 5 PM Nov 13 – Dec 31 | 11 AM – 8 PM; Last admission 7 PM $32
Bodies… The Exhibition Apr 27 – Sep 4 | 11 AM – 8 PM; Last admission 7 PM Sep 8 – Nov 12 | 11 AM – 6 PM; Last admission 5 PM Nov 13 – Dec 31 | 11 AM – 8 PM; Last admission 7 PM $32
See Cirque du Soleil’s Mystere FRIDAY – TUESDAY* 2 Shows | 7 p.m. & 9:30 p.m. Arrive 30 mins early for pre-show entertainment Actual performance time is approximately 90 mins $64 – $135


