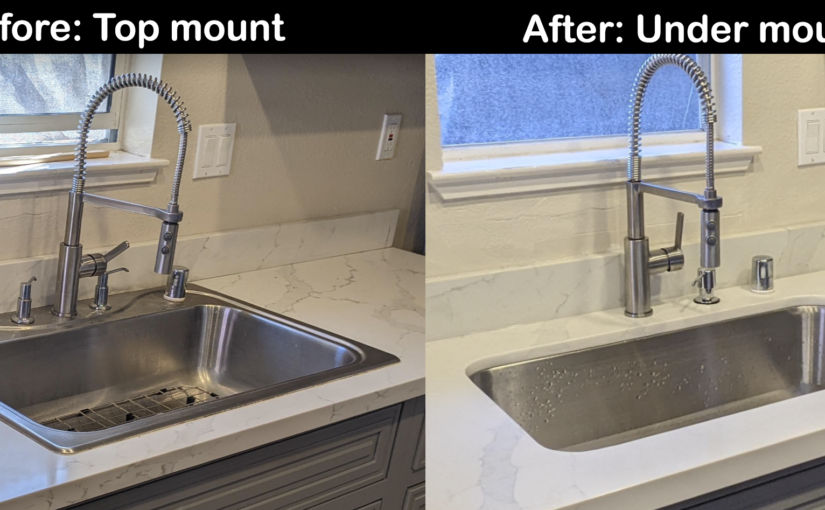
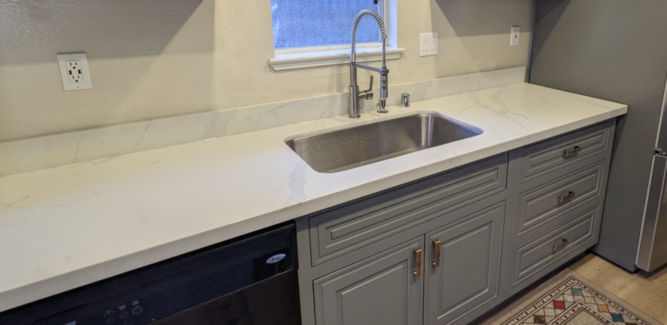
The old sink was the top-mount kind. Water kept leaking behind the sink into the base cabinet.
The same quartz countertop was on sale from $500 to $400 (8-foot-long slab).
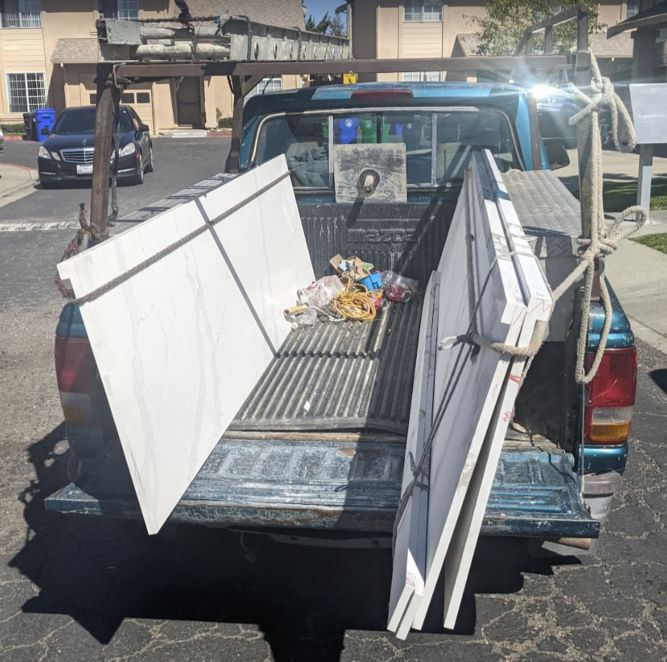
Found a Mexican guy in the parking lot and got him to transport and install the countertop.
The slab was leaning against the side of the truck and secured using a rope.
To remove the old countertop, I placed a towel on top of it and hit it with a sledgehammer to break it up into small pieces without pieces flying everything.
It actually didn’t take long to remove the old countertop.
I then unscrewed the old plywood and threw it away.
For an undermount sink, you need at least 19/32″ thick plywood. I had Home Depot cut a 4×8′ plywood sheet in have to make two 2×8′ sheets.
I was able to fit both 2×8′ sheets in my car 🙂
I screwed the plywood into the base drawers. There was moisture damage and a hole in the wall which I had to fix.
I patched up the hole and smoothened the wall surface.
That 19/32″ thick plywood should be strong enough for the undermount sink.
I found an 18-gauge undermount sink (30″ x 18″ x 9″ deep) at HD Supply for $175.
The installers cut a hole in the plywood for the sink. They should have used a jigsaw to make the hole.
They cut the countertop outside because it produces a lot of dust.
First, they cut the slab to length. Water was needed to keep the blade from getting too hot and keep dust from going everywhere.
Here, he’s cutting the hole for the sink using an angle grinder. I think he should have used a circular saw to make a straighter cut.
He then polished the edges while his assistant squirted water.
The sink didn’t come with a paper template for cutting a hole in the plywood and countertop. An easy way to mark an outline where to cut the whole is by turning the sink over, sticking your hand into the drain hole, and using a pencil, mark the perimeter.
I had them drill 3 holes: one for the faucet, one for a soap dispenser, and one for the dishwasher.
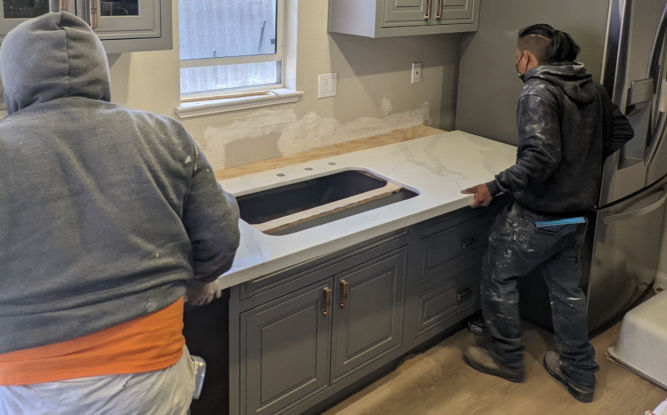
They put extra strong construction adhesive along the perimeter of the sink hole where the sink lip will sit. They also put it on the plywood in various places to secure the countertop to the plywood.
They then glued the backsplash to the wall and applied silicon to the joint.
When smoothening out silicone or caulk, you should always use a tool like the Husky 3-in-1 caulk tool. The triangular edge makes for a perfect finish.
When installing the p trap, I chose the flexible kind that you can cut to length. It’s much easier than fooling around with metal or PVC drain parts and it never leaks.
If you’re making a burger and your meat is not frozen, then you can stick a thermometer in your patty and let the thermometer beep when the meat is at your desired temperature. The problem with this is you may have to flip the burger one or more times and, if your patty is thin or not dense, it may be difficult getting the thermometer probe in the center and staying there. If your patty is frozen, like it is at many stores that sell packages of burger patties, then you can’t stick a thermometer in it.
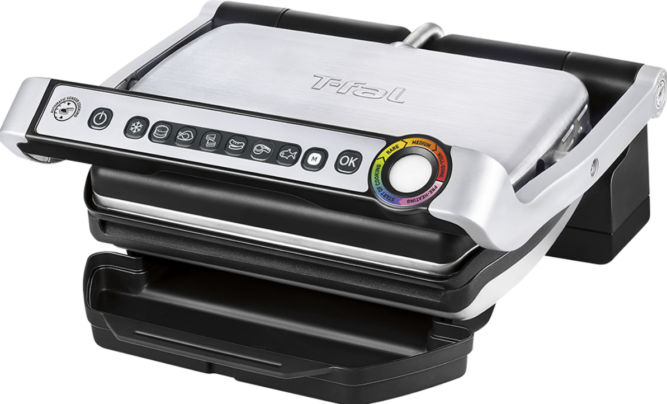
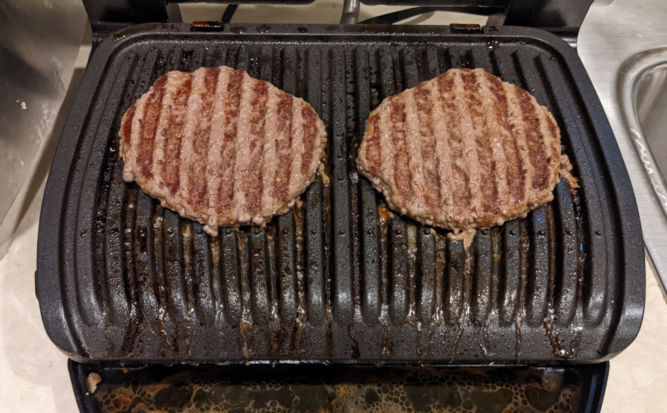
Frozen burger patties may not taste the best, but they are still good. Since they’re frozen, they will last long as well. To simplify the cooking process, I use the T-fal Optigrill. It grills both sides and has a drip tray to catch all fatty juices.
Here’s how to cook a frozen beef patty in the simplest way possible.
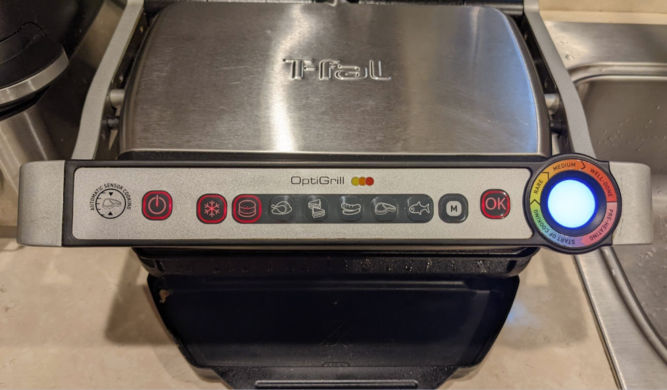
Press the power button to turn on the Optigrill
Press the snowflake button because your patties are frozen
Press the burger button since we’re making a burger. The Optigrill will heat up as indicated by the blue light. This takes about 5 minutes.
When the Optigrill beeps, it’s done heating up. Open the lid and place your patties.
The Optigrill will beep and change color every time the meat reaches a doneness level.
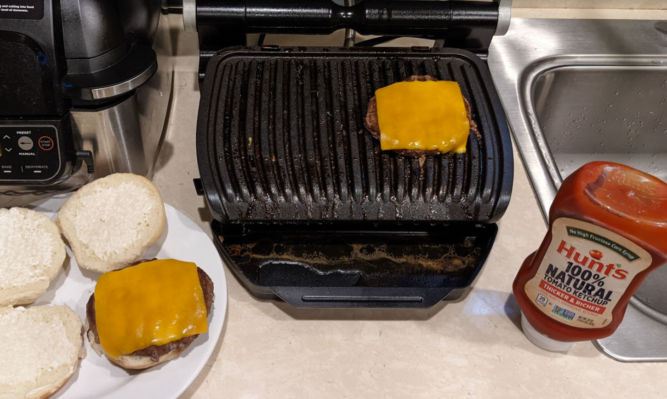
When the Optigrill has reached your desired doneness based on the color of the doneness cycle, remove your patties. In my experience, it takes about 7 minutes to get to medium-well.
For the buns, Artesano Bakery Buns are pretty good. Don’t toast these buns. They taste good as is at room temperature.
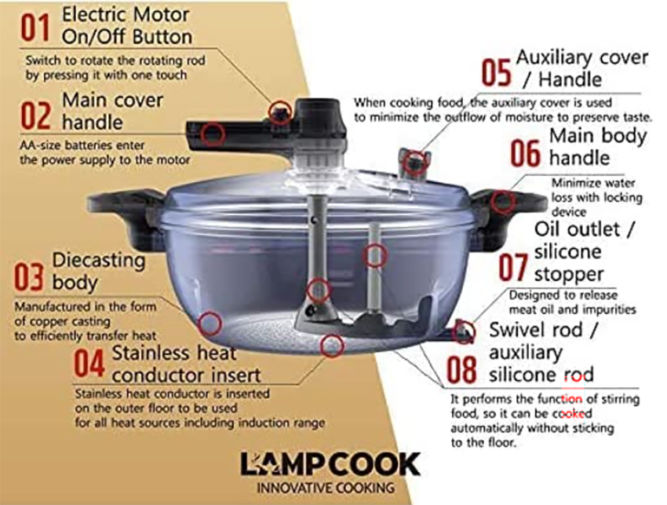
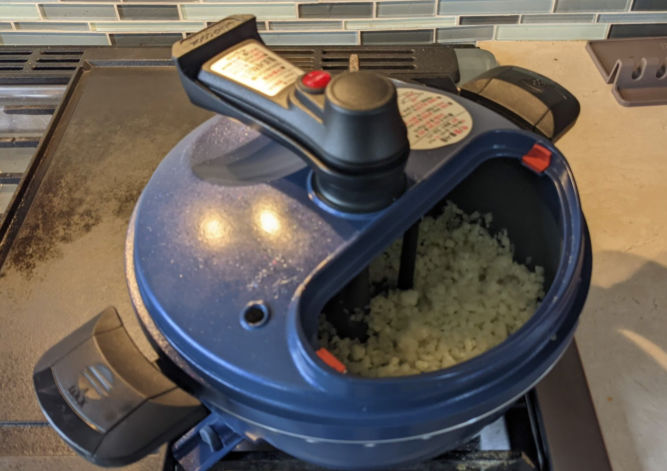
One thing I really dislike when cooking is having to occasionally stir the food. This is the case with fried rice, soups, and stir-fried vegetables. Fortunately, the Koreans feel the same way. A company called LAMPCOOK with the slogan “Innovative Cooking” sells this (overpriced) automatic pot stirrer on Amazon for $155. I normally would spend that much on a pot, but like I said, I really dislike manually stirring food every so often for 10-20 minutes while cooking.
I’ve had the pot for a couple of weeks now and it actually works. But, you can’t put it over heat higher than medium. If you do, you’ll see discoloration at the center.
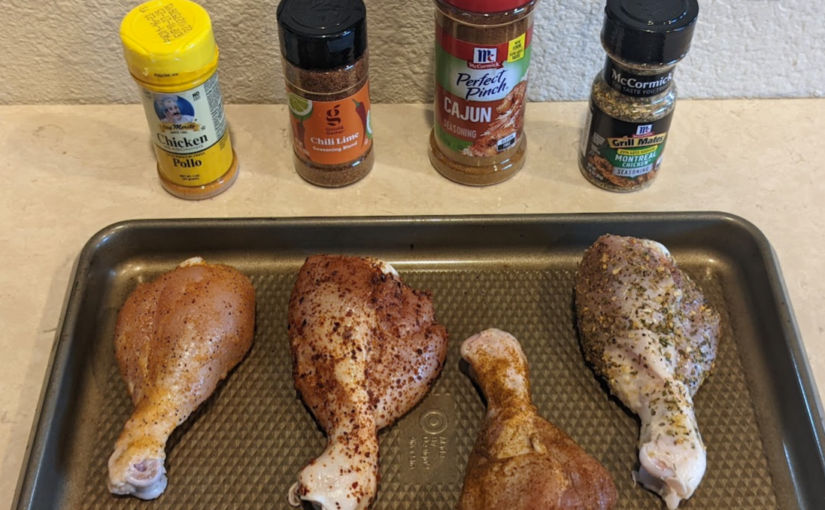
There are many spice blends available for chicken. But, which one is the best? I tasted 7 different ones and scored each on a scale of 1 to 10. The winner goes to Target’s Good & Gather Chili Lime seasoning followed closely by Chef Merito Chicken seasoning and McCormick Perfect Pinch Rotisserie seasoning.
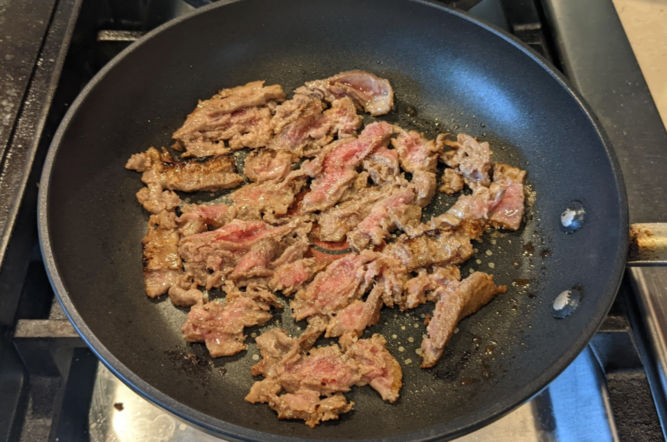
1x patty of Steak-EZE Thinly Sliced and Shaped Sirloin Steak Strips, Frozen
4 x eggs
1 x 10″ diameter tortillas (the whole wheat carb balance kind has 110 calories, the flour kind has 210 calories)
Shredded cheddar cheese
Olive oil
Instructions
Warm up the tortilla in a 10″ pan on low heat
Put 2 tbsp of olive oil in a small 8″ pan on medium-high heat
Add the steak patty and cook patty for 2 minutes
Flip patty and cook for another 2 minutes
Using a heat-resistant silicon spatula, break the patty into small strips.
Transfer steak strips to a strainer over a small bowl and press to squeeze juices out. This will limit how much juice will leak through the bottom of the burrito and make a mess.
Flip the tortilla and cook the eggs. I prefer to scramble them.
Turn off the heat to the eggs before they’re done because they will continue to cook on their own
Sprinkle some shredded cheese on the eggs, add the steak, and mix
Transfer the mixture to the tortilla
Let the mixture cool a bit while washing the dishes
Cherry-picking individual commits to merge them from one git branch to another is a very common practice. For me, I usually cherry-pick one or more commits from a develop branch to a master / main branch. The problem, however, is when I need to cherry-pick multiple commits made over a long period of time, like one month. Most git clients don’t make it easy to filter commits by keyword, and if they do, then they don’t let you easily select all filtered commits. So, back to the command line it is.
This post will describe one way to easily find all commits matching one or more keywords and extract their commit IDs on one line so you can quickly run the git cherry-pick command.
Step 1: Find and review filtered commits
We usually prefix our commit messages with an identifier so we can filter them amongst many other commits. For example, all commits to related to one project may have a commit message prefix of “LP:8929” where, in this case, “LP” stands for Landing Page. Sometimes, we might accidentally use an equal sign (=) instead of a colon (:). So, we’ll have one or more keywords to search commit messages when we filter all commits.
Furthermore, we usually cherry-pick commits from a develop branch to the master branch while we’re on master. The following command does the following:
Command
Description
git log
get the git log
master..develop
as we’re on the master branch, get the log from the develop branch
--oneline
format the output in one line (short format)
--grep='LP:8929' --grep='LP=8929‘
filter results to only results containing either ‘LP:8929’ or ‘LP=8929’
-i
do a case-insensitive search
git log master..develop --oneline --grep='LP:8929' --grep='LP=8929' -i
48b1cbcef51 LP:8929 - Fixed images path by using imagekit variable
8efa19678b3 LP:8929 - Fixed text alignment
3ab0954c725 LP:8929 - Updated banner and VS page on the landing page
bba58a1c5eb LP:8929 - Updated main heading of features section
fb56da3b134 LP:8929 - Updated content and created carousel as per the requirement
c7c6d50fbdb LP:8929 - Updated styling of the page
bc8a7fc38a1 LP:8929 - Updated icons of the comparison section
9a90ccb91ad LP:8929 - Updated text styling
a3bc0baf65f LP:8929 - Updated headshots and styling of the page
13977d2eb12 LP:8929 - Updated content as per the doc
7e589debba8 LP:8929 - First Pass: Created Landing page of Tenable v Qualys competitive page
Now that we have our list of commits, we need to review them to make sure they are correct. In our case, we primarily want to make sure the keywords are at the beginning of the commit message since that’s our commit message format.
Step 2: Extract commit IDs
If our list of commits is correct, then we need to extract the commit IDs. However, the git cherry-pick command requires the list of commit IDs to be in chronological order. By default, the git log output is in reverse chronological order. Here’s the updated command with some modifications.
Command
Description
--reverse
Reverse the git log output to chronological order
awk '{print $1}'
Extract only the text output in the first column (commit IDs)
Now that we have our list of commit IDs in the correct order, we can copy it, type “git cherry-pick” and paste the list to create a command like the following.
Svelte is a JavaScript framework similar to React, Vue, etc, but with some fundamental differences that I think make it better. It’s also much more intuitive to understand as the web component structure of the code is dead simple. When building an app using Svelte, you’re encouraged to use Sveltekit, the official Svelte application framework. But, if you just want a simple frontend-only site/app, then you can just use Svelte (without Kit). In doing so, you can then easily take the built CSS and JS files and include them in any existing web page. Then, you just add a simple div
<div id="app"></div>
in your existing HTML file where you want the app go to.
Here’s an example.
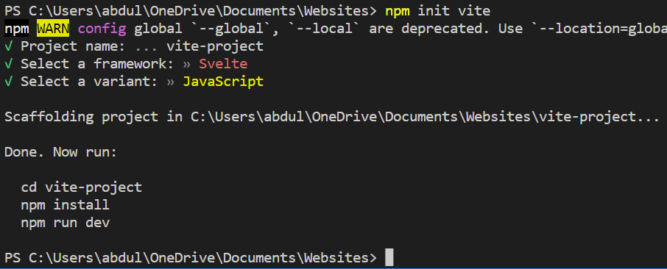
Create a Vite Project
Vite is a front-end build tool and dev server. It includes Rollup to bundle and optimize assets. Run npm init vite and follow the prompts. As you can see in the screenshot below, I chose the default project name of “vite-project”.
This will create a folder named after your project and create some files and folders within it.
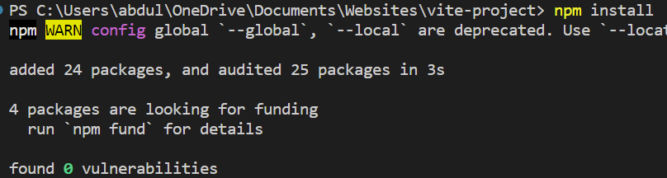
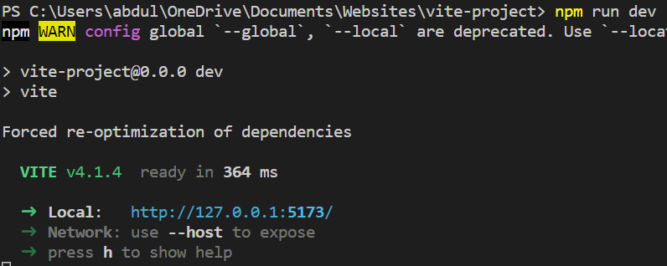
Then, as the instructions say, run the commands
cd vite-project
npm install
npm run dev
npm install will download the node packages specified in the package.json file into the node_modules folder.
Start Dev Server
npm run dev will launch a dev server. Running the dev script starts a program called Vite. Vite’s job is to take your application’s source files, pass them to other programs (including Svelte, in our case) and convert them into the code that will actually run when you open the application in a browser.
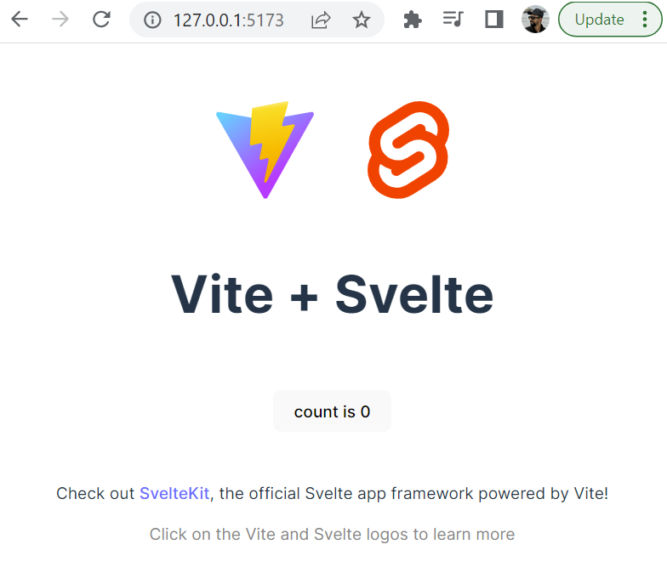
If you go to the local URL http://127.0.0.1:5173/, you will see the starter Svelte app that was created automatically.
The app includes a simple interactive counter. When you click the button, the counter increments.
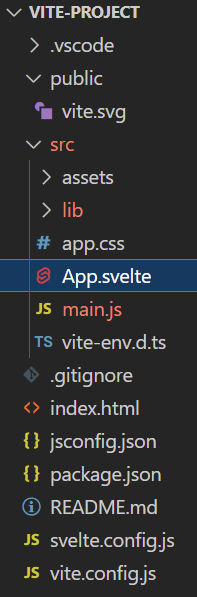
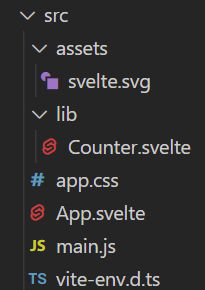
src Folder
If you look at the src folder, you’ll see a few files:
The assets folder contains static assets, like images
The lib folder contains Svelte components. In this case, there’s the counter component.
app.css is a global CSS file for the entire app
App.svelte is your main app code. In this case, it imports the svelte.svg logo and the Counter component.
<script>
  import svelteLogo from './assets/svelte.svg'
  import Counter from './lib/Counter.svelte'
</script>
main.js is the main JavaScript file. It loads your app’s CSS (app.css) and your app’s main code (App.svelte). It will also load the app in the HTML element with ID app.
import './app.css'
import App from './App.svelte'

const app = new App({
  target: document.getElementById('app'),
})

export default app
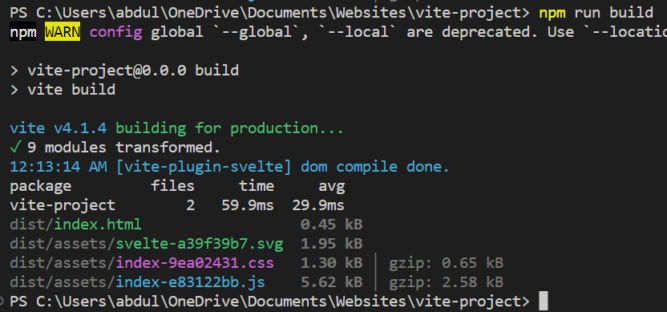
Build the App for Production
When you’re done developing your app (creating components, etc), you can run a build. This will bundle all CSS and JS files into a single CSS and JS file, optimize the bundle (e.g. minify it), and output the production files in the dist (distribution) folder. Run a build with the following command.
npm run build
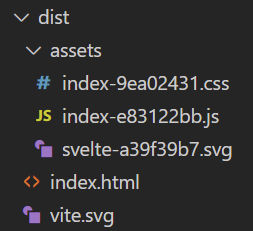
You’ll see a dist folder created. In this case, with the following files:
If you open index.html, you’ll see it references the two bundled CSS and JS files along with a div element with ID app where the app will be injected.
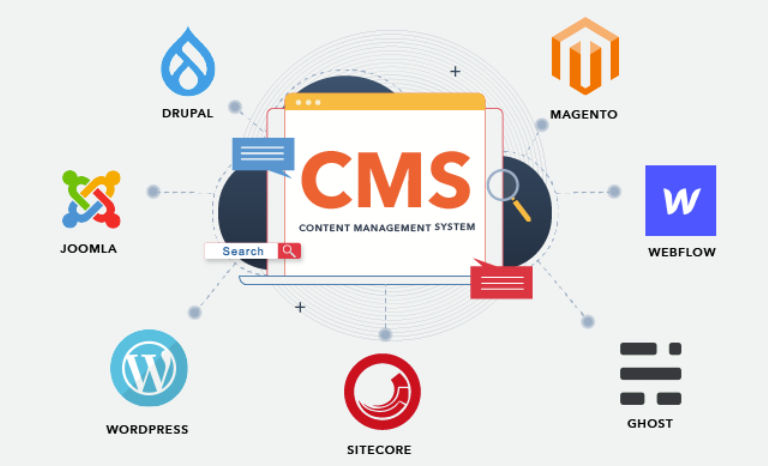
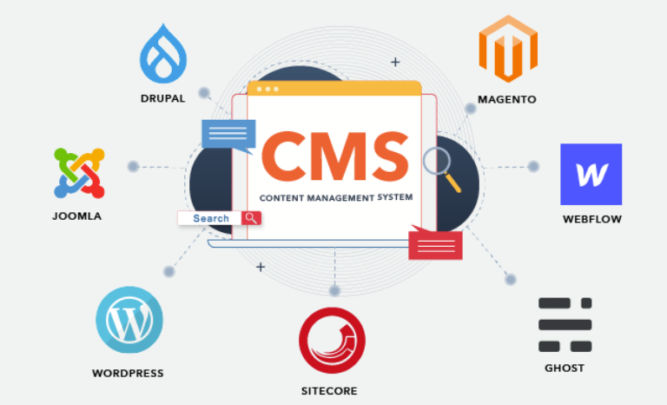
There are many different types of website content management systems. This post will explain the different types and include some examples.
No-Code CMS
A no-code CMS is one where the entire website is managed by the CMS. For example, with webflow, all changes to your website must be done in the CMS using a WYSIWYG. You can only edit the HTML of the code widget. All other changes must be done using the UI. If you want to edit the source code of the entire site, you must export the entire site. But, you can’t import any changes you made from the export.
A database-driven CMS is one that stores some or all data in a database. For example, WordPress is one such CMS. Web pages and blog post content are stored in a database (usually mySQL). Unlike webflow, however, you can edit the source code of the web page templates. WordPress has a built-in versioning system, so you can see a history of changes made to a page.
A headless CMS is one that stores data remotely. Data is integrated with your website using an API. For example, Contentful is one such CMS. You can create custom content models in Contentful. Your website will need to access the data at a particular URL that returns JSON data. Your website will then need to consume that JSON data to process it to show it on a web page, e.g. by using a template engine. Data in Contentful is likely stored in a database.
A git-based CMS stores data in git version control. Unlike many of the other CMSs, this CMS connects to your git repository as a web developer does. It then shows an interface that allows content editors to make edits to files in the repo. CloudCannon is one such CMS. With CloudCannon, web developers can add the class “editable” to HTML tags with a page’s source code. Then, the content of those tags will be the only elements that content editors can edit.
Websites that are built using a static site generator (SSG) often include front matter. Frontmatter can come in different formats. One popular format is YAML. You can have YAML at the beginning of a page’s source code. Or, you can have a separate, standalone .yaml file. YAML contains contain name-value pairs, so they basically represent data. Netlify CMS is one type of CMS that supports editing YAML. It also supports editing pages like blog posts. However, unlike WordPress, where editors can add blocks of content to a page’s body, Netlify CMS requires the blocks of content to be predetermined upfront. So, for a blog post using Netlify CMS, editors can only use one widget to entire the entire body of the page. That widget is a rich text or markdown editor.
The CMSs above can be categorized as CMSs that support structured and unstructured data. CloudCannon supports unstructured data because you can let editors edit specific elements of a complex page by marking those elements as “editable”. YAML and database-backed CMSs support structured data because there is a clear name/value mapping.
My Preference
Since WordPress is the most popular CMS and it allows editors to add blocks of different types of content to the body of a page, I think it’s worth using. However, I don’t like that WordPress keeps data in a database and relies on PHP to build pages before serving them. Also, not all pages need to be edited by non-technical people. In fact, most pages will still be edited by developers who need full access to the source code. To accommodate the needs of both developers and non-developers, I would use GitHub to version all code changes and I would use a static site generator like Eleventy that is integrated with WordPress using the WordPress API. When a WordPress editor saves or publishes a page, WordPress can trigger a save_post() action with a callback function that calls a URL, e.g. a PHP script on Heroku at myapi.com/?postid=123.
function call_commit_script( $post_id ) {
    $remote_url = 'https://www.myapi.com/?postid='.$post_id;
    $access_token = '3&^&2lhl3@#lsjk756'; //some secret password
    $args = array(
    'headers' => array(
       'Authorization' => 'Bearer ' . $access_token,
       ),
     );
    $response = wp_remote_get( $remote_url, $args );
    if ( is_array( $response ) && ! is_wp_error( $response ) ) {
        $headers = $response['headers']; // array of http header lines
        $body    = $response['body']; // use the content
    }
    $post_title = get_the_title( $post_id );
    $post_url = get_permalink( $post_id );
    $subject = 'A post has been updated';
    $message = "A post/page has been updated:\n\n";
    $message .= $post_title . ": " . $post_url\n\n$body;
    // Send email to admin.
    wp_mail( '[email protected]', $subject, $message );
}
add_action( 'save_post', 'call_commit_script' );
The PHP script on Heroku could then
verify the Authorization Bearer header contains the predetermined access token value, e.g. 3&^&2lhl3@#lsjk756. If it doesn’t, then the request didn’t come from an authorized origin and should be rejected.
pull any latest changes from GitHub
call the WordPress API to get the page content in JSON format, e.g. https://www.mywordpresssite.com/wp-json/wp/v2/pages/123
commit the JSON data to GitHub
use the static site generator to build the page using the JSON data as the data source
Note: the PHP script on Heroku, e.g. https://www.myapi.com/?postid=’.$post_id, must be secured by SSL/TLS to encrypt the URL and headers so that attackers can’t see the authorization header value.
For allowing non-technical people to
edit simple YAML files or frontmatter, I’d use Netlify CMS.
edit complex, structured data, I’d use Contentful.
edit specific, unstructured content, I’d use CloudCannon.
This tutorial will guide you to create a documentation website using Github and Netlify using the MkDocs static site generator. Even though MkDocs is designed for documentation, it can be used to quickly create simple websites with a navigation menu. Since I’m on Windows, this tutorial is for users on Windows.
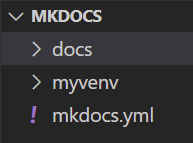
Let’s create a folder where our website project will be. I’ll call mine mkdocs at C:\Users\abdul\OneDrive\Documents\Websites\mkdocs.
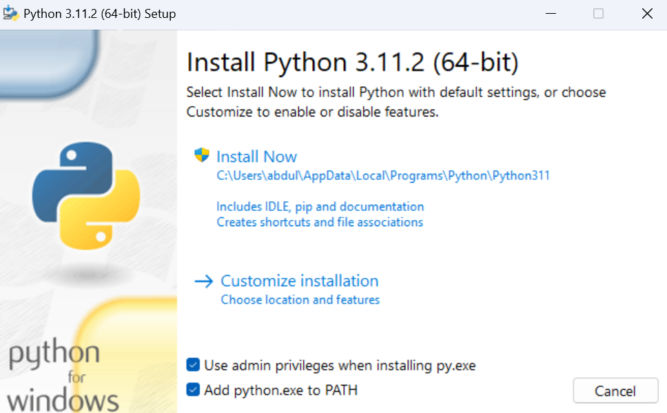
Install Python
If you don’t have Python installed, you’ll need to install it. Visit Python and download the executable. When installing, be sure to check the box to “Add python.exe to PATH” is checked.
Verify python was installed by running
python --version
You may need to close and reopen the command prompt for this to work.
Install pip
pip is a package manager for python. If you just installed python, then pip will likely be installed. Test this by running the following command
pip --version
I have pip version 22.3.1. This version may be out of date, so let’s update it with
python.exe -m pip install --upgrade pip
Now, when I run pip --version, I see a newer version installed.
Create a Virtual Environment
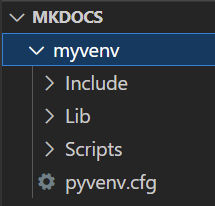
A python virtual environment is a tool that helps to keep dependencies required by different projects separate by creating isolated python virtual environments for them. This is one of the most important tools that most Python developers use. In a terminal, go to your project folder and run the following command. venv can be any name you want.
python -m venv myvenv
This creates a folder called myvenv in your project folder containing a bunch of folders and files.
Activate Virtual Environment
Now we need to activate our virtual environment. Remember: this must be done every time you begin working on your project. You’ll know you’ve activated the virtual environment if the command prompt prefix shows the name of your virtual environment.
Windows
On Windows, we have to activate it by moving into the virtual environment folder and running Scripts\Activate.
Notice how the command prompt prefix is now myvenv.
Linux/Mac
If you’re on Linux or Mac, use the following command from the project root folder.
source myvenv/bin/activate
where myvenv is whatever name you gave your virtual environment.
Install mkdocs-material theme
You can have different themes with mkdocs. The best theme is mkdocs-material so we’ll install that one. Go back to your project root folder and run the following command.
pip install mkdocs-material
This will download the mkdocs-material dependencies in myvenv\Lib\site-packages folder.
Create a New mkdocs Site
Now, let’s create a new mkdocs site by running the following command in our project root folder.
mkdocs new .
This will create 2 files.
mkdocs.yml is a configuration file.
index.md is a documentation page.
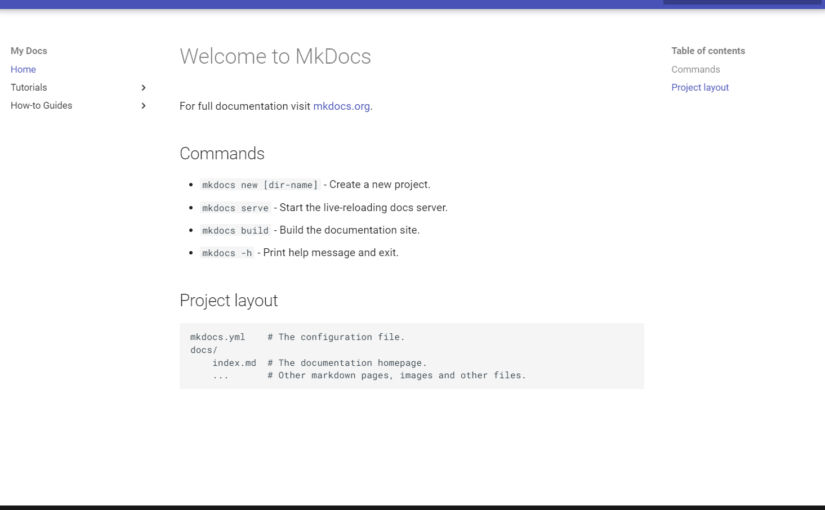
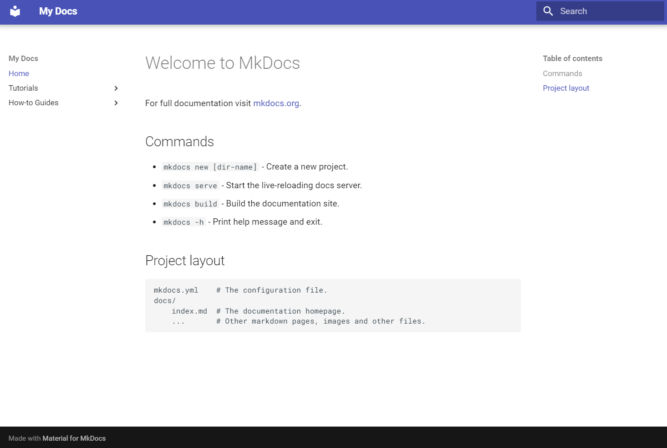
Preview the Site
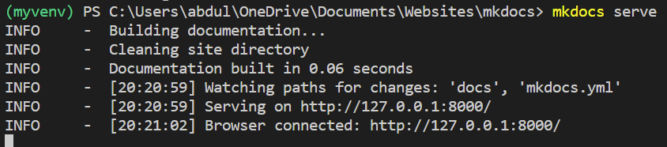
MkDocs comes with a built-in dev server that lets you preview your documentation as you work on it. Make sure you’re in the same directory as the mkdocs.yml configuration file, and then start the server by running the following command:
mkdocs serve
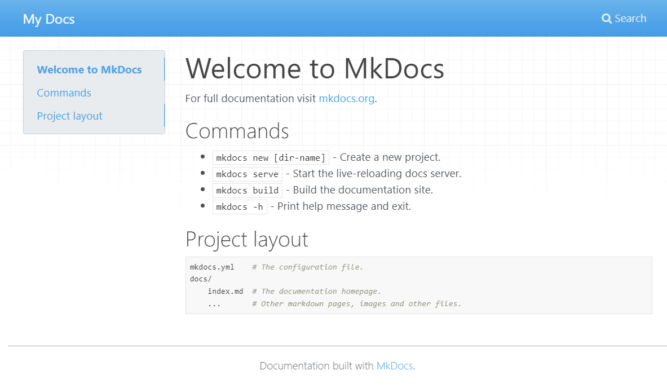
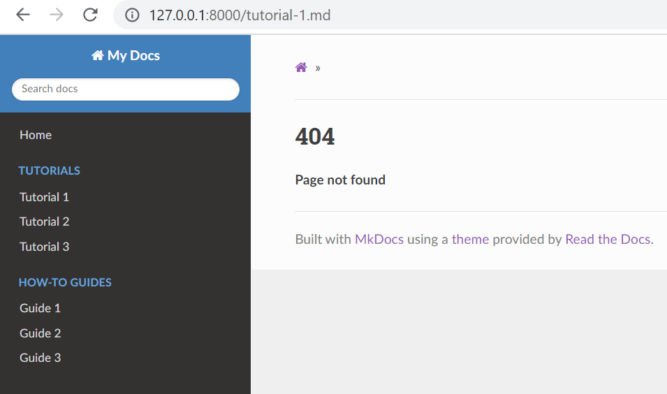
Now we have a dev server. If you open http://127.0.0.1:8000/ in a browser, you’ll see the index page.
Customize The Site
Open mkdocs.yaml to make the following changes.
Change Site Name
The default site name is “My Docs”. You can change it here.
site_name: My Docs
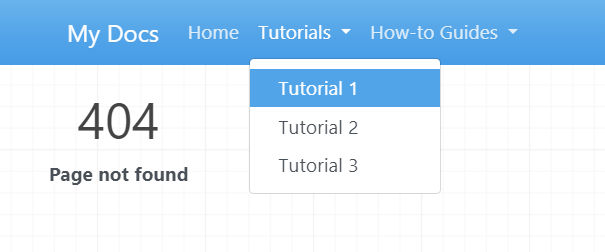
Add Pages to Site
Add an order, title, and nesting of each page in the navigation header by adding a nav setting. For example,
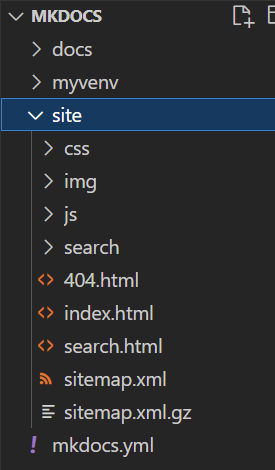
So far, we’ve been previewing the changes to the site. There are still only 2 files. Let’s build the site. In another terminal window, run the following command.
mkdocs build
This creates a site folder containing the built HTML files and other files.
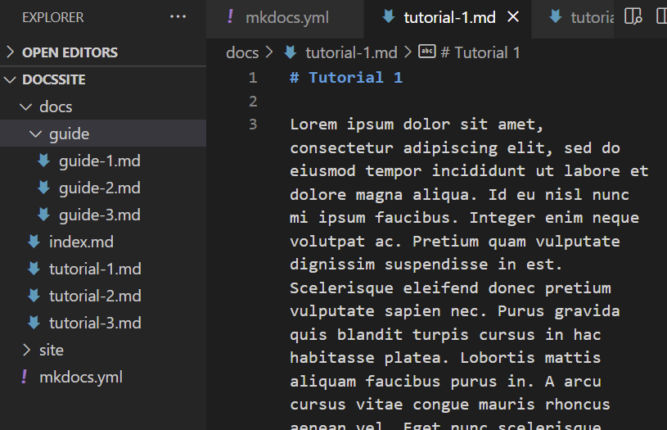
Create Pages
We have our nav menu, but we don’t have pages the nav links to. Let’s create those pages now. The file name and path should match what’s in the mkdocs.yaml config file and the source files should be in the docs folder. I just created some placeholder page content for demonstration purposes.
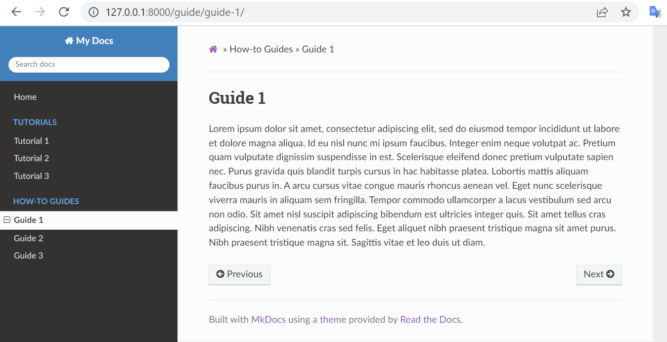
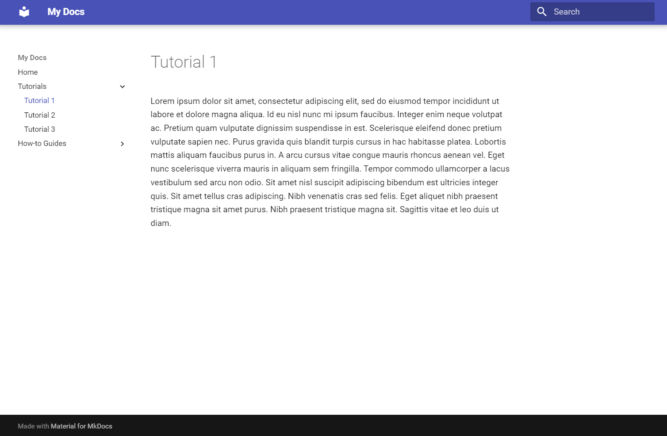
Now, our documentation website is starting to look good.
Change the Theme to the Material Theme
Let’s change the theme to the Material theme by updating the mkdocs.yaml file.
theme:
    name: material
When you do this, your dev server may crash. Just restart it with mkdocs serve. And just like that, our theme is now the Material theme.
Customize the Theme
You’ll notice that in your source code, there are no theme files. There are different ways you can customize the theme as described in the official manual. You can also create a new theme. Theme files use the Jinja2 templating engine.
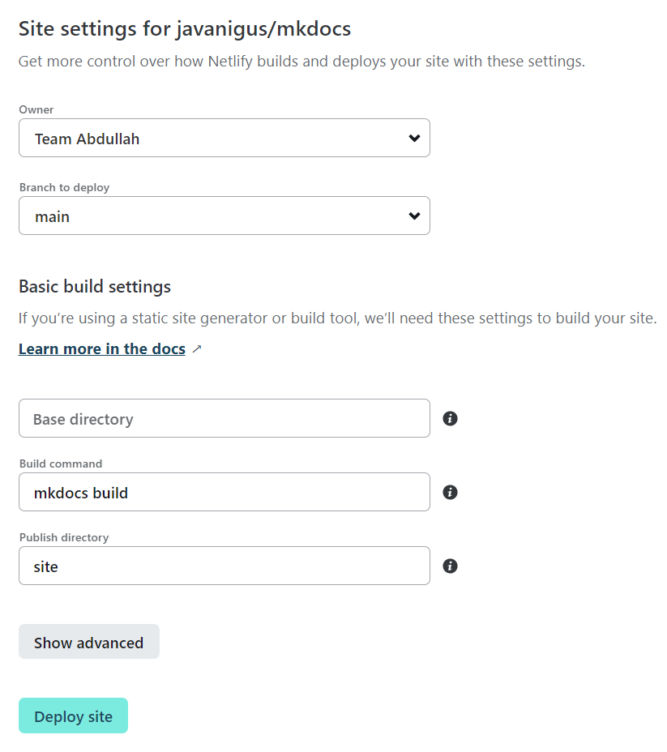
Deploy to Netlify
In order to deploy to Netlify, we need
runtime.txt (a file that specifies the version of python to run)
requirements.txt
netlify.toml
GitHub account
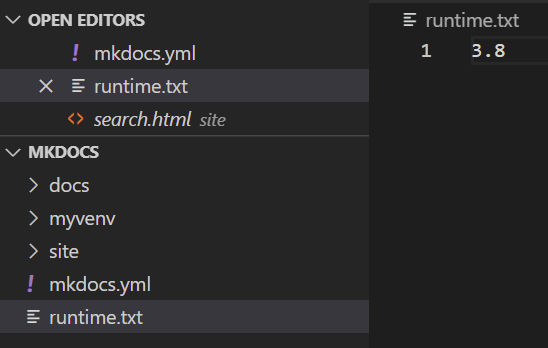
Create runtime.txt
Create a file in the project root with the version of python you want Netlify to use when building the site. The current latest version of python that Netlify supports is 3.8. The version number must be x.y (major and minor versions only, no patch numbers).
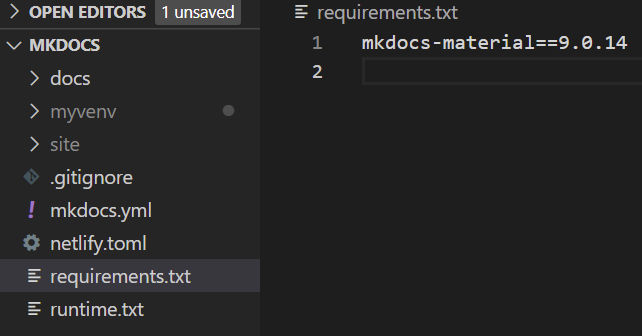
Add requirements.txt
This file will list software dependencies and versions. Create a requirements.txt file with the following
mkdocs-material==9.0.14
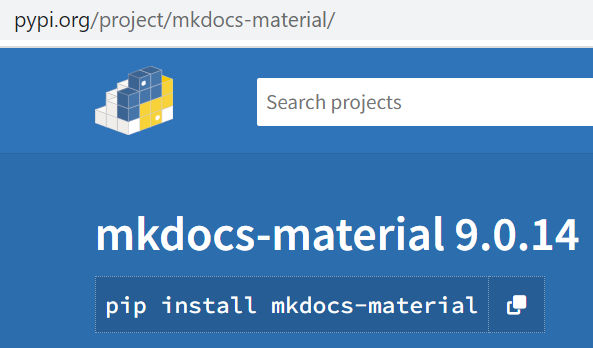
You’ll end up with a requirements.txt file similar to this. 9.0.14 is the current version of mkdocs-material pip package at https://pypi.org/project/mkdocs-material/.
Create netlify.toml
netlify.toml is a Netlify configuration file. Create the file and add the following to it.
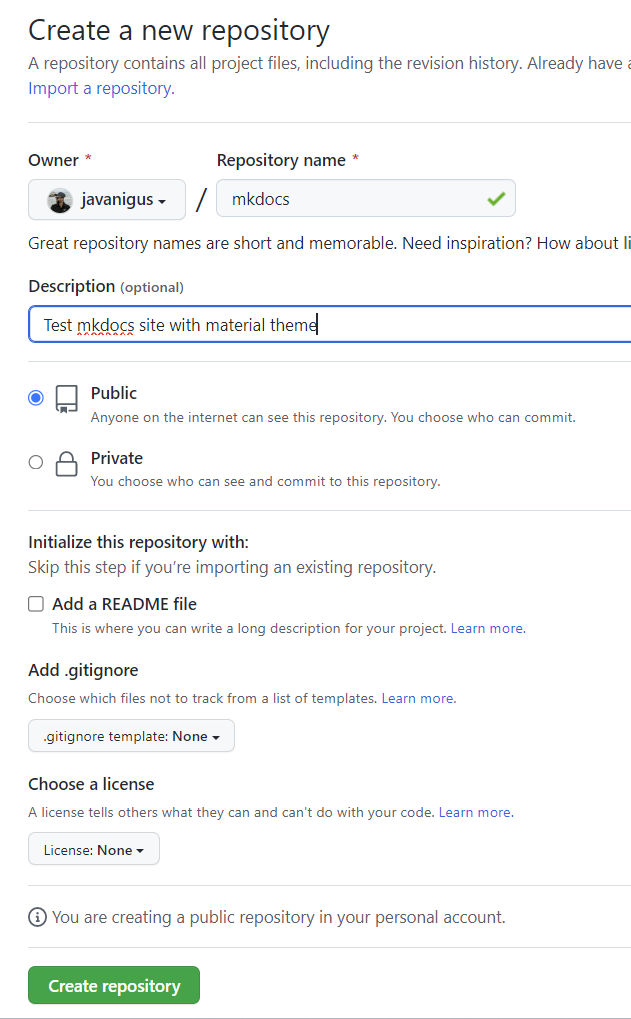
To avoid errors, do not initialize the new repository with README, license, or gitignore files. You can add these files after your project has been pushed to GitHub.
Initialize the local directory as a git repo. If you don’t have git installed, you’ll need to install it first.
Run git init -b main in our project folder. This will create a hidden .git folder.
Create a .gitignore file with the following entries to ignore them from being tracked by git.
site
myvenv
Add the files in your new local repository. This stages them for the first commit.
git add .
Commit the files that you’ve staged in your local repository.
git commit -m "First commit"
At the top of your repository on GitHub.com’s Quick Setup page, click to copy the remote repository URL.