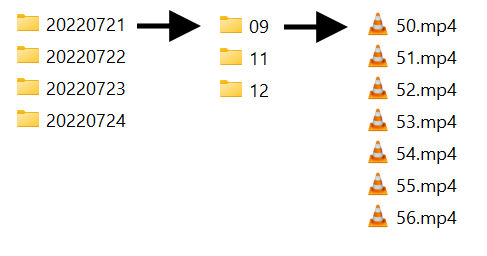
Let’s say you have a bunch of video clips and you want to simply join them together without any fancy transitions or anything. The clips could be from a bunch of short videos you took on your phone, action cam, or maybe even your security camera. In my case, I had 2 Wyze cam security cameras that recorded 24/7 footage to an SD card. Each video clip was one-minute long grouped by folder indicating the hour of the day and then grouped by day of the year.
Your first thought might be to drag all video clips to a video editing tool like Adobe Premiere or Corel VideoStudio and render one combined video. I tried that using VideoStudio but it had to reencode all clips which took a long time. Also, the resulting file size was huge because the lowest encoding settings available were much higher than the source audio and video settings.
LosslessCut
LosslessCut describes itself as the swiss army knife of lossless video/audio editing.
The main feature is lossless trimming and cutting of video and audio files, which is great for saving space by rough-cutting your large video files taken from a video camera, GoPro, drone, etc. It lets you quickly extract the good parts from your videos and discard many gigabytes of data without doing a slow re-encode and thereby losing quality. Or you can add a music or subtitle track to your video without needing to encode. Everything is extremely fast because it does an almost direct data copy.
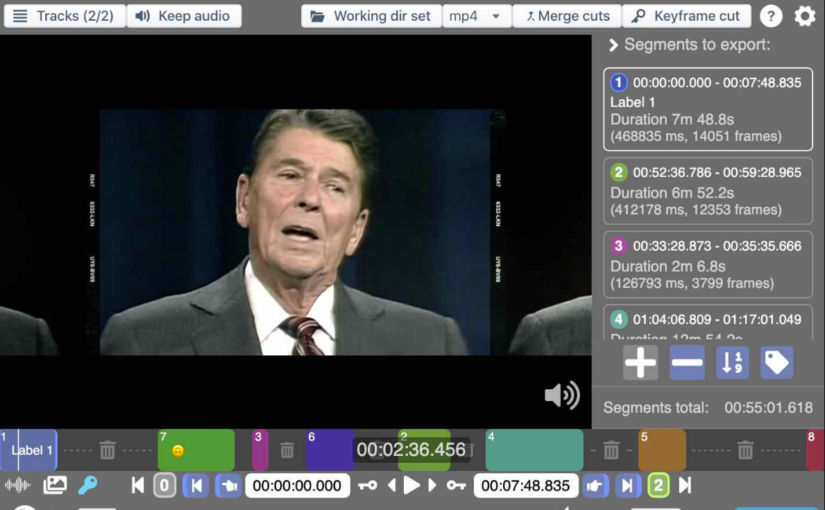
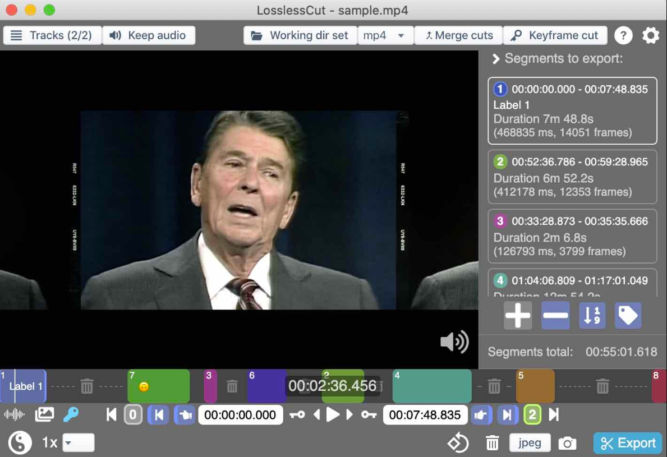
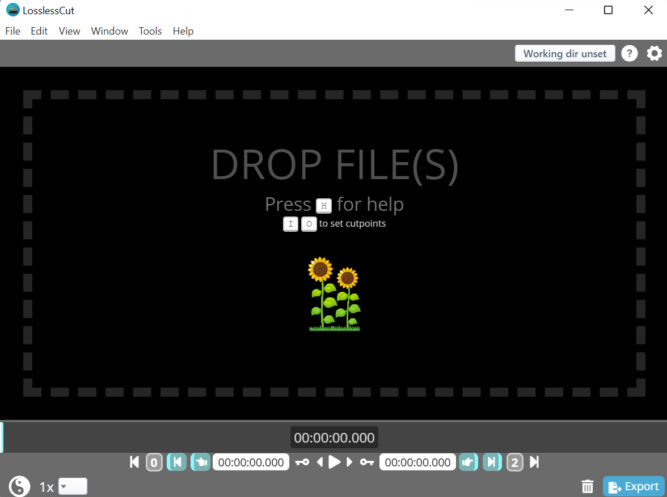
The thing I hate the most about video editing is how long it takes. I tried LosslessCut to join 60 video clips and it completed almost instantly. Drag the files to the window.
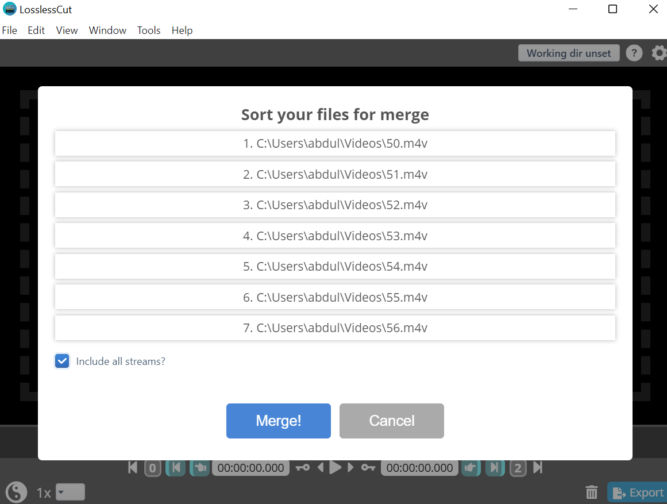
LosslessCut will allow you to sort the files. Just drag a file to the position where you want it to go. Check the “Include all streams?” checkbox and click “Merge!”
Missing Audio
In my case, I couldn’t use LosslessCut directly with the mp4 files from Wyze Cam. I would get this error.
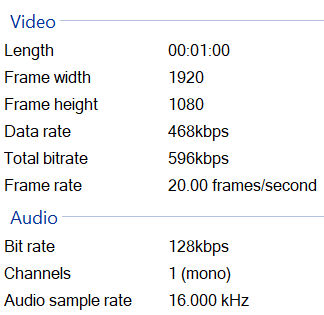
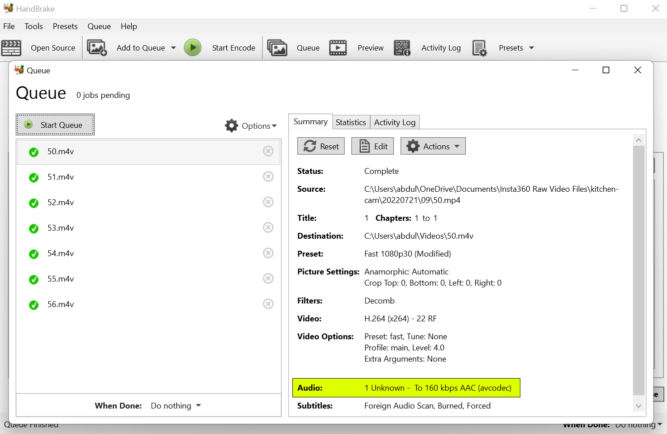
I then converted each file to MOV and then I was able to merge each MOV file. But, when I imported the MOV file into Corel VideoStudio, there was no sound. This seems to be a common issue for many people. Apparently, the audio codec used by Wyze Cam is some unknown one. To remedy this, I first batch converted all video clips using HandBrake while keeping the audio and video quality almost the same. In the screenshot below, you can see the audio is being converted from “1 Unknown” to “160 kbps AAC).
After batch encoding all video clips, I was able to merge them instantly using LosslessCut.
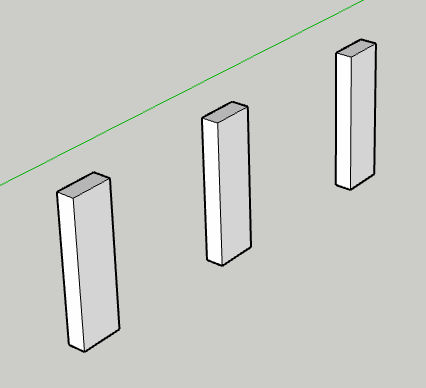
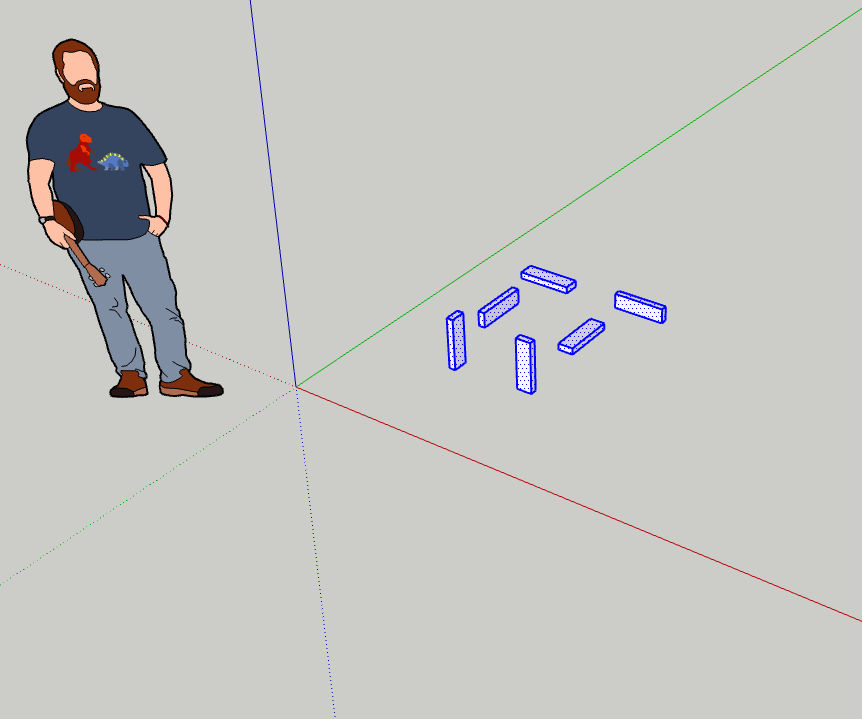
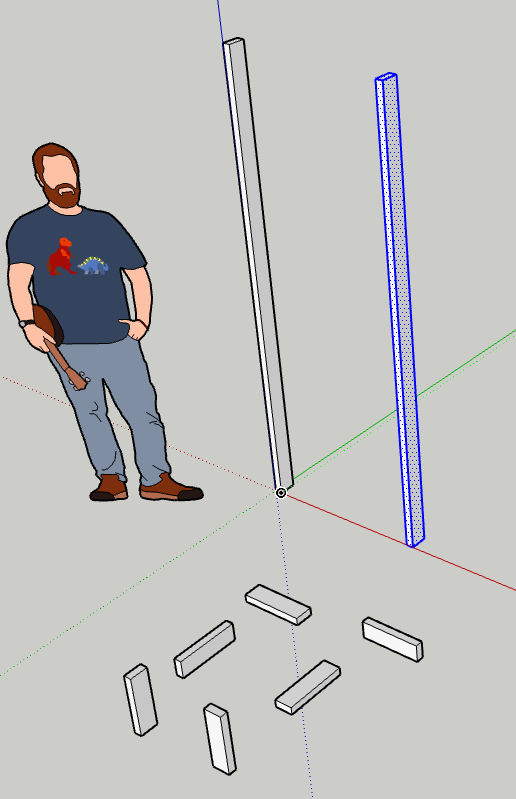
Let’s say you want to make a closet in your garage and you want to create the frame using 2×4 lumber. It’s helpful to draw this in 3D to visualize the design. This post will show you how to do it using the free web version of SketchUp.
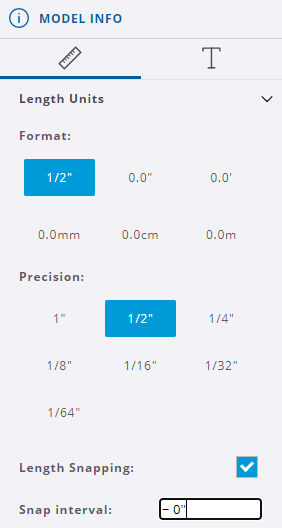
Set length units and precision
First, under Model Info, we set the length format and precision. Since a 2×4 piece of wood is actually 1.5″ x 3.5″, let’s set the length and precision to 1/2″.
Create 2×4 objects that represent stock lumber
To simplify creating the closet frame out of 2x4s in 3D, we’ll first create 2×4 objects that are any length, e.g. 12 inches long, along each axis (x, y, and z). To do this, we’ll first create a 2×4 rectangle as follows:
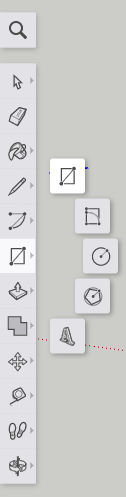
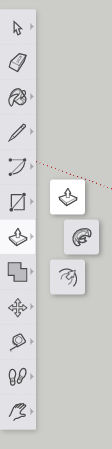
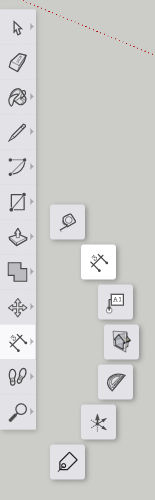
Choose the rectangle tool.
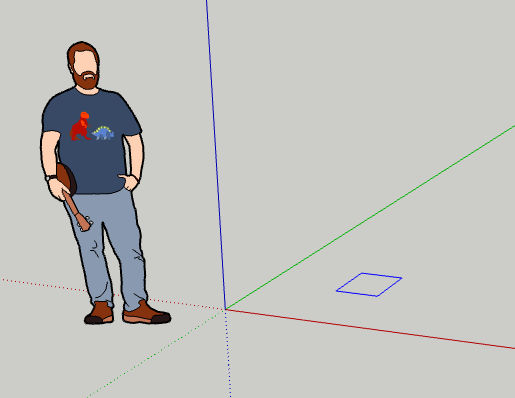
Click and drag anywhere until you see a rectangle.
Before clicking a second time, type “1.5,3.5” (without quotes) to manually specify the dimensions and then hit Enter. What you type will show up in the Dimensions field in the bottom right corner.
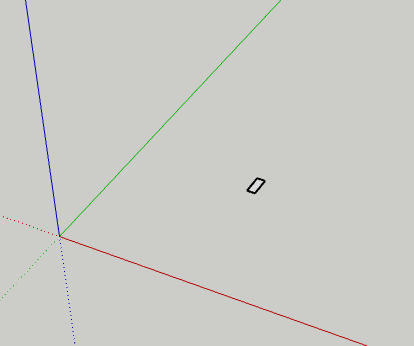
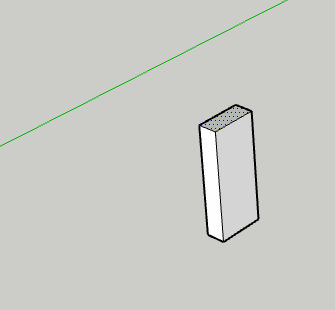
You will see the rectangle as shown below.
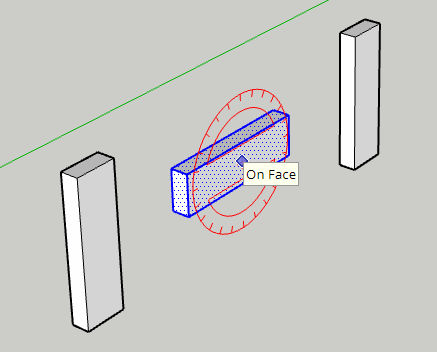
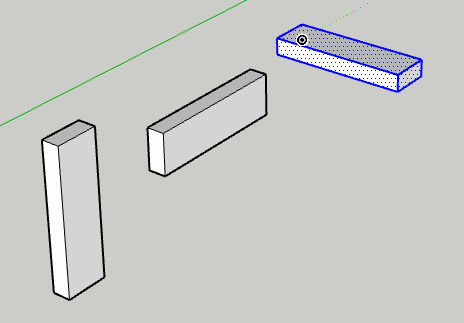
Now, we want to pull the rectangle to create a 12-inch long object representing a piece of wood. Click the Push / Pull tool.
Zoom in, if necessary. Then, click on the face of the rectangle and drag up. Do not click as doing so will set the length. Instead, type “12” (without quotes) to specify the length in inches to pull the rectangle to create a 12″ long 2×4. Then, hit Enter.
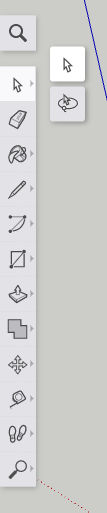
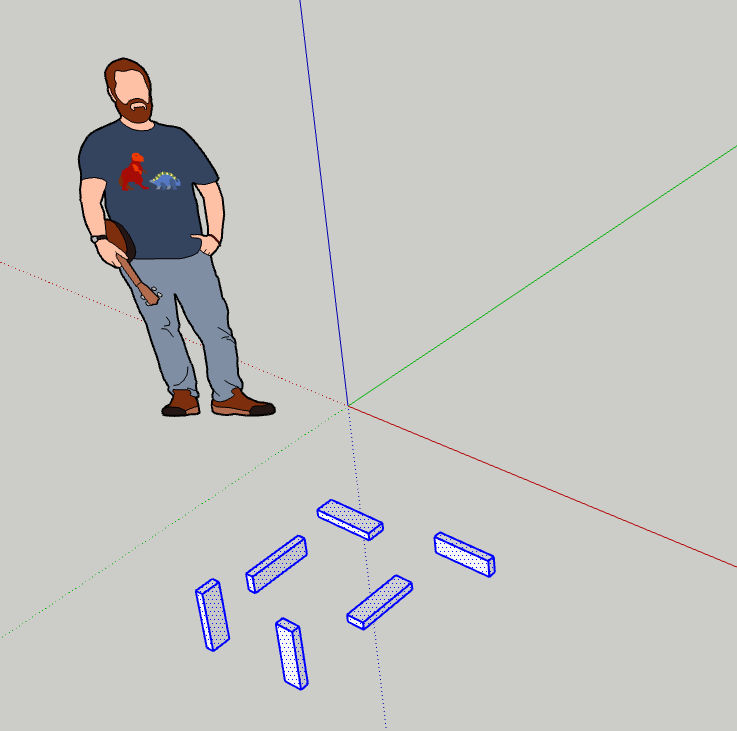
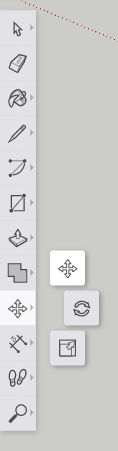
Now that we have one piece of 2×4 in one direction. Let’s copy and paste it twice to create two more pieces in the other two directions. Click the “Select” tool.
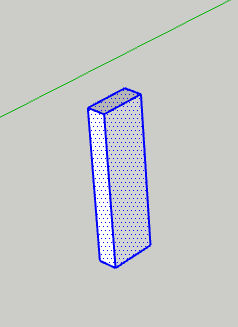
Drag a rectangle around the entire object you just created to select all of it. The object will turn blue as shown below.
Click Copy / Ctrl+C and then Paste / Ctrl+V to paste a clone of that object. Do this twice.
Now, select the 2nd object and then click the Rotate tool.
Click somewhere on the object and then click again to start rotating the object. Don’t click a third time since doing so would set the rotation angle. Instead, type “90” (without quotes) to rotate the object by 90 degrees.
Do the same with the 3rd copy of the object but rotate it in a different direction.
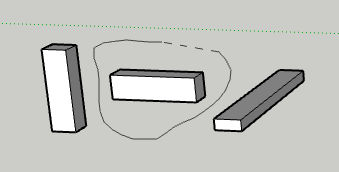
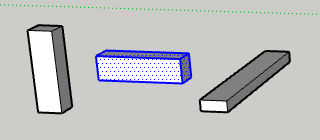
Come to think of it, we should make 3 more copies of the object and rotate them so we can have 2x4s in all 6 perpendicular directions. If you’re having a hard time selecting one entire object using the “Select” tool because it’s too close to another object, try using the “Lasso” selection tool.
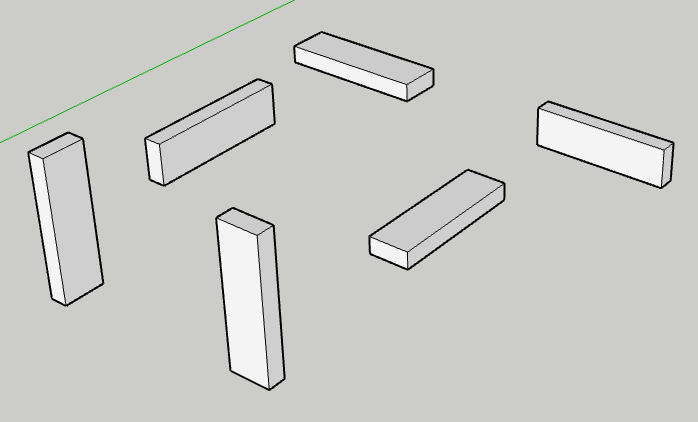
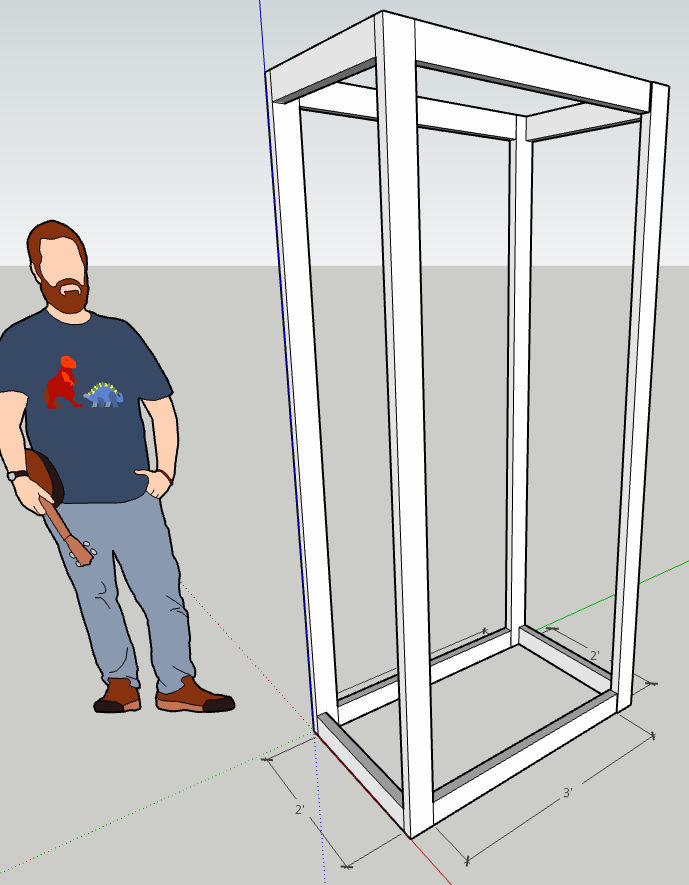
Now we’ve got our 2×4 building blocks which we can move to the side and clone to create the closet frame. I’ll select all 6 objects and move them as shown below.
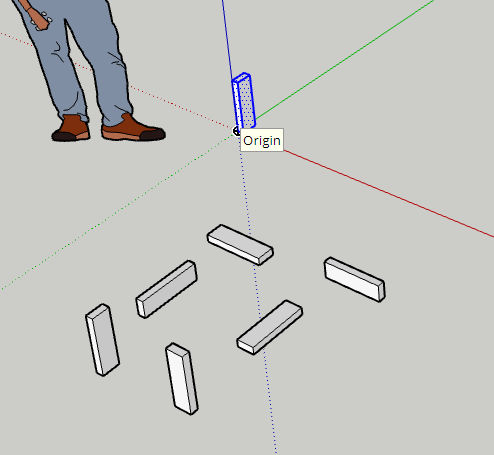
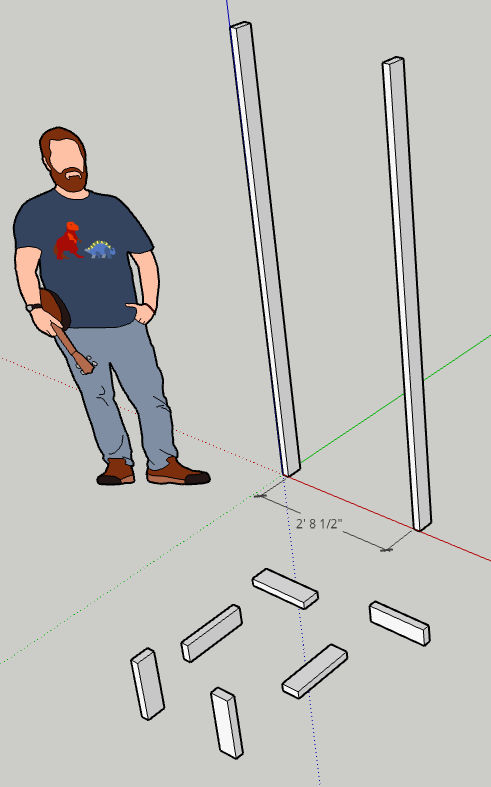
Now, we’ll create a closet frame by first cloning one of the building blocks, moving the clone, and pulling it to change its length. I’ll start with the back left corner of the closet frame. When I copied and pasted one of the 2×4 objects, I clicked on the origin to position the object there.
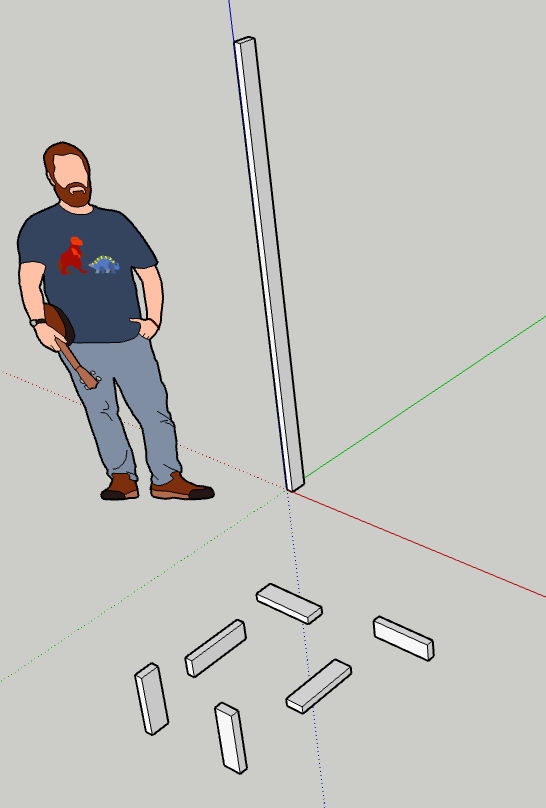
Let’s say we want our closet frame to be 80 inches tall. I’ll switch to the Push / Pull tool, click on the face of the object that I want to pull, drag up, and then type 80 to set the length to 80 inches.
Since we want all corners to be 80 inches tall, we can clone the first 80-inch tall object three more times and position them as far as we want from each other. When you paste a copy of an object, you will see tooltips that help you align the object relative to the axes and to other objects.
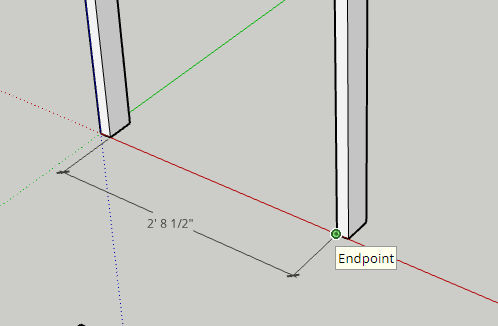
Above, we see a copy of the 80-inch tall 2×4 but we don’t know how far it is from the first 80-inch 2×4. Click the Dimensions tool.
Then, click on each of the two endpoints of the distance you want to measure. In this example, the distance is 2′ 8.5″.
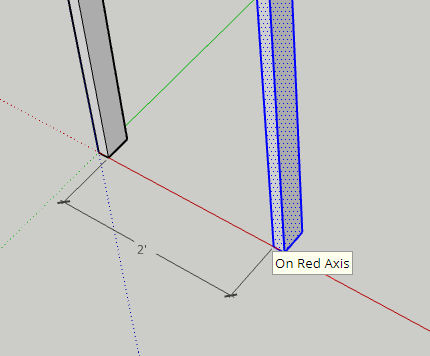
Let’s select the 2nd object and then click the Move tool so we can move the object to be 2 feet away from the other object.
Click on one corner / endpoint and then drag such that the distance becomes 2 feet.
When dragging, you’ll see tips such as “On Red Axis” which will help you stay on the same plane and only move in one direction. Below, we now see the distance between both objects is 2 feet.
Repeat the above steps for the remaining parts.
To learn more, including how to move and align objects relatively and absolutely, read my other SketchUp article.
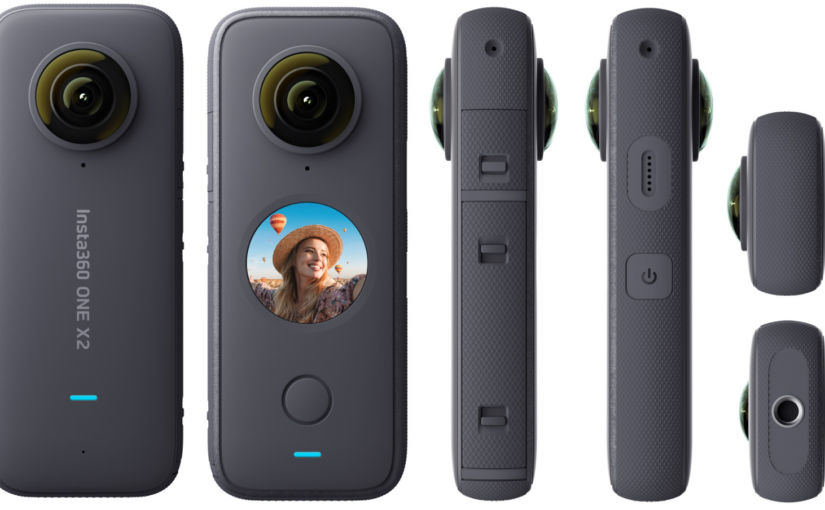
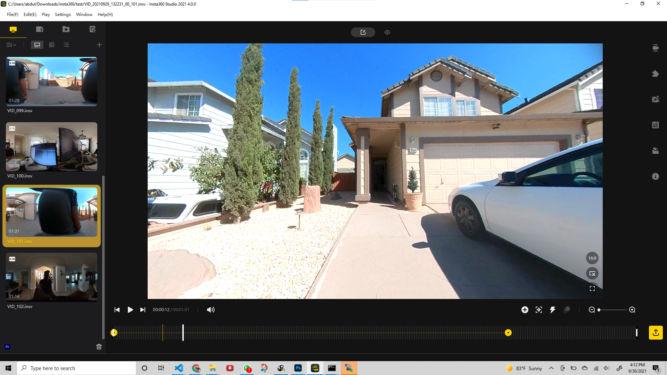
I just came back from Istanbul and wanted to make a video using my new Insta360 ONE X2 360-degree camera. To make viewers feel like they’re joining me on the trip, I wanted to include video clips showing movement from one place to another. This was easy to do using Google Earth Pro on desktop. Here’s are some examples.
In the video below, there are 4 “places”
San Francisco (zoomed in)
San Francisco (zoomed out to space)
Istanbul (zoomed out to space)
Istanbul (zoomed in)
Here’s how to make the video.
Add “Places”
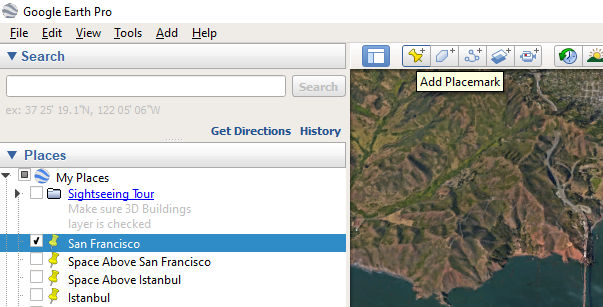
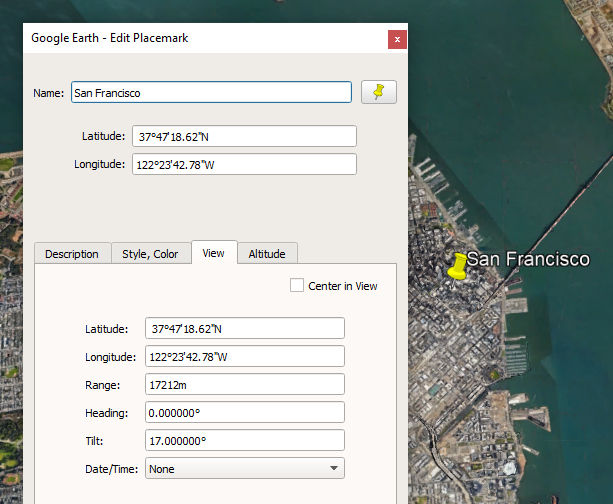
To add a place, you can search for the place using the Search field. Then, zoom in or out to your desired elevation. When you like the view of the place, click the “Add Placemark” button to add a yellow pin to the place. If you want the place label to appear in the map, check the checkbox beside the place name.
If you right click on a place under “My Places” and click on “Properties”, you can rename the place, change the camera elevation (range), etc.
Record a Tour
When you’re done adding places, click the Record a Tour button in the toolbar.
This will open a record.
Click on the first place (San Francisco) and then click the red Record button. Then, click on each place in the order you want them to appear in the video. Google Earth 3D will animate from one place to another as you are recording in real time. When you are done, click the Record button again to stop recording. You’ll then see a video player control bar.
Click the Play button to play the video. If you are happy with it, click the floppy disk (seriously, Google?) button to save the video. It will add a video item to the list of places.
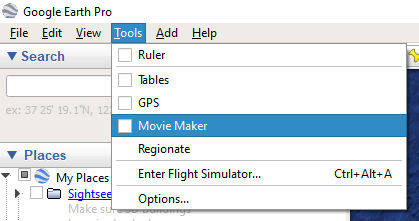
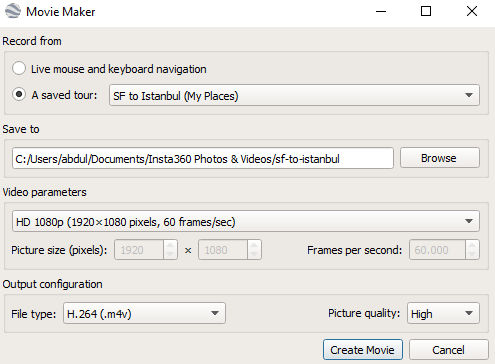
Export the Video
To export the video, click Tools > Movie Maker. If it is grayed out, close the video player control bar.
Specify a file path and name, choose video parameters (e.g. 1080p), and an output file type (e.g. H.264), and then click the “Create Movie” button.
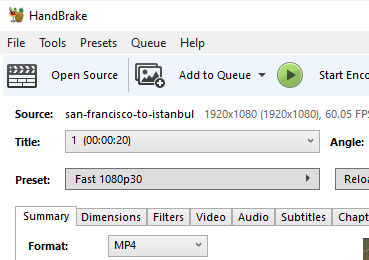
Convert Video
The video will be exported but you may not be able to open it in certain applications like Corel VideoStudio even though it opens in VLC. To fix this, install Handbrake and convert the video to MP4 format.
Other Examples
You can make videos from other angles and elevations as well. For example, if you hold the Shift key and drag, you can rotate your view. Then, add a place marker at the view you want to save. Google Earth Pro will animation smoothly from each place marker. For example, here’s a video going from the Sulemaniye mosque to the Grand Bazaar.
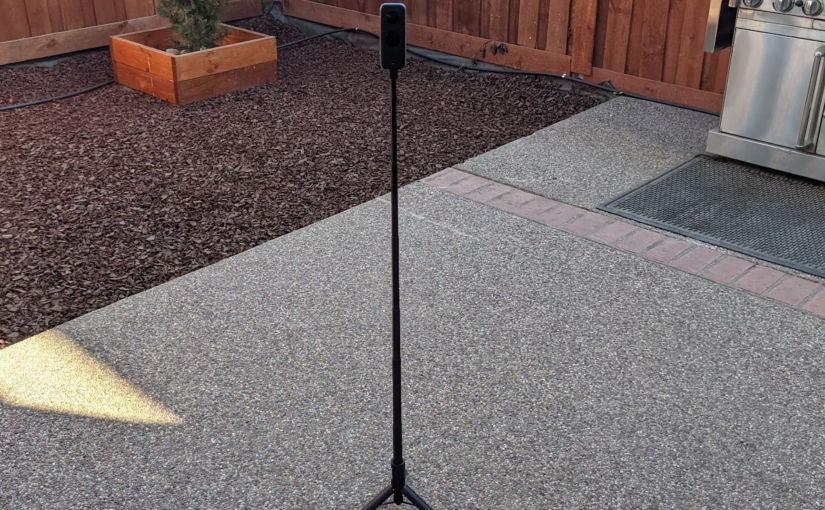
This article is based on using the Insta360 ONE X2. Let’s say you want to make a video tour of your house. You’re not a pro, you don’t want to spend a lot of money, you don’t really know what you’re doing, but you do want a video tour of each room of your house for marketing purposes, for example. Here’s an example of a house tour but only showing one room (area) – the backyard.
Here’s one easy way to do it using the Insta 360 ONE X2.
Put the camera on a tripod in a room
For this example, I put the camera in the backyard as shown below.
Start recording and leave the room
In post editing, we’ll trim the beginning of the video so you’re not in it.
Wait a while, e.g. 40 seconds
It’s up to you how long you want to wait. In the video above, the duration is 18 seconds. If you mess up and the video is too short, you can slow it down in post editing to twice the duration or 4 times the duration. In the example backyard video above, the duration is 37 seconds.
Go back into the room and stop recording
In post editing, we’ll trim the end of the video so you’re not in it.
Transfer the video to your computer
I just use a USB-C cable to transfer the video. Note that each video has 3 files because the video is unstitched and has the proprietary .insv (Insta360 Video) file extension.
Edit the video in Insta360 Studio
Open the video (you can just open one of the 3 insv files) and start editing.
Enable Flowstate Stabilization (although maybe that’s not necessary since the camera is static on a tripod)
Move the left trim marker to where you want the video to begin (the point after you’ve left the room)
Move the right trim marker to where you want the video to end (the point before you reenter the room)
Set the aspect ratio to 16:9 (standard TV screen size)
Add 5 keyframes (indicated in yellow circles) on the timeline with the following specs
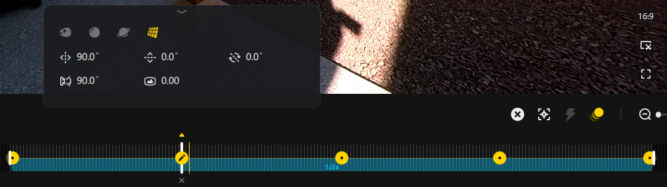
Keyframe 1
Timestamp = beginning of video in timeline Pan angle = 0° View = Natural view
Keyframe 2
Timestamp = 25% of the duration of the video from the beginning Pan angle = 90° View = Natural view
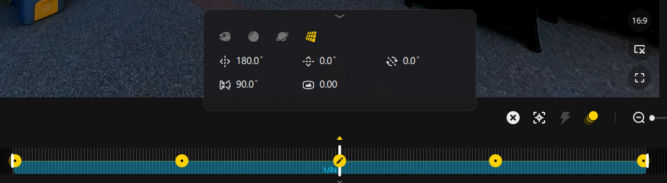
Keyframe 3
Timestamp = 50% of the duration of the video from the beginning Pan angle = 180° View = Natural view
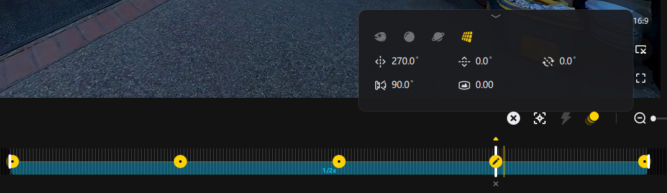
Keyframe 4
Timestamp = 75% of the duration of the video from the beginning Pan angle = 270° View = Natural view
Keyframe 5
Timestamp = end of the video in the timeline Pan angle = 360° View = Natural view
Insta360 Studio converts 360° to 1×0°.
Choose a transition
Between each keyframe, you can click on the yellow line to pick a transition type. The default is “Smooth Dissolve” which is recommended.
Adjust video speed
If the video is too short or too long, you can slow it down (2x or 4x) or speed it up (2x, 4x, 6x, 8x, 16x, 32x, 64x). Just click the lightning icon and drag from the beginning to the end of the clip. Then click on the pink bar to change the speed.
Export the video
In the dialog box, you can choose either H.264 or H.265.
H.265 produces a smaller file size but takes longer to render compared to H.264 for the same level of video quality.
For example, for an 18 second video
H.264 – 85 MB
H.265 – 55 MB
If you’re just going to upload the video to YouTube, then you might want to just pick H.264 since the time to upload a larger file may be quicker than the extra time to render in H.265. Rendering the video will stitch the video together and produce a mp4 file which can be opened and viewed in most video applications.
Repeat for each room or area of the house
Once you’ve editing the videos for each room and exported them as MP4s, you can use any regular non-360 video editor to combine the clips together, add background music, text overlays, etc.
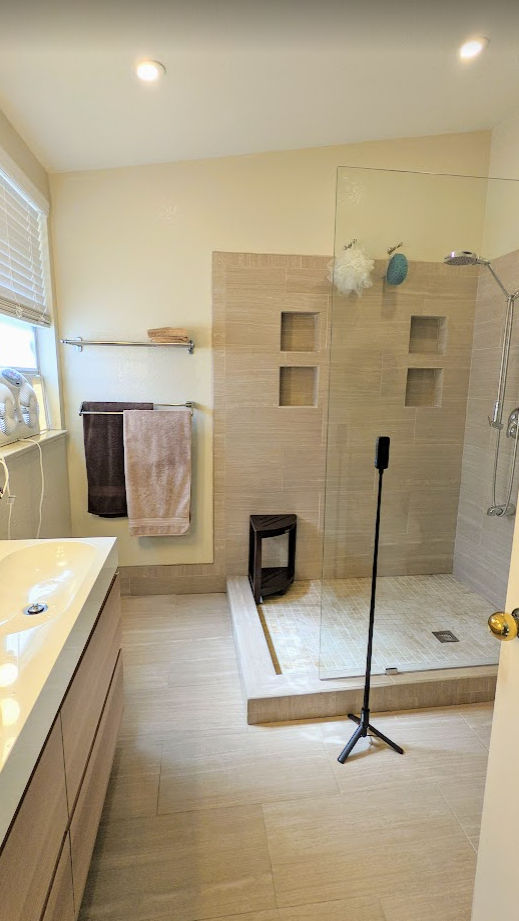
Here’s an example of the master bathroom with additional rotation to show the ceiling.
Again, the camera was just placed in the center of the room.
Have you ever wanted to take a picture of something but weren’t sure if it was allowed or felt unsure if people would be offended if they saw you point your camera at them? If so, one way around this is by taking pictures using a 360° camera like the Insta360 ONE X2.
Since the camera can take a picture of everything around you, you can point the camera at a 90° angle or 180° away from the object you want to take a picture of. Then, in post editing, just drag the picture around to face the object of interest and click the snapshot button to export a regular, flat picture. By pointing your camera away and looking away from your object of interest, no one would know that you’re actually taking a picture of something else.
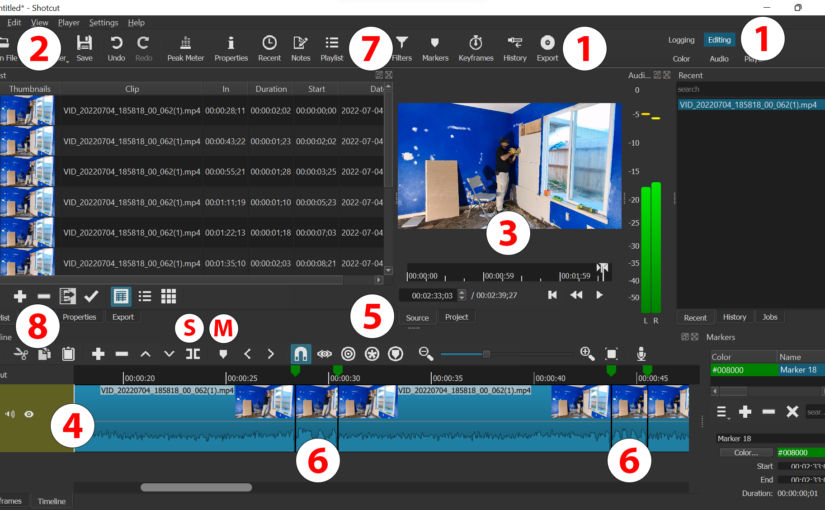
This is my usual workflow when filming and editing 360 videos using the Insta360 ONE X2/X3 and Corel VideoStudio Pro.
Hold or Mount the Camera
Selfie Stick in Hand
When I’m walking, I like to hold the selfie stick in my left (or right) hand with the stick extended such that the camera lens is at face height. Optionally, the point of interest could be behind me. In post-production reframing, I could rotate the view to sometimes face me and sometimes face some other direction.
Selfie Stick on Tripod
In certain situations, I’ll turn the selfie stick into a tripod and place it on the floor/ground or on a table.
Chest Mount (Body Cam)
When I don’t want to hold the camera for a long time or when I don’t want people to know that I’m filming them, e.g. when boarding an airplane, when standing in a subway car or bus, when buying something, etc, I’ll mount my camera to my chest.
This mode lets you push the shutter button to do two things at once
Turn on the camera and start recording
Turn off the camera and stop recording
While traveling, this can be really handy since you won’t have to waste time clicking two different buttons and waiting in between.
The recording mode will be the last mode used. If you switched the mode to timelapse and then turned off the camera, then the shutter button will turn on the camera and start recording in timelapse mode, not regular video mode.
Enable Standard Video Mode
This mode is for regular video shooting. Other modes are HDR, Timelapse, Timeshift and Bullet Time. HDR is only good for when you are filming on a tripod and not moving.
Disable Prompt Sound
By default, when you turn on and off the camera or start and stop recording, you will hear an annoying beep. Disable this “Prompt Sound”. To know whether the camera is on, off, or recording, just look at the light status.
Light off = camera off
Light solid blue = camera on
Light slowly flashing red = filming in progress
Press The Shutter Button to Start Filming
Fingerprints on the lenses can result it blurry videos. Always wipe the lenses with a clean lens cloth before filming.
When you are out and about traveling and you want to start filming, just press the shutter button once. Since Quick Capture will be enabled, you won’t need to turn the camera on first. Note that there is a bit of a delay before the camera actually starts recording.
Press The Shutter Button to Stop Filming
When you are done filming, just press the shutter button once again. Since Quick Capture will be enabled, you won’t need to turn the camera off as it will turn off automatically (and save battery).
Note: The latest Windows version of the Insta360 Studio app is version 4.3.0, which came out on 2022-05-24. The previous version is 4.2.2. I have found version 4.3.0 to have significant performance issues so I have reverted back to version 4.2.2 which performs just fine. See Insta360 Studio versions
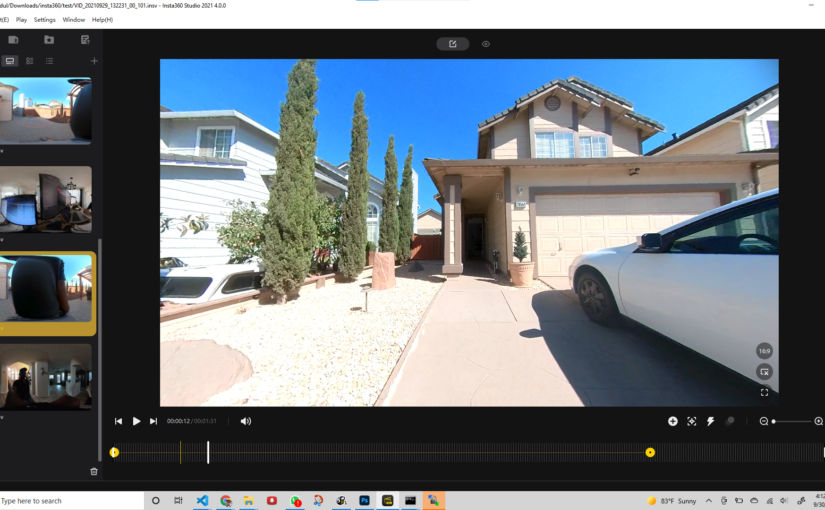
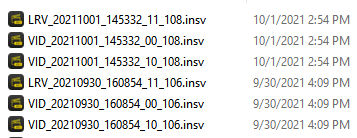
Connect a USB cable between the camera and your computer. On Windows, it auto-detects the camera as an external drive. You can then copy and paste the .insv files. Note that each video contains 3 .insv files. For example, below there are actually only 2 videos.
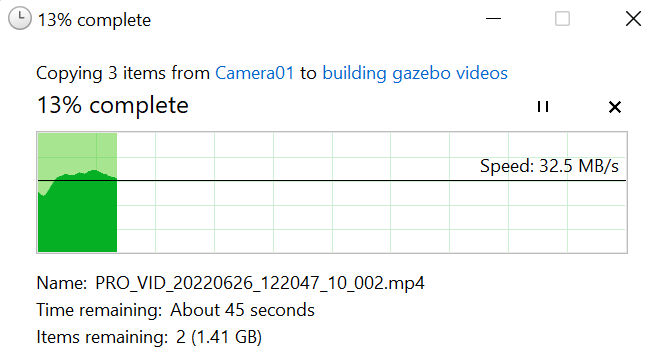
Note that transferring video files from the Insta360 ONE X2 to your computer can be really slow. For example, when I transfer files from the Insta360 ONE X2 to my laptop over USB C, it transfers at about 30 MB/s.
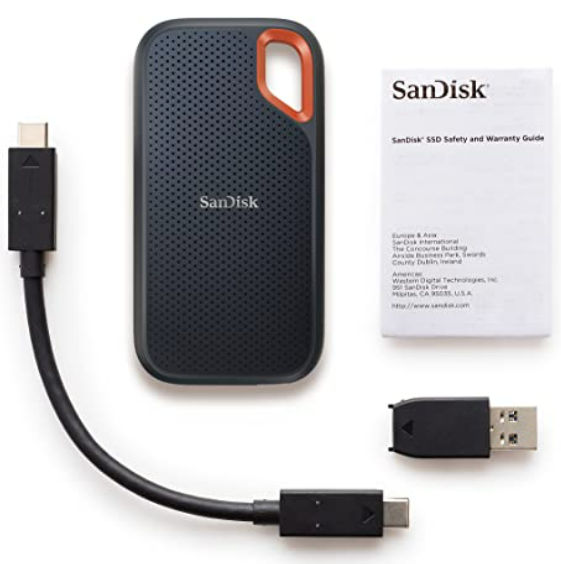
Video files are huge. You may not have enough space on your laptop to store video files. And even if you did, you should have a backup, e.g. on an external SSD. I like the SanDisk Extreme 1TB Portable External SSD Flash Storage Drive, which claims to have a data transfer rate of up to 1050MB/s.
Import the .insv Files into Insta360 Studio
In the left pane, you will see thumbnails for all uploaded videos. .insv files are unstitched 360-degree files that can only be opened in the Insta360 Studio or mobile app.
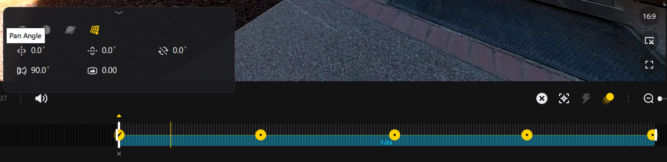
Reframe the 360-Degree Video
In the right panel, you will have many options. Enable FlowState Stabilization so that the video isn’t jerky. If you want the video view to always face one direction (front), then enable Direction Lock.
At the top, you’ll see two icons. One for edit mode and one for view mode. Ensure edit mode is on. In the video preview window, you’ll see an option to change the video aspect ratio. The most common is 16:9, e.g. for TVs and YouTube.
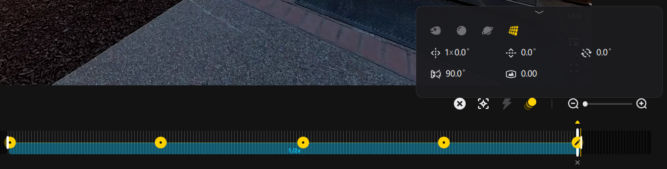
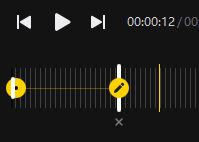
To reframe the 360 video, you’ll need to first add keyframes at each timestamp where you want to change the angle and lens of the video. Drag the white vertical playback bar to the very beginning of the timeline and click the + icon.
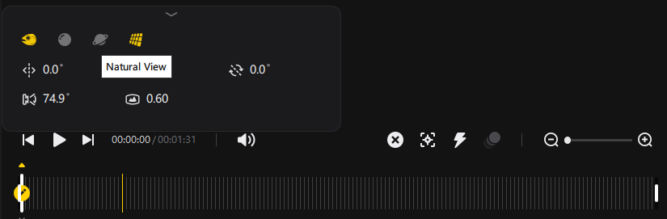
This will add a yellow circle at that timestamp, indicating that a keyframe is there. Also, the + icon turns into an x icon in case you want to delete that keyframe. Clicking on the keyframe shows options where you can choose the lens type, e.g. fisheye, etc. Choose “Natural View”. Then, drag the video preview in any direction you want so that the video beginning at that keyframe will point in that direction.
When you click “Natural View”, the Field of View (FOV) value will change to the default value of 90 degrees.
Following is what the FOV looks like at 90 degrees.
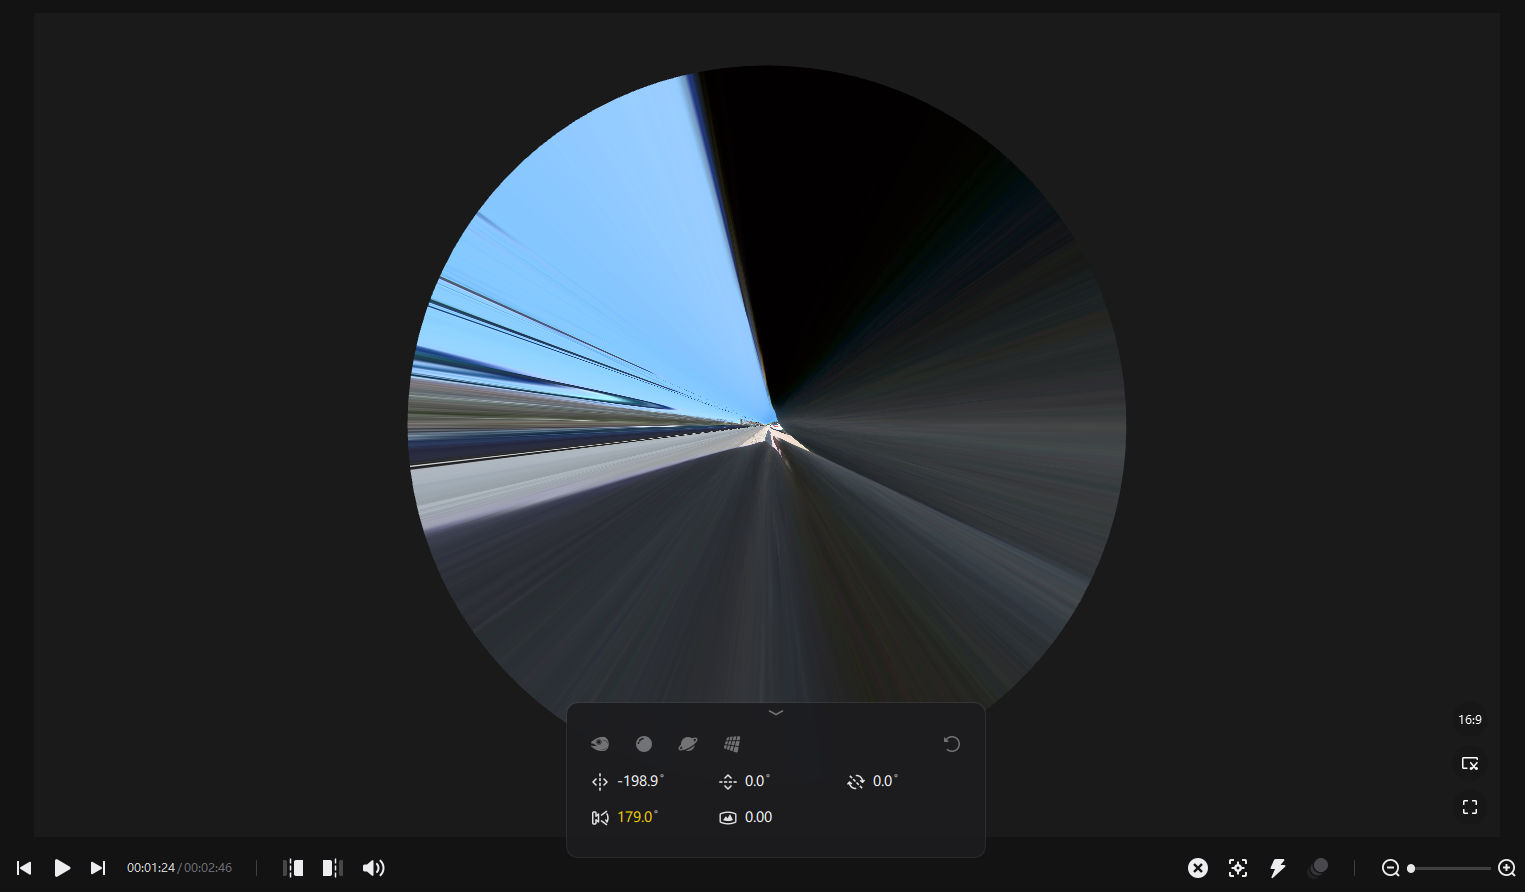
You can increase the field of view (like zooming out) and decrease the field of view (like zooming in). Since the ONE X2 is a 360 camera with two 180-degree lenses, you can increase the FOV to a max of 180 degrees (actually 179 degrees). You’ll end up getting a circle like the one below.
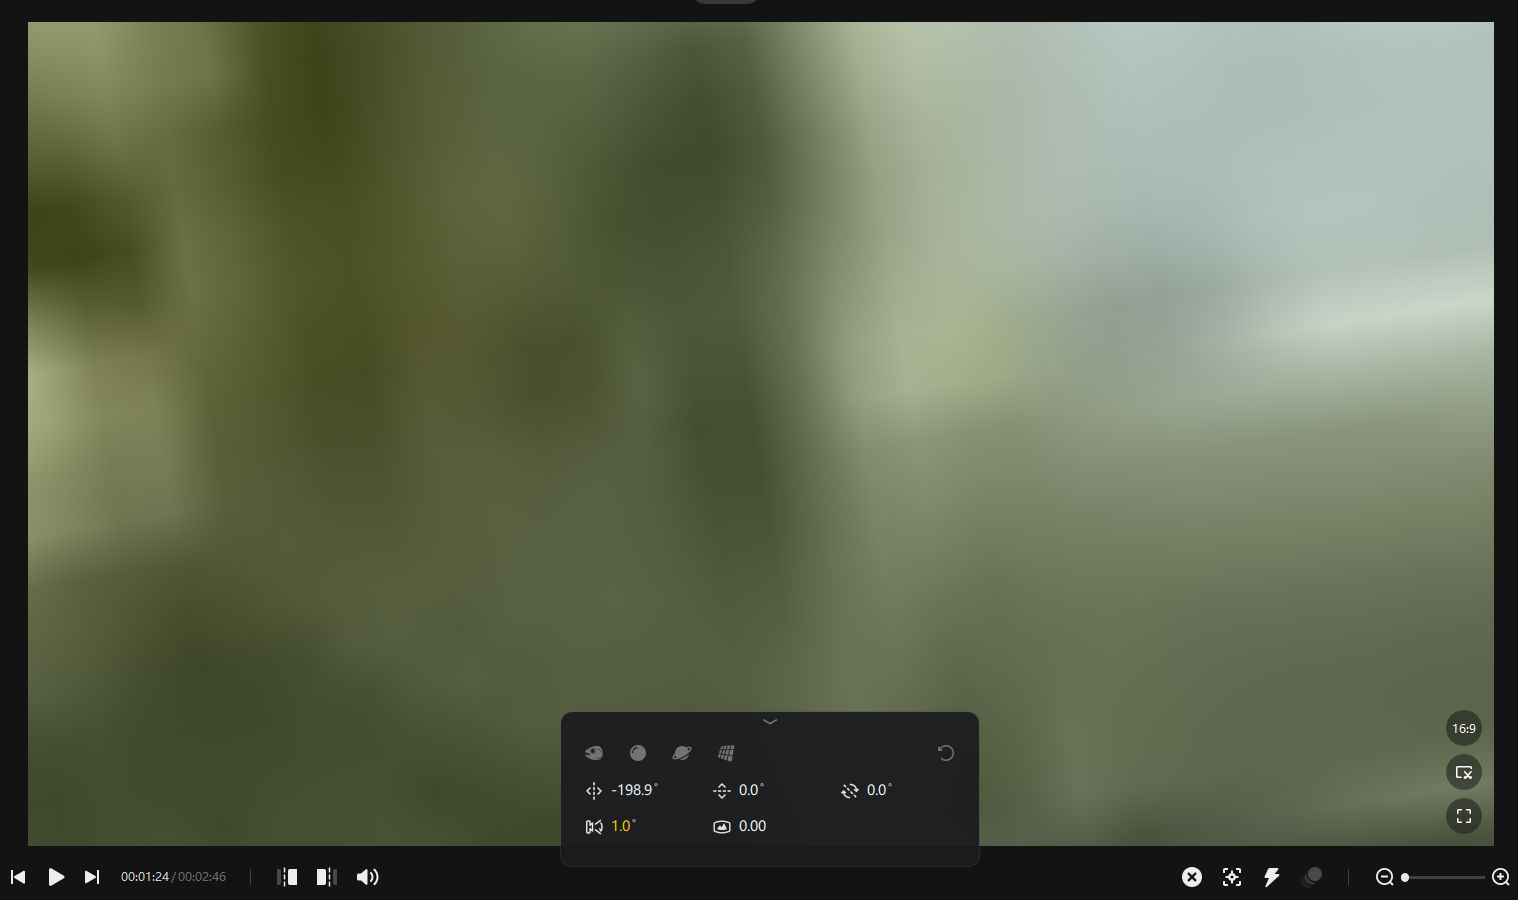
The smallest FOV is 1 degree, which results in such a zoomed-in view that is just blurry, like below.
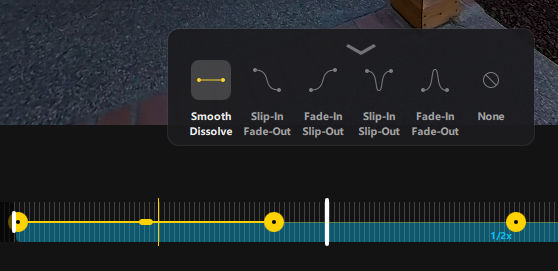
Drag the playback bar to another timestamp and repeat the steps above. You will see a yellow line connecting the two keyframes.
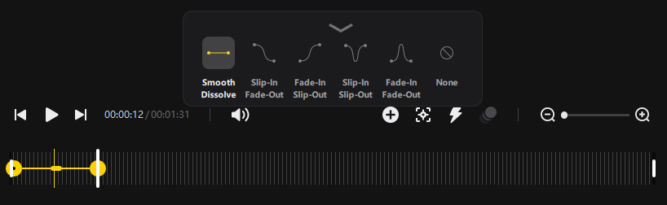
Clicking on the yellow line will allow you to choose a transition between the two keyframes. “Smooth Dissolve” is a good transition. If you choose “None”, for example, and the camera angle is facing the sky in keyframe 1 and facing the ground in keyframe 2, then at the beginning of keyframe 2, the video will jump from facing the sky to facing the ground. With the “Smooth Dissolve” transition, the video will transition slowly from facing the sky to the ground.
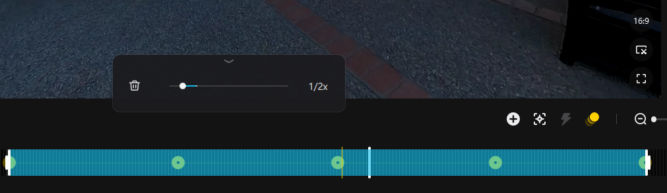
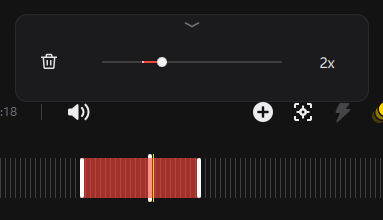
Click the lightning icon to enable Timeshift.
Then drag in the timeline where you want the timeshift to occur and choose a speed from slowing down at 1/4x speed to speeding up to 64x speed. Sections that are timelapses will have their audio muted.
Note: Creating a timelapse in a video editing tool like Corel VideoStudio is easier and comes with more options. Also, it preserves the audio.
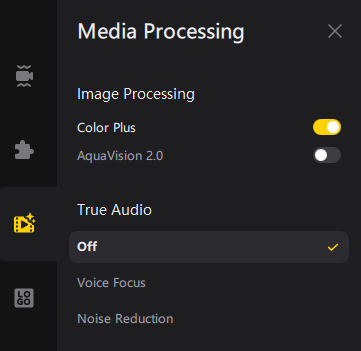
When you are done adding keyframes, setting camera angles, and adding timeshifts, adjust the picture color, if necessary. Click the media processing icon and compare the color when Color Plus or AquaVision 2.0 is enabled.
Below, you can see the difference in color between the default color and with Color Plus or AquaVision 2.0 enabled.
Default colorColor Plus enabledAquaVision 2.0 enabled
The AquaVision 2.0 setting is for taking underwater pictures. It produces a brighter picture. The Color Plus setting produces vivid, more saturated colors. It especially helps improve skin tone when the subject is in a shade.
Note: Adjusting color in Corel VideoStudio is better as you can tweak the color settings.
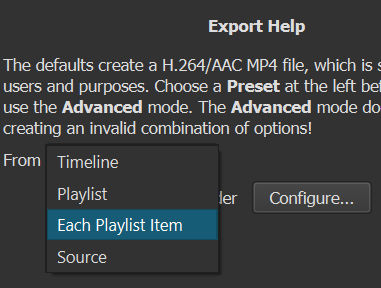
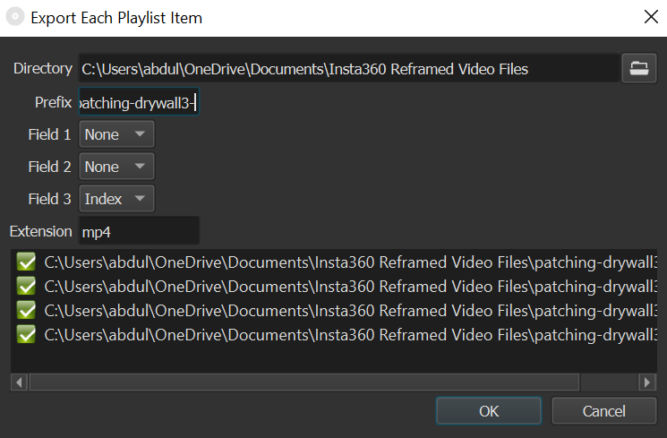
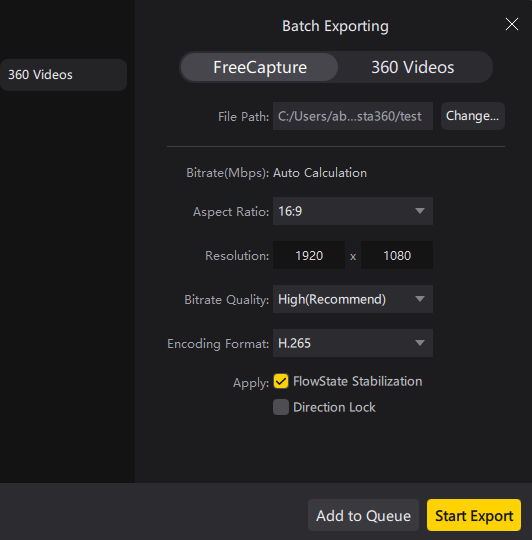
When you’re done adjusting for color, click the yellow Export button on the right of the timeline.
This will give you many options. Choose “Reframed Video” and leave the default as H.264. If you choose H.265, the video won’t open in certain programs like Corel VideoStudio Pro.
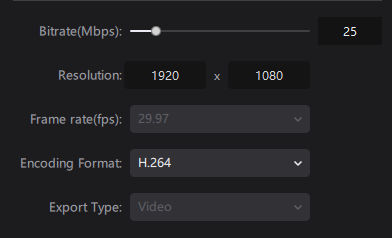
When exporting videos in the Insta360 Studio app, I tested various bitrate settings from 1 mbps to 200 mbps (max). I saw no difference in quality between 25 mbps and 200 mbps. I also did not see a difference in file size and quality between h.264 and h.265. So, I choose h.264 at 25 mbps.
Then, click the Start Export button.
Tweak video color in Corel VideoStudio
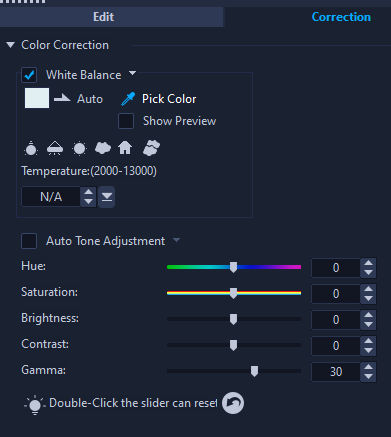
In VideoStudio 2018 Pro/Ultimate, double-click on a video clip in the timeline. In the Correction tab, slide the Gamma slider to the right to lighten the video. This may throw the white balance off. To fix the white balance, check its checkbox, click “Pick Color,” and click on a pixel in the video that should be pure white, e.g. a white napkin.
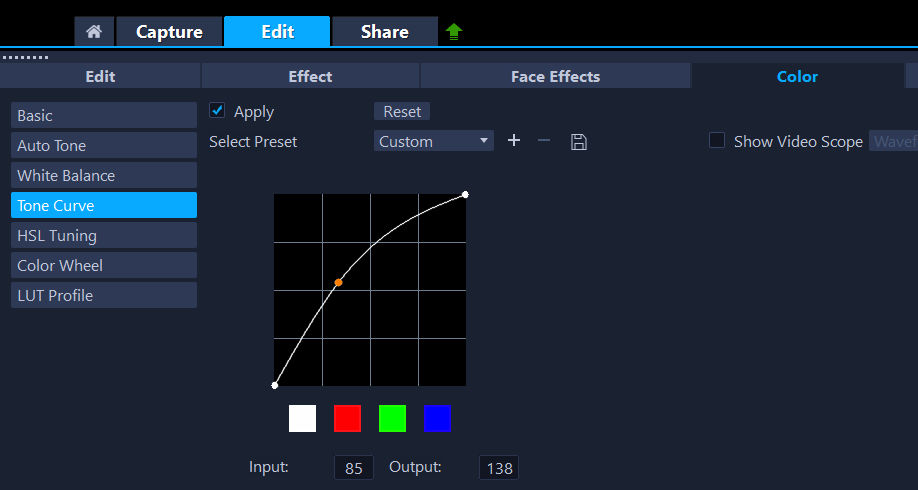
In VideoStudio 2018 Pro/Ultimate, double-click on a video clip in the timeline. In the Color tab, choose Tone Curve and drag the curve. Usually, dragging towards the top left produces a brighter picture.
Edit video in Corel VideoStudio 2022
Note: Corel VideoStudio 2018 used to work fine but, at least for me, it now hangs even after installing and running it on a brand new computer. Corel VideoStudio 2022, however, works fine.
This step assumes you have already reframed and exported the videos.
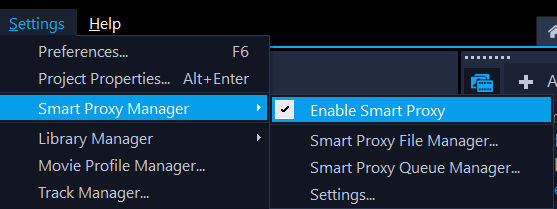
Under Settings, Smart Proxy Manager, ensure “Enable Smart Proxy” is checked. This will cause VideoStudio to create a small proxy video for videos that are large. This will help with video editing performance.
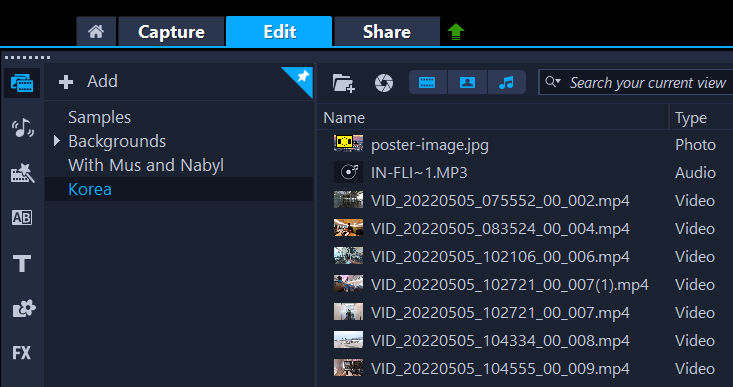
In the Edit tab, create a project, e.g. Korea, and drag all assets to it (photos, videos, audio, etc).
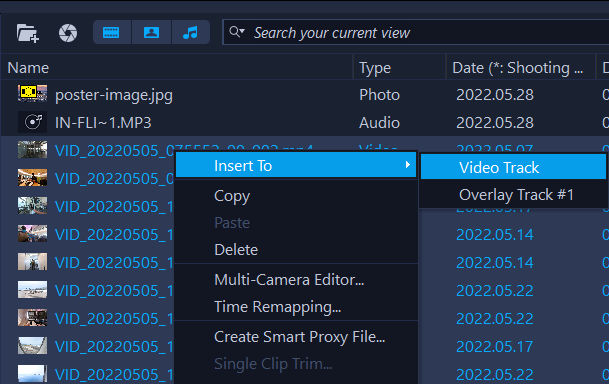
If the assets are in the order you want them inserted in the timeline, then select multiple assets, right-click, and choose “Insert To > Video Track”. This will make it quick and easy to insert multiple assets at once.
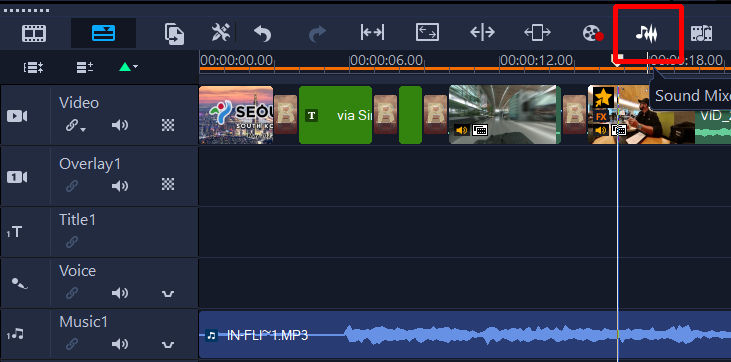
Go to Settings > Smart Proxy Manager > Smart Proxy Queue Manager. You may see a window like the one below. If you see video files in the list, that means VideoStudio is in the process of creating proxy video files. When it’s done, the list will be empty. Until it’s done, leave VideoStudio alone since editing before it’s done could be slow and possibly crash the program.
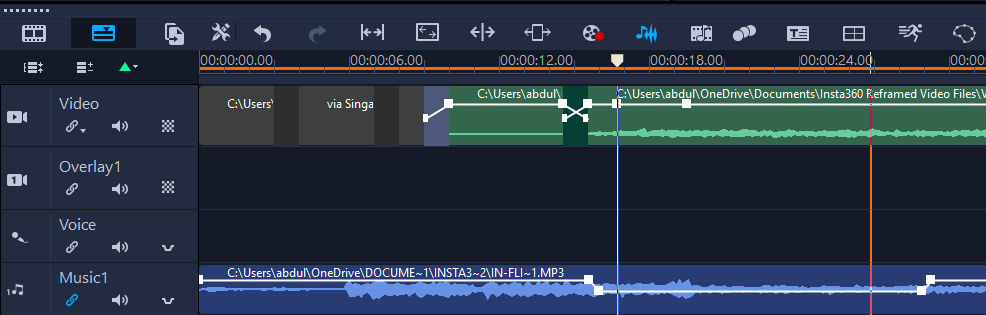
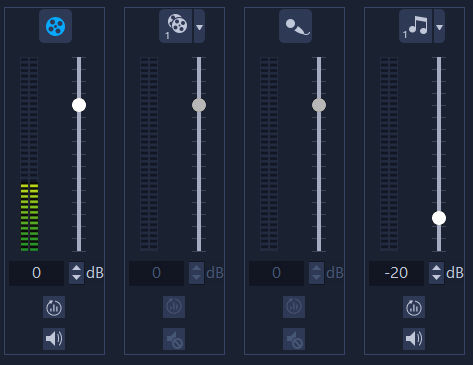
If you’ve added a song to the Music track, and you want to lower the volume of the song for a section of a video clip, e.g. when someone is talking, then do the following:
Click the sound mixer icon
Then tracks will change like below.
The white line is the audio volume line. Notice how on the music track, the volume line goes down at one point and then up at another. This was done to lower the volume of the song during that time range only. To lower the volume, move the playback marker to the point along the orange line where you want to change the volume. Then, in the sound mixer, change the dB value for the track you want to change the volume of. In the screenshot below. the music track volume was lowered to -20 dB,
VideoStudio will gradually change the volume from one point to another. If you want the volume to change immediately, then you’ll need to add another marker next to the first one.
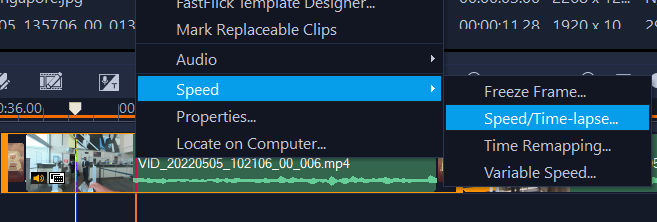
If you want to speed up a video clip, right-click on the clip and choose Speed > Speed/Time-lapse…
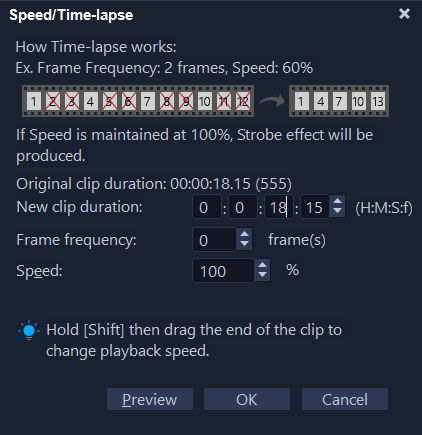
This will open a dialog like the one below. Change the duration of the new clip, e.g. from 18 seconds to 8 seconds, and then click the Preview button. If the preview looks good, click OK to apply the timelapse.
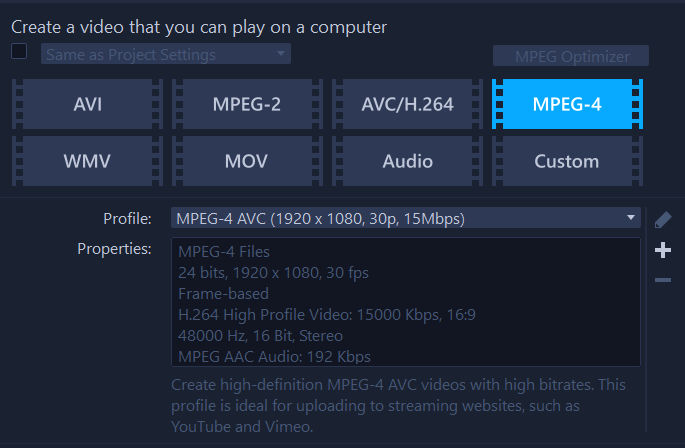
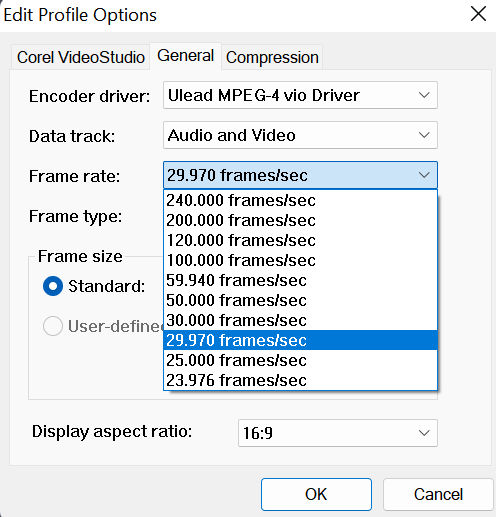
Before you export the video from Corel VideoStudio, note that the input video clips exported video from Insta360 Studio have 29.97 frames (still images) per second (fps).
Corel VideoStudio may default to choosing export settings of 30p (30 fps). If you choose this setting, the audio will not be in sync with the video.
Corel VideoStudio doesn’t have a preset for 29.97p (29.94 fps).
So, you’ll need to create your own profile preset and choose a frame rate of 29.97 fps.
Workflow Summary
Take 360 videos
Transfer videos to SanDisk external SSD drive
Open 360 videos in Insta360 Studio. 360 videos have huge file sizes.
Take snapshots, if going to make video of pics.
Convert them to natural view mp4s which are much smaller. For each video,
Enable ColorPlus, if necessary
Set start and end positions, if necessary
At start position, set the field of view (FOV) to “Natural View”
Add additional FOV points to change viewing angle, as necessary
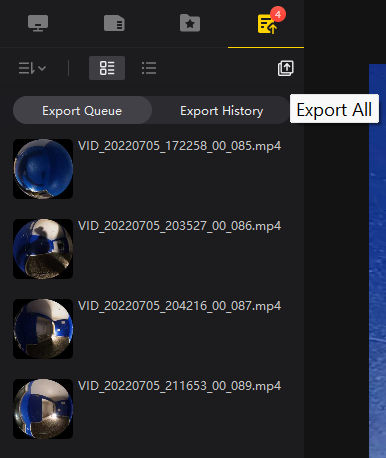
Click the Export button, chooses “Reframed Video”, set bitrate to 25 Mbps (25000 kbps), h.264 (not h.265), and click “Add to Queue”
When done editing each video, click “Export All”
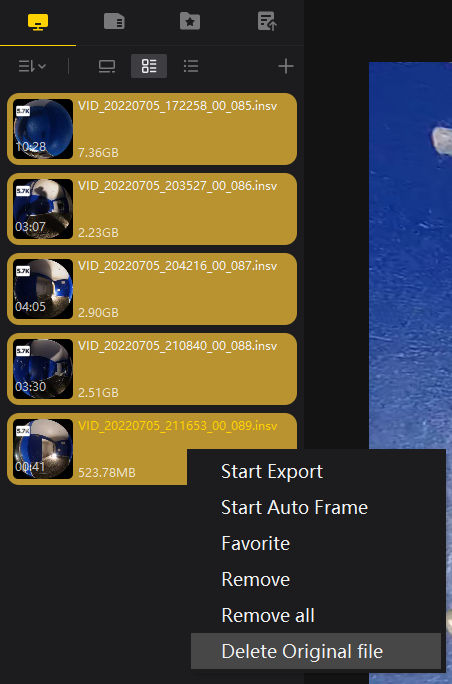
When the batch of 360 videos has been converted to mp4s, select them all in Insta360 Studio, right-click, and select “Delete Original File” to delete the large 360 videos.
If you want to create a video of an animated character that moves its head and lips as you move your head and speak, you can do so easily using Adobe Character Animator. Here’s how.
In Adobe Character Animator, click File > Import and select the puppet file.
2. Import a green screen
Since we’ll want to overlay the exported character animation on other elements in a video editing program, we’ll want to add a green screen so we can key it out. Create a solid green image (RGB = 0,255,0) the size of the scene, e.g. 1920 x 1080. Then, import it and drag the imported item to the lowest layer it the Timeline panel.
3. Enable Puppet Track Behaviors
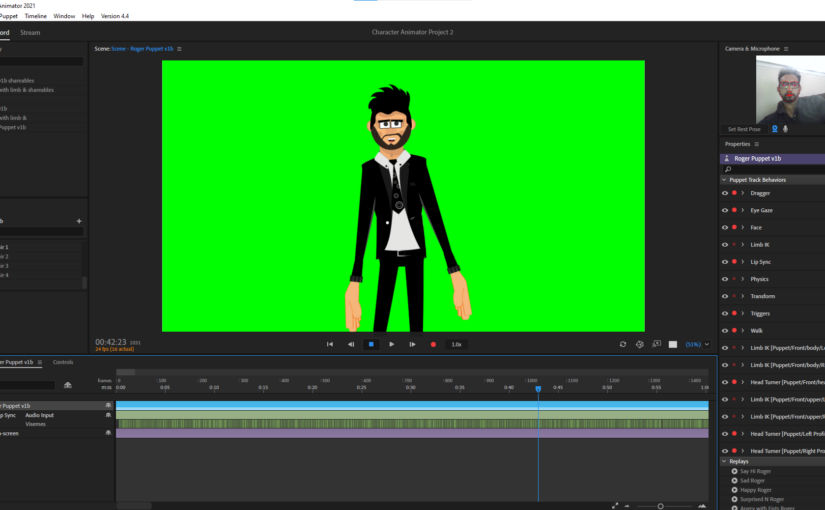
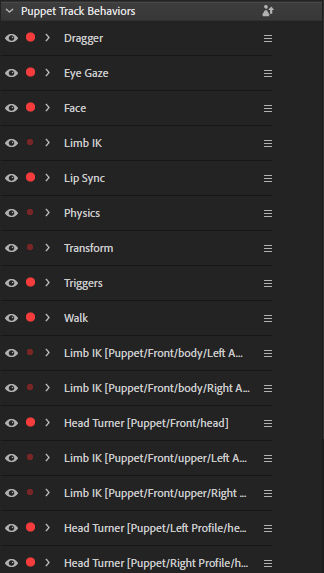
We can tell Adobe Character Animator which parts of our face and body to track as we move and talk in the camera. Click on the puppet layer to reveal the Puppet Track Behaviors panel.
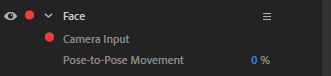
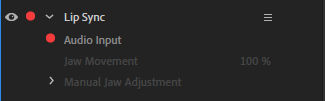
The red button indicates that the particular item will be tracked when you move in front of the camera. For example, the Face item, when expanded, will show a red dot by “Camera Input” meaning if move your face in front of the camera, your facial gestures will be tracked and the puppet’s face will move accordingly.
For the lip sync item, the red dot is by “Audio Input” so if you speak, the microphone will capture your voice and convert it into lip movements on your puppet.
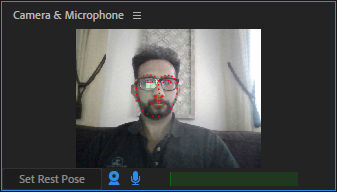
For Adobe Character Animator to track your head and lip movements, you need to enable your camera and microphone. You’ll see a circle where your face should be centered in your resting position. Once centered, click the “Set Rest Pose”. You’ll then see a bunch of red dots on your face indicating points where Adobe Character Animator will track your facial gestures.
5. Start recording
Click the red record button. A 3 second countdown timer will begin. Start talking naturally and when you are done, click the red button again to stop recording.
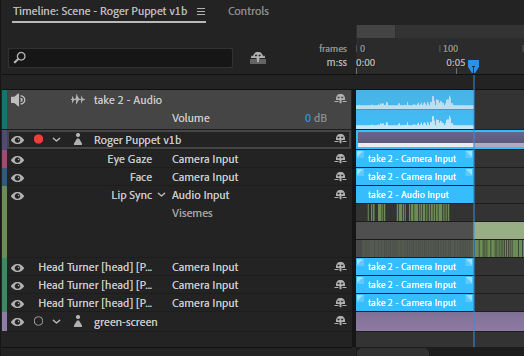
You’ll then see some layers added to the timeline including your voice audio layer.
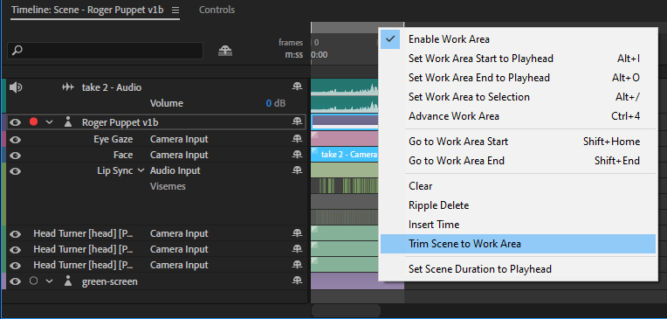
If some of the layers are longer than the audio layer, e.g. the puppet, Visemes and green screen layers in the screenshot above, trim the scene so the duration of the scene is the duration of the audio. Drag the right end of the gray Work Area bar to the right end of the audio track. Then, right click on that bar and click on “Trim Scene to Work Area”.
Now, your scene duration will just be the duration of the Work Area, in this case 5:20.
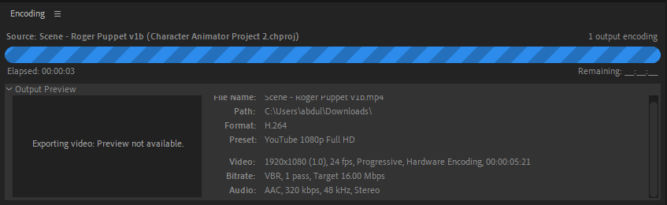
6. Preview and export the result
Click the play button to preview the recording. If you are happy with it. you can export it by clicking File > Export > Video via Adobe Media Encoder. This will open Adobe Media Encoder. In the Queue panel, choose a format (h.264) and preset (Match Source – High bitrate or YouTube 1080p Full HD). Then, click the green play button to start encoding.
You will see the encoding progress in the Encoding panel. You’ll also see the video duration as 5:21 seconds as that is the length of the scene in this example.
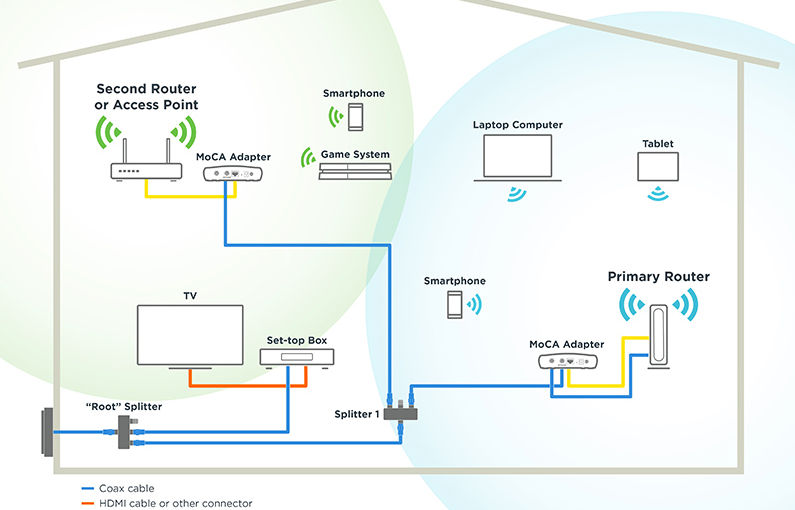
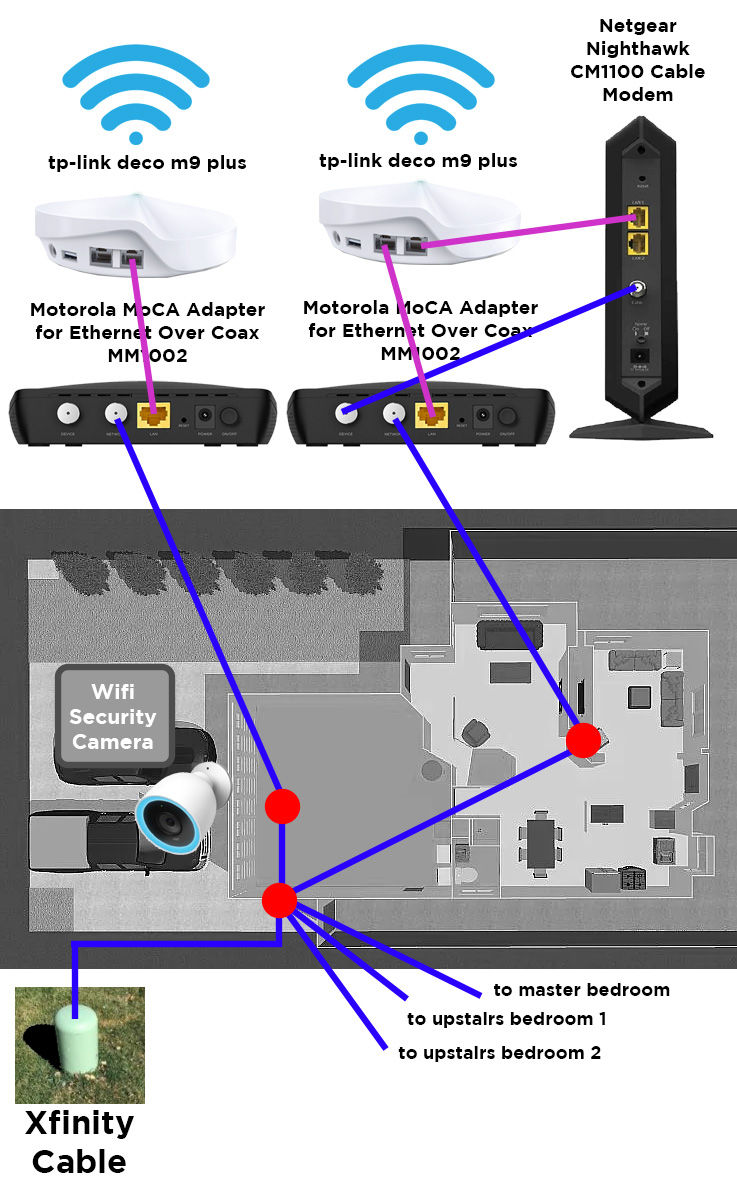
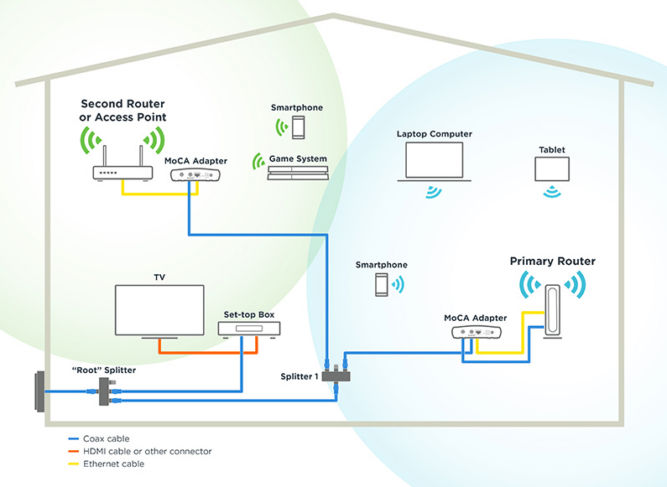
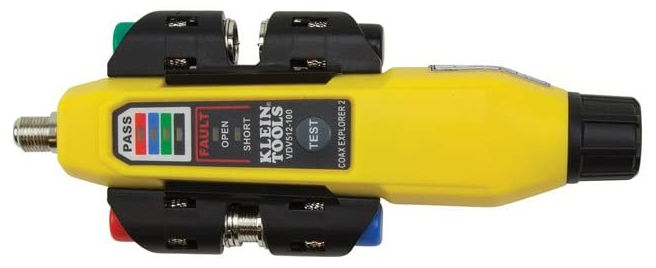
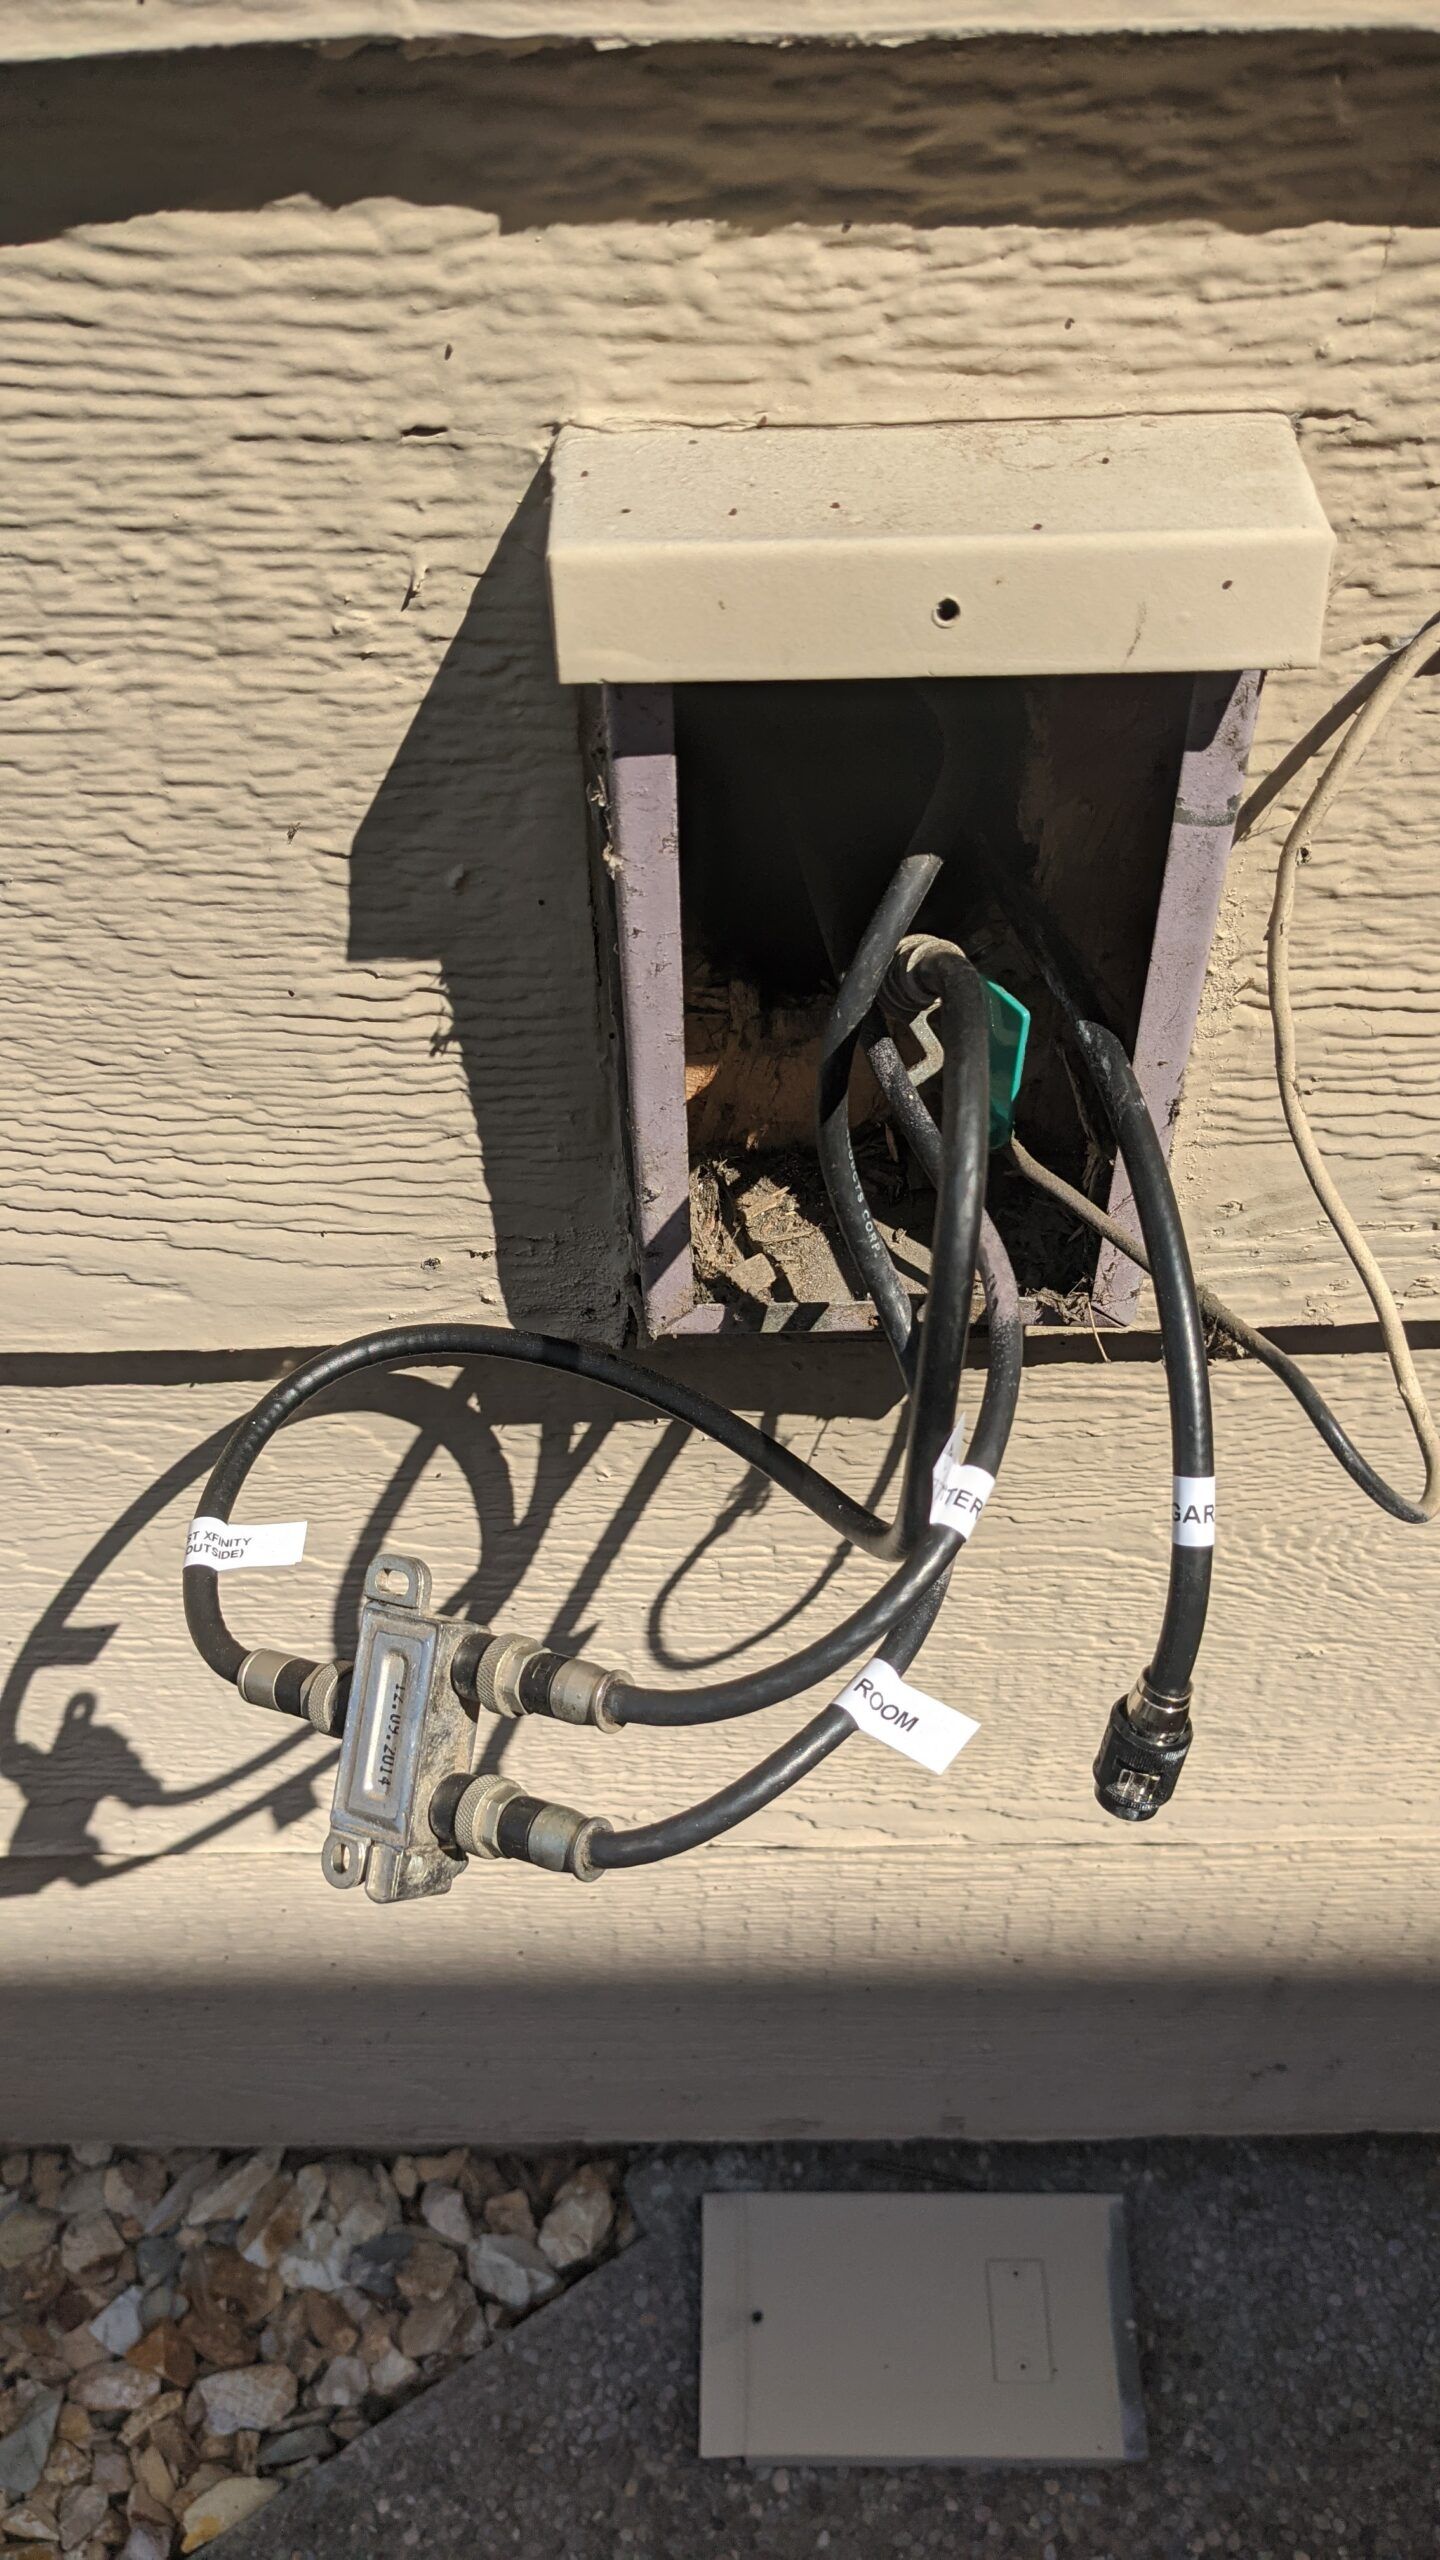
So, in my 2 story house my internet modem is in the family room in the back of the house. The internet comes over coaxial cable by Comcast xFinity 1Gbps. There is a security camera at the front of the house facing the driveway. Every now and then, the security camera would go offline. To spread wifi all over the house, I have the tp-link deco M9 plus AC2200 mesh wifi router (3 wifi access points). The backhaul between access points is wifi, unfortunately. I can’t have a wired ethernet backhaul between access points because running ethernet cable would require opening up walls which is a lot of work. Fortunately, however, there is existing coaxial cabling throughout the house. So, I can use MoCA (Multimedia over Coax Alliance) adapters to bridge ethernet over coax so I can have a wired coax backhaul between access points. This allows the wifi signal at each access point to be much stronger than with a wifi backhaul. There are many diagrams and tutorials online but none that I found were clear enough hence this blog post. Below is my setup with a diagram which should make it clear what goes where.
The continuity tester doesn’t work through splitters. Once you’ve tested all cables, you can label them in your junction box like I did below. As you can see, there is a 1 – 2 splitter where the one input is the coax cable from xfinity. The two outputs each go to the master bedroom and family room.
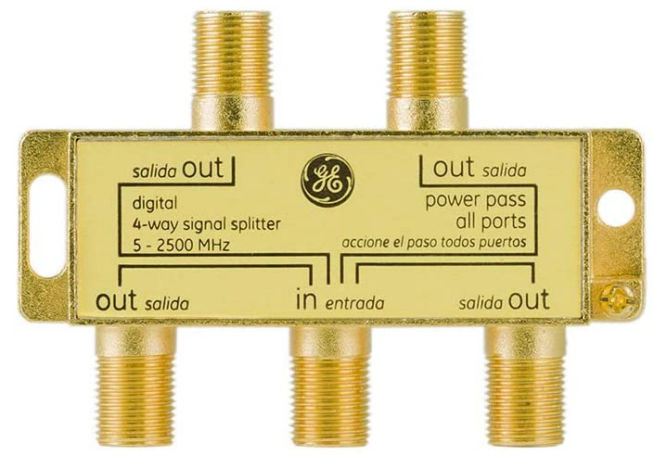
I added a new coax cable to go to the garage but it’s not connected in the picture because I need to add another splitter or replace the existing splitter with a 1-3 (or more) splitter. For MoCA to work, you need a splitter that
is not amplified
goes up to at least 1.5 Ghz (1500 Mhz)
GE Digital 4-Way Coaxial Cable Splitter, 2.5 GHz 5-2500 MHz
Before and After
BeforeAfter
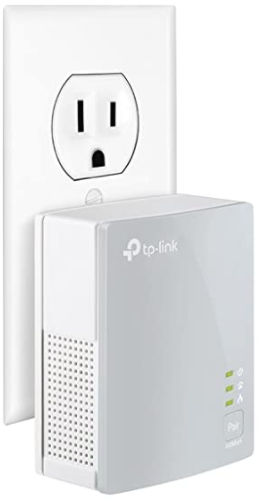
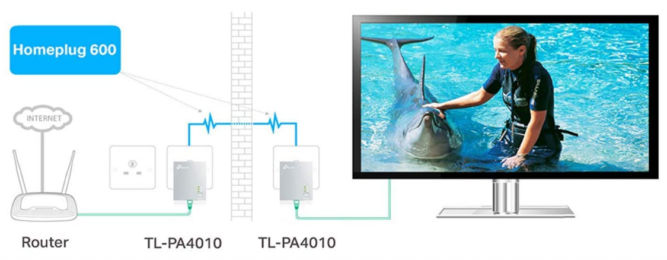
Powerline Adapters
You can also bridge ethernet over your home’s existing electrical wiring using Powerline adapters, e.g.
However, these adapters don’t work if there’s a surge suppressor. Also, there’s a lot more activity in your home electrical wiring that could interfere with the signal, e.g. from the refrigerator, hair dryers, air conditioners, washing machines, and other appliances.
It’s pretty clear now that mesh networks produce stronger wifi signals throughout larger spaces when compared to regular wifi routers even with range extenders. But, many mesh networks only instruct users to connect each router over wifi. While this may be fine in some situations, e.g. where you can’t run ethernet between a main router and a satellite, having a wired backhaul produces a much better wifi signal coming out of the downstream satellite router. Here are instructions to set this up using the TP-LINK Deco AX1800 X20 (W3600 if you bought it from Walmart).
Steps
Restart the modem
Follow the instructions to set up the main router
Follow instructions to set up the satellite router over wifi (default)
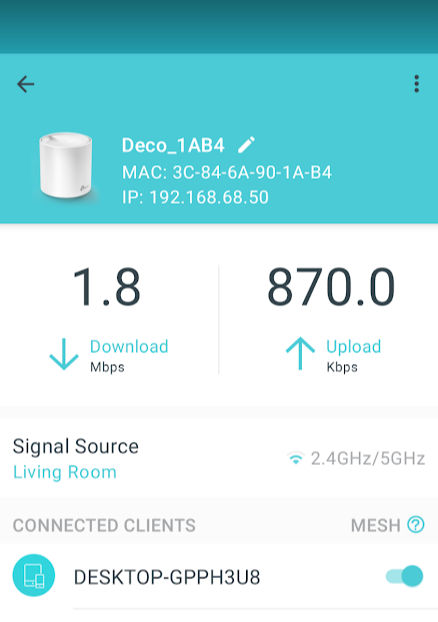
When the light on the satellite turns green, then you know the satellite router is connected to the main router. At this point, since you haven’t connected an ethernet cable between the two routers, the connection is over wifi. You can verify this by opening the Deco app and clicking the satellite router. You should see the “Signal Source” value the wifi symbol followed by 2.4GHz/5GHz.
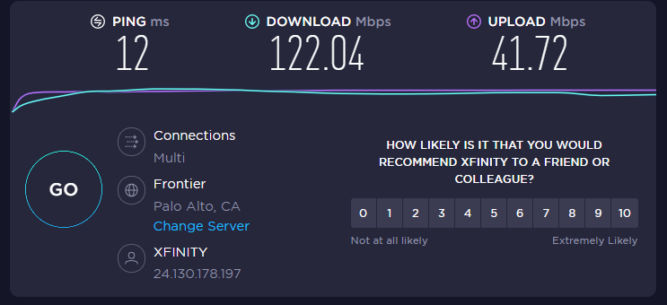
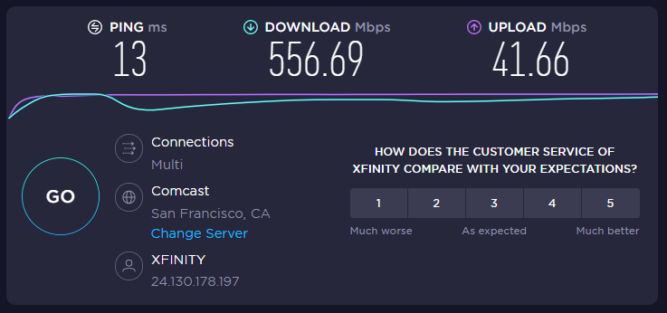
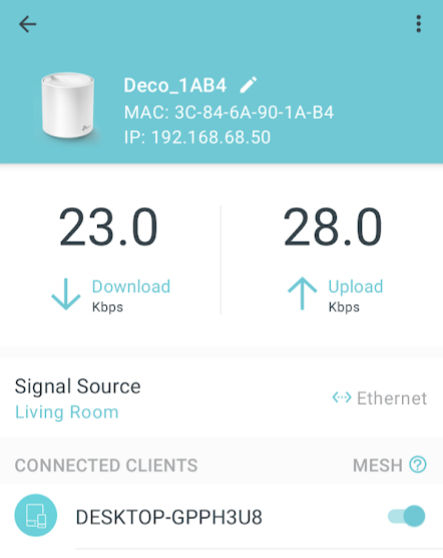
If you have a laptop or smartphone that is connected to the satellite router, you can run a speed test. In this example, I have a laptop that is connected over wifi to the satellite router. After running a speed test, connect an ethernet cable between the two routers. The light on the satellite router will turn red temporarily and then turn green when connected. Similarly, the satellite router’s status in the app will appear disconnected. Click the refresh button and you should see the “Signal Source” value change to “Ethernet” and shown in the screenshot below. This confirms that you are using a wired backhaul.
Now, run a wifi speed test from the satellite router. In my case, my laptop was still connected to the satellite router. The wifi speed test results were clearly much faster when the satellite was connected over ethernet rather than wifi. This setup is very useful when you need a strong wifi signal very far away from your main router and you can run an long ethernet cable between routers.
Note: I got this 2 router TP-Link AX1800 mesh wifi system from Walmart for $129. At Walmart, the model number is W3600 whereas on Amazon it’s X20.