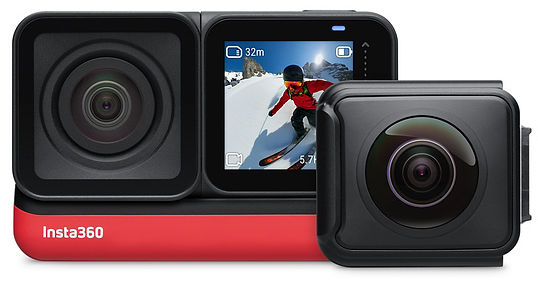
Modular and therefore can add modules that offer different / better features
HDR (high dynamic range) for better image quality
More advanced desktop editing software
Cons:
Modular and therefore can be a hassle to have to switch modules, especially quickly in order to capture a moving target
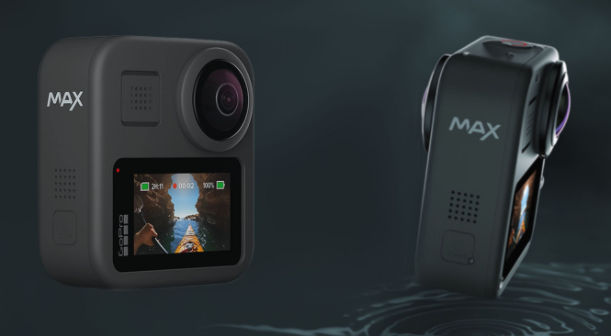
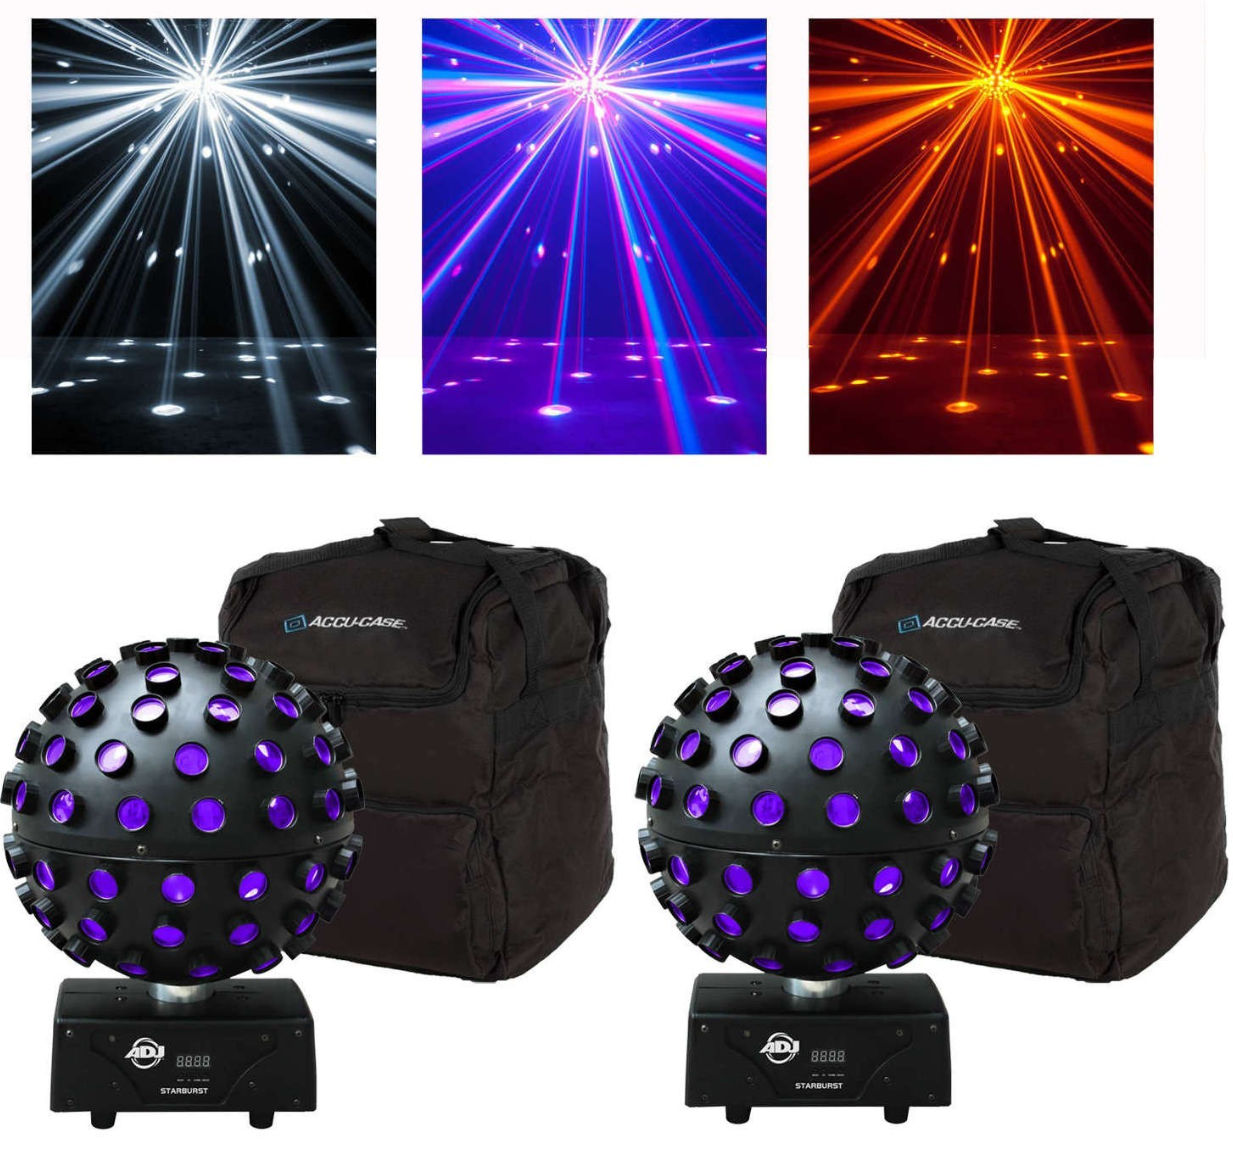
GoPro Max
Pros:
Easy to use without having to assemble modular parts
Cons:
No HDR (high dynamic range)
Desktop editing software not as powerful as the Insta360 Studio
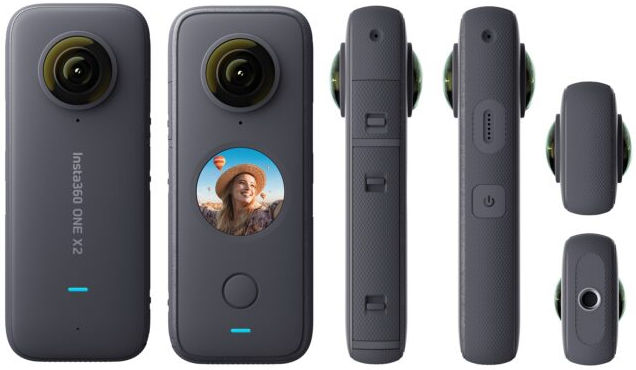
Insta360 One X2
Pros:
Small
HDR (high dynamic range) for better image quality
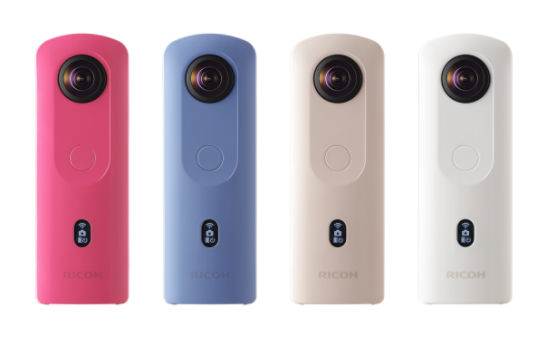
Ricoh Theta SC2
After testing the GoPro Max, Insta360 One X2, and the Ricoh Theta SC2, it clear that the Insta360 One X2 is the better camera.
Virtual Reality / 3D Panorama Software
Marzipano
Marzipano is free and open source. You can use the Marzipano tool to quickly upload 360 photos and then download a complete website with all code to host yourself. However, you can only zoom out so much as shown in the screenshot below.
Kuula
Kuula lets you upload 360 photos and embed a 360 viewer of your photos on your website. You can also zoom out much more than with Marzipano as shown in the screenshot below.
You can then take a screenshot of the zoomed out 360 photo which doesn’t show very warped and curved lines.
Metareal
Metareal is a great alternative to MatterPort. You can create floorplans as well and pay a nominal fee to have Metareal convert your 360 photos into virtual tours for you.
Photoshop
In Adobe Photoshop, you can import a 3D panorama photo
In the lower left corner, when you have the white grid enabled, you will see orbit, pan and dolly buttons to move the image around.
Under Properties, you can adjust the Vertical FOV (Field of View) to zoom in and out.
GoPro Player Desktop App
The GoPro Player desktop app will also open 360 photos and let you rotate and zoom in and out. But, unlike Photoshop and Kuula, you’ll get a fisheye view as shown below.
Google Photos Mobile App
The Google Photos mobile app has a Panorama feature but you have to move your camera horizontally or vertically to capture create the panorama. It’s not a full 360 degree panorama but it does support scrolling in Google Photos.
Insta360 Studio
The Insta360 Studio desktop app is definitely better than the GoPro Player desktop app. It’s got more features and is intuitive to use.
People’s faces vary significantly from one to another and with time as they age. Some men lose hair, some women pluck and lose their eyebrows or change the shape of their eyebrows, some men change their beard or mustache style, and last but not least, some people have or develop some natural or accidental issue with their nose, whether it’s crooked, asymmetric, bumpy, droopy, too large, or so shallow that they can’t comfortably where glasses.
For men, the most common operation is probably a hair transplant. For women, the most common operation is probably rhinoplasty (nose job) although many women should probably just get an eyebrow transplant instead of drawing their eyebrows on their skin which looks obviously fake.
Interesting fact: Iran has the highest rate of nose surgery in the world, and according to a report in the conservative Etemad newspaper, as many as 200,000 Iranians, mostly women, go to cosmetic surgeons each year for a nose job. Source
This article explains one way to edit a 3D version of your face. It can be helpful if you are just curious about what a change may look like or if you are trying to explain your desired outcome to someone.
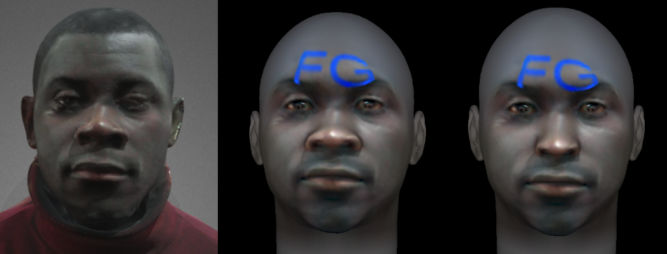
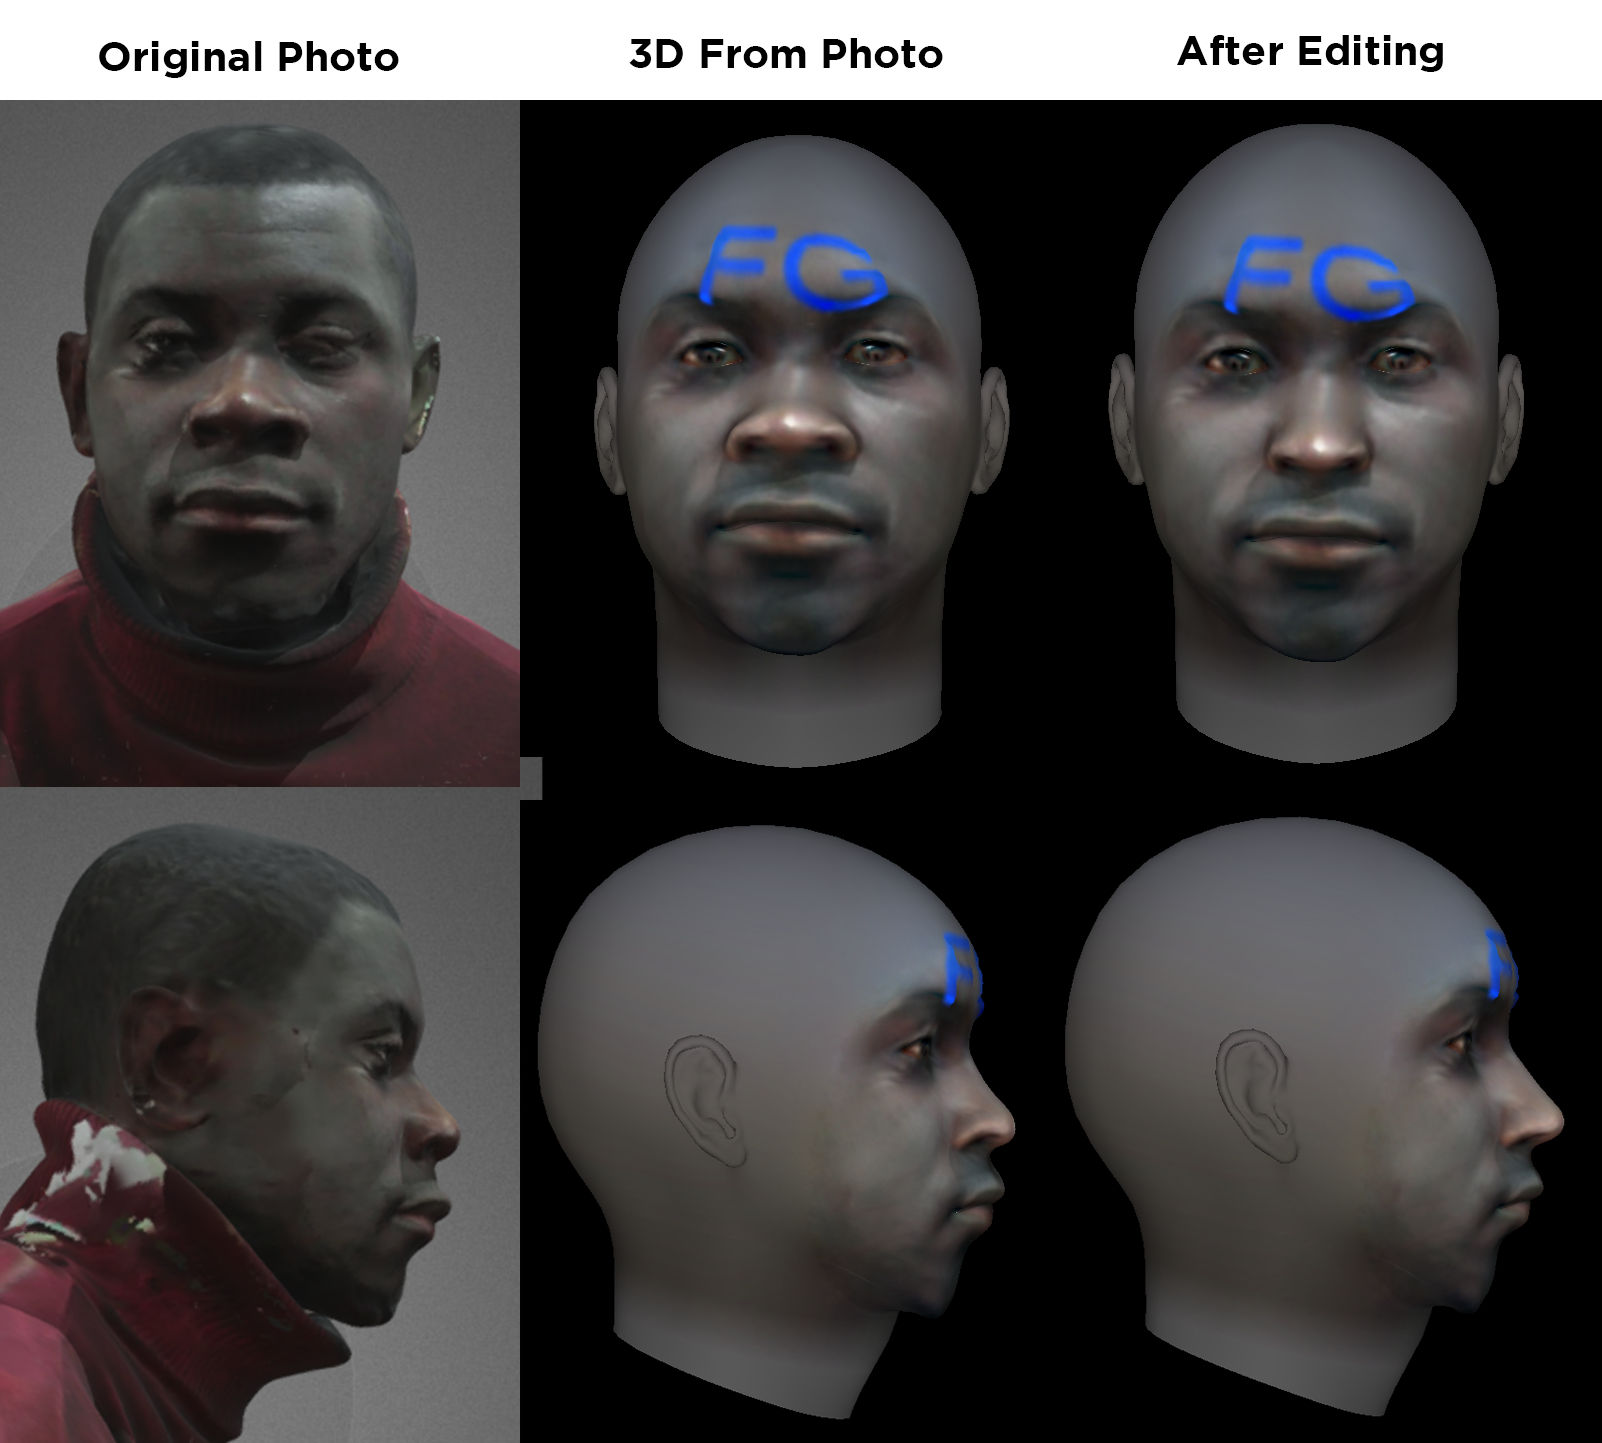
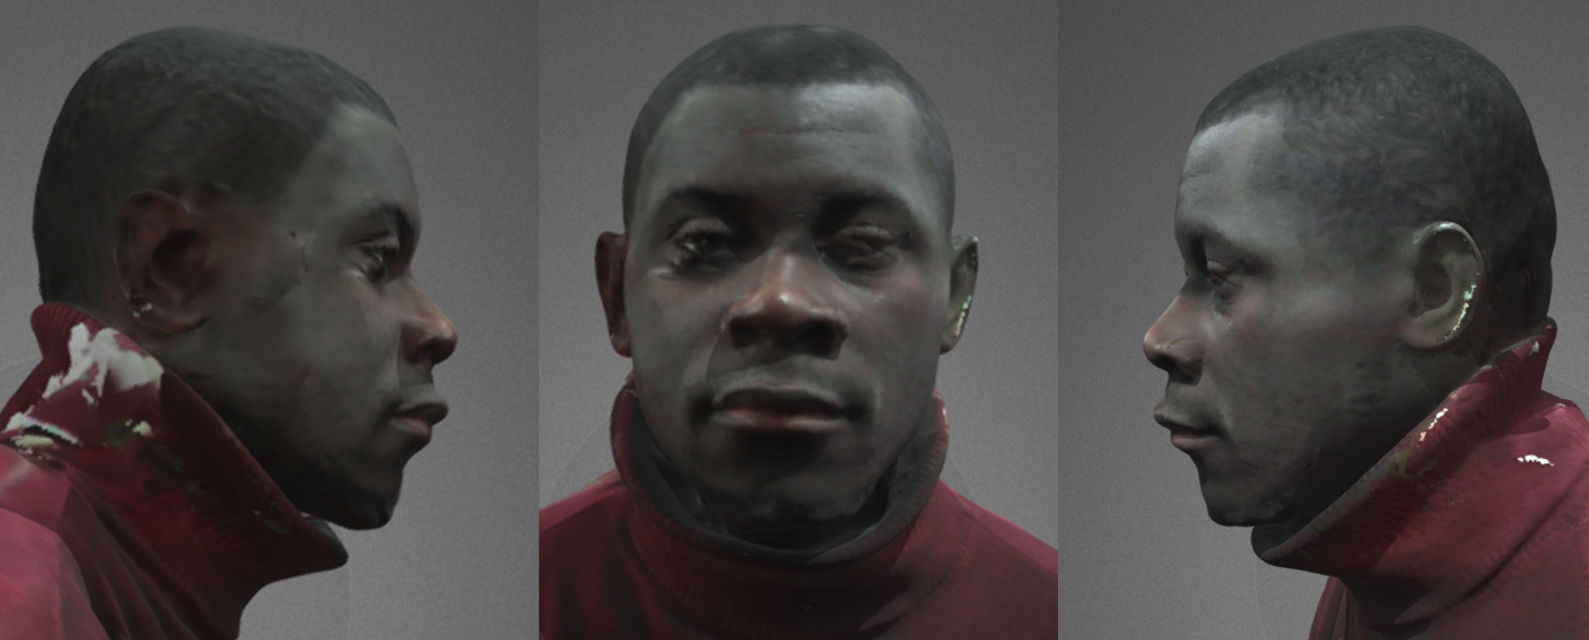
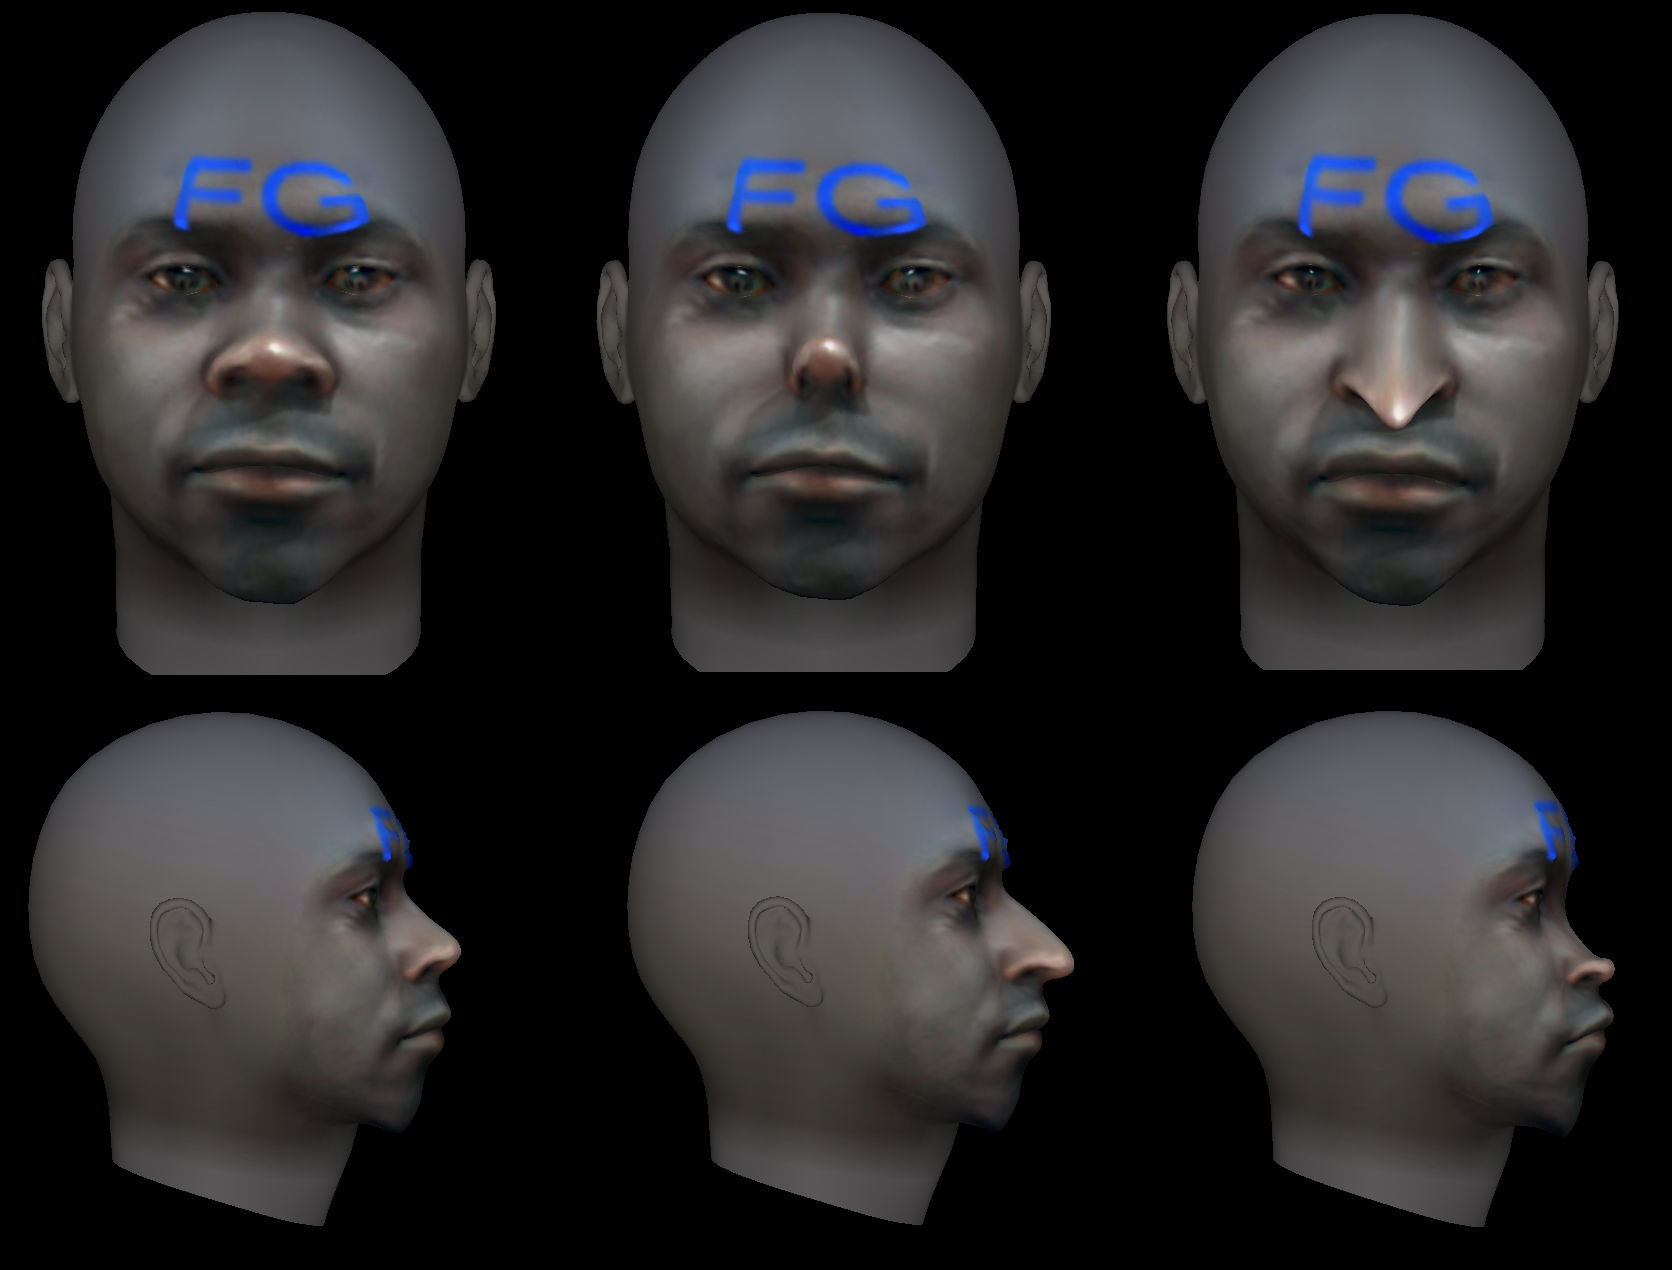
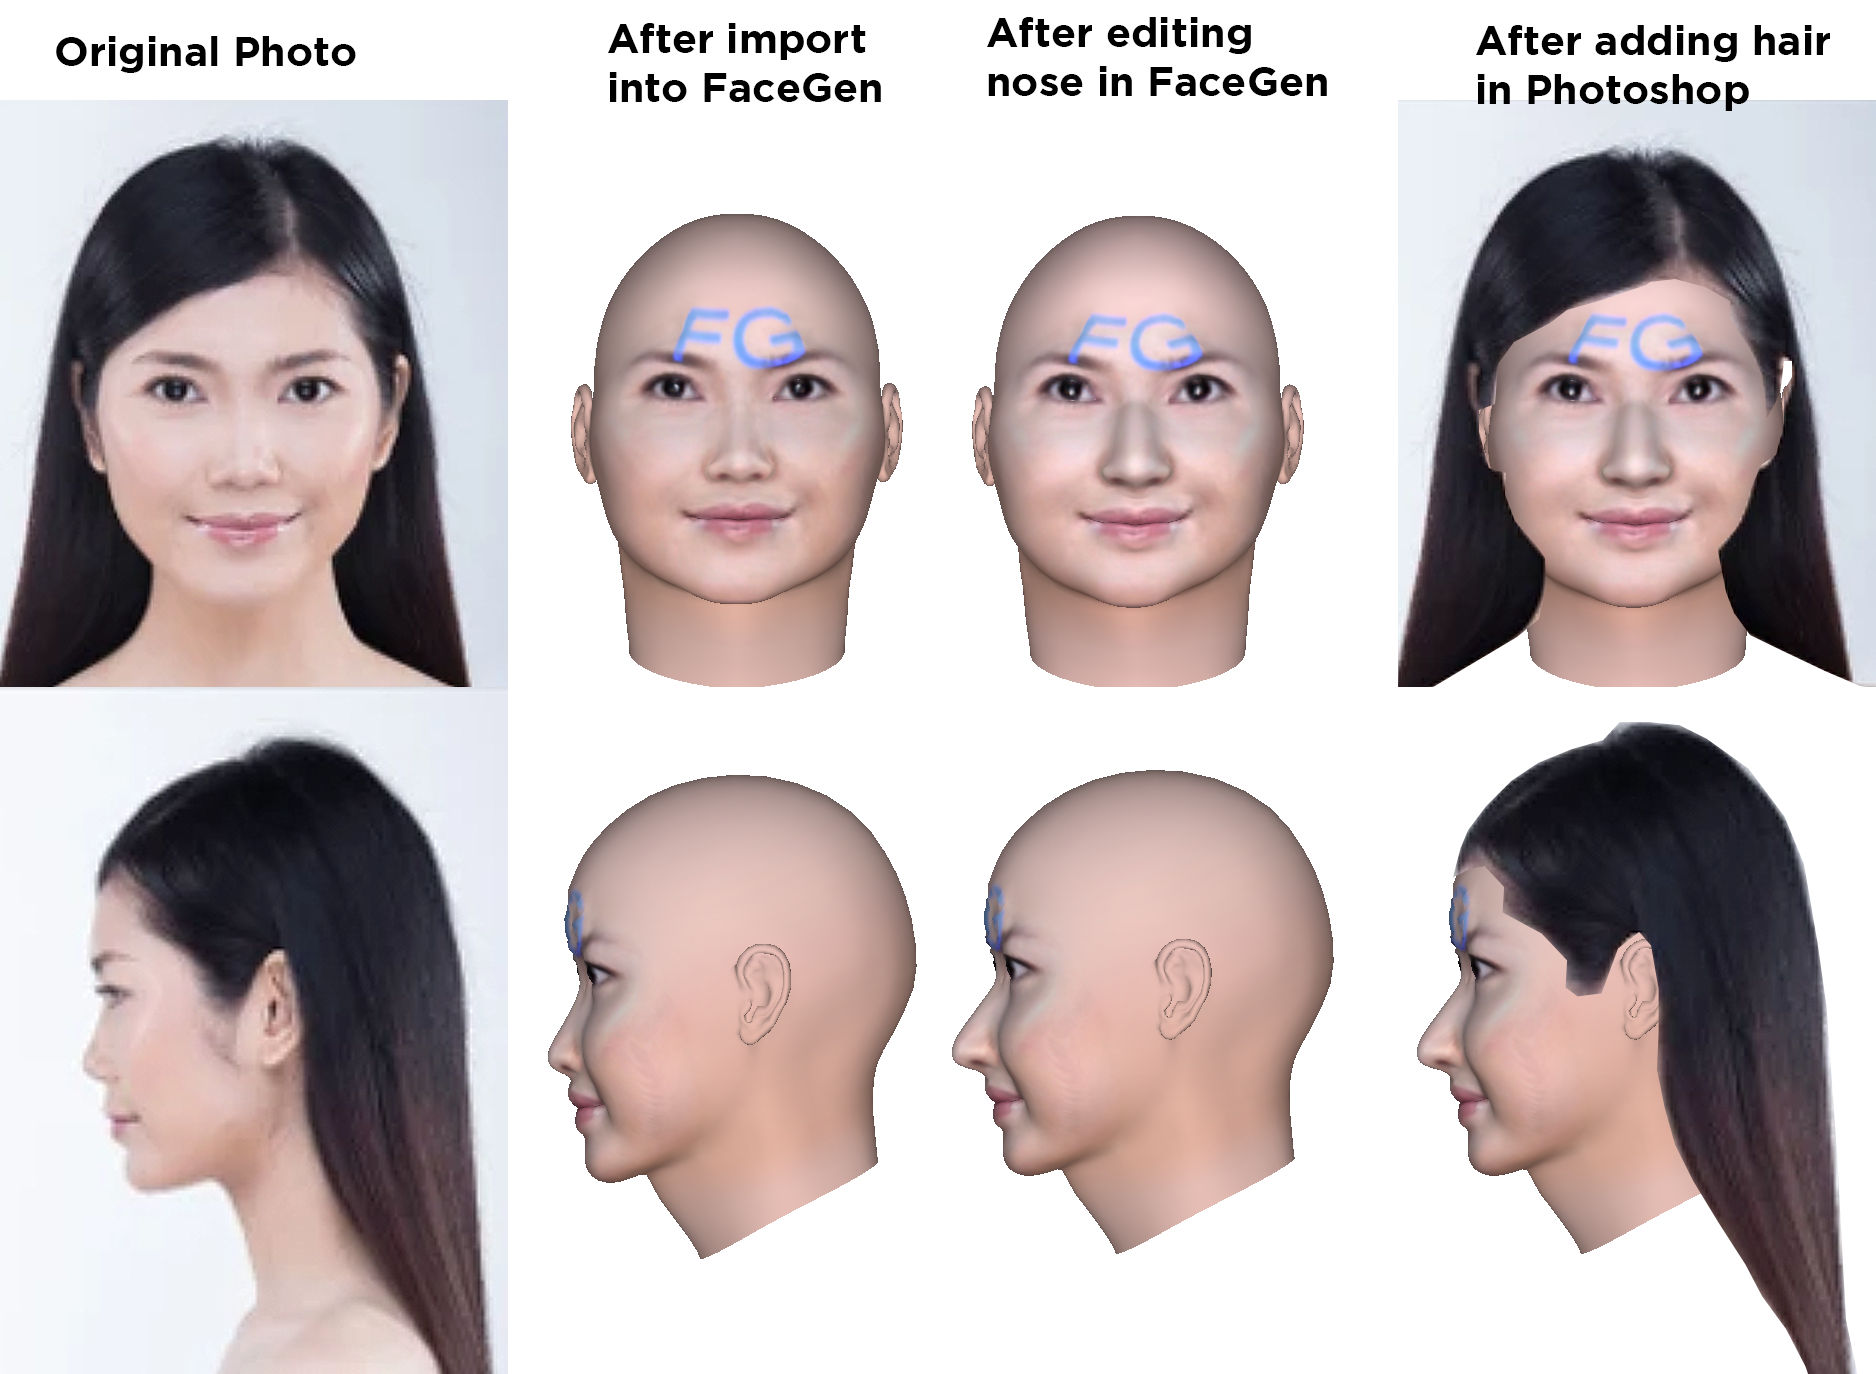
The following image shows the photos I started with (left column), the 3D faces generated from the photos (middle column), and the 3D faces after editing (right column).
1. Take a photo of someone’s face
For demonstration purposes, I took a screenshot of a 3D image of a random person on Sketchfab. You can take just a front photo but it’s better to take pictures of both sides as well.
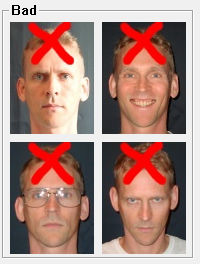
When taking photos, you should look straight and not tilt your head. You should have neutral gestures (no smiling, etc), and you shouldn’t wear glasses.
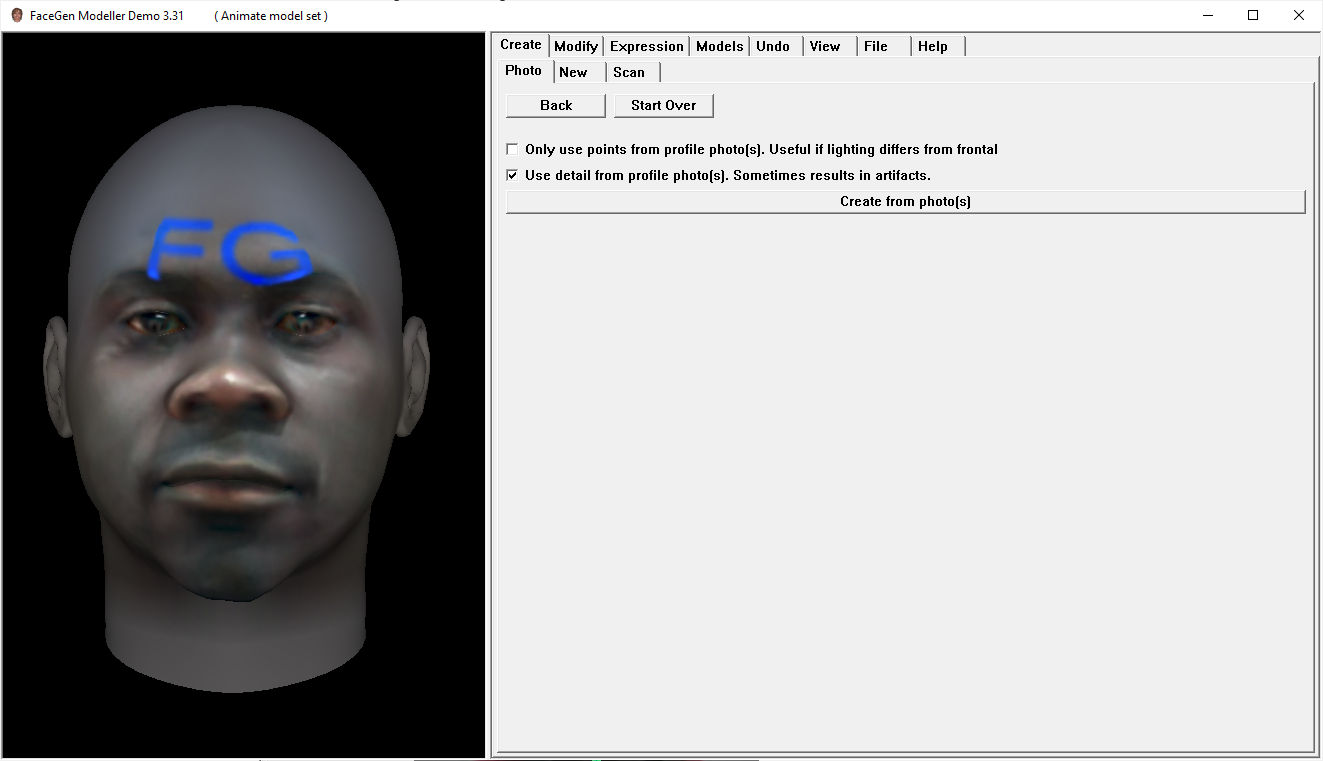
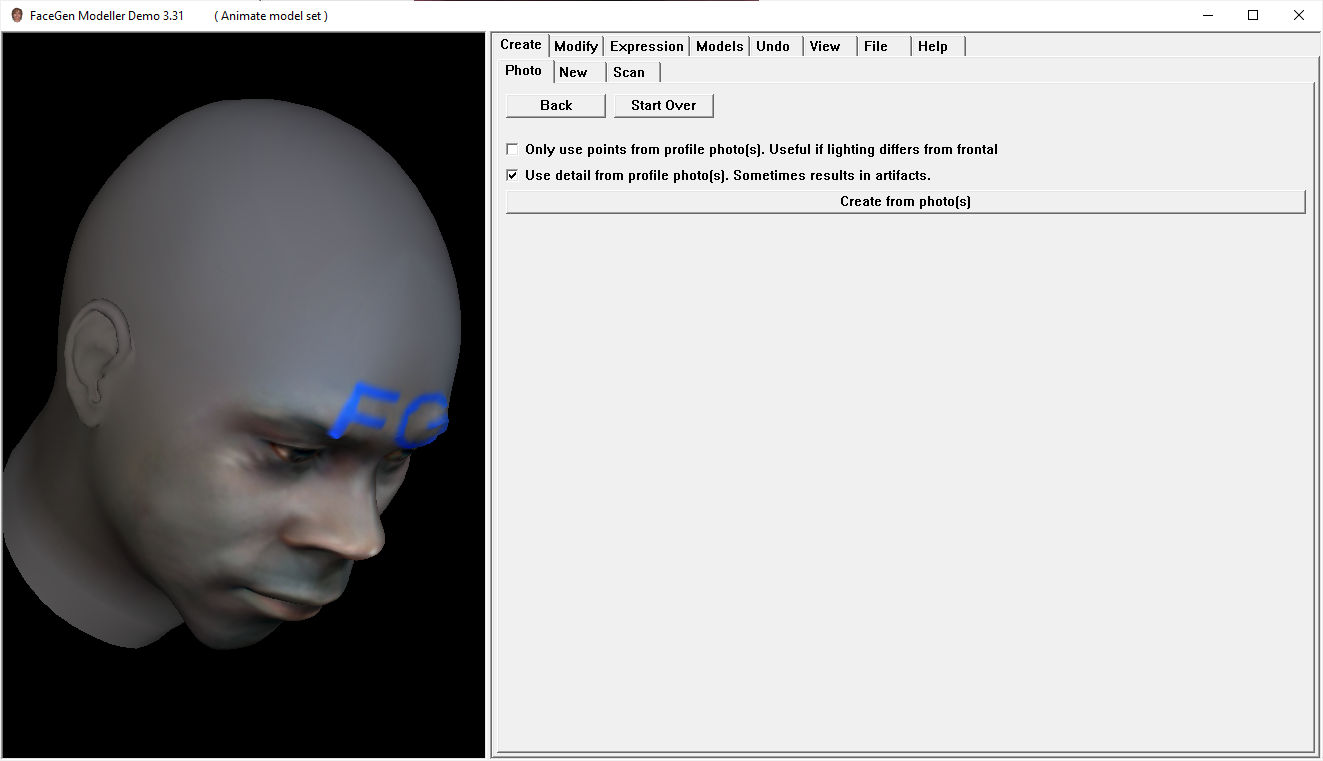
2. Load the photos into FaceGen 3D Print
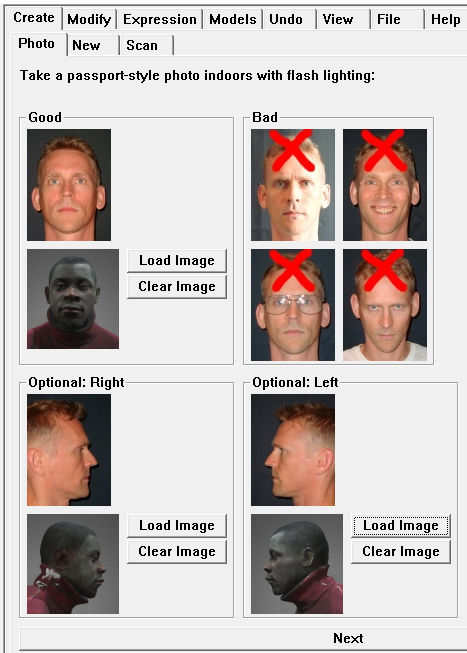
Download FaceGen 3D Print. You can download the demo version. You won’t get all of the features but you may not need all the features. The cheapest paid version costs $69. Install the program, click Create > Photo > and upload the photos from step 1.
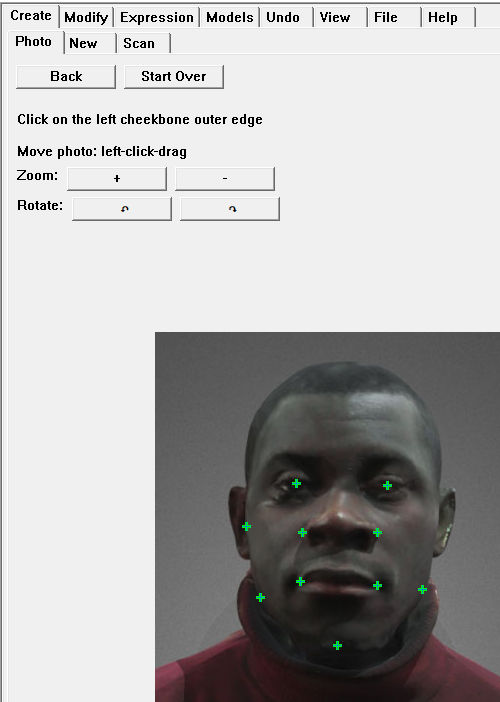
3. Mark specific points
FaceGen will then instruct you to mark specific points on your photos so that it can better generate a 3D image.
4. Generate 3D image
After you click the “Create from photo(s)” button, FaceGen will take about 30 seconds to analyze the photos and then generate a 3D image. This technique of generating a 3D image from photos is called Photogammetry. If you have a 3D scanner, you can also load a 3D image.
You can drag the 3D image around in any direction. Since I’m using the demo version, there is a blue FG (FaceGen) watermark on the image.
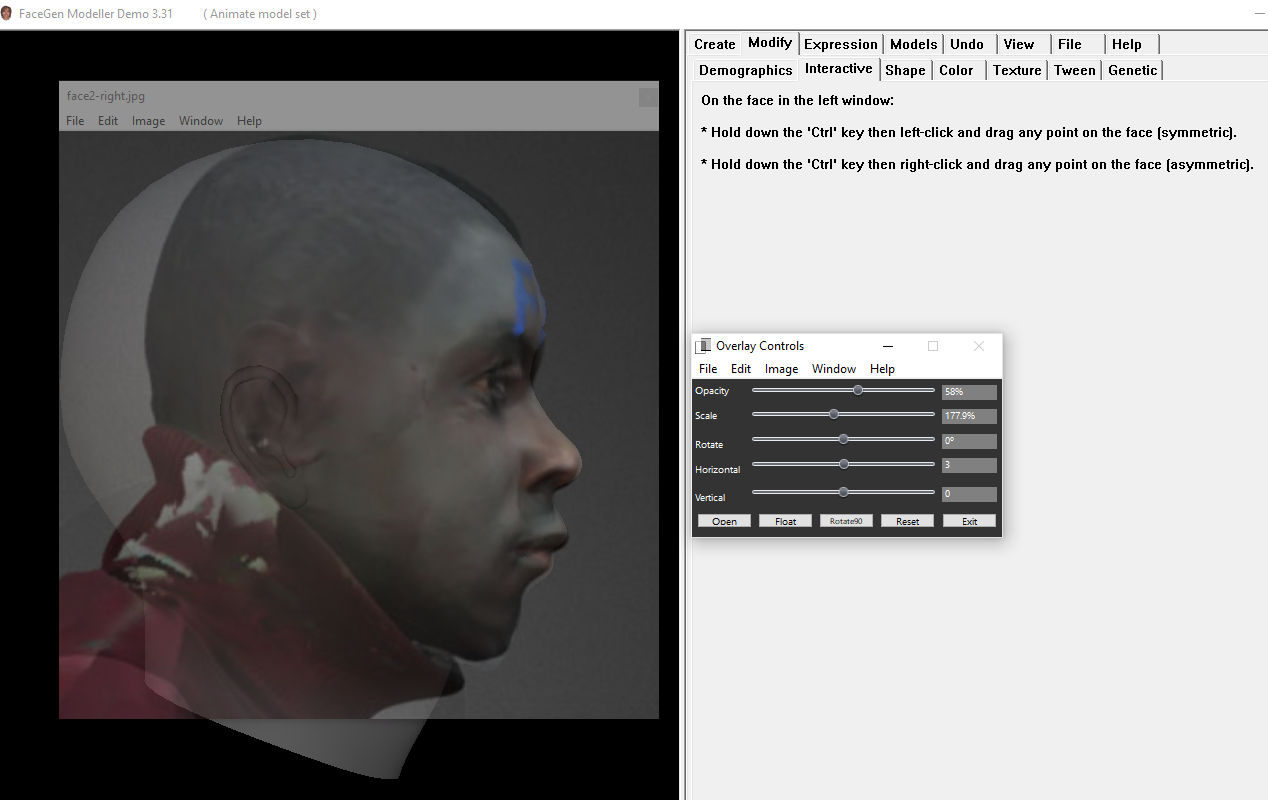
5. Overlay original photo to check accuracy
The generated 3D image may not be perfect. To fix that, we can overlay our still photos on the FaceGen window and tweak the 3D image to match the photos. One overlay utility that works is called Overlay. After installing it, load your still photo, drag the Overlay window over the FaceGen window, scale the overlaid photo so that the face elements of the overlaid photo and the underlying 3D image are almost the same. You can then see whether the generated 3D image is sufficiently accurate or needs tweaking.
6. Edit the 3D image to match the photos
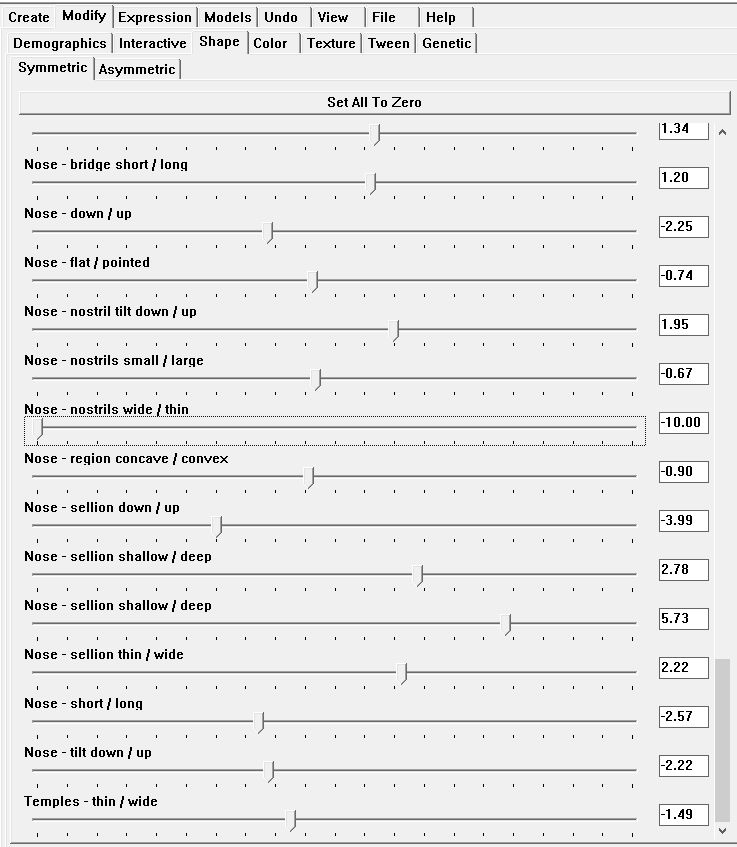
Click the “Float” button in the Overlay controls. Then, in FaceGen, click Modify > Interactive and edit the 3D image as follows:
Hold down the ‘Ctrl’ key then left-click and drag any point on the face (symmetric).
Hold down the ‘Ctrl’ key then right-click and drag any point on the face (asymmetric).
Symmetric will make changes symmetrically, e.g. if you edit the left eyebrow, then the right eyebrow will get the exact same edits. If you only want to edit one side / location, then use the asymmetric option.
In this step, your goal is to just tweak the 3D image to more closely match the photos.
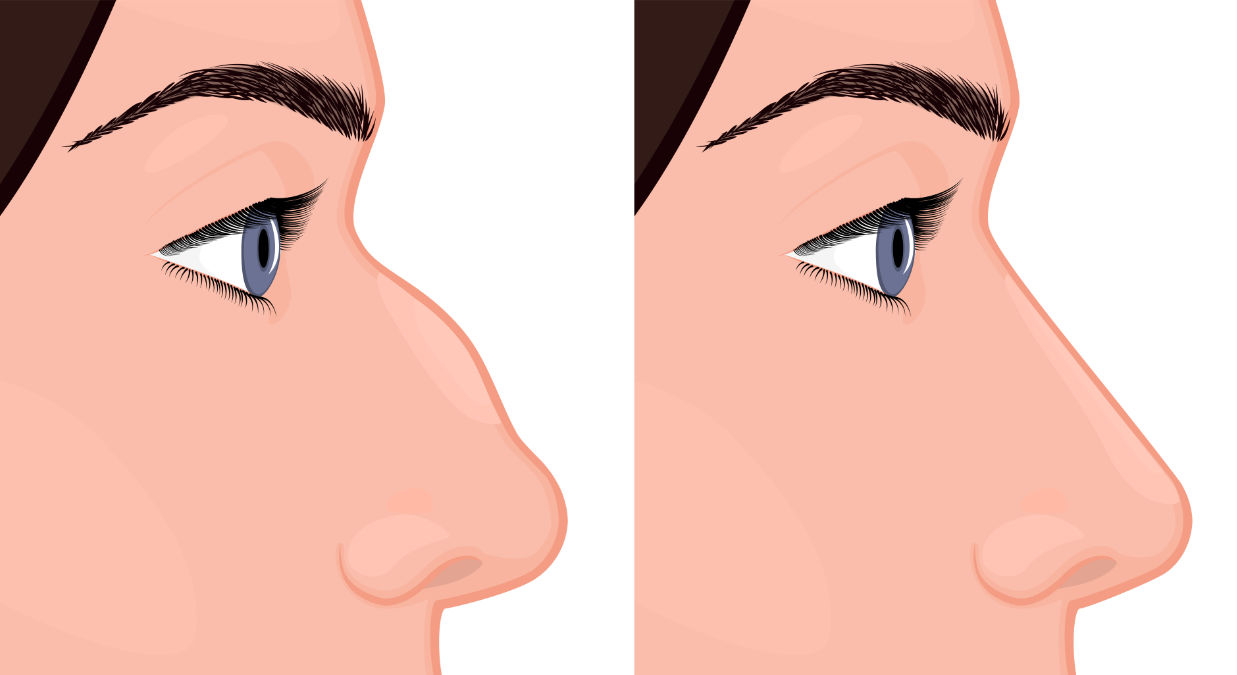
7. Edit the 3D image to your desired result
After tweaking the 3D image to match the still photos, you can start editing the 3D image to your desired transformation using the same technique as in the previous step. Following are some extreme examples for demonstration purposes.
If you click on Modify > Shape, you can modify preset facial elements, e.g. nose nostril size, etc.
8. Further editing
Though FaceGen has many features, it seems to lack the ability to modify 3D images in certain ways. For example, one complaint many people seem to have is of a hump on their nose.
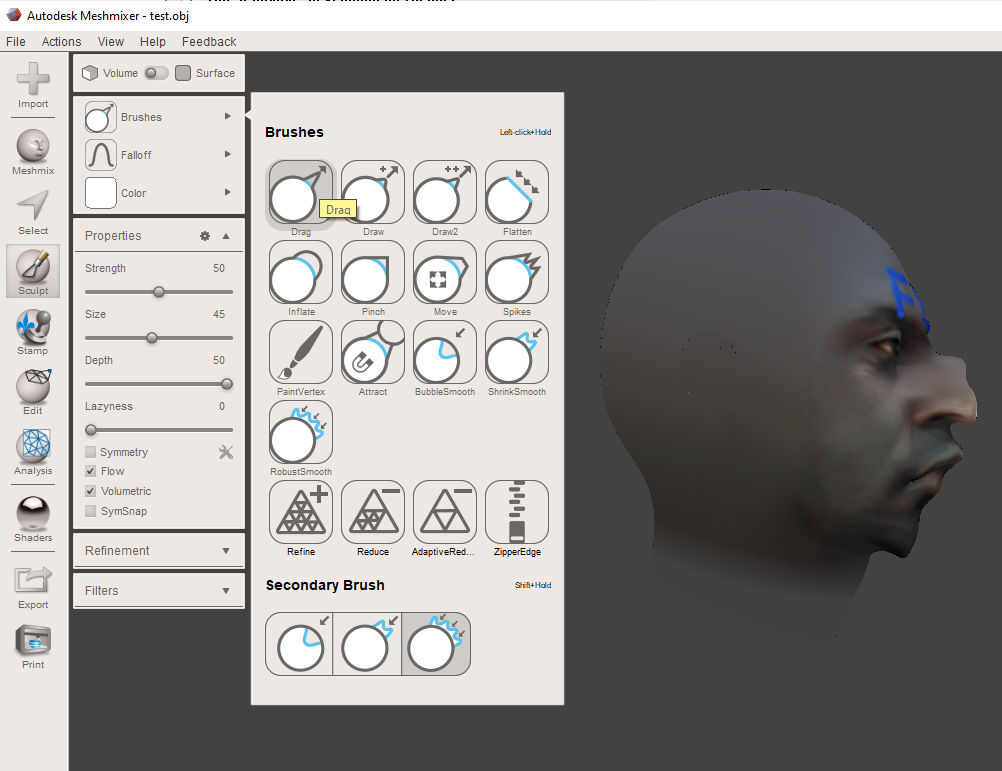
FaceGen doesn’t seem to have a way to reshape a hump like that. To resolve this, export the 3D image out of FaceGen as an OBJ file.
Then, download AutoDesk MeshMixer. It’s free. Install MeshMixer and import the 3D image you exported from FaceGen. With MeshMixer, you can sculpt your 3D image, e.g. click Sculpt > Brushes > Drag, adjust the strength, size, depth, etc of the brush, and then drag on the 3D image. Since my demo model didn’t have a hump on the nose, I created (an exaggerated) one. Note that all of this editing is in 3D so you can rotate the image around.
Another tool you can use is FaceTouchUp. But, it only works with 2D flat images, which, depending on your needs / goals, may be sufficient.
8. Upload 3D image for sharing
After you export your 3D image as an OBJ file, you can upload it to Sketchfab where you can share it with others. For example, below is an embed of the 3D image I took for this demo.
If you took a screenshot of the 3D image before and after you made edits, you can use a morphing program to show the transformation from the before state to the after one.
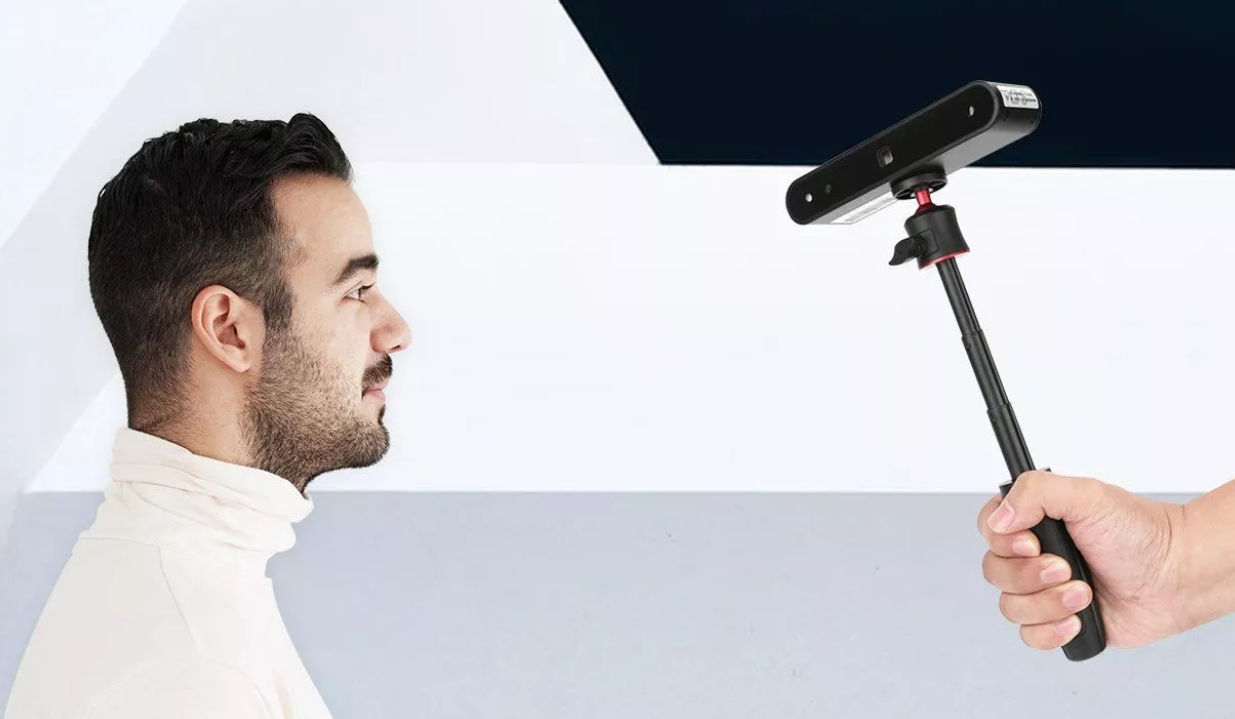
3D Scanner
Generating a 3D image from still photos works pretty well. But, you can also create a 3D image of your face (or any object) using a 3D scanner. Revopoint POP 3D Scanner ($500) is one such scanner. It’s supposed to generate a more accurate 3D model by using infrared light to calculate depth. However, it doesn’t capture anything in black so if you have black hair or a black beard, it will not pick those up.
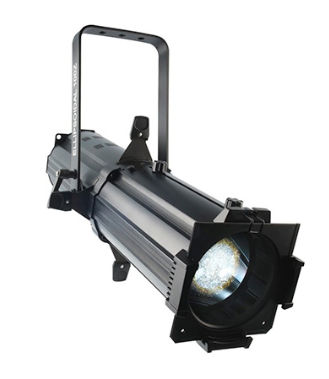
This type of light is used to highlight certain subjects or stage pieces with a relatively narrow beam angle.
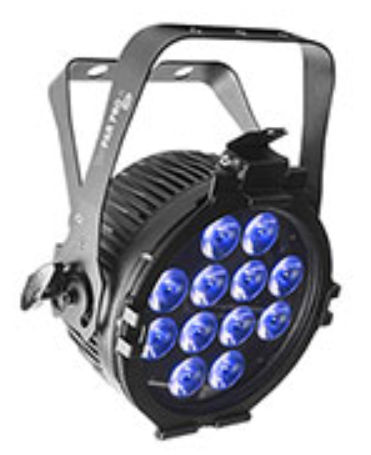
Parabolic reflectors (PAR)
This type of light is used to light up large areas. They come in a variety of lens types to get different beam angles. This light doesn’t have zoom or focus options. This is the most common fixture because it’s the cheapest.
Fresnel
This type of light is a happy medium between a PAR and an ERS. They have a zoom function but not a focus and usually cast a much “softer” light than ERS light fixtures.
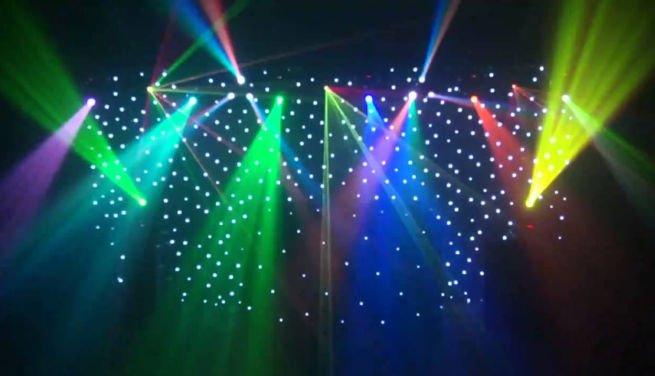
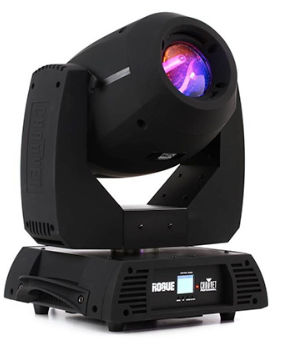
Moving Head
This type of light can move. It offers different beam angles for spot (narrow), wash (wide), beam (laser) and hybrid light effects. It is the most versatile stage lighting option.
Above are only some of the more common types of lights.
To hang your lights, you can get a lighting stand with T-Bar.
DMX Interface
DMX (Digital Multiplexing) or, officially, USITT DMX512, is a unidirectional serial data protocol, meaning the signal leaves the controller (computer or lighting board) and travels through all lighting fixtures in a daisy-chain. It was standardized in 1986. DMX networks typically only have one master device on the network, usually the DAW software / controller, and many slave devices — the lights.
DMX Cable
The 5-pin XLR the standard connector.
The reason for five pins is that pin 1 would be the ground, pins 2 and 3 would be data link 1, and pins 4 and 5 were reserved for data link 2 and/or proprietary data. Over the years, the second pair of pins (pins 4 & 5) on the connector stopped being used, since 3-pin DMX proved to be very reliable. This is why you may sometimes see fixtures with a 3-pin, 5-pin, or both connectors on the fixture.
DMX vs Audio/Mic XLR Cables
Some DMX cables are 3-pin cables. Don’t confuse them with 3-pin audio or mic cables. DMX cables use roughly 110-ohms whereas microphone cables are typically around 45 ohms. The different impedance between these cables matters with lighting networks and can cause your lights to either not respond or respond sporadically.
Number of light fixtures per DMX cable
You cannot have more than 32 devices connected on a single chain. If you have more than 32 light fixtures, you would need to use an Opto-Splitter. A splitter like the Chauvet DJ Data Stream 4 will allow you to have 32 devices connected to each DMX output connector. You cannot use Y-cables, as this approach does not electrically isolate the DMX lines and would cause data reflections.
DMX Channels / Universe
A DMX line is limited to a total of 512 channels, which is also called a universe. Each lighting fixture you have uses a number of DMX channels depending on how many parameters the fixture has. Lights can also have multiple personalities, or profiles, depending on how much or how little control you want. Note that the 512-channel limit is independent of the 32-light fixture limit.
Let’s say you have 40 lighting fixtures that use three channels each: you are only using 120 channels total. You can fit these all in the same universe of control, however, if you have more than 32 devices. You would implement an Opto-Splitter and split your devices up among the outputs in whatever configuration you would like, as long as each DMX leg has less than 32 devices on it.
Example
Let’s look at the Chauvet DJ SlimPAR Pro H.
This light has three different personalities, or profiles. It can be used in a 6-, 7-, and 10-channel mode, and again the more channels a fixture uses, the more control you have. Let’s look at 7-channel mode:
Channel 1: Dimmer
Channel 2: Red
Channel 3: Green
Channel 4: Blue
Channel 5: Amber
Channel 6: White
Channel 7: UV
Each DMX parameter on a fixture operates independently. Say I was to make this fixture a magenta color. I would turn up channel 2 (Red) and channel 4 (Blue) until I got my desired shade of magenta. However, turning up just these channels on the fixture (2 & 4) would not put out any light. I would also need to turn up channel 1, which is my dimmer that controls the overall intensity. On moving fixtures, this control becomes even more complex, because there are other parameters available, such as Pan and Tilt or gobos, again all independent.
The best way to understand a light’s capabilities is by checking its DMX assignments. For example, the ADJ Starbust’s manual shows this.
Addresses
When setting up a lighting rig, each light fixture needs to be assigned a starting address. If I have four of the same fixture mentioned above in the same personality (7-channel mode), their addresses would be 1, 8, 15, and 22. All 512 channels of data flow through every fixture in a DMX lighting chain so each fixture needs to know which channels control it based on channel addressing.
There are many different DAW software, for example, Ableton Live and Pro Tools. They can be used to create music and control lights. This article isn’t about creating music but just controlling lights in sync with existing music. Therefore, the software we’ll use is Show Buddy.
Setup
To sync light effects with music (e.g. an existing mp3 file), we’ll use this setup.
USB to DMX Controller Interface to connect laptop to lights
DMXIS software to control lights / create light effects
Unlike cheaper USB to DMX interfaces, DMXIS has an on-board controller to generate data into DMX format which is much more reliable than letting the computer generate the data.
Show Buddy software to sync light effects with music – $119
DMXIS light controller software is required to run Show Buddy
Terminate the DMX cable chain by inserting a DMX terminator into the DMX Out port of the last light fixture.
DMXIS Software
Important terminology
Show (group of songs) You can create multiple shows. A show typically is the name of a list of songs, e.g. Yanni Concert
Bank (a song) You can create multiple banks per show. A bank can be the name of a song, e.g. Santorini
Preset (a light effect) You can create multiple presets per bank. A preset can be the name of a light effect. You can create multiple presets (light effects) for a bank (song) in order of when you want the preset (light effect) to occur during song playback. You can drag presets up and down to order them.
Workflow
Add a light fixture If the light fixture you want to add isn’t in the DMXIS library, you can search for it at http://fixtures.dmxis.com/ where you can download user-uploaded DMX light fixes for importing into DMXIS. If you don’t find your fixture there, you can create and upload DMX light specs for your particular fixture. It is just a text file defining channel.
Assign each light fixture to a starting address, e.g.
PAR light 1 (3 channels) starts at DMX address 1 (channels 1-3)
PAR light 2 (3 channels) starts at DMX address 4 (channels 4-6)
PAR light 3 (3 channels) starts at DMX address 7 (channels 7-9)
PAR light 4 (3 channels) starts at DMX address 10 (channels 10-12)
Create a “show”, e.g. “Instrumental Songs”
Create a “bank”, e.g. “Santorini”
Create a preset, e.g. “Red”
Adjust the sliders for one or more light fixtures, e.g. by making them show red light
This software allows you to load audio files (e.g. mp3s) and for each song, place a preset (light effect) created in DMXIS at certain points in the song. Light effects can fade out over a specified amount of time.
Workflow
Add audio files (songs / mp3s) to the Track Library
Choose the DMXIS show to use in the DMXIS show dropdown
Choose a DMXIS bank to use in the list of banks
Choose a DMXIS preset to use in the list of presets
Drag the preset to the wave form at the point you want the preset (light effect) to run
Repeat steps 2-5 as much as needed
Resources
Capture Software
This software allows you to preview light effects.
Workflow
Create a 3D stage
Add one or more light fixtures to the 3D stage
Patch light fixtures (assign them to DMX addresses)
If the light fixture address assignment in Capture matches that in DMXIS, then DMXIS can control the light visualizations in Capture
Here’s a quick intro to 3d modeling using SketchUp in the browser.
Note: you can use SketchUp online or using the downloaded app. The free version of SketchUp doesn’t support creating Bezier curves. For that and other features, you’ll have to upgrade to SketchUp Pro.
When we create a new SketchUp sketch, we see this screen.
Let’s say we want to make four posts for a pergola. The posts are 6″x6″x10′ tall (actual dimensions are 5.5″x5.5″x10′).
First, under Model Info, we set the length format and precision.
To create our first post, we choose the Rectangle tool.
We click once in the 3D space and drag to create a rectangle which is 5.5″ x 5.5″. When dragging, we see in the bottom right corner the dimensions of the rectangle.
Instead of dragging until you get the right rectangle dimensions, just type 5.5,5.5 and then hit Enter.
Now, to complete making the first post, we need to “pull” the rectangle (actually, it’s a square) up 10 feet. Click the “pull” button.
Then click the square and drag up.
Again, to simplify getting the right dimensions, just type 120 and hit Enter to make the post 10 feet tall. Since all measurements are in inches, we type 120 instead of 10. SketchUp then converts the 120 to 10′ in the Dimensions box in the bottom right corner.
To verify the dimensions of any side of the object, click the Select tool.
and then click a side, e.g. a long side of the post, and in the Entity Info panel, we see that the length of that side is 10′.
Now, we’ll copy and paste that post by selecting the entire post, hitting Ctrl+C and Ctrl-V, and clicking where we want the other posts to be.
Now, the 2nd post is clearly not lined up with the first so we have to move it. Moving objects in SketchUp can be confusing to new users. Here are some ways to move an object.
Moving an object against another object
Let’s say we want to move the 2nd post flush against the first post. First, we orbit the view, if necessary, and select all of the 2nd post.
Then, we click the Move button.
and click on one corner of the 2nd post that we want to touch a corner on the first post.
Then, we click on the corner of the first post where we want that corner to touch. Now, the posts are flush and lined up together with each other.
Moving an object along an axis to line up with another object
Let’s say the 2nd post is higher up than the first post. We want to lower it so that both are on the ground, so to speak. We want to move the 2nd post vertically along the Z axis down until its bottom is on the same plane as the bottom of the first post. To do this,
select the 2nd post
click the Move button and click the bottom left corner of the 2nd post
drag up and down until you see “On Blue Axis” which is the Z axis
hold the Shift key – you will see the tip “Constrained on line from point” which means your movements are constrained to the axis you were on (blue / vertical / Z)
while holding Shift, drag and click on the bottom right corner of the first post.
You can also constrain movements to other axes as well.
Moving by Coordinates
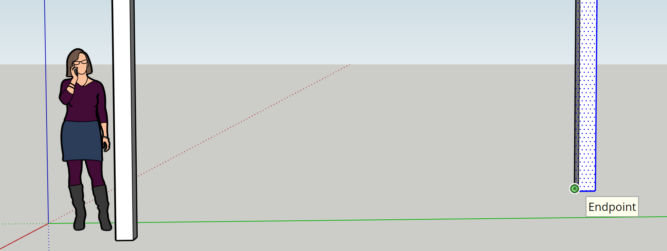
Using the dimensions tool, we mark the distance between the two posts along the green axis. We get 12′.
Let’s say we want the distance between them to be 10′ instead.
Relative coordinates in SketchUp are indicated as <r,g,b> or <red,green,blue> (the colors of the axes). So, if we want to move 2′ (24″) towards the first post (towards [0,0,0]), we can do this
select all of the 2nd post
click the Move tool and click the bottom left corner
drag a little anywhere to begin movement
type <,-24,> and hit Enter
Now, the distance between the two posts along the green axis is 10′.
Absolute coordinates in SketchUp are indicated as [r,g,b] or [red,green,blue]. So, if we want to move to the center of the coordinate system, we do the same as above except we enter [0,0,0].
Using the techniques above, we can make 4 posts that are exactly 10′ apart and all on the same red-green plane.
add the folder path containing the executables for both yt-dlp and ffmpeg to your Windows user or system path in the PATH environment variable (see screenshot below)
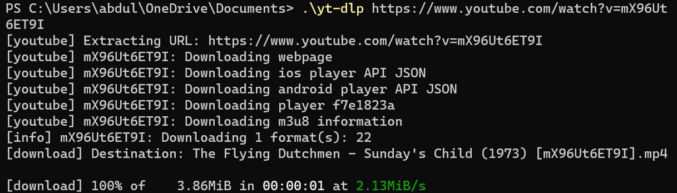
open a terminal / command prompt,
change to the folder where you want the downloads to go
run .\yt-dlp URL (I’m using PowerShell)
Path environment variable
For example,
.\yt-dlp [Youtube Video URL]
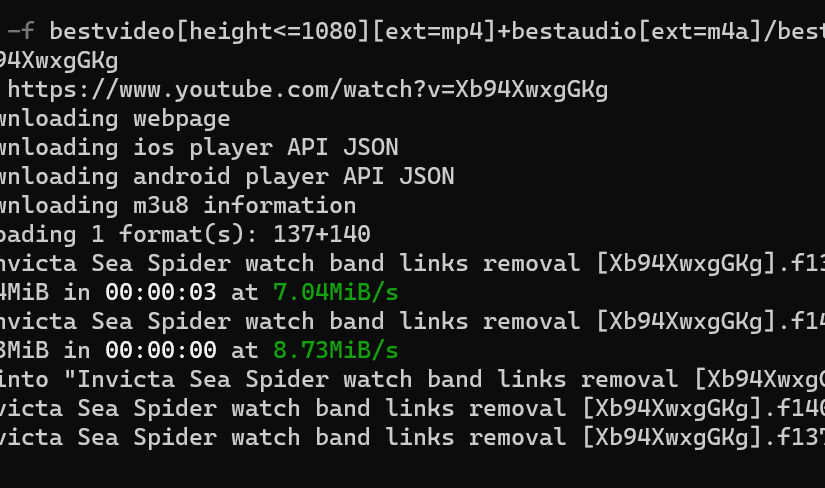
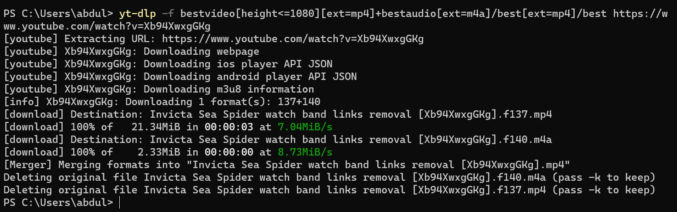
If you want to download the 1080p resolution of the video and it is available, run the following command.
yt-dlp -f bestvideo[height<=1080][ext=mp4]+bestaudio[ext=m4a]/best[ext=mp4]/best [Youtube Video URL]
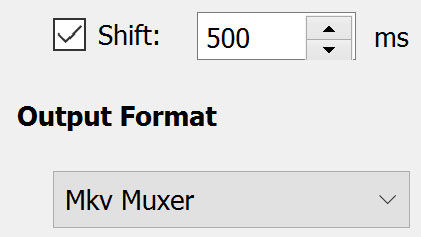
If you take an mp4 (mpeg-4) video and put it in a video editing program like Corel VideoStudio and then render the same video without any other assets (images, audio, other videos, etc), then you may find that the resulting video becomes out-of-sync with the audio. To fix this, you can use Avidemux as follows.
Open the mp4 file in Avidemux
In the Audio Output section, check the Shift checkbox and enter a value in the time field. Note that 1 second = 1000 ms. For me, I found that 500 ms works.
Hit the play button and update the time shift value until the audio and the video are in sync.
In the Output Format section, choose Mkv Muxer. This will produce an mkv file. If you choose mp4 muxer, then the output audio will be out of sync with the video again. You can upload mkv files to YouTube.
This article explains how to remove a green background in a video using Corel VideoStudio Ultimate 2018 and the NewBlueFX Chroma Key.
When applying a chroma key to a video in VideoStudio, you have two options:
using Corel VideoStudio’s native chroma key feature
using the NewBlueFX Chroma Key filter
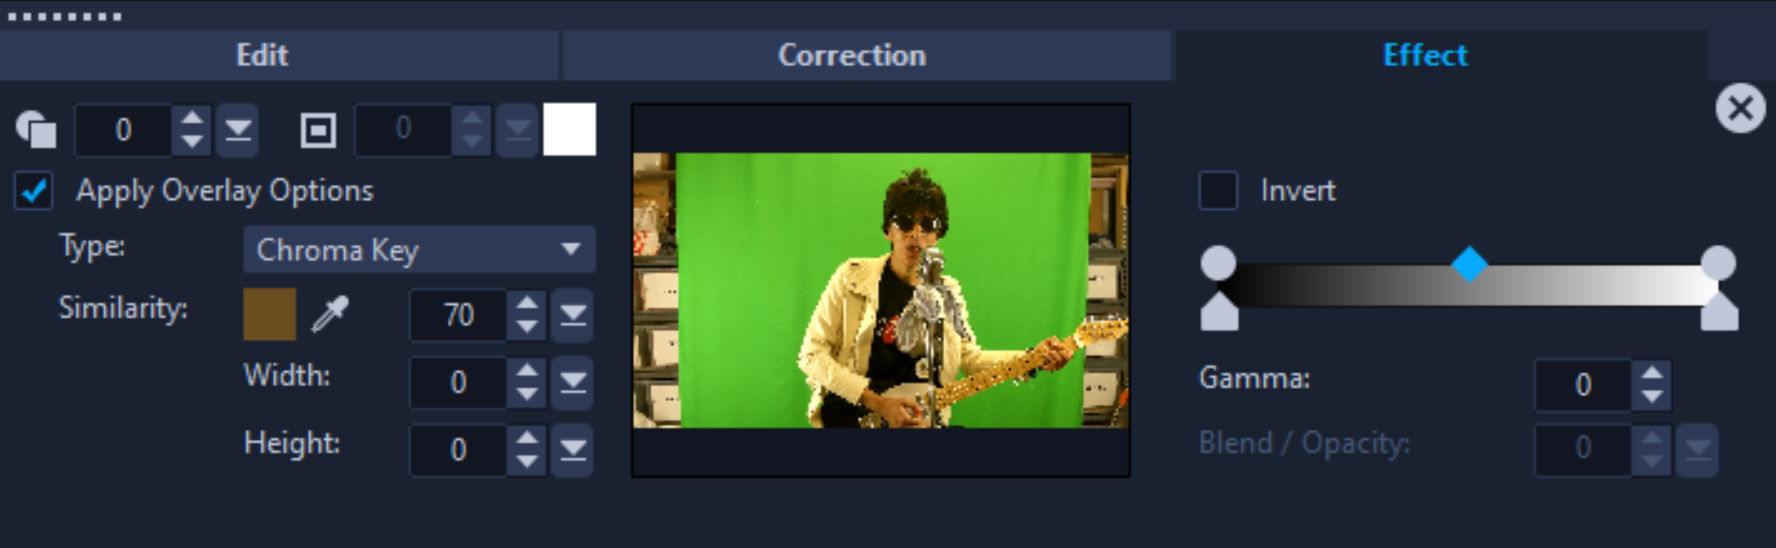
Native Corel VideoStudio Chroma Key Feature
To use VideoStudio’s native chroma key feature,
select a video on the timeline,
open the Options panel,
click the Effect tab,
check the “Apply Overlay Options” checkbox, and
adjust the settings.
From my experience, this feature doesn’t work well for imperfectly lit backgrounds. Unless you are filming in a professional studio, the chroma key results will likely be poor.
NewBlueFX Chroma Key Filter
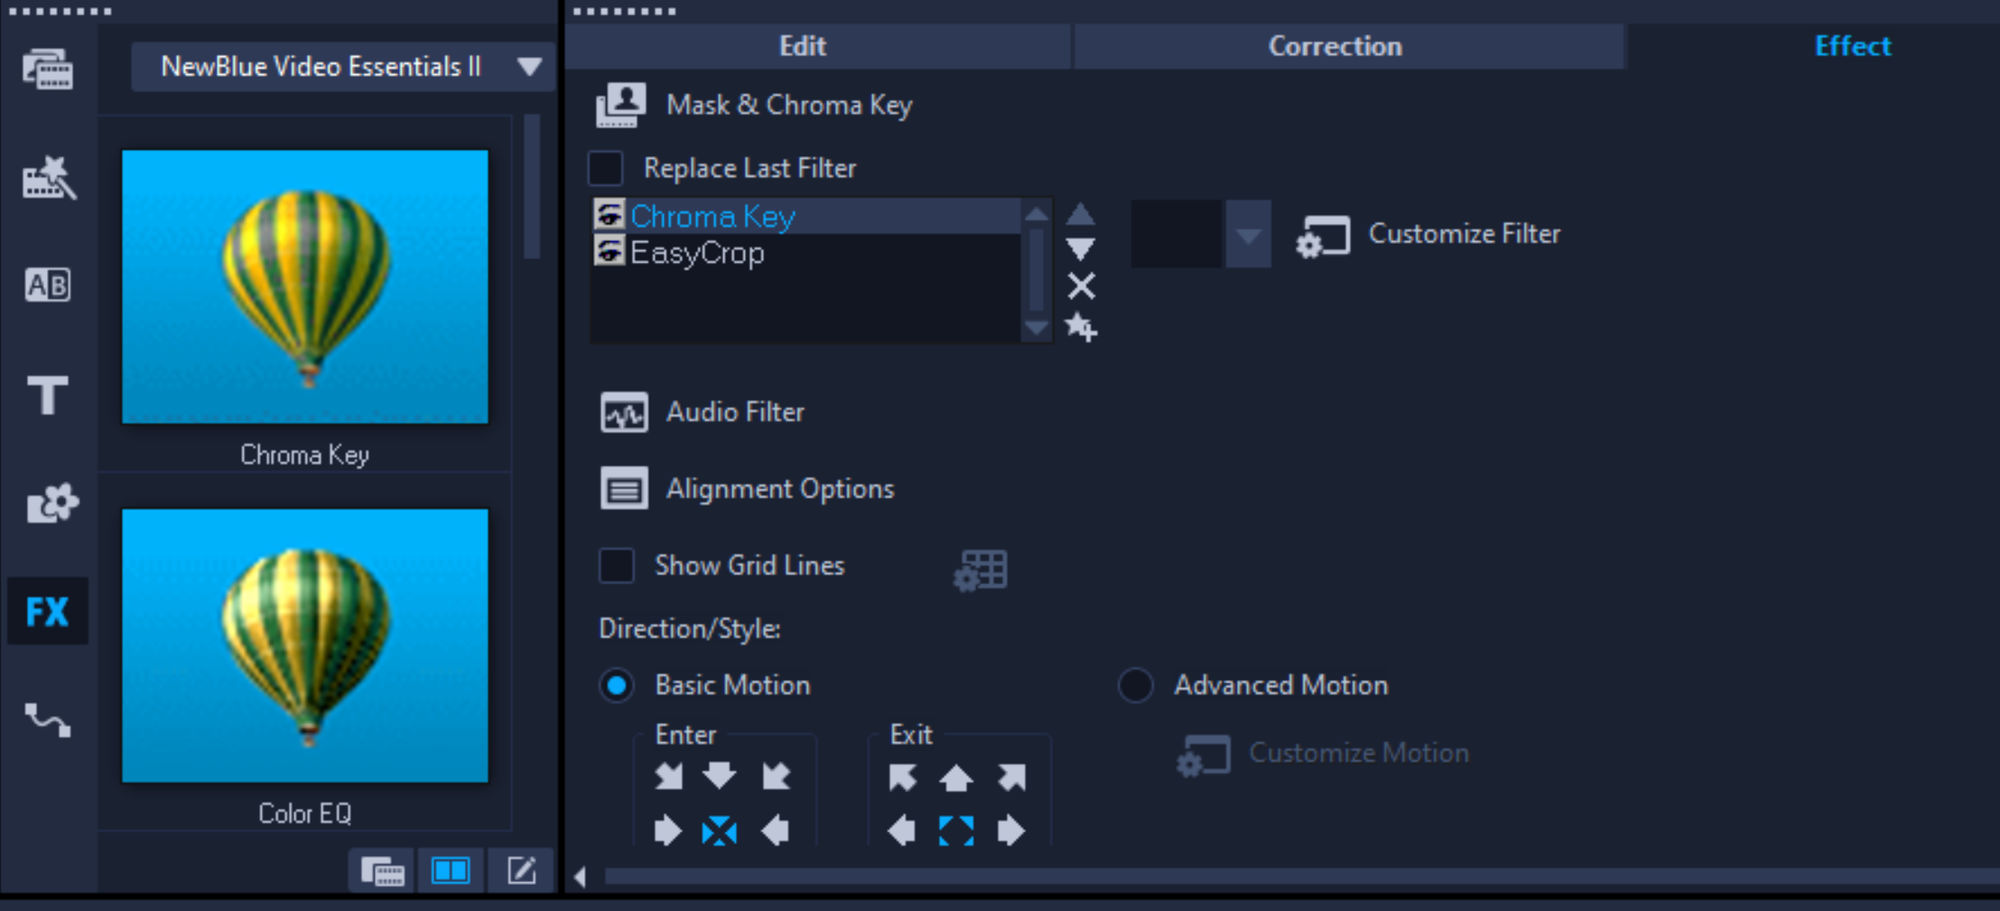
For better chroma key results, you can use the NewBlueFX Chroma Key filter. Disable the native VideoStudio chroma key by unchecking the “Apply Overlay Options” checkbox described in the previous steps. This will minimize confusion due to the application of multiple chroma keys. To use the NewBlueFX Chroma Key, do this:
crop your video to remove any areas outside of the green screen. If you don’t, the background will be gray instead of transparent.
click on the FX Filter button
select NewBlue Video Essentials II in the filter dropdown
drag the Chroma Key filter to the video in the timeline
if the native VideoStudio chroma key panel is visible, close it by clicking the x button in the top right corner of the panel
select the “Chroma Key” filter and then click the “Customize Filter” button
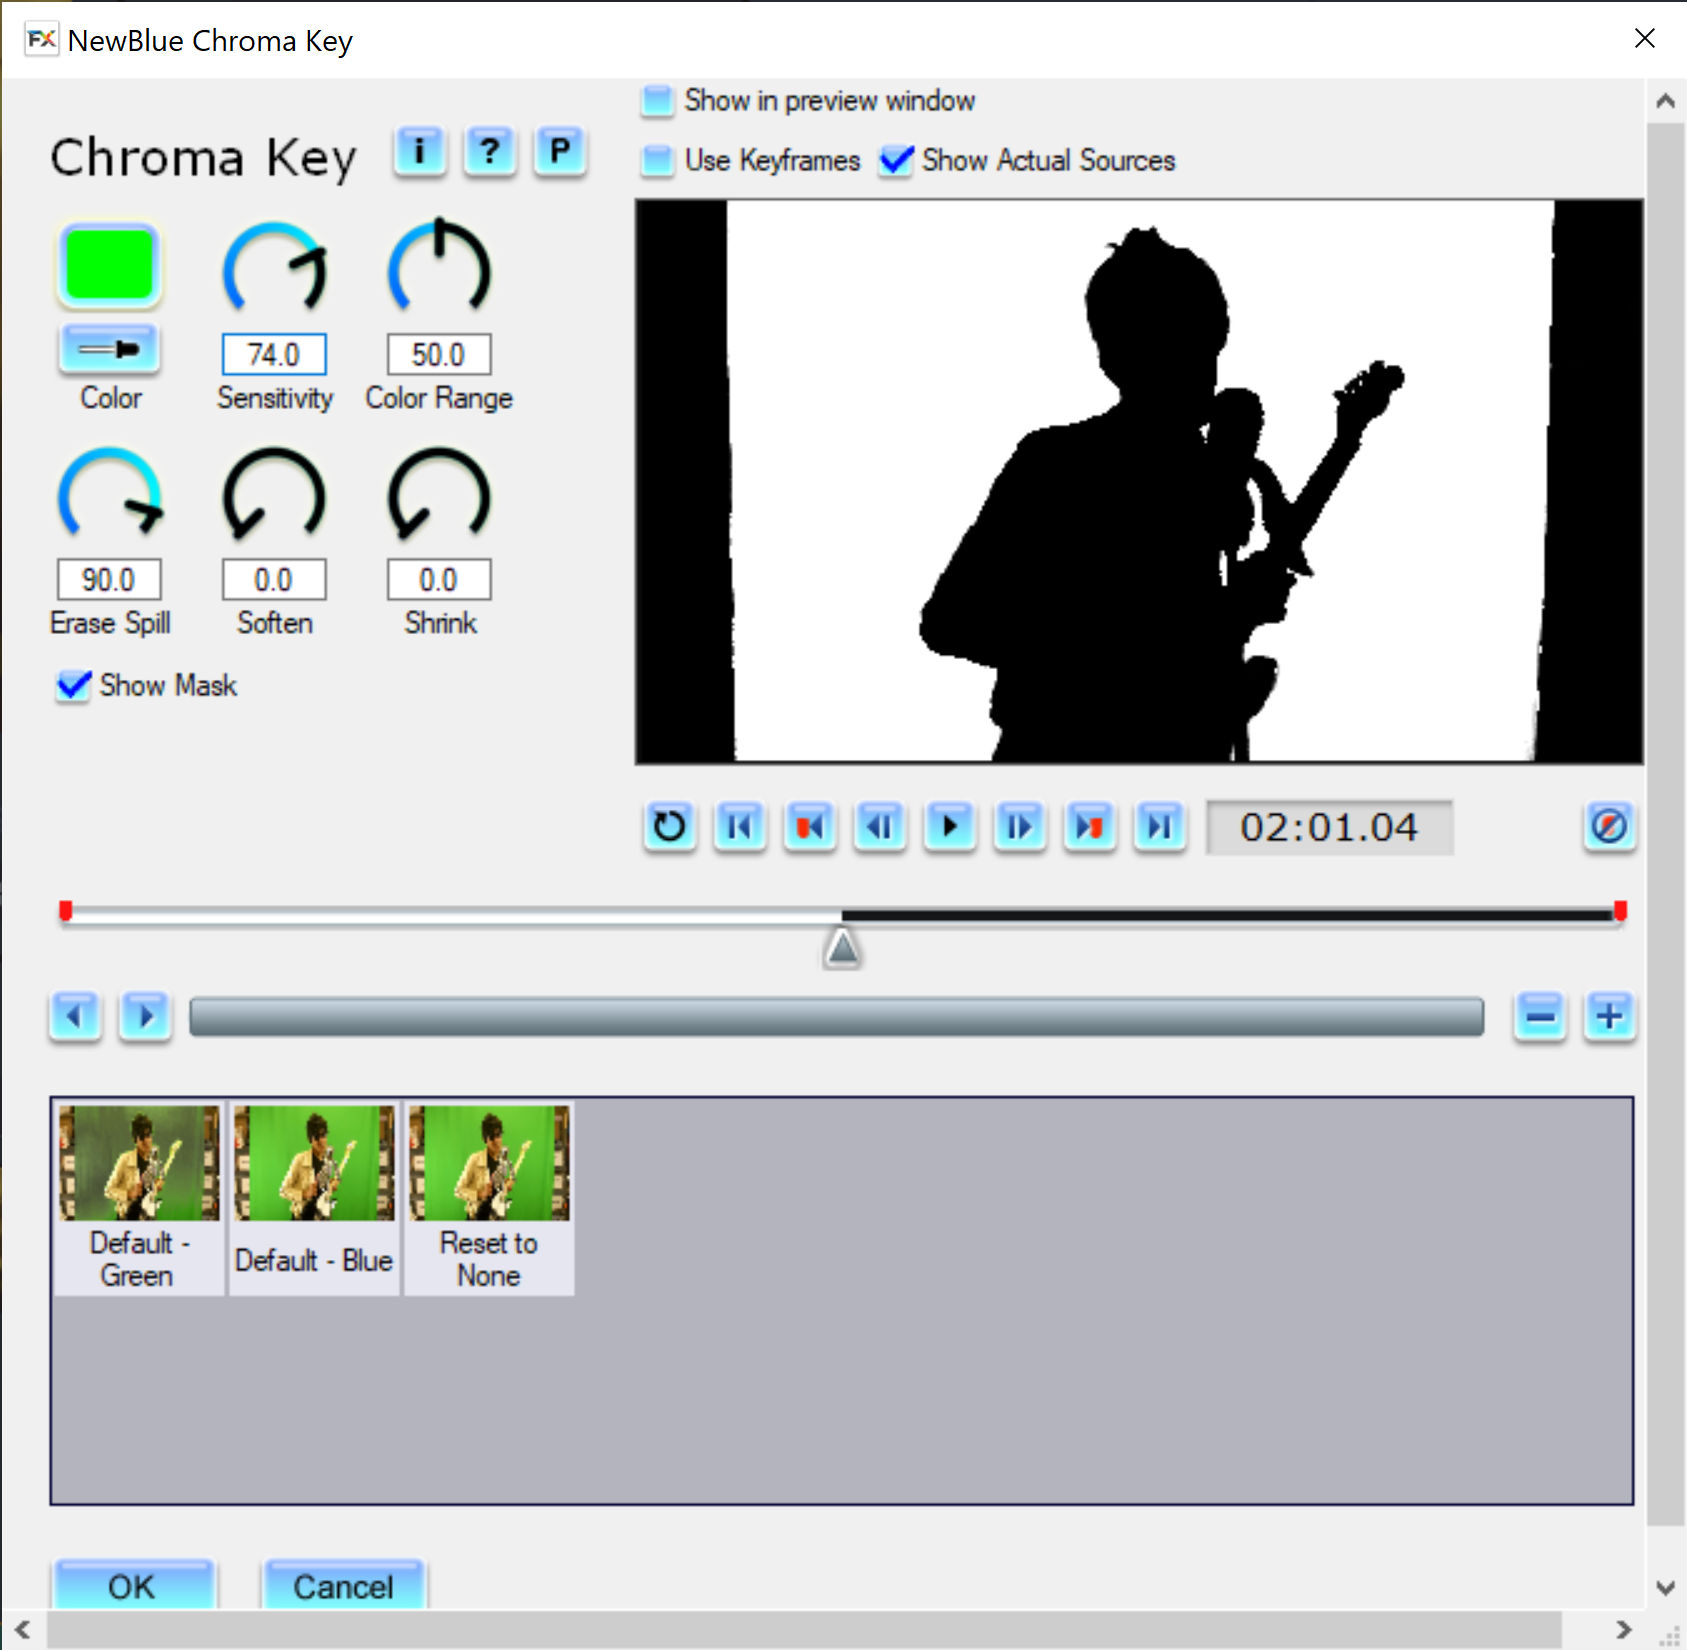
The NewBlue Chroma Key control panel will appear.
Uncheck “Show in preview window” to improve performance
Uncheck “Use keyframes” to apply the same chroma key settings for the entire video. Unless you need to apply different settings for different sections of the video, you don’t need to use keyframes.
If your background is green, leave the “Default – Green” button selected.
Check the “Show Mask” checkbox to show a black mask for any color in the video other than green
Adjust the Sensitivity value until the subject is completely black and the background is completely white. If it’s difficult to use the radial slider, just enter numeric values.
Drag the slider to scrub through the video to see if any section of the video shows a partially gray background or white subject. If it does, further increase the sensitivity setting.
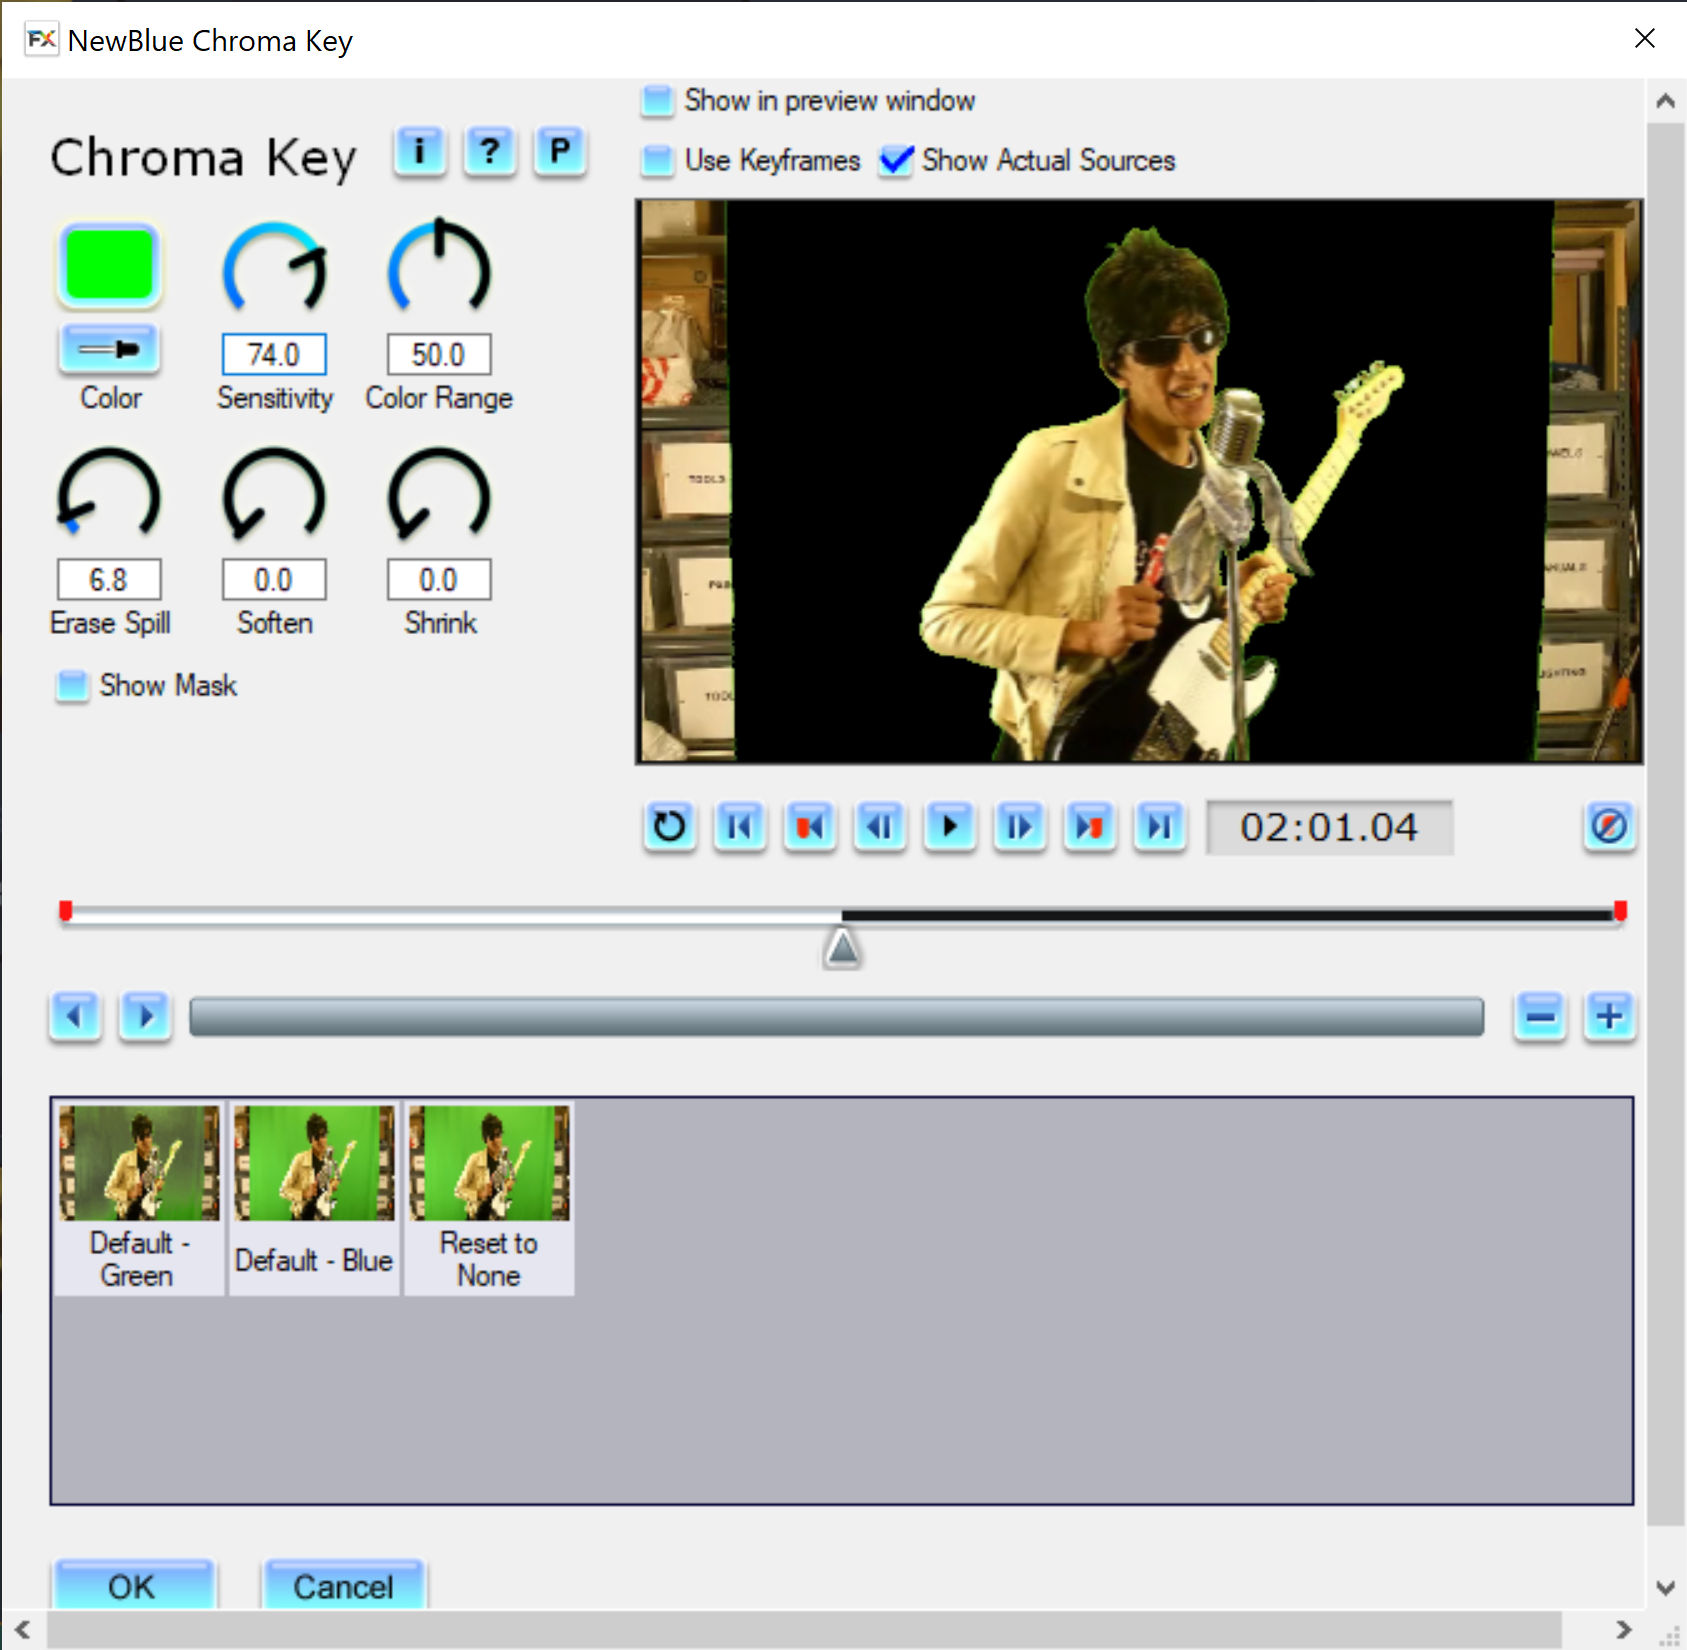
Uncheck the “Show Mask” checkbox to remove the mask and to see the video in color. If you see some of the green background spilling over on the subject (usually around a person’s hair), adjust the “Erase Spill” value.
Click OK to save and exit the Chroma Key panel.
Some of the green background is spilling over around the subject’s hair. Increase the “Erase Spill” value to fix this.
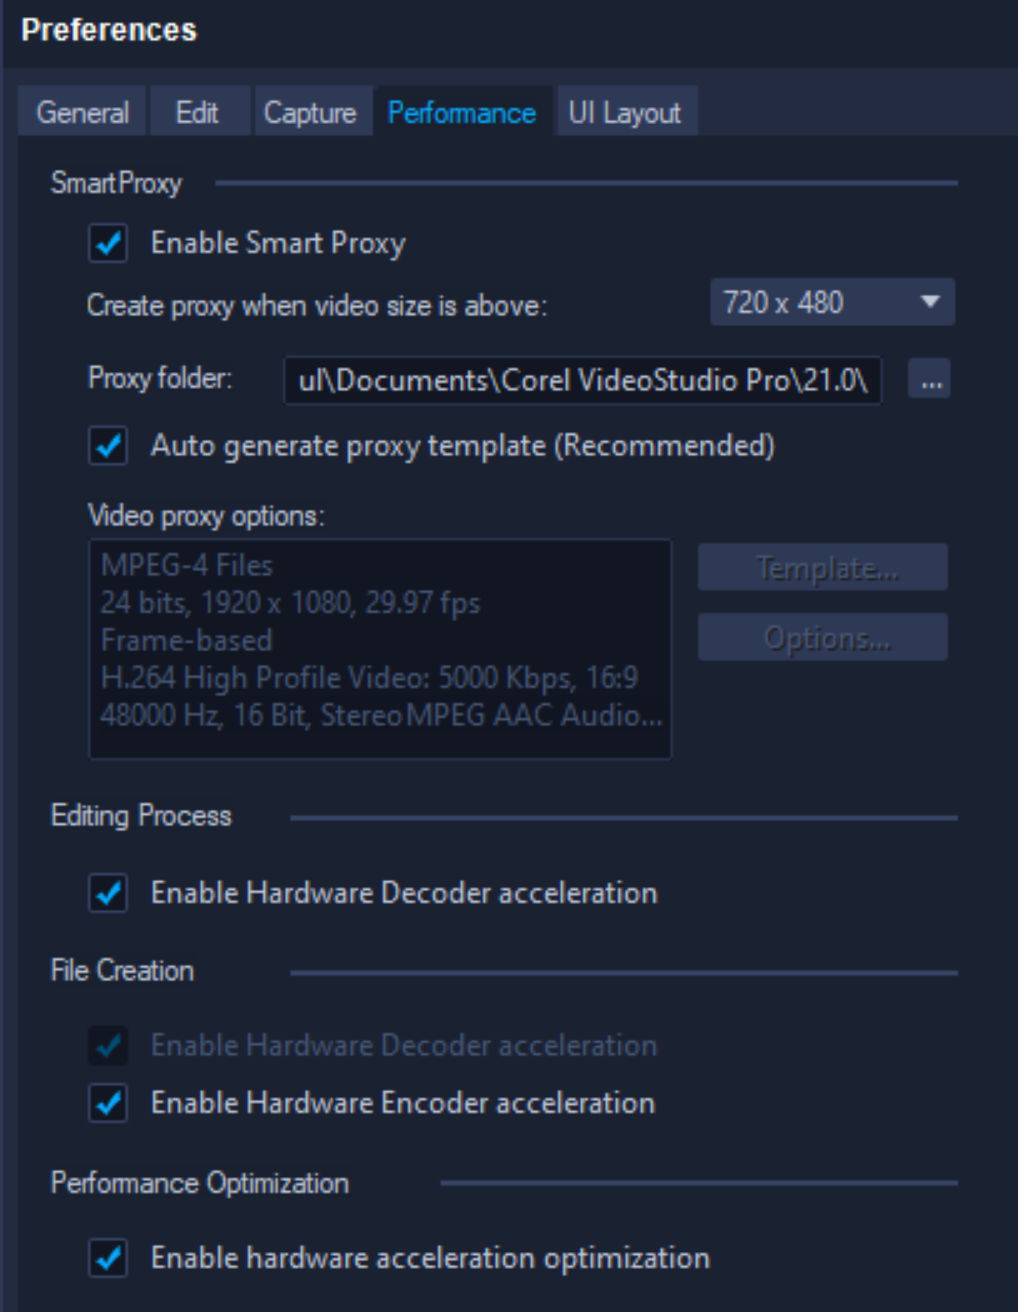
Nowadays, videos can be recorded at 4K resolution which is great for visual quality but bad for editing performance. To fix this, you can enable some settings in Corel VideoStudio under Settings > Performance as follows.
These settings will cause VideoStudio to generate a smaller version of a large video file so speedier editing. In the example settings above, if the source video is greater than 720 x 480, then a proxy file will be created in a SmartProxy folder. On my system, that folder is at
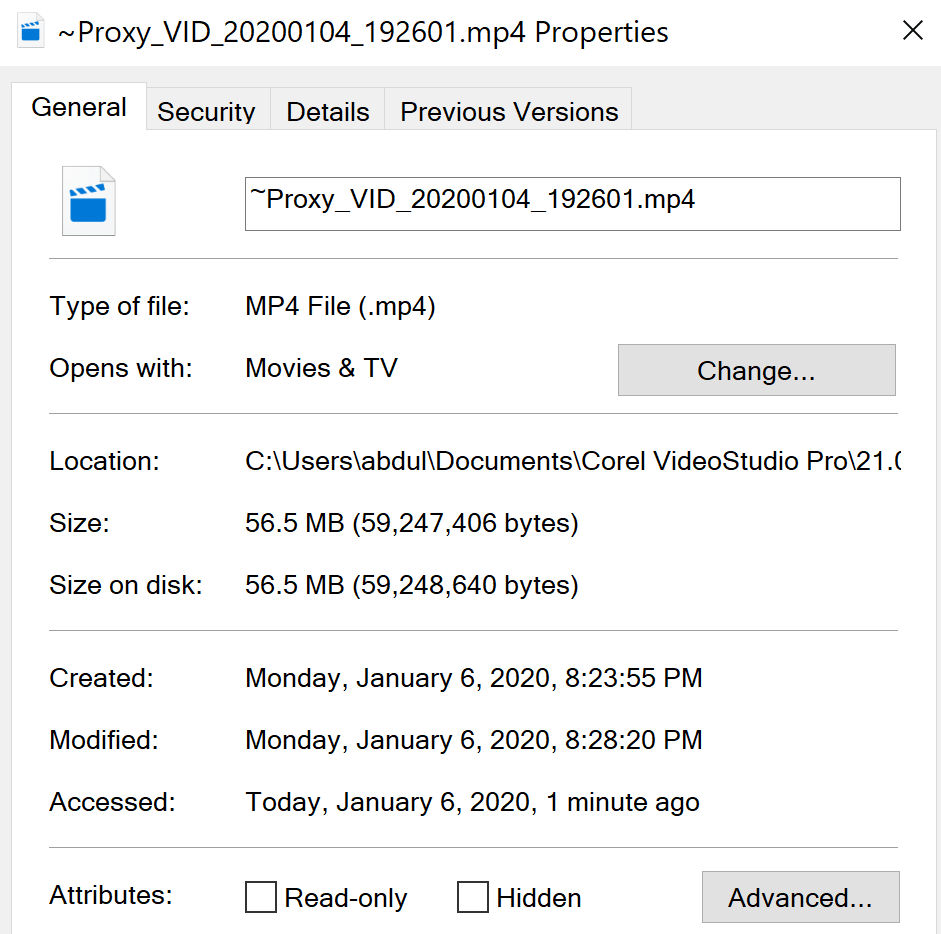
As an example, let’s compare the original video size to the proxy video size. In VideoStudio, if we select a video and view it’s properties, we see that its size is 636 MB.
If we look at the SmartProxy folder, it is currently empty. Now, if we drag the video to the timeline, VideoStudio will create a proxy file containing a lower quality version of that video. You can see the progress of the proxy file creation under Settings > Smart Proxy Manager > Smart Proxy Queue Manager.
When the proxy file has been created, you can inspect its size. As you can see, the size is only 56 MB. That’s a reduction of 91%!
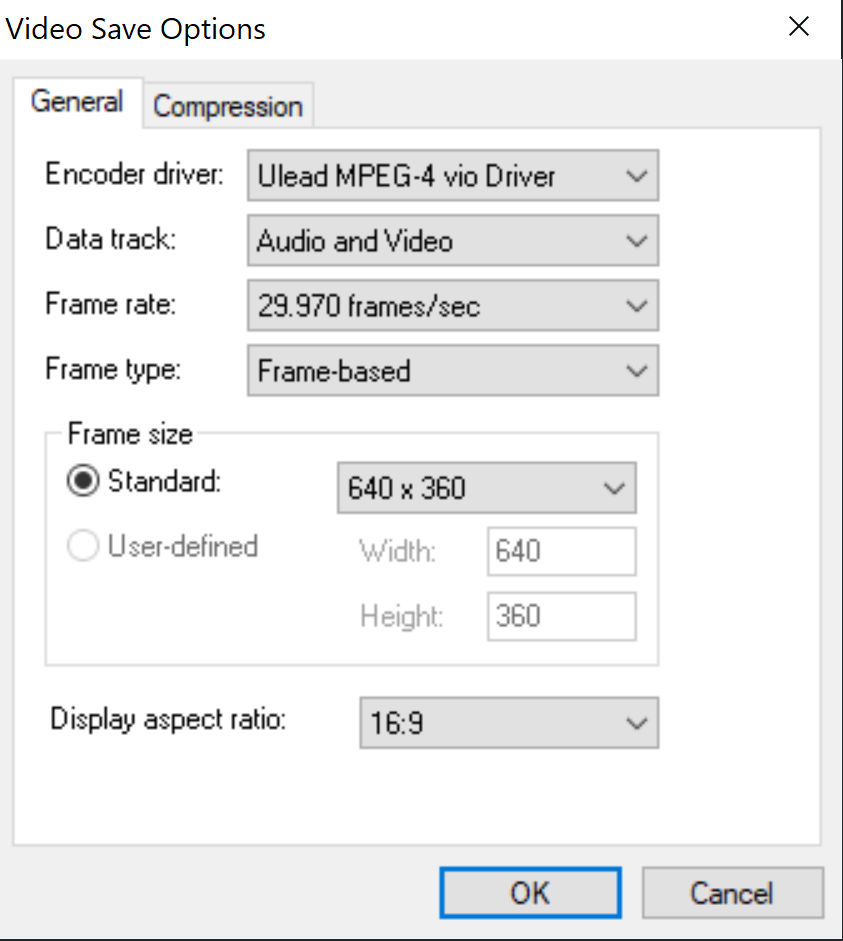
If the proxy file is still too large, you can tweak the proxy file settings to produce a lower quality file, e.g. instead of 1920 x 1080 frame size, you can choose 640 x 360.
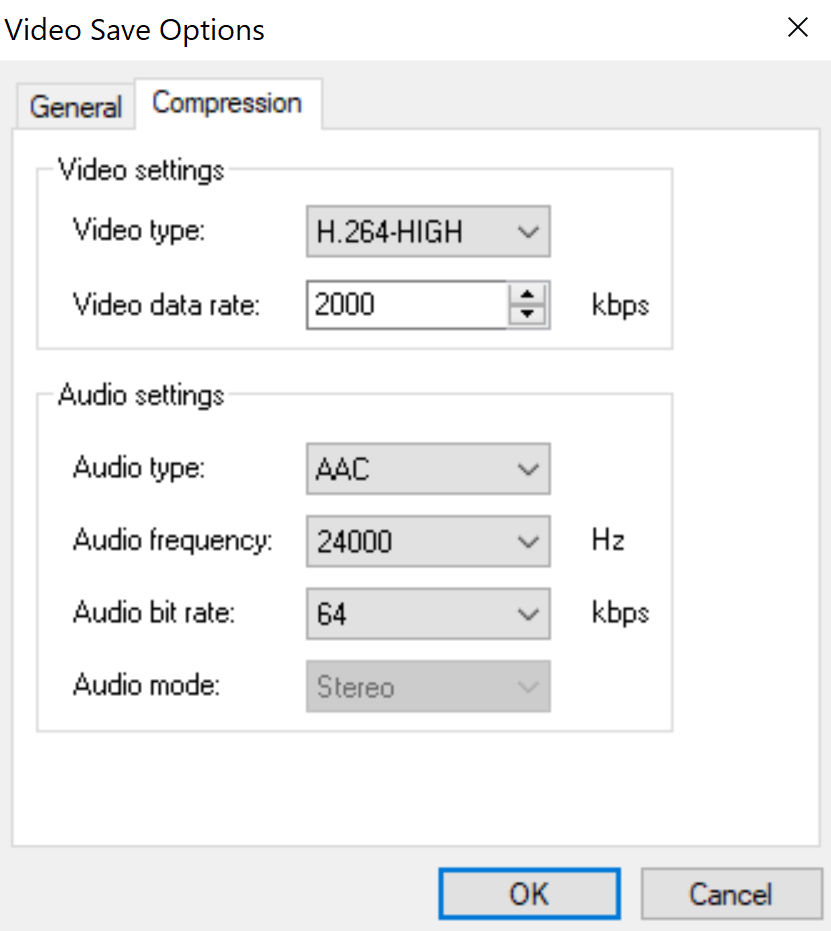
You can also tweak the audio and video compression settings.
If you are unsure whether VideoStudio is actually using the proxy files instead of the original files, you can look for a specific icon on each video in the timeline. If there is a black and white icon as shown below, then the proxy video is being used.
Making a music video often requires transitioning between multiple video clips. Many video editing programs have many effects for transitioning between video clips. The most common transition effect is the cross fade. In Corel VideoStudio, you can apply this transition by dragging it over the two video clips where they meet. Since this is a cross fade, the duration of the two clips necessarily becomes smaller. If you have a separate audio track and you want the video track to be in sync with the audio track, the crossfade transition will cause the video to become out of sync with the audio track. To maintain synchronousness and for transitioning many video clips, use the track transparency feature. The instructions below are for making a music video with multiple video tracks and a separate audio track.
1. Record Video Footage
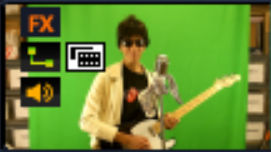
You can do this using your phone. Just remember to record in landscape. If you want to show a different background behind the subject, make sure to film against a green screen.
2. Add Assets to Corel VideoStudio
The assets are things like each source video, music files, background images and videos, etc. Make sure you name each file something descriptive to make it easy to identify them when working with many tracks.
3. Drag the Background Image / Video to the Video Track
The first track in the list of tracks is the video track. Unlike the Video Overlay tracks, the Video track must start at time 0. If the background video is abstract and can be looped but is too short, you can duplicate it back to back as shown below.
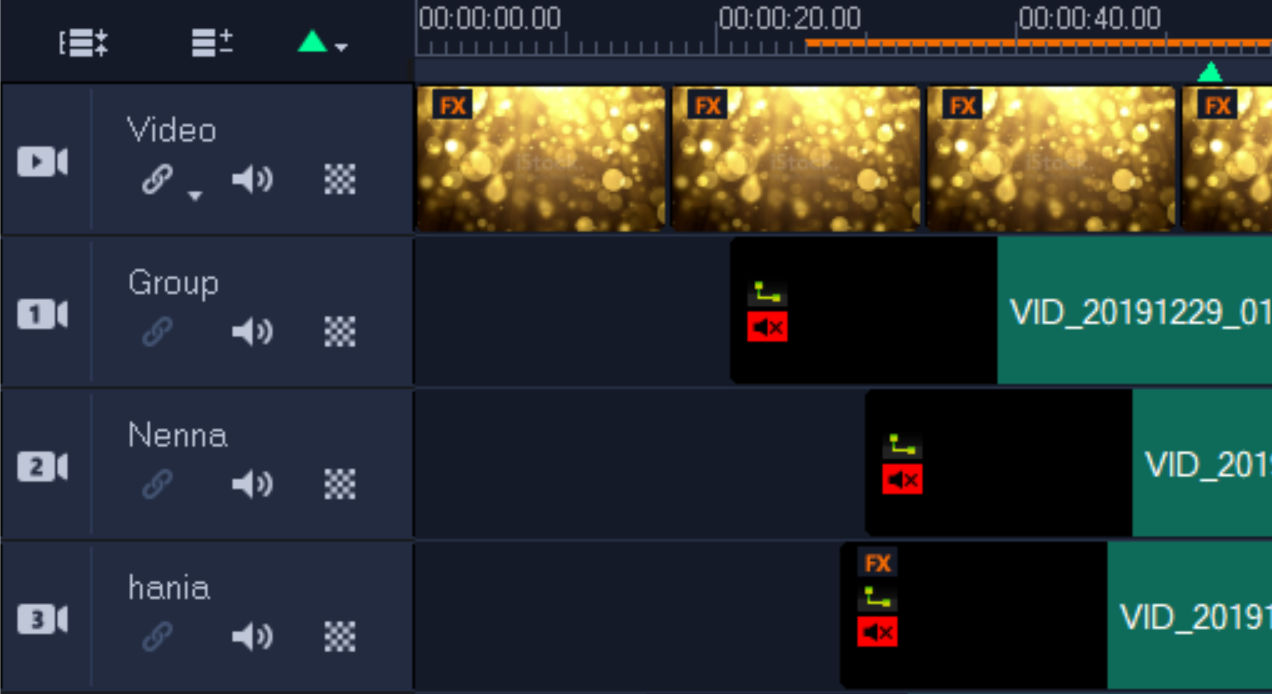
4. Drag Each Video to a Separate Video Overlay Track
To start, each video can be positioned at time 0. Later, we’ll adjust the start time of each video so they are in sync with the music track. You can also mute each video track’s audio so the only audio heard comes from the music track.
5. Create Proxy Files
This will make VideoStudio use a smaller version of each file to improve performance. See how to set up proxy files.
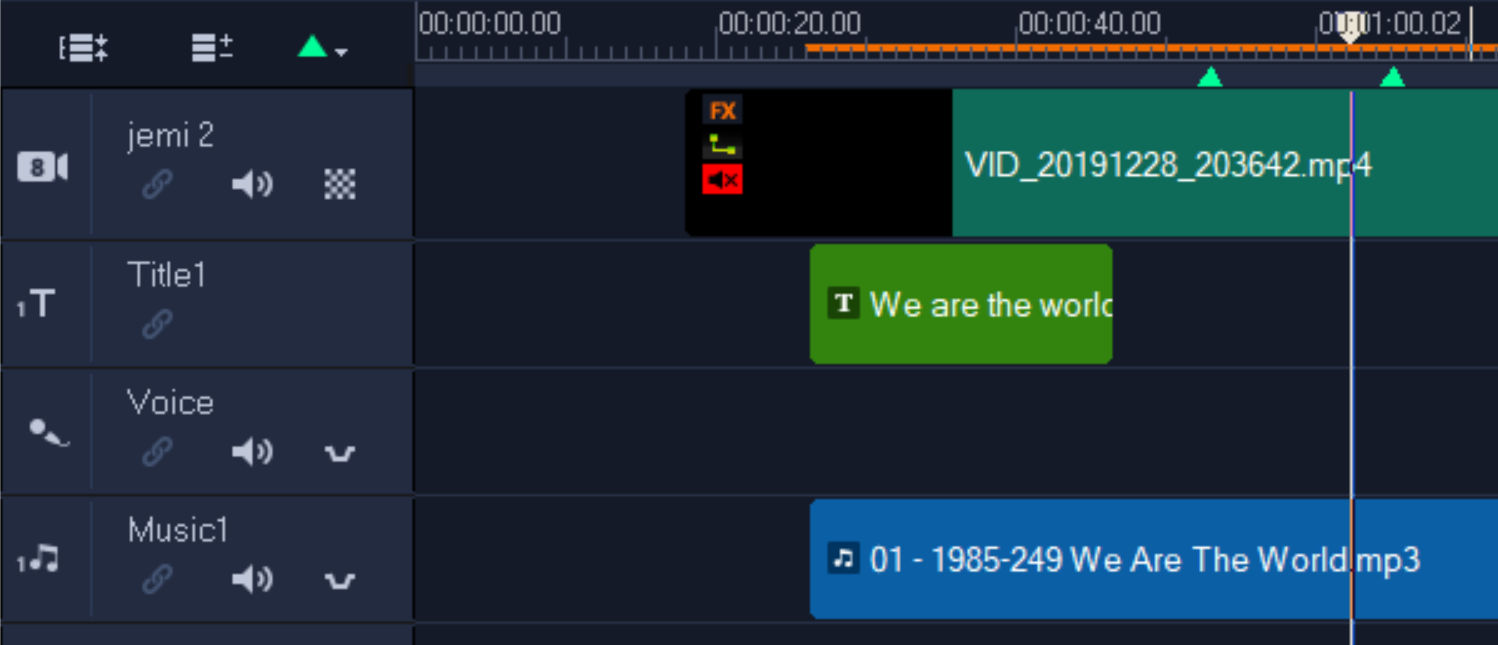
6. Drag the Audio Asset to the Music Track
In this example, I positioned the start time of the music to 20 seconds to accommodate video clips that have a long but useless intro.
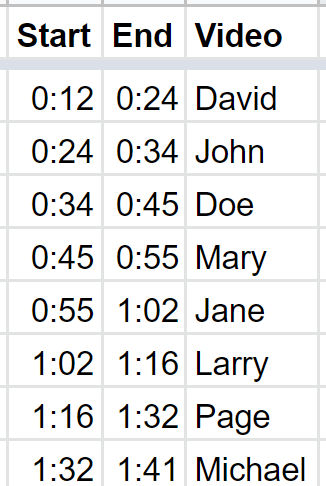
7. Determine Visibility Times for Each Video Track
Let’s say you want to make a music video containing 5 different singers each singing a different part of the song. You’ll have at least 5 video tracks to work with. You’ll need to listen to the song and determine what times throughout the song to show different videos. You can do this by creating a spreadsheet like below.
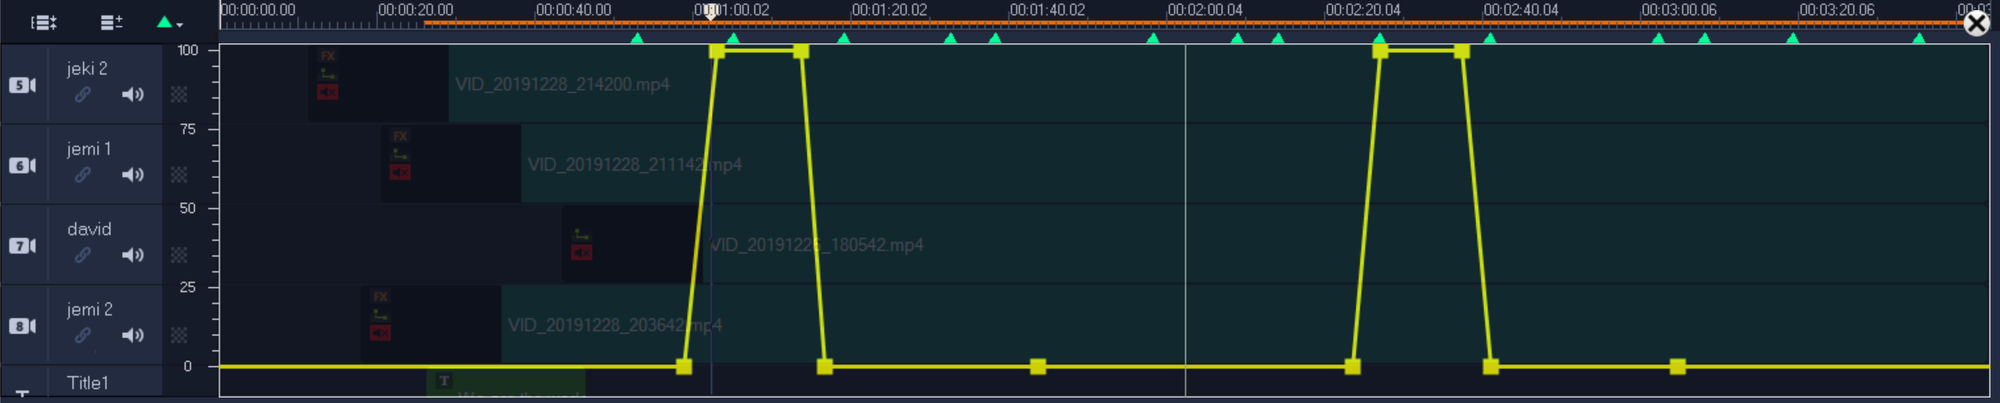
8. Set Cues / Markers on the Timeline
To make it easy to see start and end times for each video track, add a cue / marker (little green triangles below the timeline bar) on the timeline for each start time.
8. Create a Transition Between Each Video
To do this, we’ll be adjusting each video track’s transparency. In order for this to work, you can’t cut any of the video clips in the timeline.
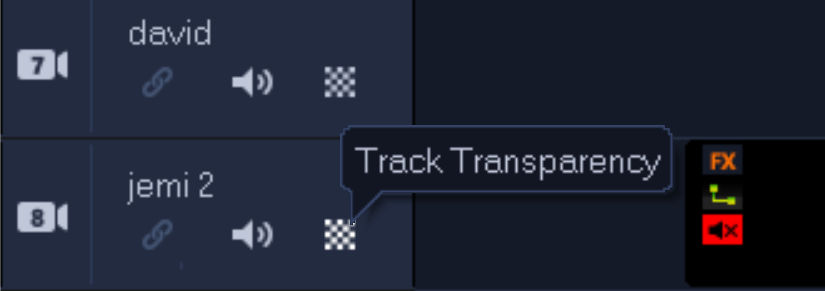
For each track, click on the Track Transparency button to reveal the transparency controls.
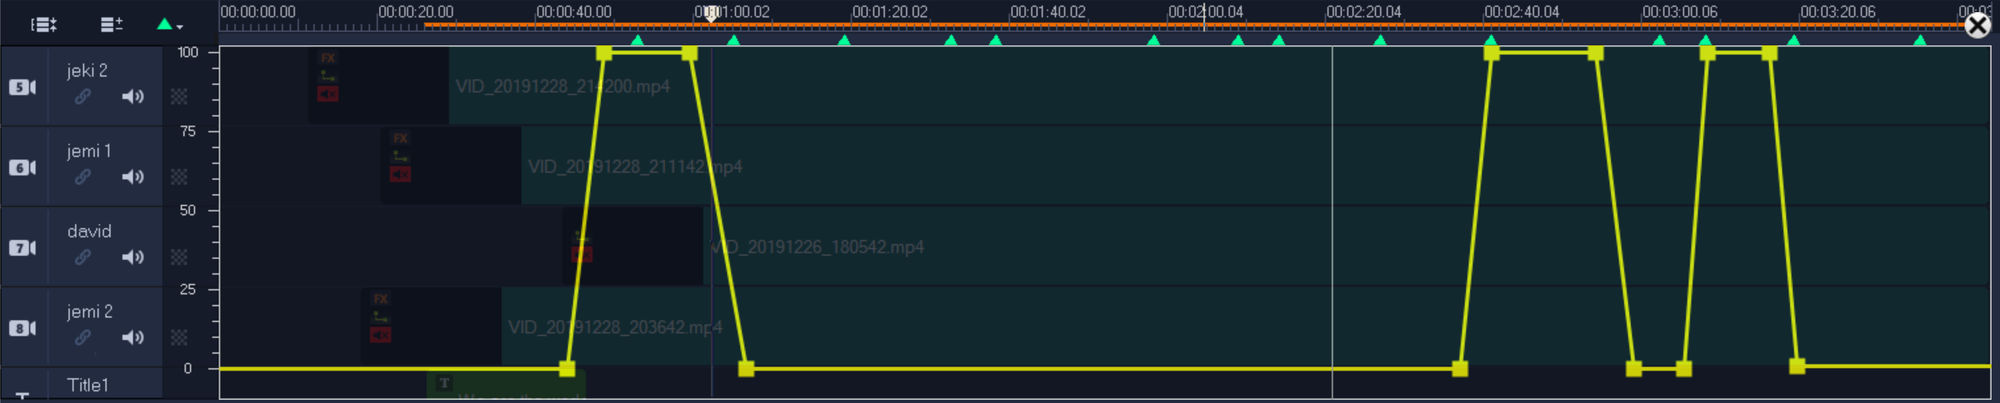
In the screenshot below. you see multiple video tracks but only the transparency track for one of them. The vertical position of the yellow line indicates the video’s transparency at any given time. When the line is at the bottom (0), the video is completely transparent (0% opaque). When the line is at the top, the video is completely visible (100% opaque). You create a fade by adding keyframes to the yellow line and dragging them.
Below is a screenshot for a different video track. Notice how the transparency graph both of these video tracks are such that one video will fade out when the other fades in.
If you’ve got many songs in Google Play Music, it can be difficult to manage which songs are in which playlists. Google Play Music doesn’t show you a list of playlists a particular song is in, if any. To create such a list, here’s a solution that works.
In the excerpt above, we see that the song “Santa Baby” is in the Christmas playlist but the song “True Blue” is not in any playlist. You can then find a playlist to the the latter song in so you don’t forget that you have that song.