Tips for Buying a Car

Car Depreciation

Unlike real estate, which increases in value over time (except occasionally during a recession), cars depreciate in value as soon as you drive them off the dealer lot. According to NerdWallet, your car’s value decreases around 20% to 30% by the end of the first year. From years two to six, depreciation ranges from 15% to 18% per year. As a rule of thumb, in five years, cars lose 60% or more of their initial value.

However, not all vehicles depreciate at the same rate, meaning certain makes or models hold their value better than others. And depreciation rates can also change over time.

A brand-new car will depreciate the most because of the steep first-year drop. Buying a car that is just one year old avoids this first hit from depreciation and saves you a significant amount of money on a nearly new car. And, of course, waiting past the three-year mark could save the owner around half of the car’s original price.

iSeeCars.com analyzed more than 800,000 car sales to identify vehicles from the 2016 model year with the lowest and highest loss in value from MSRP after five years.

5-Year Cost to Own

Even if two vehicles are priced the same, that doesn’t mean they will cost the same over time. For example, fuel costs, maintenance fees and depreciation can vary quite a bit between two vehicles. Knowing the 5-Year Cost to Own ahead of time can help you save money in the long run. On kbb.com you can find the 5-year cost to own a particular car or classes of vehicles.

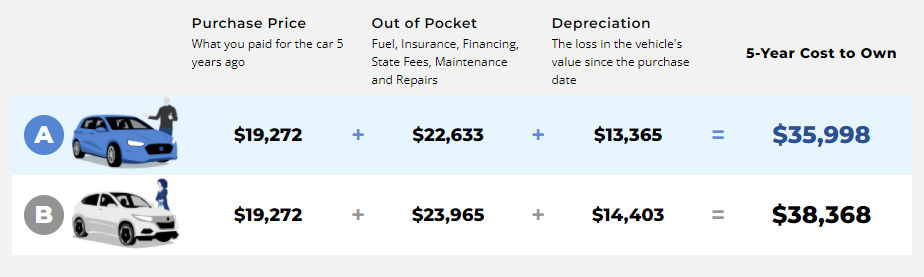
You can also see the vehicles with the lowest 5-year cost to own by vehicle class. According to kbb.com, Toyota and Lexus are the two brands with the lowest 5-year cost to own.

Buy a Used Car

If new vehicles lose so much value in the first few years, it would make sense then to buy a used car. In this case, you have two options:

Buy a used car from a private party

In this case, the potential to get the best deal is high but you may also end up with a vehicle that has many problems. The seller may lie to you and may not have maintained the vehicle which could result in expensive surprises. You can view a vehicle’s history on CarFax.com to see if it’s been in any accidents, how many owners it’s had, and more.

Buy a certified pre-owned (CPO) car

CPO vehicles are relatively new, low-mileage vehicles that have been inspected and certified by dealers representing the automaker who built them. They come with warranty coverage and other extras you wouldn’t get if you bought a non-certified used car. For pre-owned vehicles to become certified by an automaker, they must be less than five or six years old and have fewer than 60,000 to 80,000 miles on the odometer. These vehicles also undergo multipoint inspections at the dealership. Sometimes, these vehicles were loaner vehicles that the dealer loaned to customers while they wait for their vehicles to be serviced. CPO vehicles, of course, cost more than non-certified used vehicles but they are cheaper than brand new vehicles.

Financing

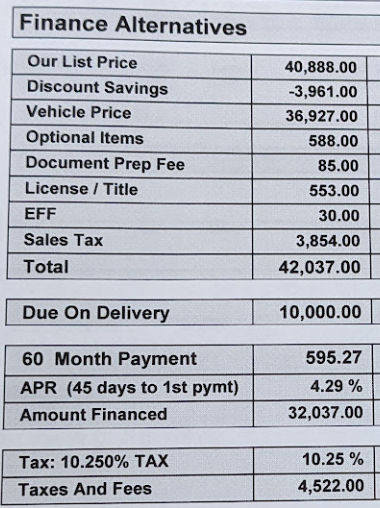
Most people don’t buy cars in cash. Instead, they finance the cost by making monthly payments for 5 years. I was just at a Lexus dealer today and with my 800+ credit score and offer to put $10,000 down on a $42,037 vehicle, I was offered an interest rate of 4.29%.

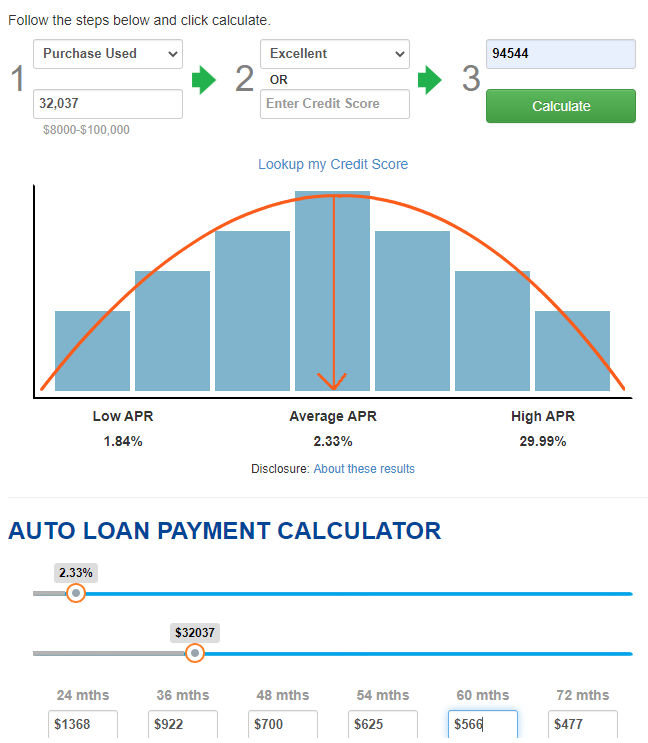
I then estimated what kind of interest rate I could get from MyAutoLoan.com and got a rate of 2.33%.

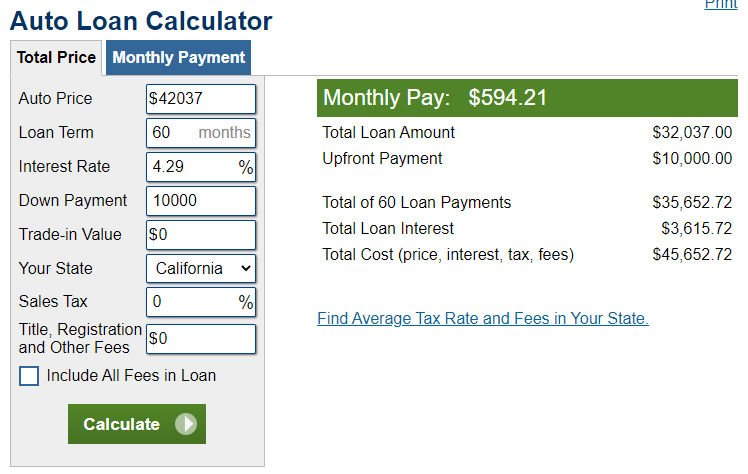
To determine the monthly payments and total interest payments, we can use a car payment calculator. At 4.29% over 60 months, my monthly payments would be $594.21 and the total interest paid over 5 years would be $3,615.72.

At 2.33% over 60 months, my monthly payments would be $566.17 and the cost total interest paid would be $1,933.44.

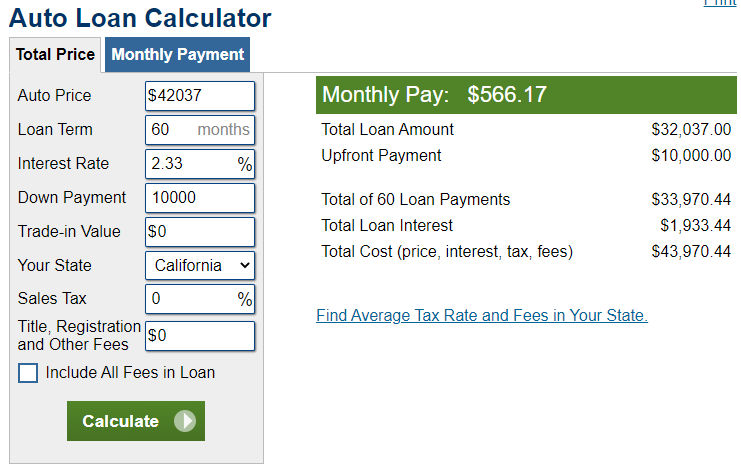
The difference is $1682.28 over 5 years.

Sometimes, dealers have specials where they offer 0% interest. For example, if a new car costs $42000 with 0% interest financing whereas a slightly used certified pre-owned car costs $39000 with 4% interest, you might as well buy the new car because the 4% interest would increase the cost from $39,000 to $42,044.75.

Another option is to get a loan from a credit union. Unlike banks, credit unions are not for profit so they can offer lower rates. For example, if you live in Alameda County in the San Francisco Bay Area, you can become a member of 1st United Credit Union and get competitive rates for a new or used car loan. See their rates.

Insurance

Car insurance costs vary depending on many factors. Following are factors that affect car insurance. For low-cost insurance, try Costo Home and Auto insurance.

Driver’s age

One cost factor is risk. Young drivers below the age of 25 and elderly drivers above the age of 65 are considered high risk drivers. For that reason, car insurance tends to cost more in those age groups. Following is a chart of average insurance costs by driver age.

AgeAnnual Minimum Coverage CostAnnual Full Coverage Cost
20$992 females, $1088 males$2769 females, $3195 males
21$821 females, $882 males$2298 females, $2609 males
22$766 females, $813 males$2152 females, $2378 males
23$709 females, $745 males$2005 females, $2202 males
24$671 females, $698 males$1896 females, $2068 males
25$614 females, $617 males$1719 females, $1801 males
30$572 females, $555 males$1588 females, $1581 males
35$569 females, $548 males$1573 females, $1556 males
40$545 females, $545 males$1544 females, $1529 males
45$560 females, $542 males$1528 females, $1516 males
50$539 females, $531 males$1451 females, $1445 males
55$528 females, $522 males$1421 females, $1419 males
60$529 females, $524 males$1414 females, $1415 males
65$551 females, $549 males$1452 females, $1463 males
70$587 females, $590 males$1527 females, $1546 males
75$651 females, $671 males$1666 females, $1736 males
80$726 females, $770 males$1831 females, $1957 males
Source

Driving record

Understandably, if you have a clean driving record (no accidents, no insurance claims), then you’ll likely pay less for car insurance, and vice versa.

Car make, model and value

The cost of your car is a major factor in the cost to insure it. Other variables include the likelihood of theft, the cost of repairs, its engine size and the overall safety record of the car. Automobiles with high-quality safety equipment might qualify for premium discounts.

The Tesla Model 3 is the most expensive popular car to insure. The 2022 Tesla Model 3 starts at a moderately priced $44,990 but at $2,830 a year for full coverage, insurance is significantly more than other popular cars.

Insurance for the Model 3 and other Tesla vehicles is so expensive because as a luxury car, Teslas are more expensive to repair and are a more enticing target for thieves.

Maintenance

Oil change

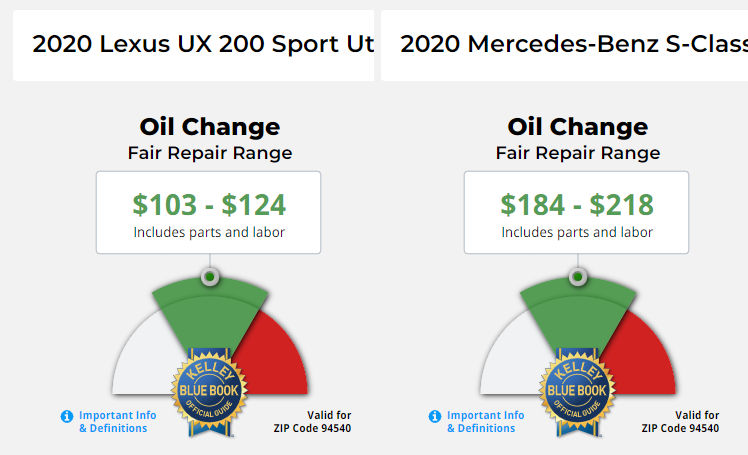
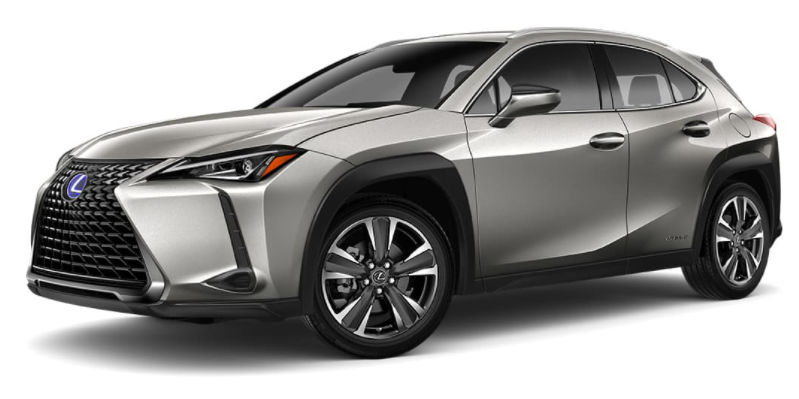
The cost to change oil can vary quite a bit from one car to another and the cost is usually exorbitant if you change oil at a dealer. For example, the average cost to change oil for a Mercedes S-Class is almost twice that for a Lexus UX SUV.

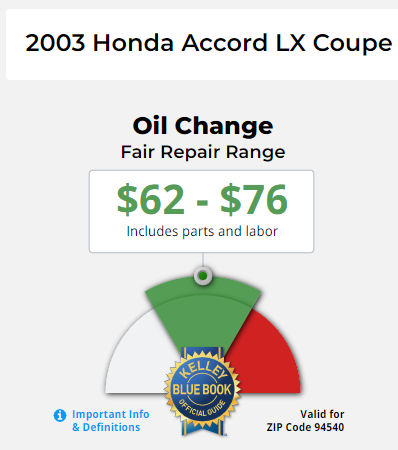
My 2003 Honda Accord costs even less to change the oil.

Note that some new cars include 3 year / 36,000 mile maintenance.

Manual

Before spending tens of thousands of dollars on a new vehicle, it might be helpful to read the manual first since you can’t return vehicles to the dealer as you can most other purchases. You can find manuals on the manufacturers’ websites.

Warranty

Fixing a car can be very expensive. Having a warranty can save you a ton of money and offer peace of mind. With a warranty, the manufacturer will fix certain things for free during a certain period of time or up to a certain mileage. There are different types of warranties.

Typical warranty

The typical auto warranty coverage is 3 years/36,000 miles — meaning a warranty that covers needed repairs in the first three years you own your car, or for the first 36,000 miles you drive it, whichever comes first. You can estimate how far you drive each year by finding the distance from one place to another in Google Maps, e.g. distance from home to work and back 5 days a week.

Comprehensive / Bumper-to-Bumper Warranty

This type of warranty covers everything except wear and tear, damage caused by you, and normal maintenance.

Powertrain Warranty

This type of warranty covers the mechanical parts that move the car.

Both Hyundai and Kia offer one of the industry’s longest warranties on new cars — a 10-year/100,000-mile powertrain warranty. However, if the vehicle is sold, only a 5-year/60,000-mile powertrain warranty goes to the new owner of the car.

Hybrid Warranty

This type of warranty covers repairs to the battery, electric motor, and other unique components found in an electric or hybrid car. 

Lexus, for example, offers the following warranties.

  • The Basic Warranty coverage is for 48 months or 50,000 miles, whichever occurs first. 
  • The Powertrain Warranty is for 72 months or 70,000 miles, whichever occurs first. 
  • The Lexus Hybrid Warranty coverage is for eight years or 100,000 miles, whichever occurs first, and covers the following components: Hybrid Battery Control Module (battery voltage sensor), Hybrid Control Module (power management control module), and Inverter with Converter.
  • The Lexus Hybrid Battery Warranty coverage is for ten years or 150,000 miles, whichever occurs first on 2020 and newer models.

Rent Before Buying

Though you can test drive a car at a dealer, that may not be enough for you to really get a good idea of whether the car is right for you or not. To be safe, you can rent the same model of car you are interested in buying. If the vehicle model you are interested in is not available at car rental centers like Hertz, you may be able to find one at a private party via the Turo.com. Of course, you can also borrow a friend’s car if they have the one you are interested in.

Fuel Economy

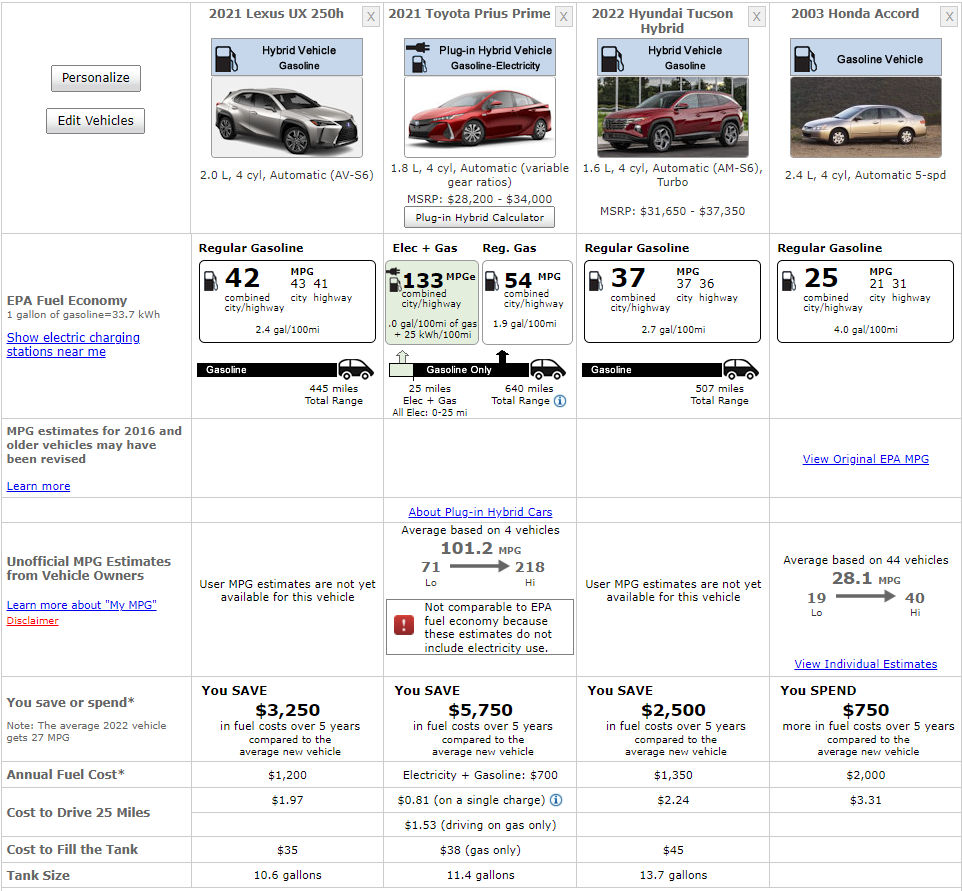
Some vehicles are gas guzzlers. This can cause you to spend a lot more money than you thought. There are 3 main types of cars: gas only, hybrid gas and electricity, and electric only. At FuelEconomy.gov, you can compare up to 4 vehicles for fuel economy.

For example:

2021 hybrid Lexus Crossover SUC2003 gas-only Honda Accord
MPG 25 miles per gallon 42 miles per gallon
Distance on full tank445 miles
Annual Fuel Cost$1,200$2000
Cost to Drive 25 Miles$1.97$3.31

Car Rebates

Sometimes you can get rebates valued at thousands of dollars. Following are some clean vehicle incentive websites.

California Clean Vehicle Rebate Project

Website

EV TypeStandard RebateIncreased Rebate
Fuel cell electric$4,500$2,500
Battery electric$2,000$2,500
Plug-in hybrid $1,000$2,500

For example, you can get a $1000 rebate for the Toyota RAV4 Prime Plug-in Hybrid and $2000 + $750 rebate for the Hyundai Ioniq 5 All-Electric SUV.

Federal Tax Credits for New All-Electric and Plug-in Hybrid Vehicles

Website

All-electric and plug-in hybrid cars purchased new, not used, in or after 2010 may be eligible for a federal income tax credit of up to $7,500. The credit amount will vary based on the capacity of the battery used to power the vehicle.

A tax credit is a dollar-for-dollar reduction of the income tax you owe. For example, if you owe $1,000 in federal taxes but are eligible for a $1,000 tax credit, your net liability drops to zero. … Therefore, if your total tax is $400 and claim a $1,000 tax credit, you will receive a $600 refund.

For example, for the Hyundai Ionic All-Electric sedan, you can get a $7500 federal tax credit.

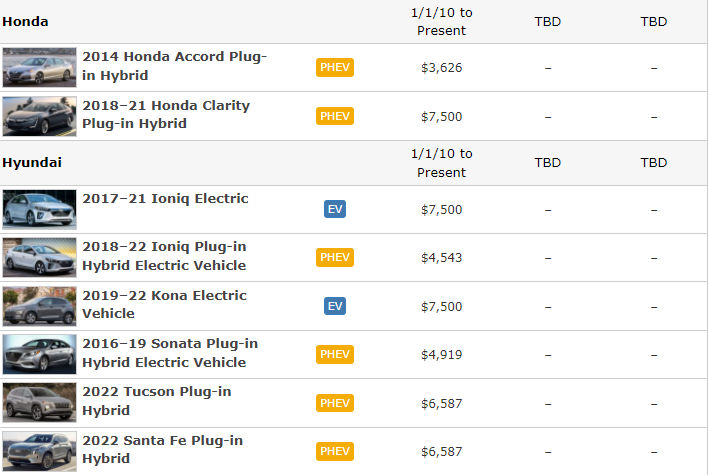
The Toyota RAV4 Prime Plug-in Hybrid and the 2022 Lexus NX Plug-In Hybrid qualify for a $7.5K federal tax credit as well.

The 2017–22 Prius Prime Plug-in Hybrid qualifies for a $4,502 tax credit.

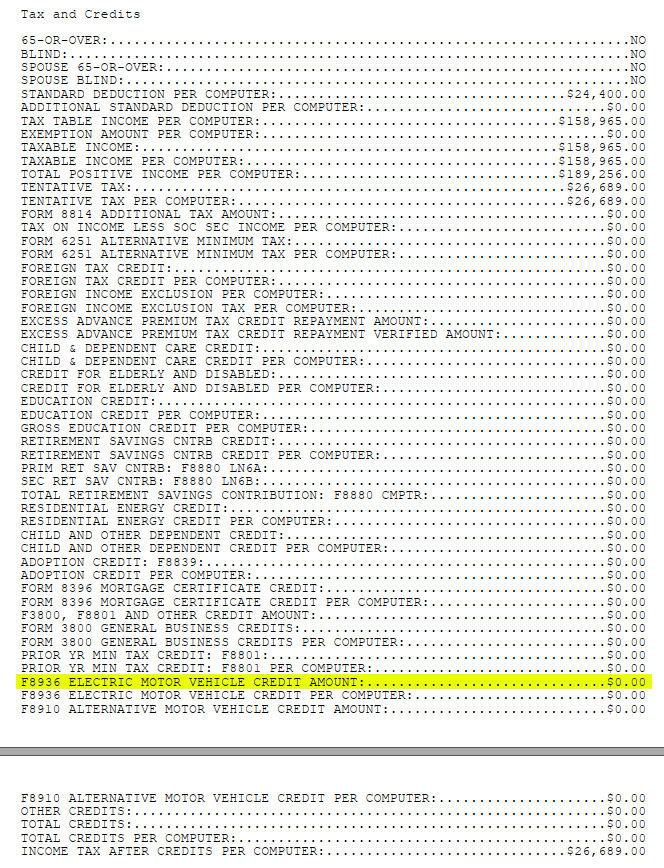
The process to apply for a tax credit is fairly simple. You first have to buy a vehicle that qualifies, of course. Then you fill out form 8936 along with your tax return. After filing your return, if you look at your IRS tax transcript, which you can download from the IRS website, you will see a section titled “Tax and Credits” with a line item (highlighted below) for “F8936 Electric Motor Vehicle Credit Amount” which should have the dollar amount of the credit available for the EV you buy.
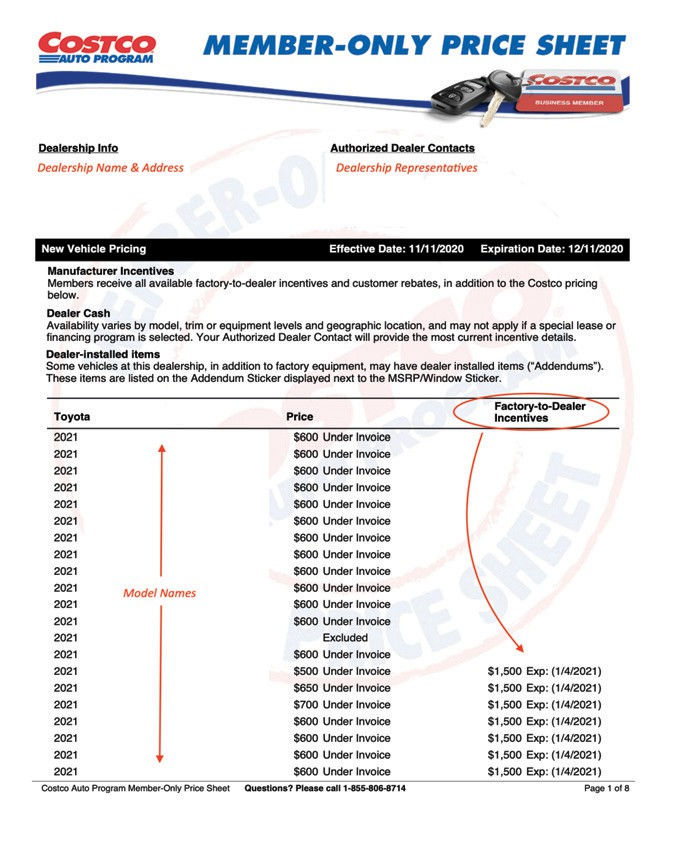
Costco Auto Program

Costco claims to offer its members a discount when buying new and pre-owned vehicles from participating dealers. An Authorized Dealer Contact will present the “Costco Member-Only Price Sheet,” displaying your prearranged pricing. The savings can be displayed in one of two ways: one version lists pricing for all models available at the participating dealership; the other will show a VIN-specific price based on the vehicle you select, including any applicable manufacturer incentives or rebates.

https://www.costcoauto.com/

Car Tires

Tires aren’t like shoes: The bigger the size, the more you pay. According to Discount Tire / America’s Tire, the average prices are as follows.

Wheel SizeAll-SeasonAll-Terrain
Small (12” – 15” wheels).
Compact cars, golf carts, etc.
$80 – $150
Medium (16” – 20” wheels).
Crossovers, SUVs, small trucks, and vans.
$100 – $250$150 – $250

All-Gas vs All-Electric Vehicles

Vehicles are becoming more and more electric. Here are some pros and cons of all-electric vehicles.

ProsCons
You can save a lot of money Electric cars can be pricey 
Electricity is renewable Charging can be a lengthy process
You can reduce your environmental impact You can’t go as far or as long as gas cars 
You can take advantage of tax credits and clean car rebatesFinding a station can be tough 
Less maintenance is required Car insurance premiums may increase 
Better performance 
Drive solo in HOV lane
No oil changes
No smog checks

Note that the Hyundai Ioniq 5 supports ultra-fast charging and can go up to 300 miles on a full charge.

The ultra-fast charging capability gives you over 60 miles of range with just a five- minute charge, or you can charge it from 10 percent to 80 percent in just under 18 minutes. However, ultra-fast chargers are only available at public charging stations.

My Picks

Lexus UX 250h

Hyundai Ioniq 5

Lexus UX250hHyundai Ioniq 5
TypeHybridAll Electric
Transport large itemsYes, it’s a subcompact SUV but the trunk is small because the battery is thereYes, it’s a subcompact SUV with a large trunk because the battery is in the front
Cost~$38,000~$40,000
CA RebateNoYes, $2000
Fed Tax CreditNoYes, $7500
ChargingNoYes, ultra fast, 5 mins gets you 60 miles
Must change oil, belt, and filterYesNo
Must get a smog checkYesNo
Must go to a gas stationYesNo, charge at home. Can also charge at a public charging station.
Basic Warranty4 years, 50K miles5 years, 60K miles
Powertrain Warranty6 years, 70K miles10 years, 100K miles
Cost to drive 25 miles$1.97$1.01

EV (Electric Vehicle)

EV Battery Size and Range

  • An EV’s range depends on the size of its battery.
  • Gross Capacity—or Total Capacity—is the total amount of energy a pack can theoretically hold.
  • Net Capacity—or Usable Capacity—is the amount of energy the car can actually draw on to move.

You can see a list of EVs sorted by battery size. The average size is 56.3 kWh. The largest is 107.8 kWh (Mercedes EQS AMG 53 4MATIC+). The smallest is 16.7 kWh (Smart EQ for four).

EV Charging Speed on Level 1, 2, 3 Chargers

Before buying an EV, make sure to research your ability to charge it. Most EV owners install a Level 2 charger in their home which is an added cost. Learn more about EV charging.

Charging LevelPower DeliveryRange Added Per HourTime to Charge 60 kWh EV
Level 11-1.4 kW3-5 miles30-40 hours
Level 23.9-19.2 kW12-80 miles2.5-4.5 hours
Level 324-300 kW75-1,200 miles30-40 minutes
Time to Charge EV with a 60-kWh battery is the time to raise the battery’s charge level from 10% to 80%

The Ioniq 5’s battery pack size is 77.4 kWh, and the maximum continuous draw permitted on a 15A 120V outlet is 12A (incidentally the rate at which Hyundai’s In-Cable Control Box, aka granny charger, tops out in the North American market).

120V * 12A = 1.44 kW, and the charging efficiency lies somewhere between 80 and 90 percent, let’s call it 85. So 77.4 / 1.44 / 0.85 = 63.25 hours, or a bit over 2 days and 15 hours. That said, you’d never use 100% of the battery capacity. If you’re plugging in each night after an average daily commute of 30 miles, you’d be recharged in under 8 hours.

Most EV owners will install a Level 2 charger in their home with between 30 and 40 amp capacity, with 32A being common. Charger efficiency is about 90 per cent at the higher voltage, so 77.4k / (32 * 240) / 0.9 = 11.2 hours from 0 (never drive your EV down to zero!) to 100 per cent.

Browse Level 2 Home Chargers

Screen Capability

So many cars now have touchscreens and the screens are just getting bigger and bigger. Many people use their phones for driving directions, playing music, and more. But, phones screens are small which makes them more difficult to use, especially when driving. Some car screens have maps and driving directions but they’re hard to use and ugly. Tesla car screens have nice maps but Teslas are expensive and you may not want a Tesla. In that case, you may want to get a car that supports Android Auto and Apple CarPlay.

For example, here’s how Google Maps looks on Android Auto.

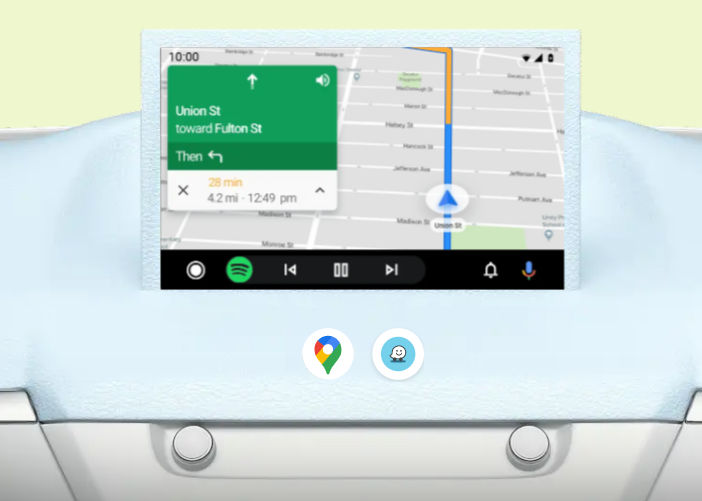
You can find routes, get real-time alerts, view places on the way, reserve parking, find a charging station, and more.

You can also control music using some apps on your phone like Spotify, Pandora, and Amazon Music.

I personally use the PowerAmp music player. It was upgraded to support Android Auto and the screen looks like this.

Of course, you can all make phone calls and chat as well.

Note that for Android Auto, not all apps are supported.

Features

When considering a new car, there are often more than one trim levels to choose from. Each trim comes with different features. You’ll want to make sure you compare each trim and feature, e.g. does the base model include heated seats, before picking a trim.

SketchUp Tools For Drawing in 3D

The free version of SketchUp offers many tools for drawing in 3D.

Following is a list of them and how to use them.

Select Tool

Select items and objects in the model.

Tool Operation

  1. Click on an item or object.

Modifier Keys

  • Hold Ctrl = Add an item to the selection set.
  • Hold Shift = Add and/or subtract an item to/from the selection set.
  • Hold Shift+Ctrl = Subtract an item from a selection set.

Tips

  • Double-click a face to select the face and all of its edges.
  • Double-click an edge to select the edge and the faces that share it.
  • Triple-click an edge or face to select all connected items.
  • Double-click an object to edit it.
  • Ctrl+A = Select all visible items in the model.
  • Ctrl+T = Deselect all selected items in the model.

Lasso Tool

Make precise selections.

Tool Operation

  1. Click and drag to draw selection boundary.

Modifier Keys

  • Hold Ctrl = Add an item to the selection set.
  • Hold Shift = Add and/or subtract an item to/from the selection set.
  • Hold Shift+Ctrl = Subtract an item from a selection set.

Tips

  • Drag to the right to create a window selection that will capture items entirely within the selection boundary.
  • Drag to the left to create a crossing selection that will capture anything the selection boundary touches.
  • Make single-click selections just like the Select tool.

Eraser Tool

Erase entities.

Tool Operation

  1. Click on entity to erase. Alternatively, hold down mouse button drag over entities. All entities are erased when mouse button is released.

Modifier Keys

  • Ctrl = Toggle soften and smooth edges.
  • Alt = Toggle unsmooth edges and unhide edges and objects.
  • Shift = Toggle hide edges and objects.
  • Ctrl + Shift = Toggle deselect edges and objects selected by the eraser tool.

Paint Bucket Tool

Assign colors and materials to items and objects.

Tool Operation

  1. (Optional) Preselect the items or objects that you want to paint.
  2. Select a materials library using drop down list in Materials Browser.
  3. Select a material from materials library.
  4. Click on faces to paint.

Modifier Keys

  • Alt = Sample material for painting.
  • Shift = Toggle paint all faces with matching materials.
  • Ctrl = Toggle paint all connected faces with matching materials.
  • Shift + Ctrl = Toggle paint all faces on the same object with matching materials.

Line Tool

Draw edges or line entities.

Tool Operation

  1. Click to set the first point.
  2. Move cursor.
  3. Click to set the second point (creating an edge).
  4. (Optional) Move cursor.
  5. (Optional) Click to set a third point.
  6. (Optional) Repeat step 4-5 to create additional connected edges.

Modifier Keys

  • Alt = Cycle through linear inference options (All On; All Off; Parallel/Perpendicular Only).
  • Hold Shift = Lock Line tool to the current direction inference.
  • Arrow keys = Lock Line tool to specific inference direction (→ = Red, ← = Green, ↑ = Blue, ↓ = Parallel/Perpendicular).

Tips

  • Esc = Cancel operation.
  • Once you’ve drawn a closed loop of at least 3 coplanar edges, a face will fill in automatically.

Freehand Tool

Create hand-drawn curve entities.

Tool Operation

  1. Click and drag to draw a freehand curve.

Modifier Keys

  • Ctrl = Decrease the segments of the last drawn freehand curve.
  • Alt = Increase the segments of the last drawn freehand curve.
  • Before an operation, use arrow keys to lock the drawing plane of a curve (→ = Red, ← = Green, ↑ = Blue, ↓ = Parallel/Perpendicular).

Tips

  • Segments may only be modified immediately after creating a curve.

Arc Tool

Draw Arc entities.

Tool Operation

  1. Click to set arc’s center. Optionally, click and drag first point to set drawing plane.
  2. Move cursor to define first arc point or enter radius.
  3. Click to set first arc point.
  4. Move cursor around the protractor guide or enter angle.
  5. Click to set second arc point.

Modifier Keys

  • Hold Shift = Lock current inference direction.
  • Arrow keys (before 1st click) = Lock protractor rotation axis direction (→ = Red, ← = Green, ↑ = Blue, ↓ = Parallel).
  • Arrow keys (after 1st click) = Lock drawing direction to specific inference direction (→ = Red, ← = Green, ↑ = Blue, ↓ = Parallel/Perpendicular).

Tips

  • Esc = Cancel operation.
  • Click Window > Model Info > Units > Angle Units to change snapping angle.
  • Ctrl '+' or Ctrl '-'= Change the number of segments.

2-Point Arc Tool

Draw 2-Point Arc entities.

Tool Operation

  1. Click to set start point of arc.
  2. Click at ending point of arc or enter value.
  3. Click to set bulge distance or enter value to finish arc.

Tool Operation (Tangent Inference locked)

  1. Click to set start point of arc at an existing edge or vertex.
  2. Click an end point for arc, or enter value.

Modifier Keys

  • Alt = Lock tangent arc drawing.
  • Hold Shift = Lock current inference direction.
  • Arrow keys = Lock drawing direction to specific inference direction (→ = Red, ← = Green, ↑ = Blue, ↓ = Parallel/Perpendicular).

Tips

  • Esc = Cancel operation.
  • Ctrl '+' or Ctrl '-'= Change the number of segments.
  • When multiple edges intersect, define tangency by hovering over one of the edges before starting the arc.

3-Point Arc Tool

Draw 3-Point Arc entities.

Tool Operation

  1. Click to set start point of arc.
  2. Click to set second point. The arc will always go through this point.
  3. Click to finish the arc, or enter an angle to define arc’s section of a circle.

Tool Operation (Tangent Inference locked)

  1. Click to set start point of arc at an existing edge or vertex.
  2. Click an end point for arc, or enter value.

Modifier Keys

  • Alt = Lock tangent arc drawing.
  • Hold Shift = Lock current inference direction.
  • Arrow keys = Lock drawing direction to specific inference direction (→ = Red, ← = Green, ↑ = Blue, ↓ = Parallel/Perpendicular).

Tips

  • Esc = Cancel operation.
  • Ctrl '+' or Ctrl '-'= Change the number of segments.
  • When multiple edges intersect, define tangency by hovering over one of the edges before starting the arc.

Pie Tool

Draw Pie entities.

Tool Operation

  1. Click to set pie’s center. Optionally, click and drag first point to set drawing plane.
  2. Move cursor to define first arc point or enter radius.
  3. Click to set first arc point.
  4. Move cursor around the protractor guide or enter angle.
  5. Click to set second arc point.

Modifier Keys

  • Hold Shift = Lock current inference direction.
  • Arrow keys (before 1st click) = Lock protractor rotation axis direction (→ = Red, ← = Green, ↑ = Blue, ↓ = Parallel).
  • Arrow keys (after 1st click) = Lock drawing direction to specific inference direction (→ = Red, ← = Green, ↑ = Blue, ↓ = Parallel/Perpendicular).

Tips

  • Esc = Cancel operation.
  • Click Window > Model Info > Units > Angle Units to change snapping angle.
  • Ctrl '+' or Ctrl '-'= Change the number of segments.

Rectangle Tool

Draw rectangular face entities.

Tool Operation

  1. Click to set first corner.
  2. Move cursor diagonally.
  3. Click to set second corner.

Modifier Keys

  • Ctrl = Toggle drawing from center.
  • Hold Shift = Lock Rectangle to current drawing plane inference.
  • Arrow keys = Toggle lock drawing plane inference (→ = Red, ← = Green, ↑ = Blue, ↓ = Parallel).

Tips

  • Esc = Cancel operation.
  • When drawing rectangles, you can specify length & width by separating the measurements with a comma. For example: to draw a two foot by four foot rectangle, you can enter 2', 4' into the measurement box. The order of the measurements matches the order of the axes (R, G, B). For example: Red, then Green; Red, then Blue; or Green, then Blue.

Rotated Rectangle Tool

Draw rectangular face entities.

Tool Operation

  1. Click to set first corner. Optionally, click and drag first point to set drawing plane.
  2. Move your cursor around the protractor to set the direction of the first edge.
  3. Click to set second corner.
  4. Move your cursor to set the length and angle of the second edge.
  5. Click to set third and final corner.

Modifier Keys

  • Hold Shift = Lock current inference direction.
  • Alt (after 1st click) = Lock drawing plane for first edge.
  • Alt (on a locked plane, after first click) = Set protractor baseline.
  • Alt (after 2nd click) = Set protractor baseline.
  • Arrow keys (before 1st click) = Lock protractor rotation axis direction (→ = Red, ← = Green, ↑ = Blue, ↓ = Parallel).
  • Arrow keys (after 1st click) = Lock drawing direction to specific inference direction (→ = Red, ← = Green, ↑ = Blue, ↓ = Parallel/Perpendicular).

Tips

  • Esc = Cancel operation.

Circle Tool

Draw Circle entities.

Tool Operation

  1. Click to set center point.
  2. Move cursor away from center point to define radius.
  3. Click to finish circle.

Modifier Keys

  • Hold Shift = Lock current inference direction.
  • Arrow keys (before 1st click) = Lock surface normal (→ = Red, ← = Green, ↑ = Blue, ↓ = Parallel).
  • Arrow keys (after 1st click) = Lock drawing direction to specific inference direction (→ = Red, ← = Green, ↑ = Blue, ↓ = Parallel/Perpendicular).

Tips

  • Esc = Cancel operation.
  • Ctrl '+' or Ctrl '-'= Change the number of segments.

Polygon Tool

Draw Polygon entities.

Tool Operation

  1. Click to set center point.
  2. Move cursor away from center point to define radius.
  3. Click to finish polygon.

Modifier Keys

  • Hold Shift = Lock current inference direction.
  • Ctrl = Toggle between inscribed and circumscribed radii of polygon.
  • Arrow keys (before 1st click) = Lock surface normal (→ = Red, ← = Green, ↑ = Blue, ↓ = Parallel).
  • Arrow keys (after 1st click) = Lock drawing direction to specific inference direction (→ = Red, ← = Green, ↑ = Blue, ↓ = Parallel/Perpendicular).

Tips

  • Esc = Cancel operation.
  • Ctrl '+' or Ctrl '-'= Change the number of segments.

3D Text Tool

Push/Pull Tool

Push and pull face entities to add or subtract volume from your 3D models.

Tool Operation

  1. (Optional) Preselect the face that you want to push/pull.
  2. Click on a face to start push/pulling.
  3. Move cursor to push or pull face.
  4. Click to set face or enter distance.

Modifier Keys

  • Ctrl = Toggle create new starting face.
  • Alt = Toggle Stretch mode.

Tips

  • Esc = Cancel operation and clear selection.
  • When a face is pre-selected, you can click anywhere in the model to begin push/pulling it, and then click anywhere to set it down.
  • Double-click to repeat a Push/Pull distance, in the same direction.

Follow Me Tool

Extrude a face along a path.

Tool Operation (Nothing Pre-selected)

  1. Click the face of the profile that you want to extrude.
  2. Move cursor along the edge or edges that you want the profile to follow.
  3. Click to set the extrusion.

Tool Operation (Preselect Path)

  1. Use the Select tool to pre-select a continuous set of edges to define the path.
  2. (Alternatively) Pre-select a face to define the perimeter of the face as the path.
  3. Activate the Follow Me tool.
  4. Click the face of the profile that you want to extrude.

Modifier Keys

  • Alt = Use perimeter of face as the path.

Tips

  • Esc = Cancel operation.

Offset Tool

Create copies of lines at a uniform distance from originals.

Tool Operation

  1. Click on a face.
  2. Move cursor.
  3. Click to finish offset operation.

Modifier Keys

  • Alt = Toggle allow/trim overlap.

Tips

  • Esc = Cancel operation.

Outer Shell Tool

Combine all selected solid objects into a single solid object and remove interior items.

Tool Operation

  1. Select first solid object.
  2. Select second solid object.
  3. Select next solid object or press Esc to complete.

Move Tool

Move or copy entities, and/or rotate objects.

Tool Operation

  1. Click on an entity or object to pick it up.
  2. Move cursor to move entity or object to a new location.
  3. Click to set it down or enter a distance.

Modifier Keys

  • Ctrl = Cycle Move/Copy/Stamp.
  • Alt = Toggle Autofold mode (useful for overriding Move tool constraints); when hovered over an object, use Alt to cycle through grip types.
  • Shift = Lock Move to the current inference direction.
  • Arrow keys = Toggle lock inference direction (→ = Red, ← = Green, ↑ = Blue, ↓ = Parallel/Perpendicular).

Tips

  • Esc = Cancel operation.
  • When items are pre-selected, you can click anywhere in the model to begin moving them, and then click anywhere to set them down. This is an effective way to move things precisely and/or align things to other things.
  • Click the red crosshairs that appear on the bounding box of an object to rotate that object.
  • After moving a copy, you can type a number followed by the X key and then press Enter to create an array of copies.

Rotate Tool

Rotate, stretch, distort, or copy items or objects along a rounded path.

Tool Operation

  1. (Optional) Preselect the items or objects you want to rotate.
  2. Click on an item or object to both make a selection and set the center point of rotation.
  3. Move cursor to indicate start point of rotation.
  4. Click to set starting point of rotation.
  5. Move cursor to indicate end point of rotation.
  6. Click to complete rotation, or enter angle in degrees.

Modifier Keys

  • Ctrl = Toggle rotate a copy.
  • Before first click, hold Shift to lock protractor inference.
  • Before first click, use arrow keys to toggle the protractor inference lock direction (→ = Red, ← = Green, ↑ = Blue, ↓ = Parallel).
  • After first click, use arrow keys to toggle rotation inference lock direction (→ = Red, ← = Green, ↑ = Blue, ↓ = Parallel/Perpendicular).

Tips

  • Esc = Cancel operation.
  • During Step #2 of the tool operation steps above, you can click-drag the protractor along an edge or axis to set an axis of rotation.
  • After rotating a copy, you can type a number followed by the letter X and then press Enter to create a rotated array of copies.
  • When inputting rotation values into the Measurements box, you can enter either an angle of rotation, in degrees (for example 45 Enter),or a slope expressed as a rise:run architectural slope notation (for example 4:12 Enter).

Scale Tool

Resize or stretch items and objects.

Tool Operation

  1. (Optional) Preselect the items or objects you want to scale.
  2. Click on a face or object.
  3. Click on a Scale grip.
  4. Move cursor to resize or stretch item or object.
  5. Click to finish scaling item or object.

Modifier Keys

  • Ctrl = Toggle scale about center.
  • Shift = Toggle uniform scale.

Tips

  • Esc = Cancel operation.
  • Click a corner grip for 3-way scale. Default = Uniform. Pressing Shift = Non-uniform.
  • Click a midline grip for 2-way scale. Default = Non-uniform. Pressing Shift = Uniform.
  • Click a center grip for 1-way scale. Default = Non-uniform. Pressing Shift = Uniform.
  • When scaling an item or object you have the option to enter either a scale factor (for example 2.5 Enter will make the things you’re scaling 250%, or two and a half times bigger), or you can simply input the size that you want the thing you’re scaling to be (for example, if scaling up along the blue axis direction, 6' Enter will make the selection six feet tall).

Tape Measure Tool

Measure distances, create guide lines, or scale a model.

Tool Operation

  1. Click at starting point of measurement.
  2. Move cursor.
  3. Click at ending point of measurement.

Modifier Keys

  • Ctrl = Toggle create guide lines.
  • Hold Shift = Lock Tape Measure to current inference direction.
  • Arrow keys = Lock Tape Measure to specific inference direction (→ = Red, ← = Green, ↑ = Blue, ↓ = Parallel/Perpendicular).

Tips

  • Esc = Cancel operation.
  • After measuring from point to point, you can input a distance to scale/resize the model.
  • When in Create Guide mode, begin on an edge to create a guide of infinite length; begin on a point to create a guide of finite length.

Dimension Tool

Place Dimension entities.

Tool Operation

  1. Click at starting point of dimension.
  2. Move cursor.
  3. Click at ending point of dimension.
  4. Move cursor to pull out the dimension string.
  5. Click to set the dimension string.

Tips

  • Esc = Cancel operation.

Text Tool

Create Text entities.

Tool Operation

  1. Click on an entity to indicate ending point of leader line (location where leader will point).
  2. Move cursor to position text.
  3. Click to place text.
  4. (Optional) Click in text box.
  5. (Optional) Enter text in text box.
  6. Click outside text box to complete operation.

Tips

  • Esc = Cancel operation.

Section Plane Tool

Create section cuts through your model or objects.

Tool Operation

  1. Click on a face to create a section plane that is aligned to that face.

Modifier Keys

  • Hold Shift (before 1st click) = Lock section plane to current orientation.
  • Arrow keys = Toggle lock section plane orientation (→ = Red, ← = Green, ↑ = Blue, ↓ = Parallel).

Tips

  • It’s possible to activate multiple section planes at the same time, as long as the section planes are in different contexts. For example, you can activate one section plane through the model, and then activate another section plane through a group or component object and have both planes active at the same time.

Protractor Tool

Measure angles and create angled guide line entities.

Tool Operation

  1. Place protractor’s center at vertex of angle.
  2. Click to set vertex. (Alternatively: click and drag first point to set rotation plane.)
  3. Move cursor in circle until touching start of angle.
  4. Click to set start of angle.
  5. Move cursor in circle until touching end of angle.
  6. Click to measure angle.

Modifier Keys

  • Ctrl = Toggle create guide lines.
  • Before first click, hold Shift to lock protractor inference.
  • Before first click, use arrow keys to toggle the protractor inference lock direction (→ = Red, ← = Green, ↑ = Blue, ↓ = Parallel).
  • After first click, use arrow keys to toggle rotation inference lock direction (→ = Red, ← = Green, ↑ = Blue, ↓ = Parallel/Perpendicular).

Tips

  • Esc = Cancel operation.
  • When inputting rotation values into the Measurements box, you can enter either an angle of rotation, in degrees (for example 45 Enter ), or a slope expressed as a rise:run architectural slope notation (for example 4:12 Enter).

Axes Tool

Move or reorient drawing axes.

Tool Operation

  1. Click to set axis origin.
  2. Move cursor to locate direction for the red axis.
  3. Click to set the red axis.
  4. Move cursor to locate direction for the green axis.
  5. Click to set the green axis.

Modifier Keys

  • Alt = Alternate axis orientation (after clicking to set the origin).

Tips

  • Esc = Cancel operation.

Tag Tool

Apply tags to objects.

Tool Operation

  1. Select a single tag in the Tags panel.
  2. Click on an item or object to assign the selected tag.

Modifier Keys

  • Alt = Sample the assigned tag from an object or item.
  • Ctrl = Apply a tag to all instances of a component.
  • Shift = Replace the current tag of all items in a given context with the selected tag.

Tips

  • Before tagging edges and faces, consider creating groups or components, and then tag the group or component instead.
  • Use ‘Select > All with Tag’ in the right-click context menu to select all items in a given context that share the same tag.
  • Color by Tag can be a useful way to identify which tags have been assigned to which items.

Walk Tool

Walk through (tour) a model.

Tool Operation

  1. Click and drag the cursor: Up = Walk forward; Down = Walk backward; Left = Turn left; Right = Turn right.

Modifier Keys

  • Hold Shift = Float up instead of forward, or down instead of backward.
  • Hold Ctrl = Run instead of walk.
  • Hold Alt = Walk through things.

Tips

  • Esc = Cancel operation.
  • The further you drag the cursor away from the start point (indicated by crosshairs), the faster you’ll walk.

Position Camera Tool

Position camera at a specific eye height.

Tool Operation

  1. Click anywhere in the model to place the camera. The camera will be positioned above the point where you click, at the eye height distance specified in the measurements box.
  2. (Optional) Click and drag from one point in the model to another point in the model to create a target camera. The point you drag from will be the exact location where the camera will be positioned, the point you drag to will establish the camera target.

Look Around Tool

Pivot camera from a stationary point.

Tool Operation

  1. Click and drag the cursor to pivot the camera (i.e. look around in the model).

Tips

  • Esc = Enable previously selected tool.

Orbit Tool

Orbit camera around model.

Tool Operation

  1. Click and drag cursor within the drawing area to orbit the camera.

Modifier Keys

  • Hold Shift = Pan tool.
  • Hold Ctrl = Suspend gravity (do not try to keep vertical edges up and down).

Tips

  • Esc = Enable previously selected tool.

Pan Tool

Move camera vertically or horizontally.

Tool Operation

  1. Click and drag cursor within the drawing area to pan the camera.

Tips

  • Esc = Enable previously selected tool.

Zoom Tool

Move camera in or out.

Tool Operation

  1. Click and drag cursor within the drawing area to zoom the camera.

Modifier Keys

  • Hold Shift = Change field of view degrees.

Tips

  • Esc = Enable previously selected tool.

Zoom Window Tool

Zoom in to a specific area of the model.

Tool Operation

  1. Click and drag the cursor across the items in the model that you want to zoom into.

Tips

  • Esc = Enable previously selected tool.

How to Draw a 3D Closet Frame Using 2×4 Objects in SketchUp

Let’s say you want to make a closet in your garage and you want to create the frame using 2×4 lumber. It’s helpful to draw this in 3D to visualize the design. This post will show you how to do it using the free web version of SketchUp.

Set length units and precision

First, under Model Info, we set the length format and precision. Since a 2×4 piece of wood is actually 1.5″ x 3.5″, let’s set the length and precision to 1/2″.

Create 2×4 objects that represent stock lumber

To simplify creating the closet frame out of 2x4s in 3D, we’ll first create 2×4 objects that are any length, e.g. 12 inches long, along each axis (x, y, and z). To do this, we’ll first create a 2×4 rectangle as follows:

Choose the rectangle tool.

Click and drag anywhere until you see a rectangle.

Before clicking a second time, type “1.5,3.5” (without quotes) to manually specify the dimensions and then hit Enter. What you type will show up in the Dimensions field in the bottom right corner.

You will see the rectangle as shown below.

Now, we want to pull the rectangle to create a 12-inch long object representing a piece of wood. Click the Push / Pull tool.

Zoom in, if necessary. Then, click on the face of the rectangle and drag up. Do not click as doing so will set the length. Instead, type “12” (without quotes) to specify the length in inches to pull the rectangle to create a 12″ long 2×4. Then, hit Enter.

Now that we have one piece of 2×4 in one direction. Let’s copy and paste it twice to create two more pieces in the other two directions. Click the “Select” tool.

Drag a rectangle around the entire object you just created to select all of it. The object will turn blue as shown below.

Click Copy / Ctrl+C and then Paste / Ctrl+V to paste a clone of that object. Do this twice.

Now, select the 2nd object and then click the Rotate tool.

Click somewhere on the object and then click again to start rotating the object. Don’t click a third time since doing so would set the rotation angle. Instead, type “90” (without quotes) to rotate the object by 90 degrees.

Do the same with the 3rd copy of the object but rotate it in a different direction.

Come to think of it, we should make 3 more copies of the object and rotate them so we can have 2x4s in all 6 perpendicular directions. If you’re having a hard time selecting one entire object using the “Select” tool because it’s too close to another object, try using the “Lasso” selection tool.

Now we’ve got our 2×4 building blocks which we can move to the side and clone to create the closet frame. I’ll select all 6 objects and move them as shown below.

Now, we’ll create a closet frame by first cloning one of the building blocks, moving the clone, and pulling it to change its length. I’ll start with the back left corner of the closet frame. When I copied and pasted one of the 2×4 objects, I clicked on the origin to position the object there.

Let’s say we want our closet frame to be 80 inches tall. I’ll switch to the Push / Pull tool, click on the face of the object that I want to pull, drag up, and then type 80 to set the length to 80 inches.

Since we want all corners to be 80 inches tall, we can clone the first 80-inch tall object three more times and position them as far as we want from each other. When you paste a copy of an object, you will see tooltips that help you align the object relative to the axes and to other objects.

Above, we see a copy of the 80-inch tall 2×4 but we don’t know how far it is from the first 80-inch 2×4. Click the Dimensions tool.

Then, click on each of the two endpoints of the distance you want to measure. In this example, the distance is 2′ 8.5″.

Let’s select the 2nd object and then click the Move tool so we can move the object to be 2 feet away from the other object.

Click on one corner / endpoint and then drag such that the distance becomes 2 feet.

When dragging, you’ll see tips such as “On Red Axis” which will help you stay on the same plane and only move in one direction. Below, we now see the distance between both objects is 2 feet.

Repeat the above steps for the remaining parts.

To learn more, including how to move and align objects relatively and absolutely, read my other SketchUp article.

How to Build Muscle

There are 3 main things that affect muscle growth:

  1. food
  2. strength / resistance training
  3. rest

To grow muscle, you need to

  • do strength training to break down muscle
  • have a moderate calorie surplus
  • have sufficient protein consumption (1 gram of protein per pound of body weight)
  • rest to build muscle

If you have a calorie deficit, your body will expend more energy resulting in weight loss in the form of BOTH fat and muscle loss.

If you have an excessive calorie surplus, you will GAIN weight, and grow some muscle but also gain a lot of fat.

You build muscle when the amount of protein synthesized into muscle during rest is greater than the amount of muscle protein breakdown during strength training. Without sufficient protein, you will just gain fat and little muscle.

Food

Both creatine and whey protein powder have been shown to increase muscle mass when taken in combination with resistance exercise.

Creatine increases exercise capacity during high-intensity exercise. This leads to improved recovery and adaptations such as increased muscle mass.

Meanwhile, ingesting whey protein in combination with exercise provides your body with a high-quality source of protein, enhancing muscle protein synthesis and leading to increased muscle gains over time.

While both creatine and whey protein promote muscle gain, they differ in the ways they work. Creatine increases strength and muscle mass by increasing exercise capacity, whereas whey protein does so by stimulating increased muscle protein synthesis.

Source

Protein

Muscles are made out of protein, among other things. So, you’re going to need to consume enough protein to build muscle. You should target 1 gram of protein per pound of body weight. For example, I currently weigh 178 lbs, so I should consume 178 grams of protein. Here are some protein-rich foods.

FoodQuantityProtein (g)CaloriesProtein / Calorie Ratio
Eggs1 large67811%
Egg White1 large41822%
Almonds1 ounce61643.6%
Chicken Breast1 roasted w/o skin5328418%
Oats1 cup113073.5%
Cottage Cheese1 cup2816317%
Greek Yogurt6 ounces1710017%
Regular Milk1 cup814916%
Soy Milk1 cup6.31056%
Broccoli1 cup chopped3319.6%
Lean Beef3 ounces2518613%
Tuna1 can (142 grams)2712821%
Quinoa1 cup cooked82223.6%
Whey protein concentrate supplement1 scoop (33 g)2513019%
Whey protein isolate supplement1 scoop (33 g)3013023%
Lentils1 cup boiled182308%
Ezekiel Bread1 slice4 805%
Pumpkin Seeds1 ounce91585.6%
Turkey Breast3 ounces2612520%
Shrimp3 ounces208424%
Brussel Sprouts1/2 cup2287%
Peanuts1 ounce71614.3%
Source

Other protein-rich foods

Pistachios, cashews, parmesan cheese, swiss cheese, mozzarella cheese, cheddar cheese, regular full-fat yogurt, kefir, soybeans, kidney beans, chickpeas, flax seeds, sunflower seeds, chia seeds.

Consuming a lot of protein without supplements can be difficult because you might feel full before you’ve reached your target daily intake. Also, it can be expensive. For that reason, most bodybuilders take protein supplements. When choosing a protein supplement, it’s important to stay away from ones with a lot of added sugar. The most popular protein supplement is whey protein. To be safe, opt for pure whey protein. I personally get the unflavored Nutricost Whey Protein Concentrate. It contains only one ingredient: Whey protein concentrate. 1 scoop contains 25 g of protein and 130 calories.

You can also buy whey protein isolate, which has 90 – 95% protein compared to whey protein concentrate, which has 60 – 80% protein. Source

Creatine

Creatine monohydrate is the best-studied and most effective form of this supplement. There are 2 dosing regimens:

Option 1

  1. Loading phase: Take 20-25 grams split into 4 or 5 equal doses over 5-7 days.
  2. Maintenance phase: Then, take 3-5 grams per day to maintain your muscle stores of the compound.

Option 2

Skip the loading phase and start the maintenance phase.

Both options are effective. The first option will allow you to experience the benefits 4x faster. Source

I personally take unflavored Nutricost Creatine Monohydrate.

Other Foods

Now, don’t go consuming nothing but protein shakes. They are meant to be supplements and not food substitutes. You can eat whatever else you want, but generally, you should avoid processed foods and foods with lots of added sugar. I have personally found the Keto diet (very low-carb diet) to be one of the best, if not the best, diets. I was able to lose 20 lbs following the Keto diet. It’s not just good for losing weight, but it’s also good for overall healthy eating.

Calories

While you can build muscle in a calorie deficit (losing weight), it will be quicker to build muscle by having a moderate calorie surplus. In order to determine how many calories is “moderate”, you first need to know your maintenance calories – the number of calories to consume each day to neither lose nor gain weight.

Maintenance Calories

Your maintenance calories is the number of calories you consume and burn each day to neither lose nor gain weight. Use the calorie calculator from the Mayo Clinic to determine your maintenance calories. It uses the Mifflin-St. Jeor equation, which pros consider the gold standard.

Slight Calorie Deficit to Lose Weight Without Losing Muscle

On days you don’t lift weights, you want to lose fat. You can do this by counting calories consumed and, if you are doing cardio exercises (treadmill, etc), subtracting calories burned such that your net calorie deficit is 5-10% of your maintenance calories. In my case, that would be 2200 – 10% = 1980 calories. You don’t want a huge calorie deficit because then you’ll lose fat and muscle.

Moderate Calorie Surplus Gain Muscle

On days that you lift weights to build muscle, depending on how much muscle you want to put on and how quickly you want to gain it, add 5% to 15% to your maintenance calories. In my case, that would be 2200 + 15% = 2530 calories.

Example Weekly Schedule

DAYACTIVITYCALORIES
MondayRestCalorie Deficit
TuesdayStrength TrainingCalorie Surplus, Extra Protein
WednesdayCardioCalorie Deficit
ThursdayRestCalorie Deficit
FridayStrength TrainingCalorie Surplus, Extra Protein
SaturdayCardioCalorie Deficit
SundayStrength TrainingCalorie Surplus, Extra Protein

On calorie-surplus days, your body needs the extra calories above your maintenance calories to build new muscle while you sleep.

Example Meal Plan

Here’s my daily meal plan.

Breakfast

  • 4 eggs in a bowl microwaved for 2 minutes
  • 1 cup of espresso coffee with frothed milk, 1/4 teaspoon of Truvia sugar substitute (erithrytol + Stevia extra), and cinnamon

Lunch

Protein shake containing

Dinner

5 air-fried skinless chicken legs (60 g protein, 380 calories) with one Anaheim pepper

Post-Dinner Drink

Another protein smoothie, but substitute the Acai with 3 or 4 frozen strawberries

Post-Workout Drink

Chocolate-flavored Premier 30g Protein Drink (30 g protein, 160 calories)

Total Daily Protein and Calorie Consumption

FoodQuantityProtein (gr)Calories
Eggs424300
Protein shake148544
Chicken drumsticks560380
Protein shake148544
Protein drink130160
Snacks (nuts)?
Total2101928

Without eating snacks, my total daily calorie intake is 1928.

Strength / Resistance Training

Muscle size increases when a person continually challenges the muscles to deal with higher levels of resistance or weight. This process is known as muscle hypertrophy.

Muscle hypertrophy occurs when the fibers of the muscles sustain damage or injury. The body repairs damaged fibers by fusing them, which increases the mass and size of the muscles. This increase, however, does not happen while you actually lift the weights. Instead, it occurs while you rest.

You need to be consistent and lift progressively heavier weights. To do this, you should keep track of your efforts. Personally, I log my workouts using the free version of the FitNotes app.

Sets and reps

A standard way of exercising each muscle is by grouping each exercise into 3 sets of 8 to 12 reps (repetitions). For example, if you bench press, you can choose a weight such that for the first set, you lift X lbs until you reach failure (can no longer lift / perform a complete cycle) after the 12th rep. Then, for the 2nd set, you do the same until your failure is maybe at the 10th rep. And for the 3rd set, you fail maybe at 8 reps.

SetWeightReps
1100 lbs12
2100 lbs10
3100 lbs8

Note that more important than the number of reps is the effort to lift until failure. If, after a while, you feel that you can do more than 12 reps at X lbs for the first set, then you need to increase the weight and continue to lift until failure, regardless of the exact number of reps you can do. This is called “progressive overloading.”

Let me repeat that. Train until failure such that you can barely complete your last rep with proper form. The last 2 to 3 reps before failure are the ones that count towards building muscle.

Breathing

You might be tempted to hold your breath while you’re lifting weights. Don’t hold your breath. Instead, breathe out as you lift the weight and breathe in as you lower the weight. Lowering weights requires less exertion, which makes it an ideal time to inhale. By breathing correctly, you’ll be able to lift more and limit fainting and injury.

Muscles

Here’s a diagram of some of the more obvious muscles that you’ll want to target when lifting weights.

Exercises

There are many types of strength training exercises you can do among free weights and machines. I personally prefer using machines as they are more comfortable and help you perform exercises using proper form and reduce the chance of injury. However, some exercises produce better results when using free weights, e.g. dumbbell or barbell chest press instead of a chest press machine. Here are some of the upper body exercises I prefer.

Exercise Database

Fatigue

When you start a workout, your muscles will have rested and you will be able to lift the most weight for any given exercise. As you progress through your workout, you will have less strength when performing other exercises. For that reason, it’s good to be selective in the order of the exercises you perform. For example, I would do 10 or so different exercises in the following order:

OrderExerciseMuscles Targeted
1V-Bar Tricep PushdownTriceps (Tris)
2Dumbbell chest press (flat)Chest
3Dumbbell chest press (30° incline)Upper chest
4Hammer Strength MTS Shoulder PressShoulders
5Biceps Curl MachineBiceps (Bis)
6Plank exerciseAbs, Core
7Lat PulldownBiceps and Latissimus Dorsi (Lats)
8Triceps PressShoulders and Triceps
9Lat RowLats, Delts and Back
10V-Bar Tricep PushdownTriceps (Tris)
11Row MachineLats, Delts and Back
12Biceps Curl MachineBiceps (Bis)

Each exercise, except the plank, is done with 3 sets. This sequence takes about 1.5 hours and I burn on average 500 calories.

Muscles by Volume

Many men generally want a bigger upper body. Oftentimes, they’ll focus exercises on 2 muscles: chest and biceps. However, to have a larger upper body, they may be better off targeting larger muscles. Following is a list of the 10 largest muscles in the body.

MuscleLocationVolume
Quadriceps femorisLower thigh1,420 cm3
Gluteus maximusBack of pelvis760 cm3
DeltoidShoulder380 cm3
Triceps BrachiiBack upper arm370 cm3
IliopsoasHips350 cm3
Pectoralis majorChest290 cm3
Biceps femorisTop of the thigh269 cm3
Latissimus DorsiMid back262 cm3
Biceps BrachiiFront upper arm143 cm3
SartoriusUpper and inner thigh126 cm3
Source

Muscle Gain By Weight

The longer you lift weights, the harder it becomes to grow more muscle. Following are average muscle weight gains for men and women at different stages of resistance training.

StageMenWomen
Newbie1.5 lbs / month0.5 lbs / month
Intermediate0.5 lbs / month 0.3 – 0.4 lbs / month
Advanced0.25 lbs / month 0.1 – 0.2 lbs / month
Source
Year of Proper TrainingPotential Rate of Muscle Gain Per Year
120-25 lbs (2 lbs / month)
210-12 lbs (1 lb / month)
35-6 lbs (0.5 lbs / month)
4+2-3 lbs (not worth calculating)
Source

You may have heard that muscle weighs more than fat. However, according to science, a pound of muscle and a pound of fat weigh the same. The difference between the two is density.

Rest

In order for your muscles to grow, you need to have sufficient rest. Make sure to sleep enough, e.g. 8 hours a day. Contrary to popular belief, you don’t actually build muscle while you’re lifting weights. You do need to lift weights to add mass, but training actually causes muscle breakdown.

How to Tell if You’re Gaining Muscle

  1. You’re Gaining Weight
    Track your weight at the same time each day and plot it on a chart to see your long-term progress. 
  2. Your Clothes Fit Differently
    Getting jacked will often mean your clothes start to fit differently – usually in a good way. If you’re noticing your shirts are fitting a bit tighter around your shoulders, chest, and biceps, or your pants are getting snug in the thigh and hip area, these tend to be good signs you’re gaining healthy weight. 
  3. You’re Building Strength
    If you can lift heavier weights, then you are probably building muscle. Track your strength using a log and practice progressive overloading. 
  4. Your Muscles Are Looking “Swole”
    Feeling puffier or bigger is normal and likely a good sign you’re growing your muscle fibers. Lifting weights increases fluids to your muscle, giving you that post-weight training pump, especially when you are just getting started with strength training. Over time, some of the water retention may diminish, but you should continue to feel bulkier. 
  5. Daily or Weekly Progress Photos
    Stand in front of a mirror and take a full-body photo. Repeat and assess your visual transformation regularly.
  6. Your Body Composition Has Changed
    Ultimately, the most efficient way to measure your muscle gain progress is to assess your body composition at the beginning and end of your bulk. You can opt for an affordable and convenient at-home scale, or schedule a DXA/DEXA scan that estimates your body fat percentage within a 1.6% margin of error. 

The best way to know you are gaining muscle is if you are progressively able to lift heavier weights because the only way you can lift heavier weights if you have bigger muscles.

Tracking Progress

If you use an app to keep track of your progress, you can periodically calculate your percent gains and improvements over time. Here’s an example of my actual gains.

ExerciseDec 26, 2021March 12, 2022% increaseTarget area
lbslbs
V-bar pushdown5072.545%Triceps
Chest press machine7012071%Chest
Lat pulldown machine9013044%Back
Shoulder press machine407075%Shoulders
Tricep pushdown machine11517047%Triceps
Bicep curl machine6511069%Biceps

Gadgets and Accessories

To support your strength training goals, I have found the following gadgets useful.

Wi-fi body scale

I have the Withings smart wi-fi body scale. It automatically records my weight, and in the app, I can see my weight change over time.

Smartwatch

I have the Fossil Men’s Gen 6 Touchscreen Smartwatch. It’s got a ton of features.

Whenever I enter the gym, I start tracking my heart rate and calories burned. When I’m done, I stop tracking. I can see a history of my calories burned and workout duration over time.

Bluetooth Headphones / Earphones

I have the Sony Wireless Behind-Neck Headset (WI-C400). Many people like to wear Beats headphones. I prefer the behind-the-neck style headset because it’s lightweight and doesn’t move around as I exercise, including when I do sit-ups.

Compression T-Shirt

I have the Under Armour Men’s HeatGear Compression Short-Sleeve T-Shirt. It allows you to see your body shape so you can see how you’re progressing. I find it motivating to see physical progress.

Weight Training Workout Gloves

Repeatedly lifting weights can result in calluses (thickened skin that forms as a response to repeated friction or pressure). Workout gloves tend to have a cushion to protect your skin. I find it much more comfortable to lift with gloves on.

Summary

  • Stay in a positive protein balance by hitting your protein consistently.
  • Get your protein from high-quality sources like meat, eggs, dairy, and soy.
  • Your body needs energy to grow, so you need to be in a moderate calorie surplus.
  • Make sleep a priority — both quantity and quality.
  • Hit the weights consistently, and train harder by adding volume (in weight, reps, and sets) over time – progressive overloading.

Various Ways of Working With Lots of Text and Files

Table of contents

  • Find and replace text in a single text file
  • Find and replace text in multiple files
  • Find and replace multiple regexes in all files in a folder recursively
  • Sort a list of text
  • Get unique / remove duplicate lines in a list of text
  • Select a column of text
  • Find text in a single file and copy all matches to the clipboard
  • Add text to the beginning of each line of text
  • Copy differences (diff) between two files
  • Rename multiple filenames in multiple folders

The instructions below use Visual Studio Code unless stated otherwise.

Find and replace text in a single text file

  1. Open the text file in Visual Studio Code
  2. Click Edit > Find or Edit > Replace
  3. Enter your search term and replace term
  4. Use optional options like
    • case senstive match
    • match whole word
    • regular expression
    • preserve case
    • replace first match
    • replace all matches at once
    • find in selection

Find and replace text in multiple files

  1. In Visual Studio Code, right click on a folder and click “Find in Folder…”
  1. Enter your search term and replace term
  2. Use optional options like
    1. case senstive match
    2. match whole word
    3. regular expression
    4. preserve case
  3. In the search results, you will see a preview of the text change.

If you click on a preview in search results, you can can the a side-by-side view of the change in each file.

Find and replace multiple regexes in all files in a folder recursively

Modify this JavaScript and run using NodeJS.

Sort a list of text

  1. Select all the text to sort
  2. Right click on the selection and click “Sort lines”

Get unique / remove duplicate lines in a list of text

  1. Select the list of text
  2. Click View > Command Paletter
  3. Click one of the unique sort options

Select a column of text

  1. Put the cursor at one corner of the column of text you want to select
  2. On Windows, click and hold “Shift” + “Alt” keys and drag the cursor to the opposite corner of the column of text you want to select
  1. You can then start typing to replace the text or copy the text to the clipboard

Find text in a single file and copy all matches to the clipboard

  1. Open the text in Visual Studio Code
  2. Click Edit > Find
  3. Enter a search term
  4. Click Selection > Select All Occurrences
    All matches will be highlighted. Notice the different highlight color in the two screenshots below.
  1. Right click on the highlighted text and click “Copy”
  1. You could then paste the copied text in a new file

Add text to the beginning of each line of text

  1. Click Edit > Replace
  2. Use the following regex search

Copy differences (diff) between two files

Let’s say you have two files and you want to get only the differences between the two. Visual Studio Code will show you a diff between two files as follows:

  1. Open both files
  2. Select both files in the OPEN EDITORS section
  3. Right click and click “Compare Selected”

You will then see a nice diff between the two files.

But, you won’t be able to copy only the changed lines or export the diff. On Windows, you can use a tool called DiffMerge by SourceGear. If you open both files, you’ll see a similar view.

You can then click Export > File Diffs > Traditional > In Text > To Clipboard to copy the diff to your clipboard.

You can then paste the diff in a text editor like Visual Studio Code and extract only the text you are interested in.

Rename multiple filenames in multiple folders

Let’s say you have many files and you want to rename the filenames all at once. For this, I find it easy to use a tool like Rename Expert. For example, in the screenshot below, I did the following:

  1. Added all files the filenames of which I want to rename
  2. Under “Actions”, chose the actions I want done. In this case, I did 2 actions:
    1. Replace (to replace the first character of each filename with an underscore)
    2. Edit file extension (to change the file extension from php to jpg)
  3. Previewed the changes and resolve any conflicts
  4. Clicked the Apply button to run the batch renaming of files.

Choosing Keywords to Improve Search Engine Ranking

If you have a website or are publishing an article online, you can increase your chances of people finding it by carefully choosing keywords to use both in the domain, folder path, and page content. One tool to help with this is Google Adword’s Keyword Planner. As a trivial example, let’s say you are building a dictionary website. You could buy a domain name that has the word “dictionary” in it or you could use the word “dictionary” in your page content. Or, you could use a synonym like “lexicon”. If you enter both words in the Keyword Planner, you’ll see the average monthly search volume for those words. In addition, Google will offer keyword ideas. As you can see in the screenshot below, many more people search using the term “dictionary” than they do the term “lexicon”. You can also see the competition level in the Competition column. However, that’s for if you want to pay Google to place your link at the top of search results. In the example below, the competition is low for both keywords.

Now, since “dictionary” is a popular term, you can expect more competition with respect to organic (not paid) search results. As you can see below, there are 4.32 billion results for the term “dictionary” and 3.05 billion for “lexicon”.

Of course, you’re not going to just write “dictionary” in your website content. You’ll probably write something like “Chinese – English dictionary” or “Spanish – English dictionary” which will have different average monthly searches and search results.

Animal vs Plant Protein

Amino Acids

Proteins consist of units called amino acids. There are 20 amino acids. The body synthesizes some of them from components within the body, but it cannot synthesize 9 of the amino acids—called essential amino acids. They must be consumed in the diet. The amount and type of each amino acid vary based on the protein source.

Animal proteins such as eggs, milk and steak are complete because they contain all of the essential amino acids that your body needs to function effectively.

Plant proteins, such as beans, lentils and nuts are considered to be incomplete, as they lack one or more of the essential amino acids that your body needs.

Protein Quality Score

Due to the important role proteins play in our nutrition, it’s vital that we have a standard measure to determine protein quality.

PDCAAS (Protein Digestibility-Corrected Amino Acid Score)

In 1993, the Food and Agricultural Organization (FAO) and the US FDA made PDCAAS the official standard for comparing protein quality.

DIAAS (Digestible Indispensable Amino Acid Score)

In 2013, FAO proposed using a new evaluation method resulting in different scores called DIAAS. According to DIAAS, protein quality can be categorized as follows:

  • No protein quality claim – Score of <75%
  • Good protein quality – Score ranging from 75% to 99%
  • Excellent or High protein quality – Score of 100% or more

As you can see in the table below, all animal-based proteins are of high quality whereas plant-based proteins are either just good or poor in quality.

DIAASaPDCAASb
Animal-derived foods
 Whey protein isolatee1.000.99
 Whey protein concentratee1.071.00 (1.07)
 Milk protein concentratee1.201.00 (1.21)
 Skimmed milk proteine1.051.00 (1.12)
 Whole milk powdere1.161.00 (1.16)
 Caseine, f1.091.00 (1.20)
 Cow milke1.16 
 Sheep milke1.09 
 Goat milke1.24 
 Whole egg, boilede1.131.00 (1.05)
 Beefe1.121.00 (1.14)
 Porke1.141.00
 Chicken breaste1.081.00 (1.01)
 Tilapia (fish)d1.00 
Non-animal-derived foods
 Soya protein isolatee0.840.93
 Soya floure0.890.98
 Wheate0.450.50
 Pea protein concentratee0.620.75
 Cooked peasf0.580.60
 Oat protein concentratee0.670.69
 Cooked rolled oatsf0.540.67
 Rice protein concentratef0.370.42
 Cooked ricef0.600.62
 Ryee0.480.59
 Barleye0.470.59
 Pease0.650.79
 Sorghume,f0.290.29
 Cooked kidney beansf0.590.65
 Roasted peanutsf0.430.51
 Corn based breakfast cerealf0.010.08
Source
  1. Only values that used the scoring patterns for children older than 3 years, adolescents, and adults were selected
  2. aValues for DIAAS were calculated from the ileal digestibility of amino acids
  3. bValues for PDCAAS were calculated from the total tract digestibility of crude protein
  4. cAll values for DIAAS and PDCAAS were selected in humans, if available, growing pigs, or in growing rats in that order
  5. dMeasured in humans
  6. eMeasured in pigs
  7. fMeasured in rats

Essential Amino Acid Comparison Between Steak and Broccoli

Since essential amino acids are essential, it’s important and interesting to compare how much of them you get when you compare the same amount of an animal protein to a plant protein. The following table compares 1 oz of steak to 1 oz of broccoli.

%RDI = % Recommended Daily Intake

Essential Amino Acid1 oz Broiled Sirloin
Strip Steak
1 oz BroccoliRatio
Tryptophan (mg)
(% RDI)
55
(20%)
9
(3%)
6.7x
Threonine (mg)
(% RDI)
332
(32%)
25
(2%)
16x
Isoleucine (mg)
(% RDI)
378
(27%)
22
(2%)
13.5x
Leucine (mg)
(% RDI)
661
(24%)
37
(1%)
24x
Lysine (mg)
(% RDI)
703
(33%)
38
(2%)
16.5x
Methionine (mg)
(% RDI)
217
(30%)
11
(1%)
30x
Phenylalanine (mg)
(% RDI)
329
(38%)
33
(4%)
9.5x
Valine (mg)
(% RDI)
412
(23%)
35
(2%)
11.5x
Histidine (mg)
(%RDI)
265
(38%)
17
(2%)
19x
Source

As you can see, you get WAY more essential amino acids from 1 oz of steak than you do from 1 oz of broccoli. However, from a calorie point of view,

  • 1 oz of Broiled Sirloin Strip Steak has 60 calories
  • 1 oz of Broccoli has 10 calories

1 oz of steak has 6 times as many calories as 1 oz of broccoli.

So, what if you just ate more broccoli to consume the same amount of amino acids as steak. The highest number in the ratio column is 30x. So, you’d need to eat 30 oz of broccoli to get at least the same amount of amino acids as steak. But then your calorie intake would be 10 calories x 30 = 300 calories, which is way more than 60 calories for the 1 oz of steak.

Conclusion

Don’t be a vegetarian. Include animal-based proteins such as eggs, meat and milk in your diet. If you don’t like them, then at least drink a smoothie made with whey protein powder. Here are some nutrients you can’t get from a vegetarian or vegan diet.

How the Ultrawealthy Legally Avoid Paying Taxes

It’s not uncommon to hear that some of the wealthiest Americans pay less tax than the average taxpayer or, sometimes, no tax at all. However, there hasn’t been much, if any, proof or an understanding of how they get away with it until recently. ProPublica, somehow, got IRS records of many of the wealthiest Americans and in June of 2021, published an article and video showing what these people’s effective tax rates were and how they did it.

Tax Rate

In recent years, the median American household earned about $70,000 annually and paid 14% in federal taxes. The ultrawealthy, on the other hand, paid less than 3.5% from 2014 to 2018.

Wealth GrowthTotal Income ReportedTotal Taxes PaidTrue Tax Rate
Warren Buffet$24.3B$125M$23.7M0.10%
Jeff Bezos$99.0B$4.22B$973M0.98%
Michael Bloomberg$22.5B$10.0B$292M1.30%
Elon Musk$13.9B$1.52B$455M3.27%
Source

Buy, Borrow, Die

According to ProPublica, the ultrawealthy are able to pay so little or nothing in taxes by living off of loans. Income tax is tax on any income you receive, like a paycheck. For most people, your employer withholds your taxes due so when annual taxes are due, you pay or get a return of the difference of your final taxes owed. Therefore, the less your income is, the less you pay in taxes. Wealth in the form of stocks and real estate can go up and down and is not taxable until you sell. You probably have heard of some CEOs getting a salary of only $1 a year. This might sound like they are extremely generous and humble but in reality, it’s a strategy for them to continue to live lavishly but pay very little in taxes. Since no one can live on a salary of $1 a year, they borrow money to pay for food, housing, yachts, airplanes, etc. And because they’re so rich, they can get a loan at a very low interest rate, like 3%. As an example, if a CEO gets a salary of $1M a year, then their tax rate would be 37% and their tax bill would be, assuming no deductions, $370K. However, if they borrow $1M and pay 3% interest, then they only pay $30K in interest and $0 in taxes assuming they took a salary of $1.

Steps

  1. BUY an asset (buy stock, real estate; build a company, etc).
    As long as they don’t sell, they don’t pay any taxes.
  2. BORROW against their holdings
    This is like when ordinary people do a cash-out refinance on their house. Since the ultrawealthy have good credit (and can just buy the bank they are borrowing money from), they get a super low interest rate.
  3. DIE and still not pay taxes
    Use complicated trusts and philanthropic foundations to avoid estate tax. Their heirs can inherit stocks and other assets tax-free.

A new generation starts ultrawealthy and the cycle starts all over again.

Weight Loss With Glucomannan Fiber

Consuming foods high in fiber is important for your digestion and to feed your gut bacteria. But, it can also be very effective for weight loss. Fiber can soak up water in the intestine, slowing the absorption of nutrients and increasing the feeling of fullness.

Dietary fiber is a non-digestible carbohydrate found in foods. As such, it can be subtracted from total carbs since fiber simply passes through your body. Unlike other carbs, it does not get converted to sugar or get stored as fat.

There are 2 types of fiber based on water solubility:

  1. Soluble fiber: dissolves in water and can be metabolized by the “good” bacteria in the gut
  2. Insoluble fiber: does not dissolve in water

What is Glucomannan?

Glucomannan is a natural, water-soluble dietary fiber extracted from the roots of the elephant yam, also known as konjac. It is grown in East and Southeast Asia and is a very common food in Japan and Korea.

It’s the main ingredient in Shirataki noodles and comes in powder and pill form.

How does Glucomannan support weight loss?

Glucomannan is one of the most viscous dietary fibers known. It absorbs so much liquid that a small amount of glucomannan added to a glass of water turns the entire content into a gel. Chia seeds, which you may have heard of, are also high in fiber and also absorb water but it’s nothing compared to Glucomannan. Note that ground flaxseeds is another healthy fiber supplement but it doesn’t gel up nearly as much as Chia seeds.

In the picture below, you can see Glucomannan in powder form being added to water, and on the right, the Glucomannan after it absorbed all the water.

This thick gel lines the stomach and provides bulk and satiety / feeling of fullness which lowers your appetite so you eat less. In addition, Glucomannan

  • is very low in calories.
  • delays stomach emptying, contributing to increased satiety
  • like other soluble fibers, reduces the absorption of protein and fat

According to this article, reliable studies show that consuming Glucomannan as part of a weight-loss diet is very effective in supporting weight loss. Of all fiber sources you can consume, Glucomannan is the most effective in supporting weight loss.

Consuming Glucommanan

It is recommended to take 1 gram (1000 mg) of Glucomannan before a meal with two 8 oz glasses of water. The amount of time before a meal depends on how long it takes for the Glucomannan to gel up. When you get your Glucomannan, it’s a good idea to add water to it to see how long it takes to gel up. The powder form should gel up in a few minutes whereas the pill form should take about 30 minutes. In general, you can wait 15 minutes to an hour before eating.

WARNING: Glucomannan MUST be consumed with water so that it reaches the stomach before it turns into a thick gel. Consuming Glucomannan without water could cause it to gel up in the throat or esophagus causing blockage and choking. The government of Australia even banned Glucomannan because of this choking and blockage risk.

The amount of water to drink while consuming Glucomannan is important as it will affect the viscosity and effectiveness of the Glucomannan to support weight loss. For example, according to this video, the same amount of Glucomannan was added to a small and large glass. Then, different amounts of water was added to each glass. The result was the gel in the small glass was so thick that turning the glass over would not cause it to come out. The gel in the large glass, on the other hand, could spill out. The more water, the better.

Not all Glucomannan brands are the same

According to this video, the brand on the left did not coagulate as much a the one on the right. Therefore, test the Glucomannan you buy to ensure that it coagulates as expected.

Testing viscosity of Glucomannan by Nutricost

I bought a bottle of glucomannan pills by Nutricost on Amazon. To test the viscosity, I put water and glucomannan in 3 glasses as follows:

  • Left glass: Emptied powder from pill (600 mg) into 1/3 glass of water
  • Middle glass: Emptied powder from pill (600 mg) into 7/8 glass of water
  • Right glass: Put pill (600 mg) into 7/8 glass of water

I stirred the powder in the water but there was too little powder that the glucomannan hardly became coagulated.

I then added another pill (600 mg) and although the mix was more viscous, it wasn’t very thick. I then added another pill (600 mg) and blended the mix together.

Finally, the mix in the left glass became thick like a thick sauce. The middle glass was somewhat thick but due to there being more water, it was still very runny. The pill in the right glass still hadn’t melted after 6 hours.

Based on these results, I think

  • it’s better to consume glucomannan as a powder rather than a pill so the satiety effects will be quicker
  • it’s better to consume glucomannan blended with water (or in a smoothie or in food so that the glucomannan can expand before you consume it)