


Launch an EC2 Instance
- Log in to AWS and go to EC2 > Instances > Launch an Instance
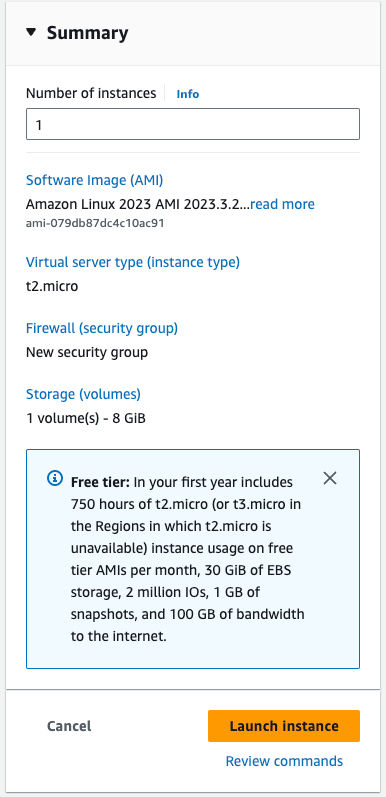
- Enter a name. I’m calling mine “My Web Server”.
- For Application and OS Image, I’ll just choose the default, which is “Amazon Linux 2023”.
- For Amazon Machine Image (AMI), I’ll choose the default, which is “Amazon Linux 2023 AMI”
- Under Key Pair, click “Create new key pair”.

Amazon EC2 can easily create a key pair for you. Just enter a key pair name. I chose “aws-ec2”. OpenSSH is available on Linux, Mac, and Windows 10+, so keep the default key format of .pem. On Windows 10+, OpenSSH is an optional feature you must install. Click the “Create Key Pair” button. The private key will be downloaded to your computer. Keep it in a safe place. You will need it to SSH into your EC2 instance.

In the Network Settings section, since we want to SSH into the EC2 instance and we want to be able to browse our website over HTTP and HTTPS, check those checkboxes.

Leave everything else at their defaults. Review the summary and click the “Launch Instance” button.
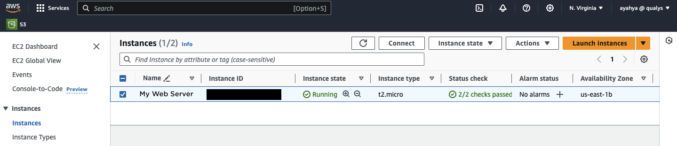
You will then see your EC2 instance listed. Wait for the “Status check” to change to “2/2 checks passed”.
Once your instance has been set up, click the button to connect to the instance.
SSH into EC2 Instance
You have a few options to connect to the EC2 instance. For simplicity, choose EC2 Instance Connect. This will open a new browser tab with shell access. Leave the default username as “ec2-user”.
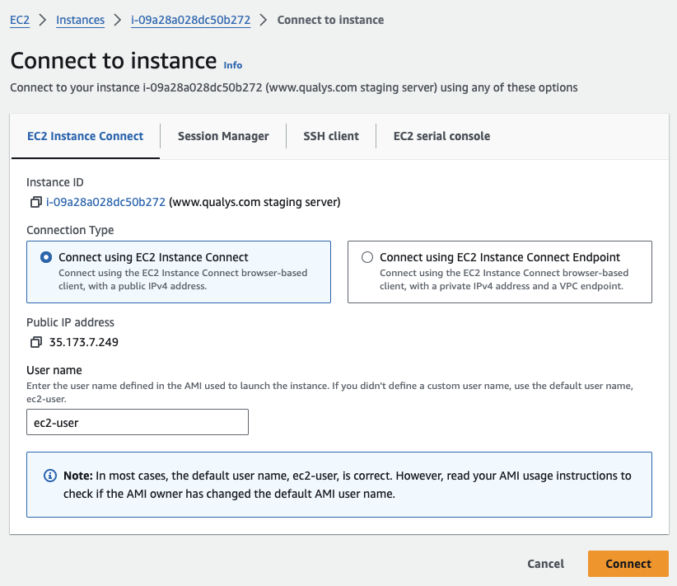

You’ll notice the command prompt changes to ec2-user@ip-172-31-47-114 which is my default username (ec2-user) followed by my EC2 instance’s private IP (ip-172-31-47-114).
Install Apache
Since we installed Amazon Linux 2023, follow these instructions to install Apache. Since we don’t need MySql and PHP, ignore the commands and instructions for those. For example, instead of
sudo dnf install -y httpd wget php-fpm php-mysqli php-json php php-develjust do
sudo dnf install -y httpdMake sure to follow the instructions to set the file permissions so that Apache can serve the website.
- The Amazon Linux Apache default document root is
/var/www/html - The Apache config is at
/etc/httpd/conf/httpd.conf - The Apache logs are in
/var/log/httpd/

To view Apache errors, run the following command
sudo tail -100 /var/log/httpd/error_log Test that Apache works by going to the public IP address WITHOUT “https”, e.g. http://34.229.240.7/.
Set Up SSL/TLS
These instructions show how to create a self-signed certificate and a CA-signed certificate. For a self-signed cert, you don’t need a domain name. You can access your website over https by IP address, e.g. https://34.229.240.7/
For a CA-signed cert, you can follow these instructions to automate certificate renewals using Let’s Encrypt with Certbot. You can also use AWS Certificate Manager to manage and automatically renew certs.
Get a Fixed IP Address
The default IP address that AWS gives you is dynamic (will change whenever the server restarts). To get a static (fixed) IP address, get an Elastic IP Address. Once you get one, try to access your website over https, e.g. https://35.173.7.249/
Put Your Website in a GitHub Repo
- Create your website locally in a folder. If you have an existing website under git version control with a lot of history and you want to remove the history, git clone the repo into a new folder, delete the “git” folder, and then run
git init. - Create a new repo in GitHub
- Push your local repo to GitHub
git remote add origin [email protected]:...
git push -u origin
Clone the GitHub Repo to Your EC2 Server
- In your EC2 CloudShell (web-based terminal), install git (
sudo dnf install git -y). Learn more. - Generate a new SSH key and add it to the ssh-agent. Since your EC2 instance is Linux, follow the instructions for Linux.
- Add your new SSH key to your GitHub account
- Clone your GitHub repo to your EC2 instance. I’m going to clone it to my home folder.
- In GitHub, get the SSH URL of your repo.

Then, in your home folder, clone it

You will then see a new folder containing your website files from the GitHub repo.

Since my website document root is at /home/ec2-user/my-website/www, we need to update the Apache default document root (/var/www/html) to reference that path by editing the Apache config.
sudo nano /etc/httpd/conf/httpd.conf 
- Change all references of
/var/www/htmlto/home/ec2-user/my-website/www - Change all references of
/var/wwwto/home/ec2-user/my-website - Restart Apache (
sudo systemctl restart httpd)
Update Folder Permissions
If you try to view your website, e.g. by going to https://35.173.7.249/, you will probably get a “Forbidden” error. To better understand this error, view the Apache error log.
sudo tail -100 /var/log/httpd/error_log You will probably see an error like this
[Sat Dec 23 01:36:55.545345 2023] [core:error] pid 89394:tid 89446 Permission denied: [client 135.125.246.189:49368] AH00035: access to / denied (filesystem path '/home/ec2-user/my-website') because search permissions are missing on a component of the pathTo fix this, follow these instructions on how to update file permissions

But replace /var/www with your website document root. In my case, I changed it to /home/ec2-user/my-website
According to the Apache docs, you also need to change the file permissions of all parent folders. In my case, the following folders need to be executable
- /home
- /home/ec2-user
- /home/ec2-user/my-website
ls -la
chmod +x .
cd ..
# repeat up to the root
When you’re done, you should be able to view your website in a browser.
Optional
- Install Node.js and npm on EC2
- Note that the dotenv package is no longer needed in Node.js v20.6.0+ because those Node versions have built-in support for .env. Learn more