If you’re getting on the Jamstack bandwagon, you’ll probably get to a point where you need to figure out a way to handle web forms. That’s what happened to me when I migrated from WordPress (PHP) to static HTML. I needed a way to handle my contact form. Fortunately, there are many form backend services like
After reviewing each one, I find KwesForms to be the best, but to have one of the worst costs because it’s one of the most expensive.
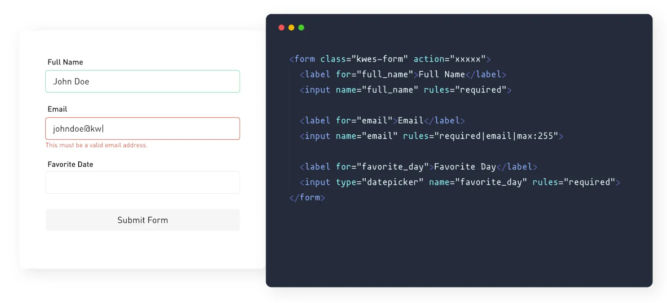
At $29 / month, that’s cheap for a company but more than I would want to pay for a personal blog. There is a free version but it has some limitations and has the KwesForms logo on confirmation emails. Anyway, KwesForms has the best features, what super easy to integrate, includes form validation, custom redirects, clear documentation, and more. You can view and edit form data and export it all as a CSV file.
Since I don’t want to pay $29 / month for a contact form, and since I’ll be hosting my new blog on Netlify, I’m just going to use Netlify Forms. It’s not as user-friendly and feature-packed as KwesForms, which is to be expected since Netlify specializes in static site hosting, not form handling, but it’s free (up to 100 submissions per month). However, unlike KwesFroms, which comes with form validation, I’ll have to add my write my own form validation code. Instead of reinvent the wheel, I’ll use .validate, a jQuery validation plugin.
As you can see from their website and the video below, it’s dead simple to use.
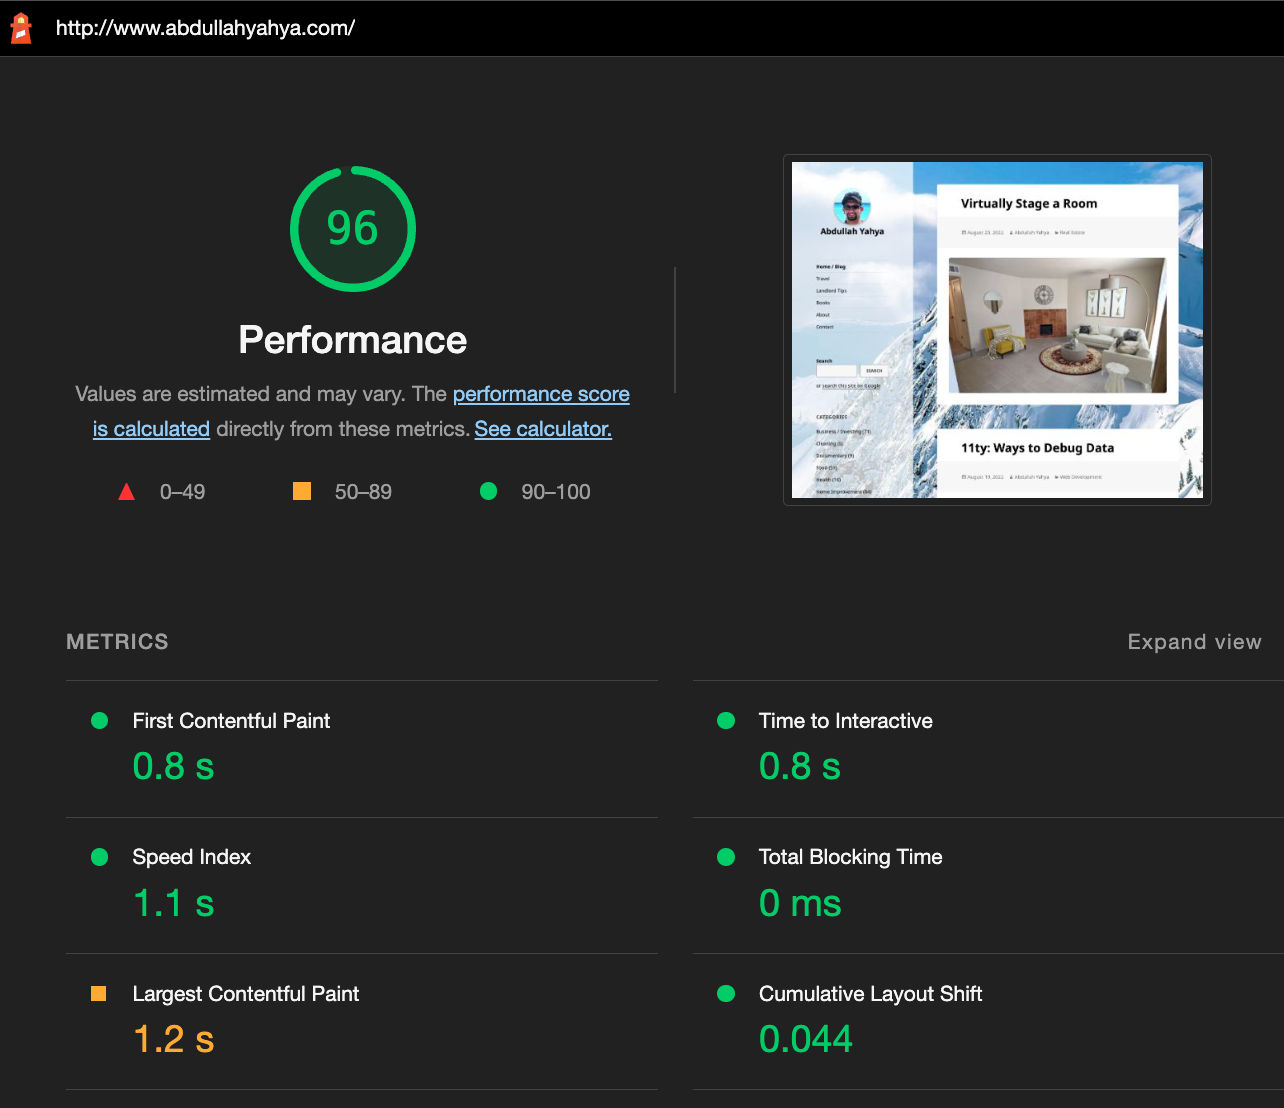
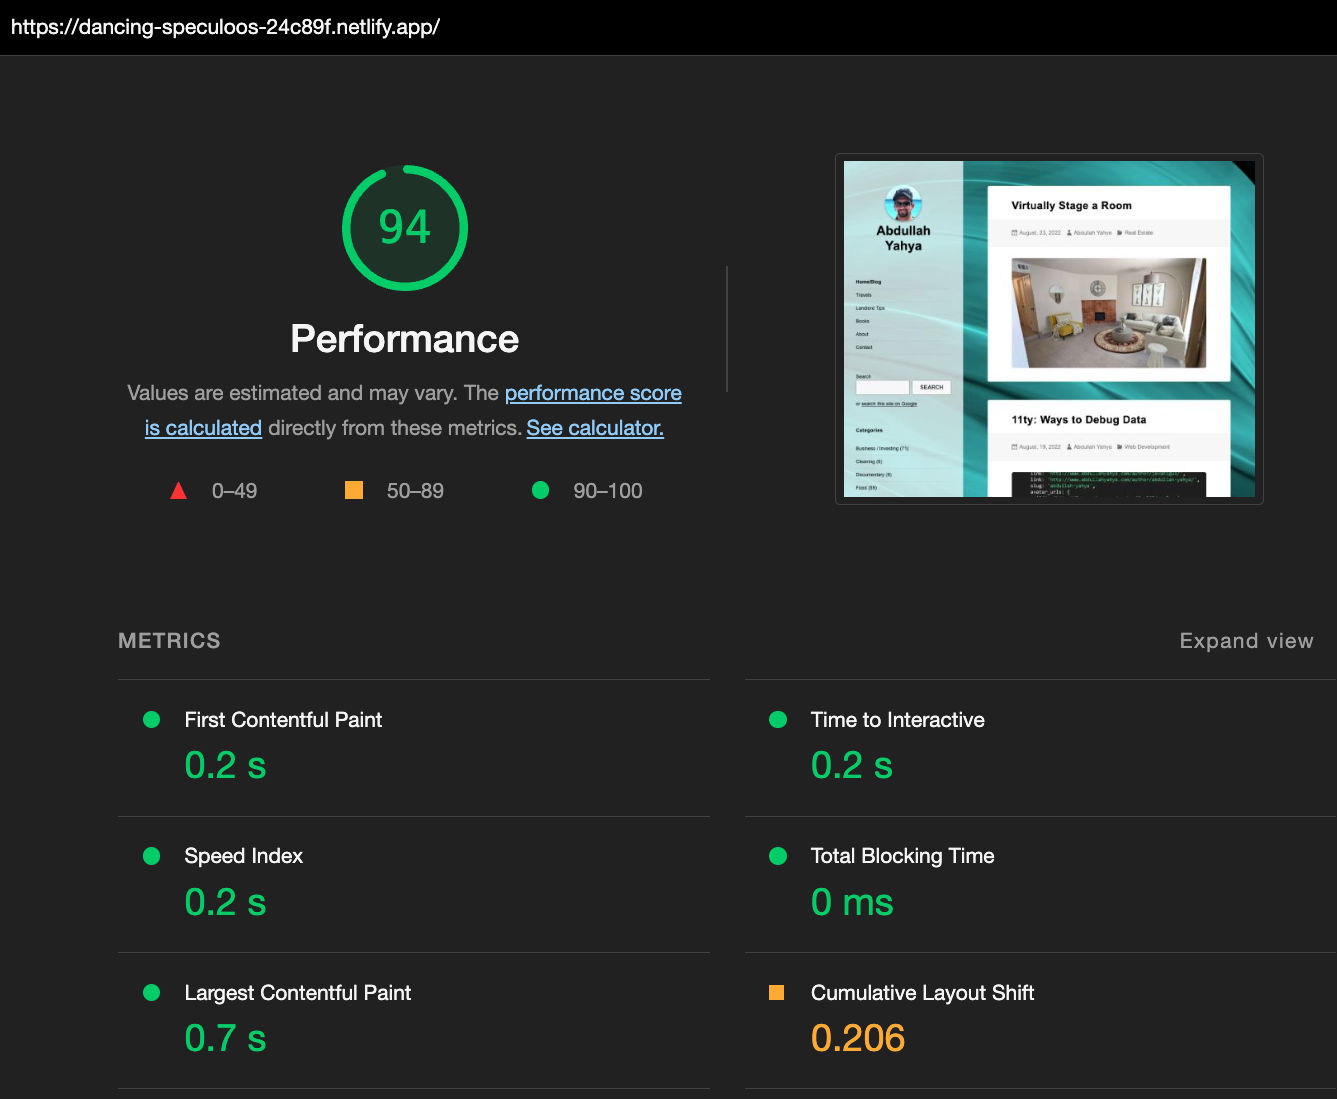
I’m in the process of migrating this blog from a managed WordPress instance on GoDaddy to a static HTML site on Netlify. Before I switch over the domain, I wanted to compare the Google Lighthouse performance scores for each site. In Google Chrome Developer Tools, I clicked the Lighthouse tab and ran a test for each site. Here are the results.
Performance score for WordPress (PHP) version of site on GoDaddy
Performance score for static HTML version of site on Netlify
Now, you might be thinking, why would the PHP site get a slightly higher score than the static HTML site? The static site has a lower cumulative layout shift score (see definition below). This factor has nothing to do with PHP vs HTML or GoDaddy vs Netlify. This factor has to do with how elements on the page shift their position. The original theme in the WordPress site came from one developer and the theme in the static HTML site came from another developer who recreated the original theme. This tells me that the original theme was coded better than the recreated theme. Since I’m more concerned with speed rather than layout shift, we can see that the static HTML site on Netlify is much faster than the PHP site on GoDaddy. This is to be expected. If we add up all scores except for the Cumulative Layout Shift score, we get
PHP on GoDaddy Performance Score: 3.9 s
HTML on Netlify Performance Score: 1.3 s
The new site performs 3x faster than the old one! That’s a speed gain of 300%!
First Contentful Paint
First Contentful Paint marks the time at which the first text or image is painted. Learn more.
Time to Interactive
Time to interactive is the amount of time it takes for the page to become fully interactive. Learn more.
Speed Index
Speed Index shows how quickly the contents of a page are visibly populated. Learn more.
Total Blocking Time
Sum of all time periods between FCP and Time to Interactive, when task length exceeded 50ms, expressed in milliseconds. Learn more.
Largest Contentful Paint
Largest Contentful Paint marks the time at which the largest text or image is painted. Learn more
Cumulative Layout Shift
Cumulative Layout Shift measures the movement of visible elements within the viewport. Learn more.
I just finished renovating one of my rental apartments. I took a bunch of photos and, though the apartment looks nice, it looks extremely plain and uninviting without furniture. Some people have a good imagination and sense of design and can visualize what a room could look like with furniture the right furniture, but most people are clueless when it comes to interior design. I definitely don’t want to spend a lot of time, money, and energy paying a professional stager to come and bring real furniture to my apartment. Fortunately, there are online services where you can pay companies (or individuals) to virtually stage photos of your rooms for you. Or, you can use one of many DIY websites where you can virtually stage your rooms yourself.
After doing some research, I came across Apply Design. They charge up to $10 per photo. You can try it for free on one photo. So, I gave it a try and here’s what I came up with.
Living Room When Occupied by Tenant
The photo is distorted because I used a 360-degree camera placed in the center of the room. To show more of the room, I had to zoom out which made the walls look wider or narrower.
Living Room Right After I Kicked Out My Inherited Tenant
Again, the photo above is distorted.
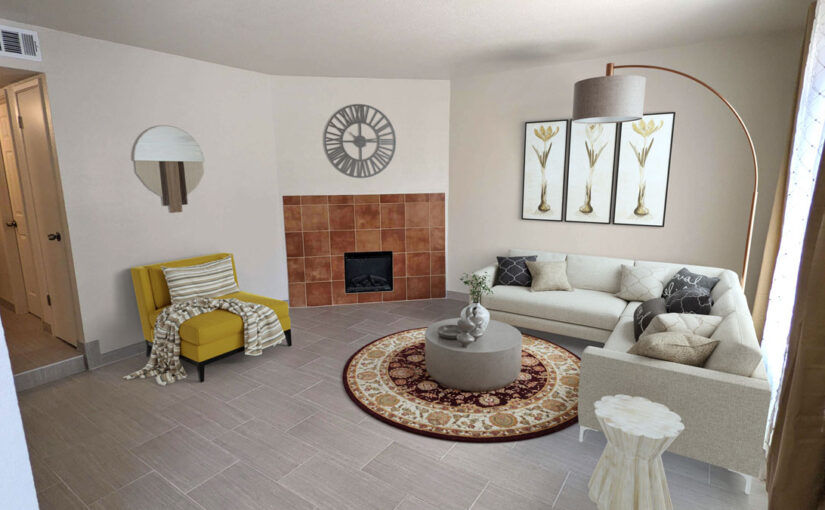
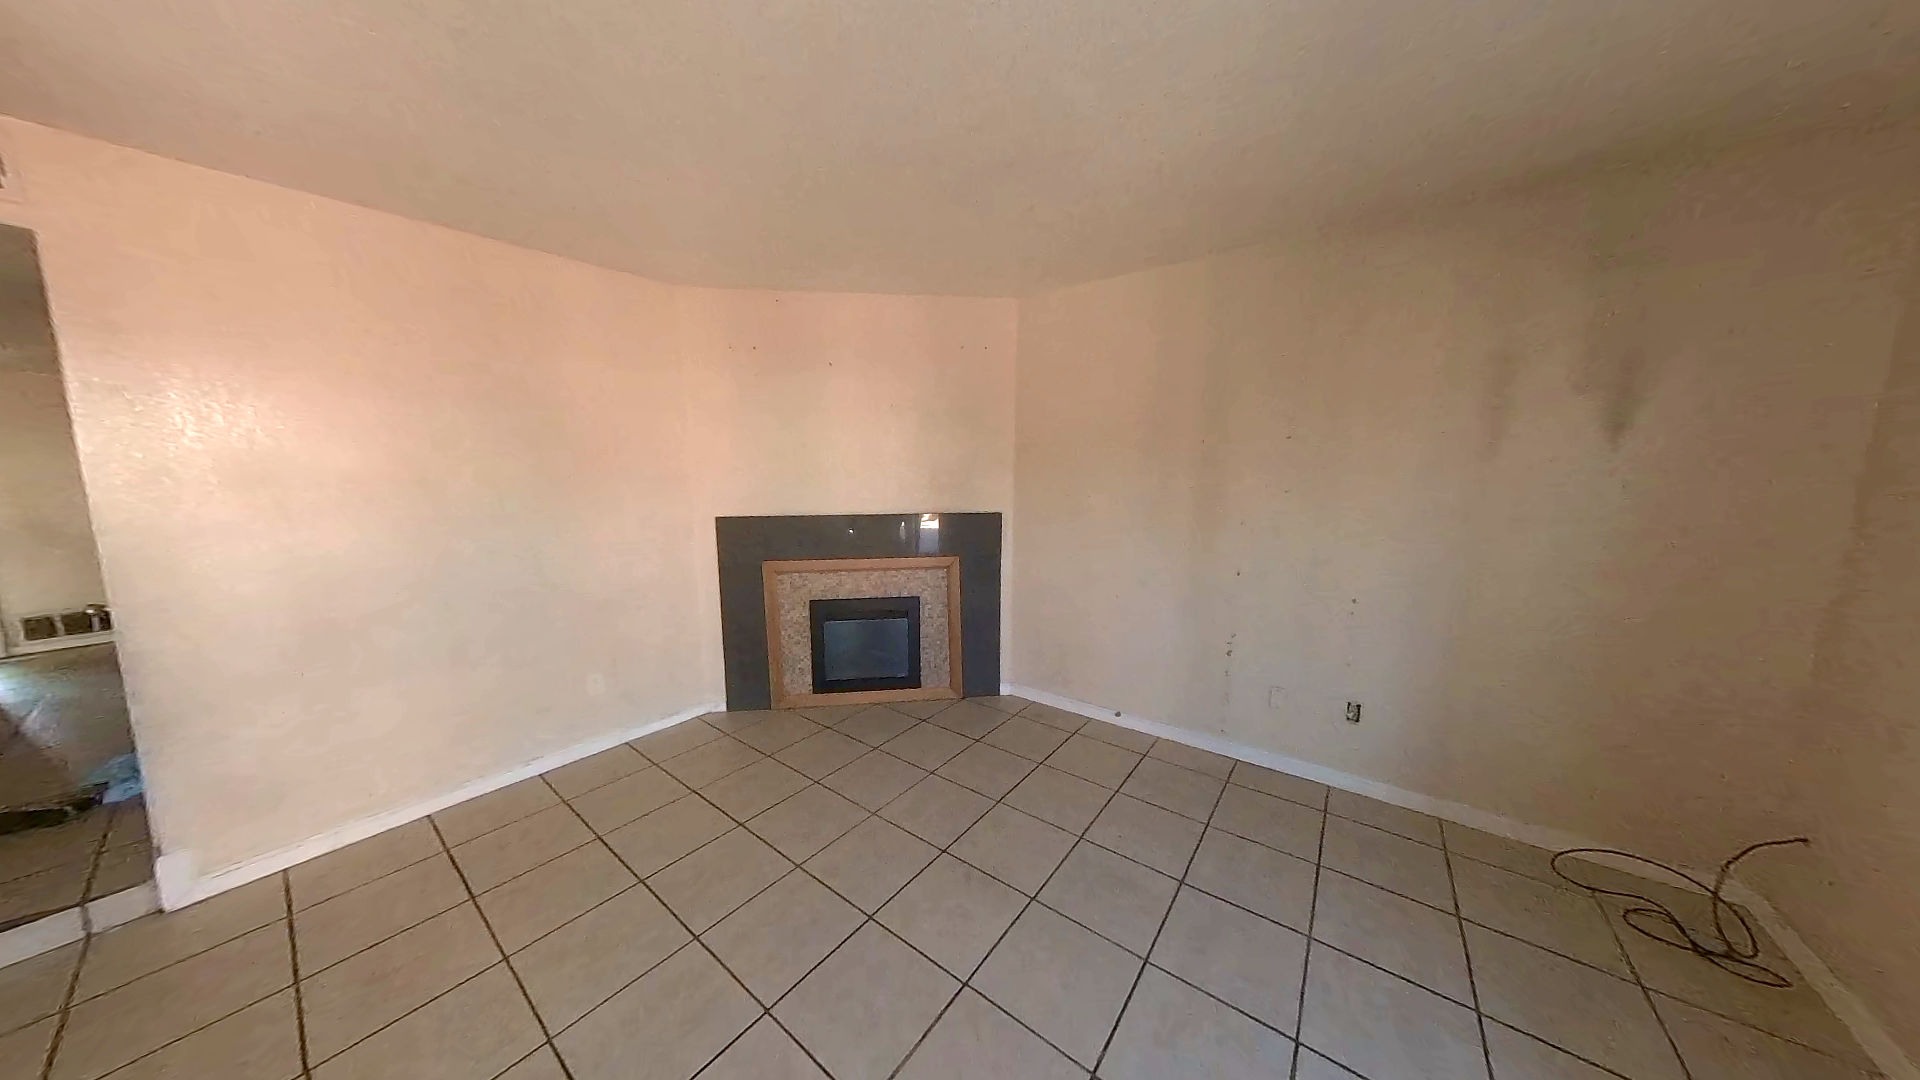
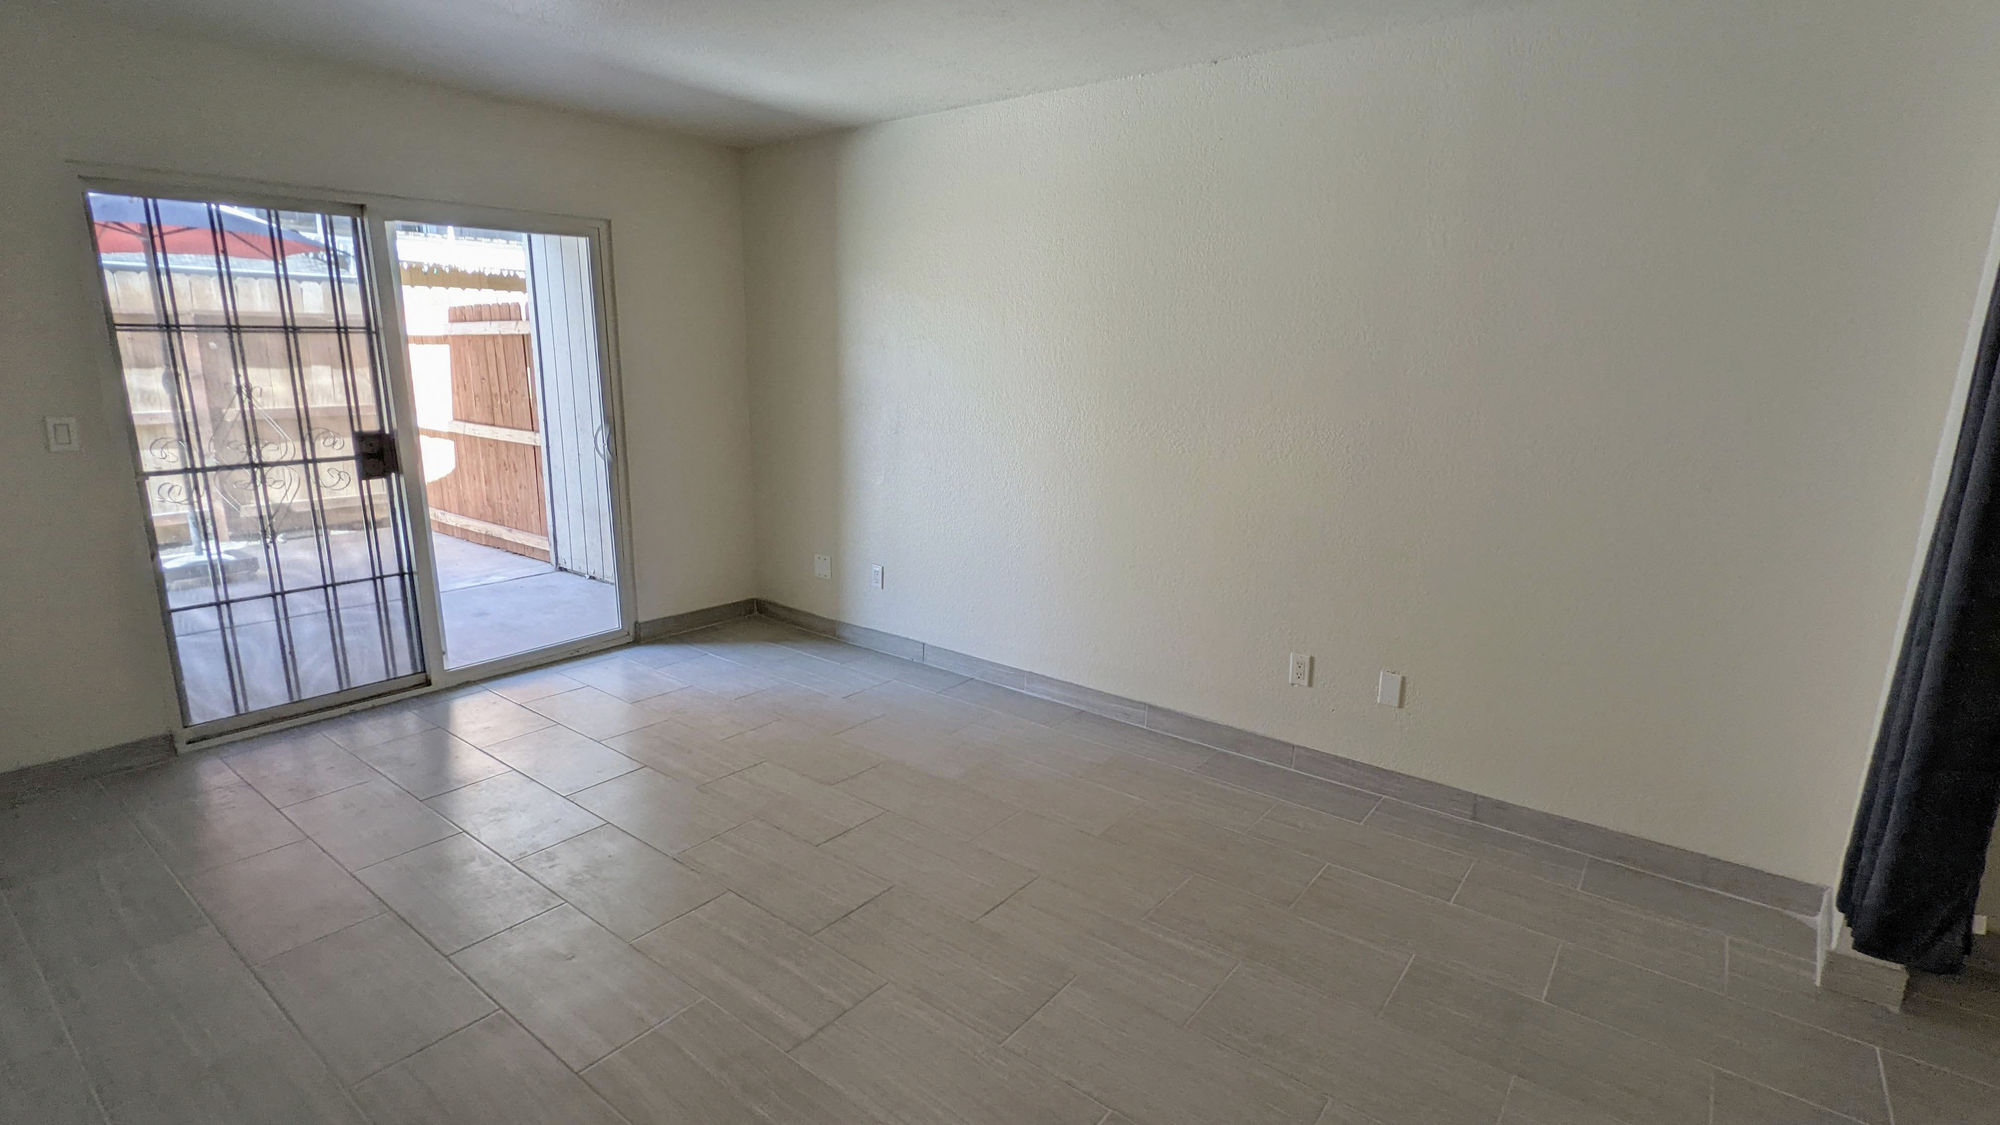
Living Room After Renovating It
The photo above is the one I uploaded to Apply Design.
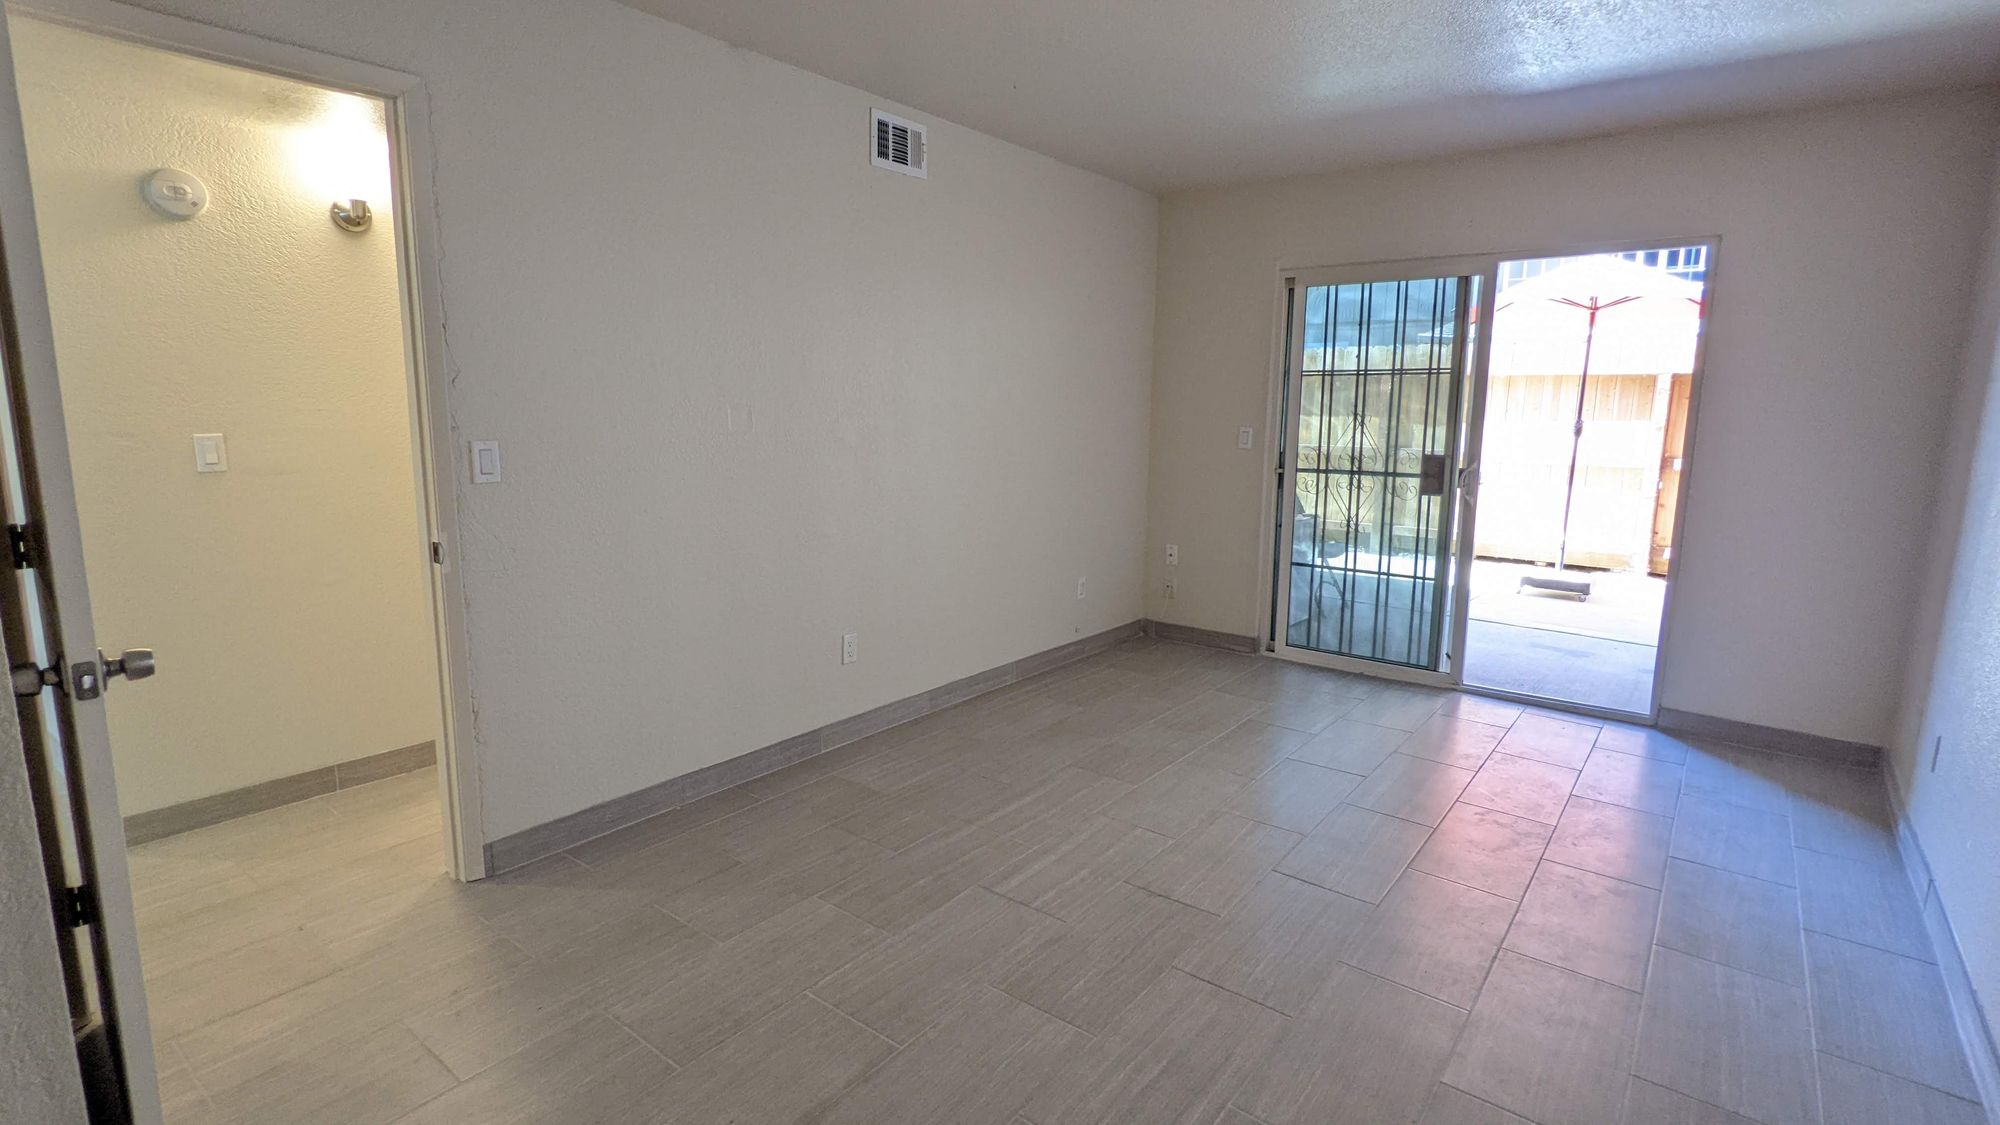
Virtually Staged Photo (Before Rendering)
This is how the living room looked after I drag and dropped furniture and design elements onto the previous photo but before rending the objects.
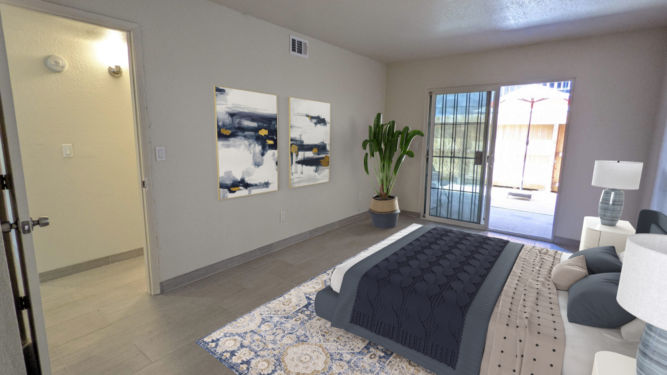
Virtually Staged Photo (After Rendering)
This is the final, rendered version of the photos. As you can see, it not only looks realistic, but it looks way more attractive and inviting than the empty room. When you compare it to the pre-rendered version, you see much more detail, shadows and vibrant colors.
How it Works
Virtually staging a room is actually very easy. Here are the steps using Apply Design.
Upload photos Apply Design will take a few minutes to analyze each photo. I think it’s trying to determine where the walls are and the depth of field.
Drag furniture and interior elements You can search or browse for furniture and then drag them to your photo. You can edit each object by moving, resizing, rotating, etc.
Render a photo Rendering a photo takes around 5-10 minutes.
Overall, I think this is a great way to improve your home sale or rental potential.
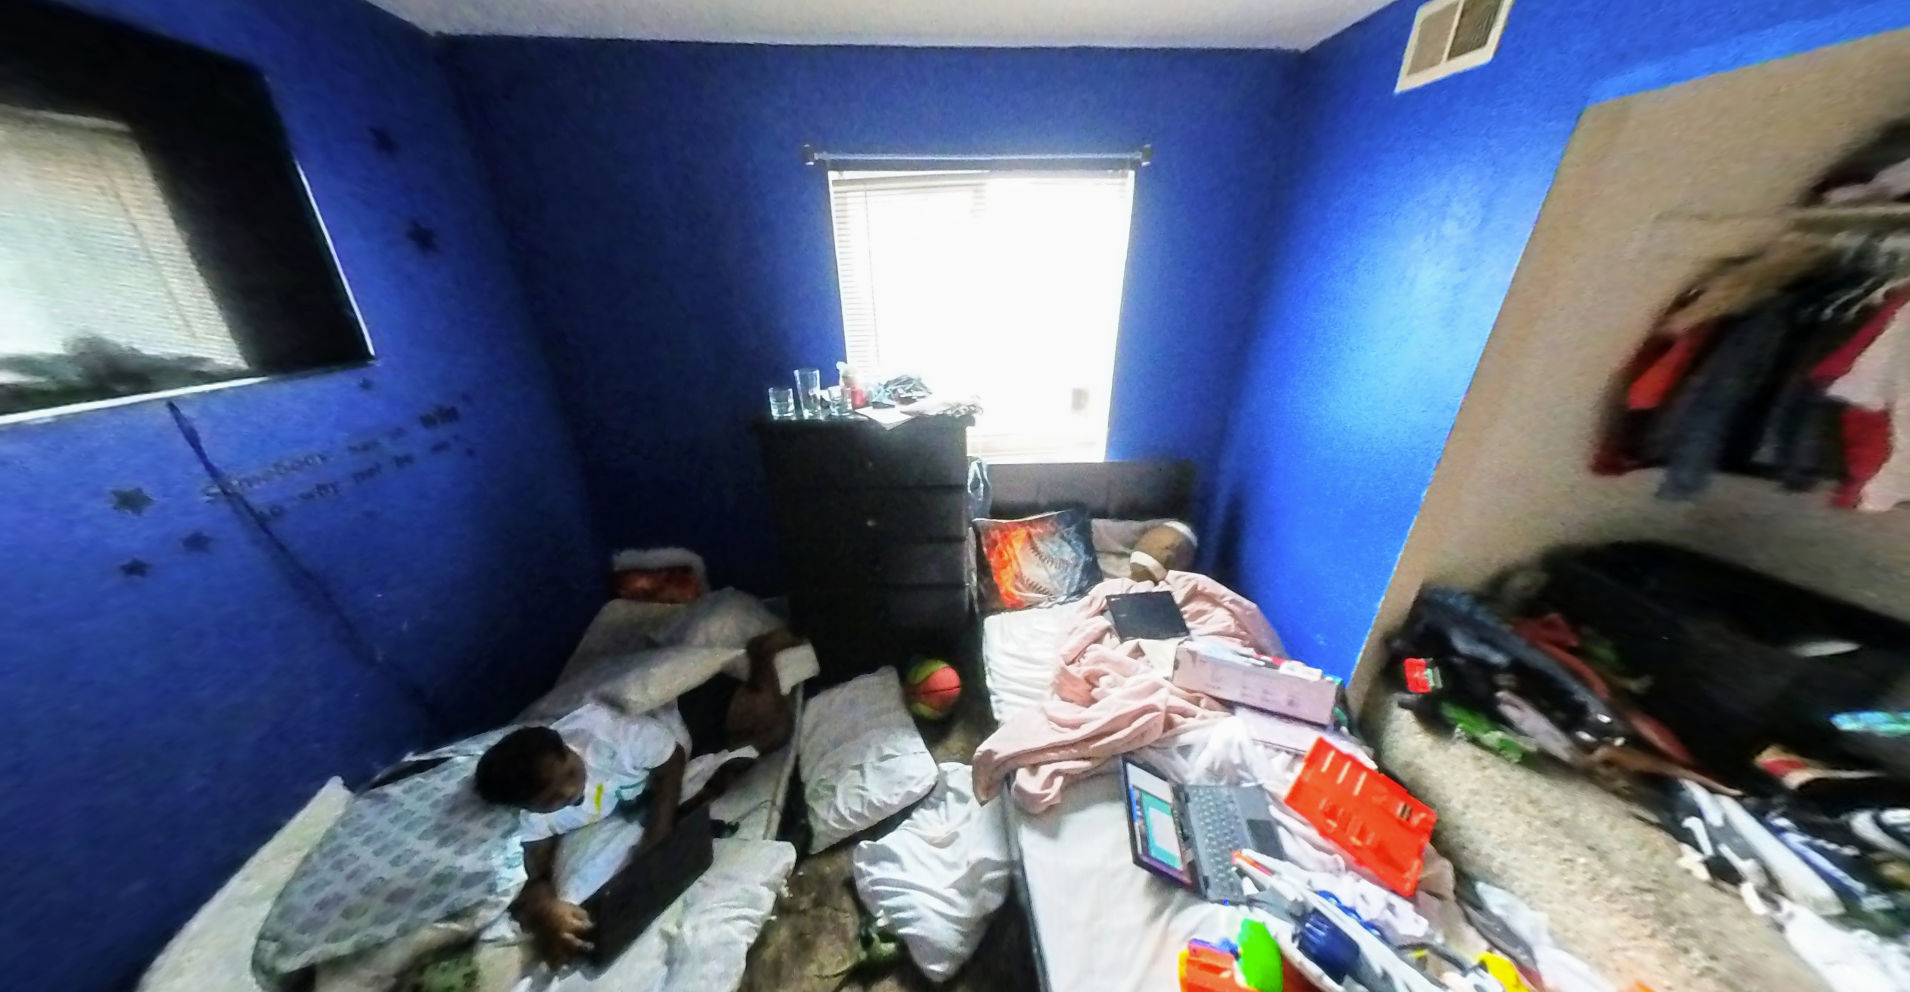
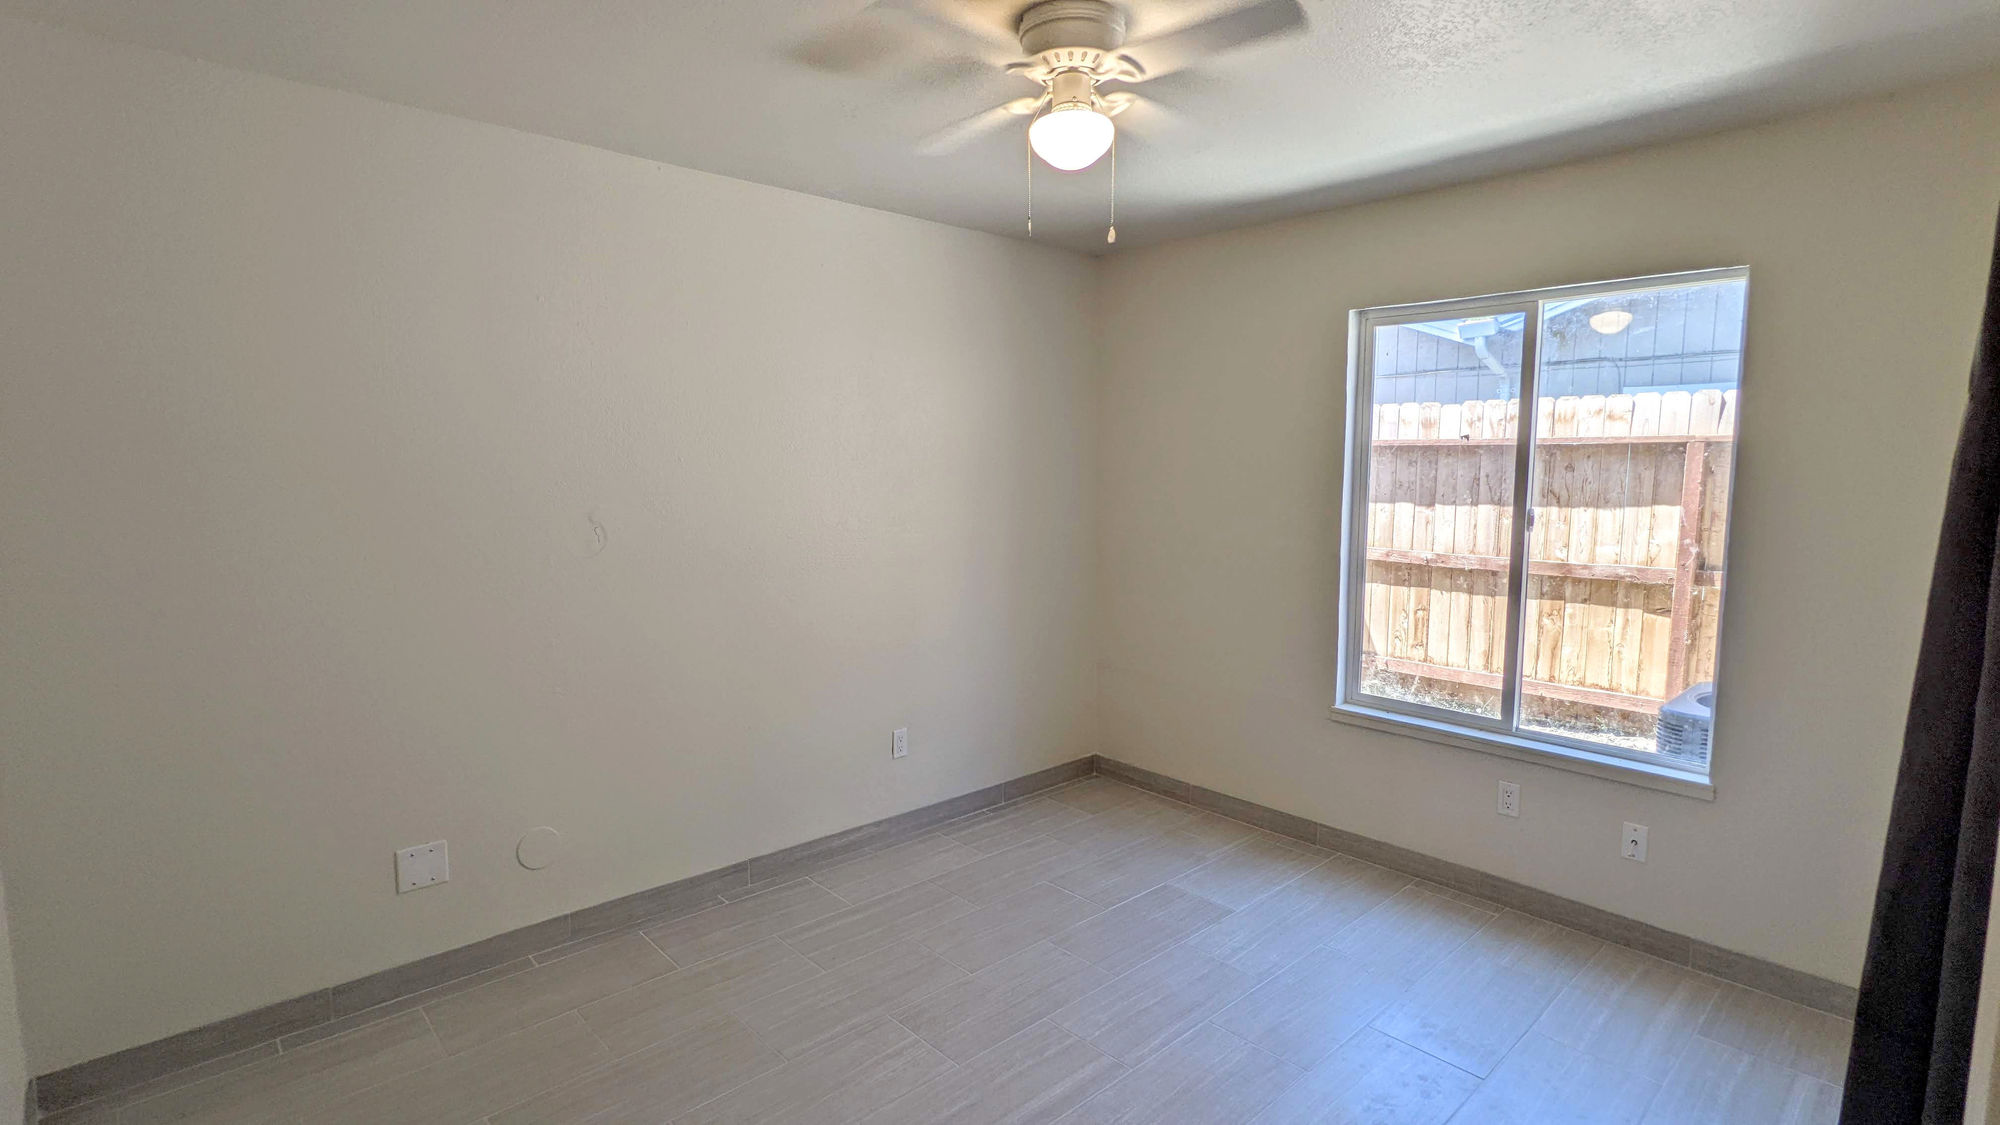
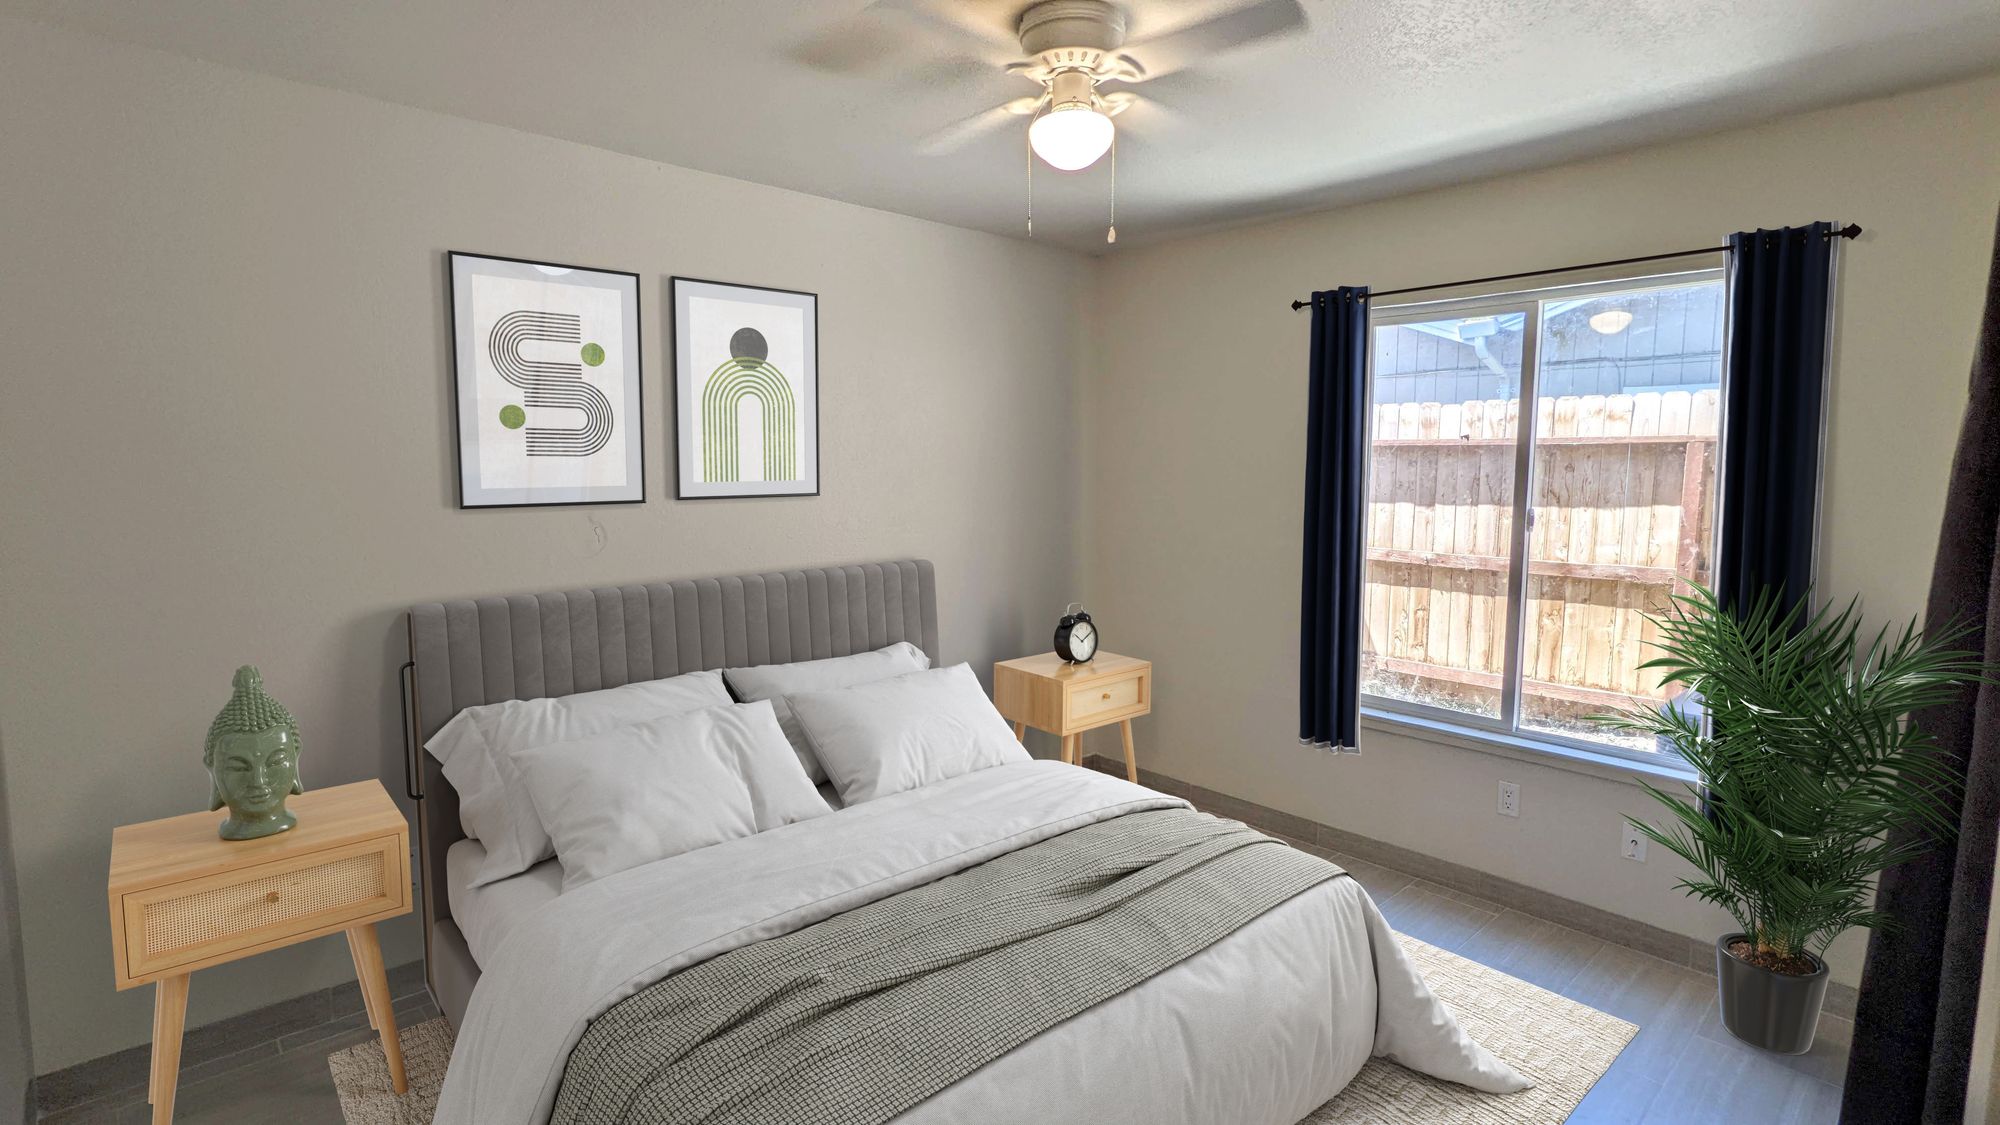
Other Examples
Bedroom when occupied by tenantsBedroom after (necessarily) renovating itBedroom after virtually staging itMaster bedroom when occupied by tenantsMaster bedroom after (necessarily) renovating itMaster bedroom after virtually staging itBeforeAfter virtual staging
I’m in the process of migrating this blog from Managed WordPress on GoDaddy to Eleventy, GitHub and Netlify. Since I like the convenience of writing content in WordPress, I decided to continue to use it, but just as a headless CMS. When 11ty builds the site, it would fetch WordPress post, page, category, tag, and author data and, using the eleventy-fetch plugin, cache the data locally for a customizable period (I chose 1 day). Since Netlify automatically triggers a build when it detects a commit or push to GitHub, an automated build only happens when I make changes that are tracked by git and not changes in WordPress. For WordPress changes that I want published, I would manually trigger a build in the Netlify admin panel.
During this migration project, there were coding bugs that needed to be fixed. Following are some of the ways I discovered helped me to debug in Eleventy.
Debugging data in JavaScript files in the _data folder
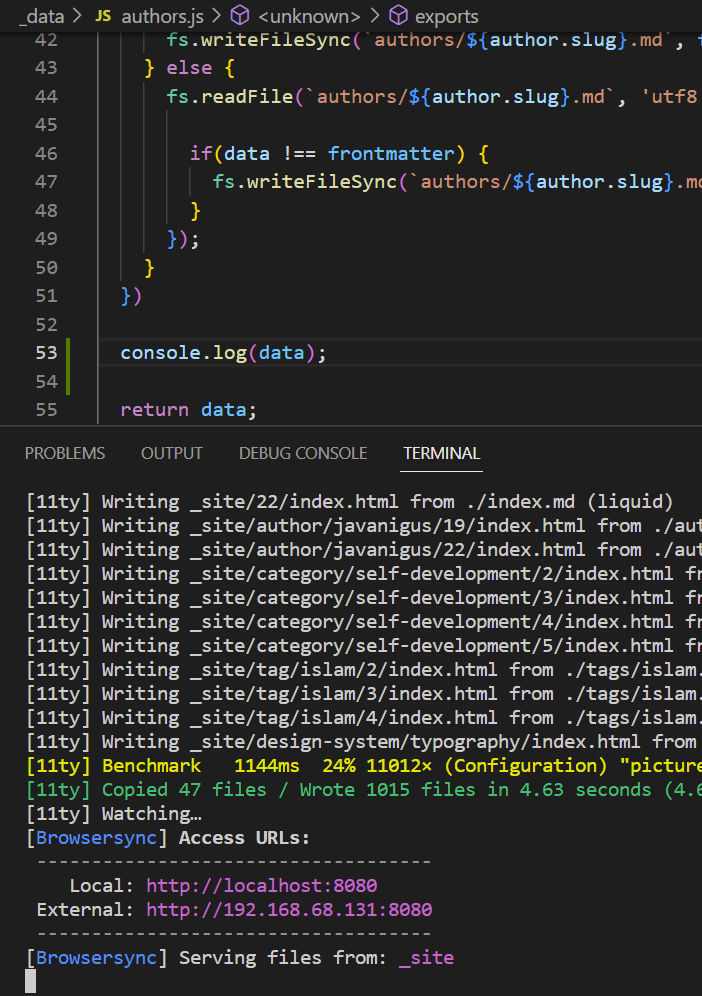
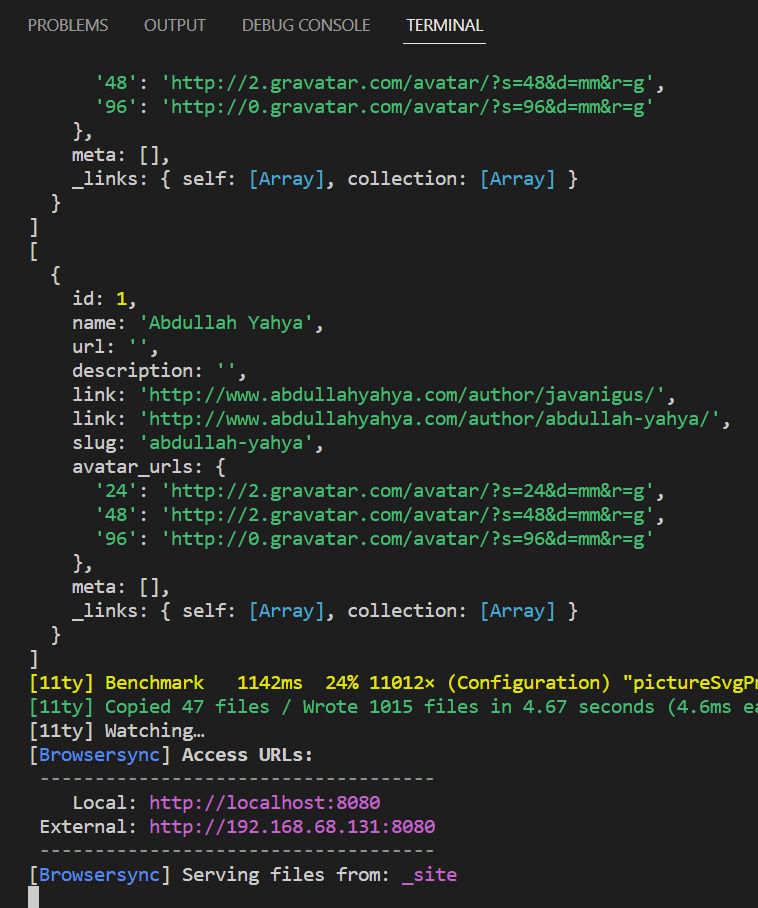
As mentioned above, my project fetches data from WordPress to dynamically build pages. For example, I have a file at _data/authors.js that fetches data from the WordPress remote API endpoint, does some custom processing, and returns the data. It is often necessary to see if the data at different points of the code is as expected. To see this data, you can simply console out the data variable (see line 53 in the screenshot below).
When 11ty builds the site, the console.log statement will output the data in the console / terminal. However, f you are running the default 11ty build command, depending on how many files are being built (in my case, 11ty wrote 1015 files), the data dump may get truncated or lost in the console output. To remove the noise and status messages in the 11ty output, enable quiet mode. Since I’m on Windows, I use the following command.
npx @11ty/eleventy --serve --incremental --quiet
Now, the output is much simpler, and I can see the data dump immediately.
Debugging data in template files
If you’d like to view the value of data variables in template files, you can do that by outputting the value and passing it to the log function (see example on line 9 below). This will tell 11ty to output the data to the console / terminal.
Dumping all data to a built page
Viewing data in the console terminal is handy for some situations. But, sometimes you can have a lot of JSON data that you’d like to see. In this case, it can be easier to dump the data to a page that you can view the entirety of in a file or at a URL To do this, first add a filter with the following code to .eleventy.js.
eleventyConfig.addFilter('dump', obj => {
    const getCircularReplacer = () => {
      const seen = new WeakSet();
      return (key, value) => {
        if (typeof value === "object" && value !== null) {
          if (seen.has(value)) {
            return;
          }
          seen.add(value);
        }
        return value;
      };
    };

    return JSON.stringify(obj, getCircularReplacer(), 4);
  });
Then, create a file to dump the data. In the example below, I have 2 files.
Drive from Tracy to San Francisco Int’l Airport (SFO)
8:30 AM
Check in
Flight
SQ 31
Airline
Singapore
Confirmation Number
2ZAVWN
11:30 AM
Take off to Singapore
Flight Duration: 16h 40m Plane: Airbus A359
Sunday, October 27, 2024
7:10 PM
Land at Changi International Airport, Singapore
7:10 PM
Go to connecting flight
Layover in Singapore: 3 hours 30 minutes
Flight
SQ 968
Airline
Singapore
Confirmation Number
2ZAVWN
10:40 PM
Take off to Jakarta
Flight Duration: 1 hr 35 min Plane: Boeing 777-300ER
11:25 PM
Land in Jakarta, Indonesia
12:00 AM
Drive to Hania’s house
Jalan Sakatak lll No.47 RT 2 / RW 15 Abadijaya, Sukmajaya, Depok City, West Java 16417 Indonesia
Food to Eat
Sticky sweet rice with shredded coconut
Sumedang Tofu
Bubur Kacang Ijo with Ketan and Santen
Sweet Martabak (مطبق)
Mutabak or Martabak is a street food that originated in southern Saudi Arabia and Yemen, and its name in Arabic (مطبق) means folded. It spread to Southeast Asia, including Malaysia, Indonesia, Singapore, and Brunei, where it is even more popular than in Arabia and has many variations, including a sweet and a savory version. The matabak that is found on the streets of Sanaa is usually an egg or cheese version, but you can add a variety of fillings.
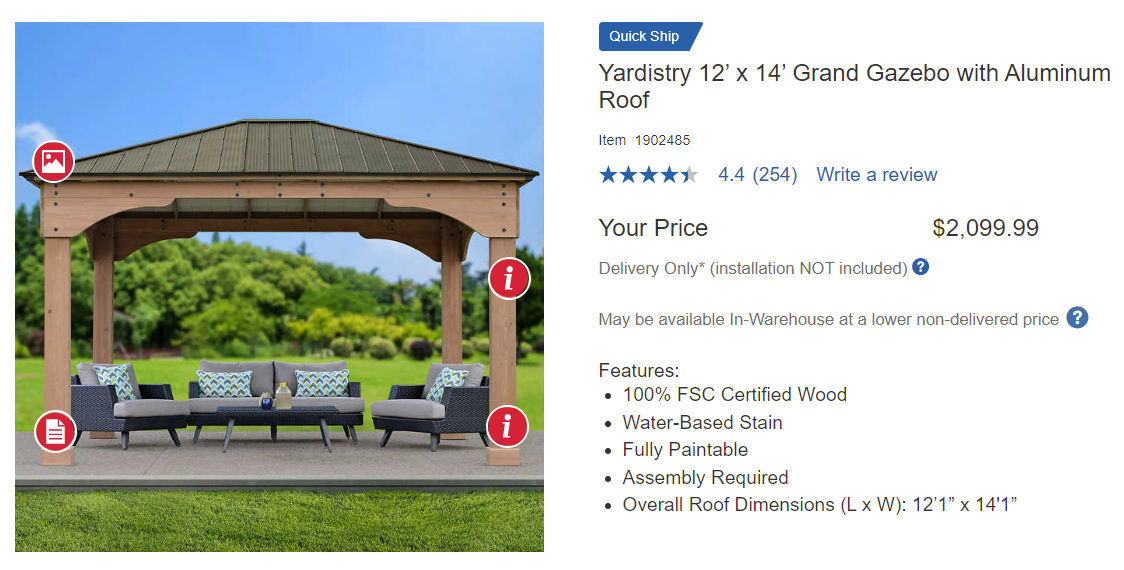
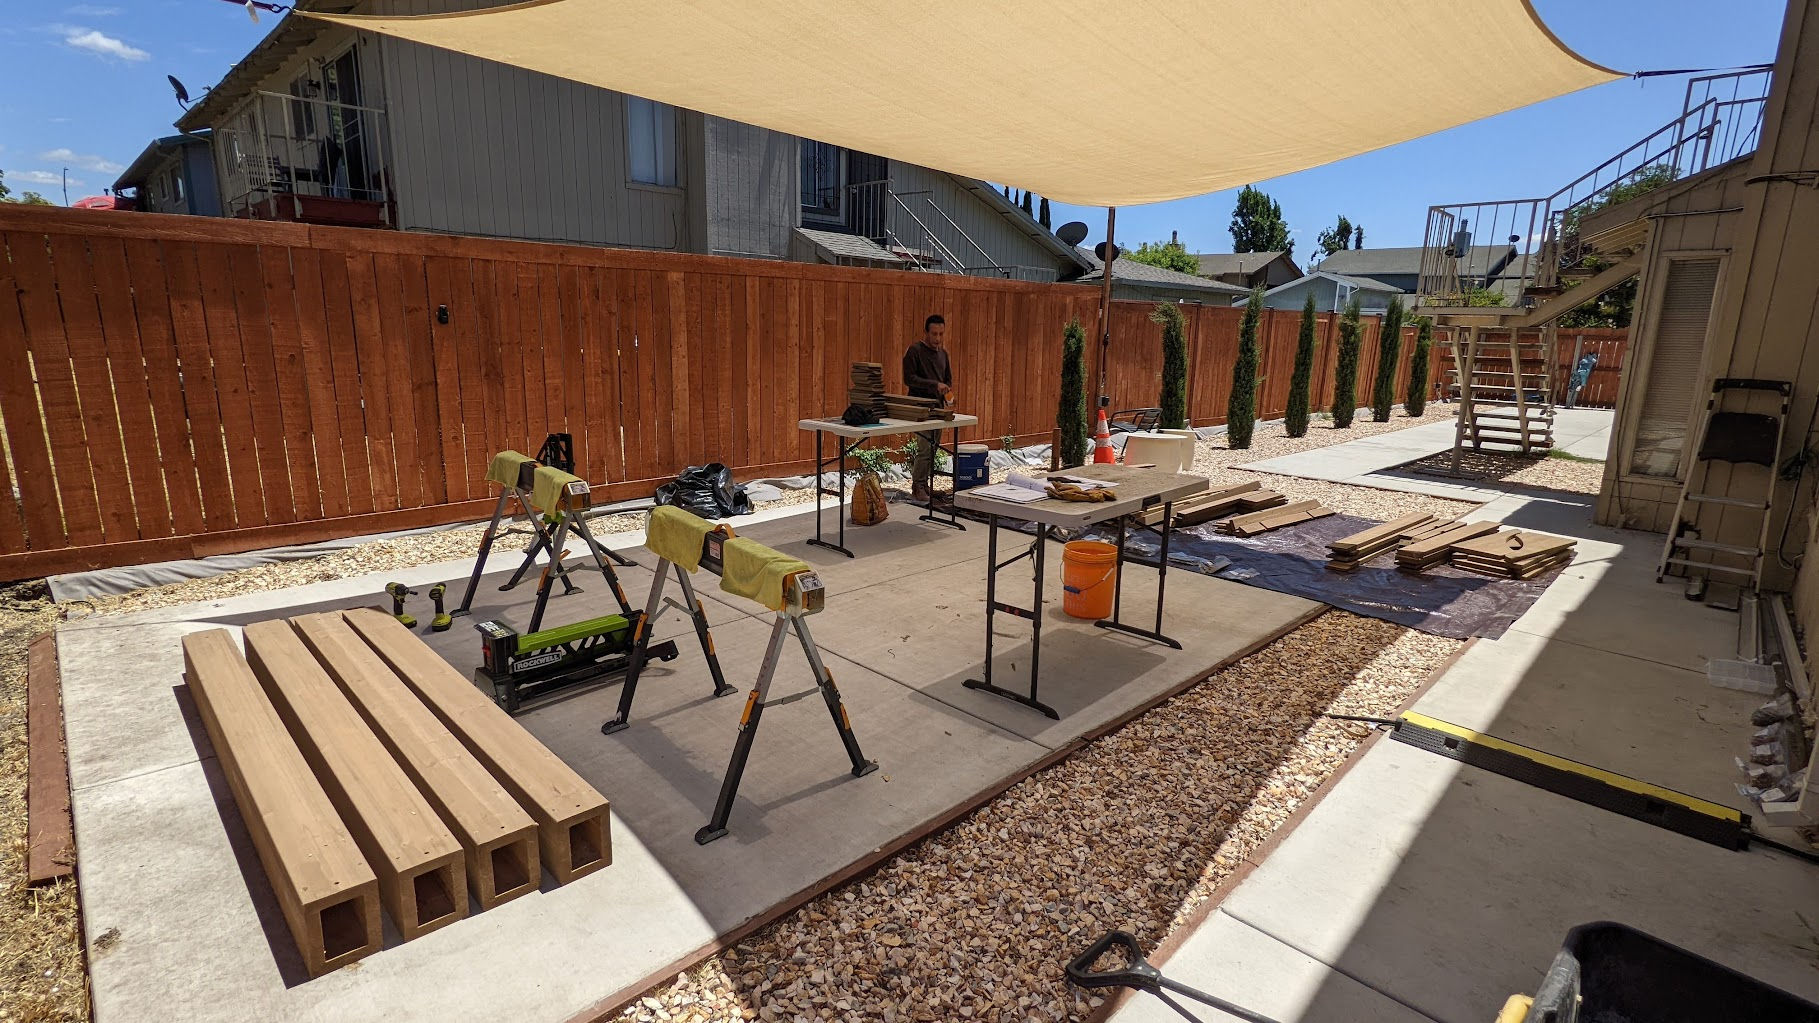
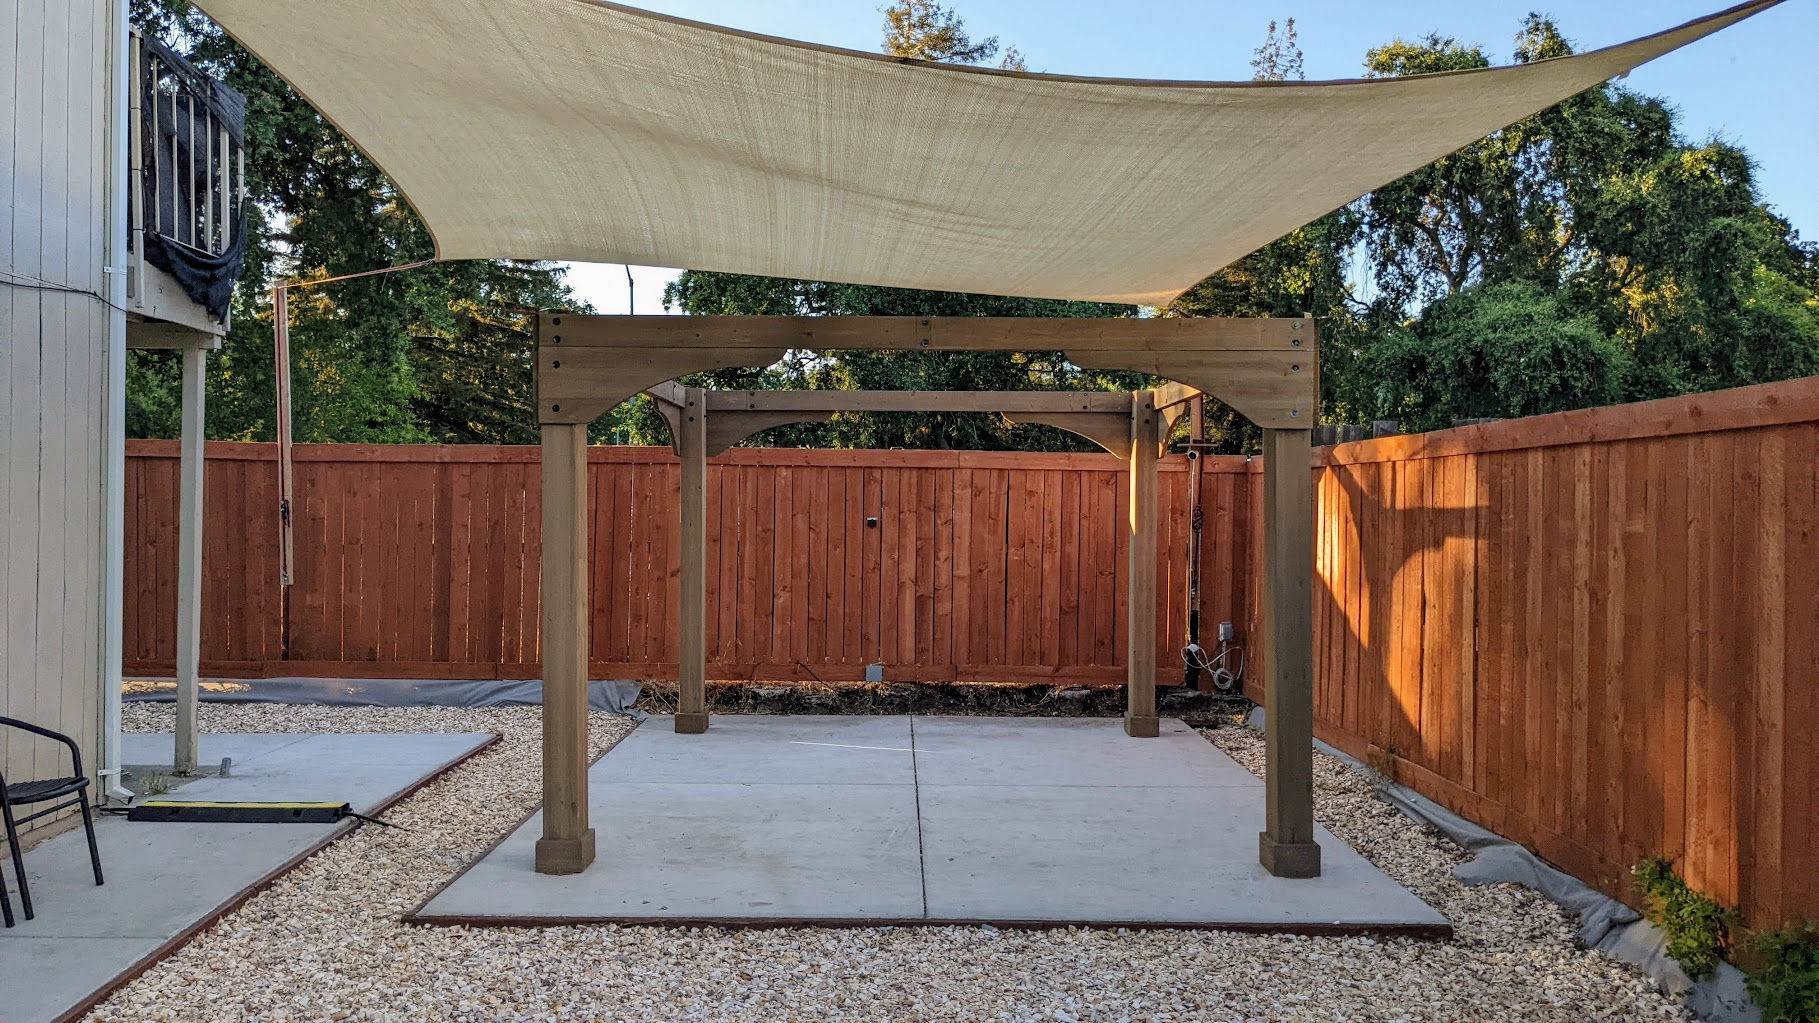
Assembling the posts and beams was easy but time-consuming. It took one day.
The hard part was assembling the roof. Half a day was spent screwing in the aluminum roof panels. Another half was spent raising the roof up and fastening everything together. In the picture below, we used the Jawstand to hold a 2×4 piece of wood which supported the center peak of the roof. The Jawstand made it easy to adjust the height of the 2×4 since the angle of the roof had to constantly be adjusted to get all 4 roof panels to fit right.
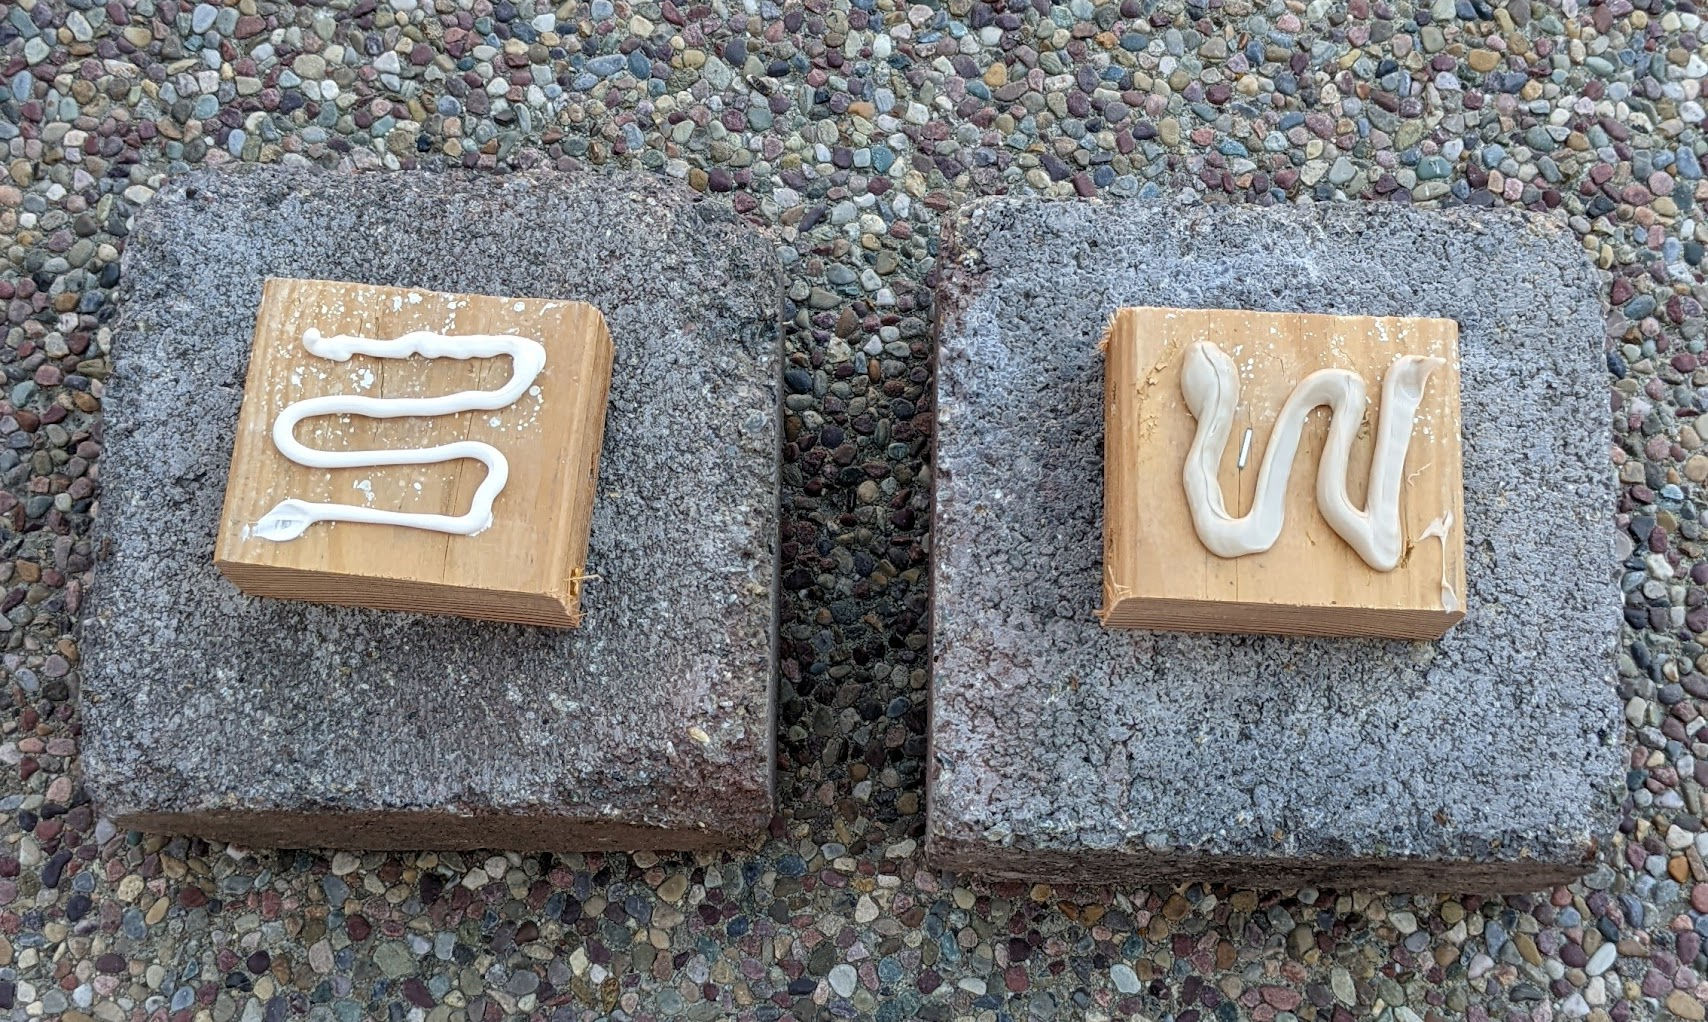
I wanted to find a glue that was simple to use, not too expensive, was very strong, and would maintain its strength in wet conditions. There are many glue options to choose from. I ended up choosing two popular brands: Liquid Nails and Loctite. For each brand, I chose either the strongest option or the option that was designed for wet environments. I didn’t include epoxy in my test because I didn’t want to mix two parts together and apply the mixture using a stick. Below are the two options I chose.
I first glued a piece of 2×4 to a concrete landscape block.
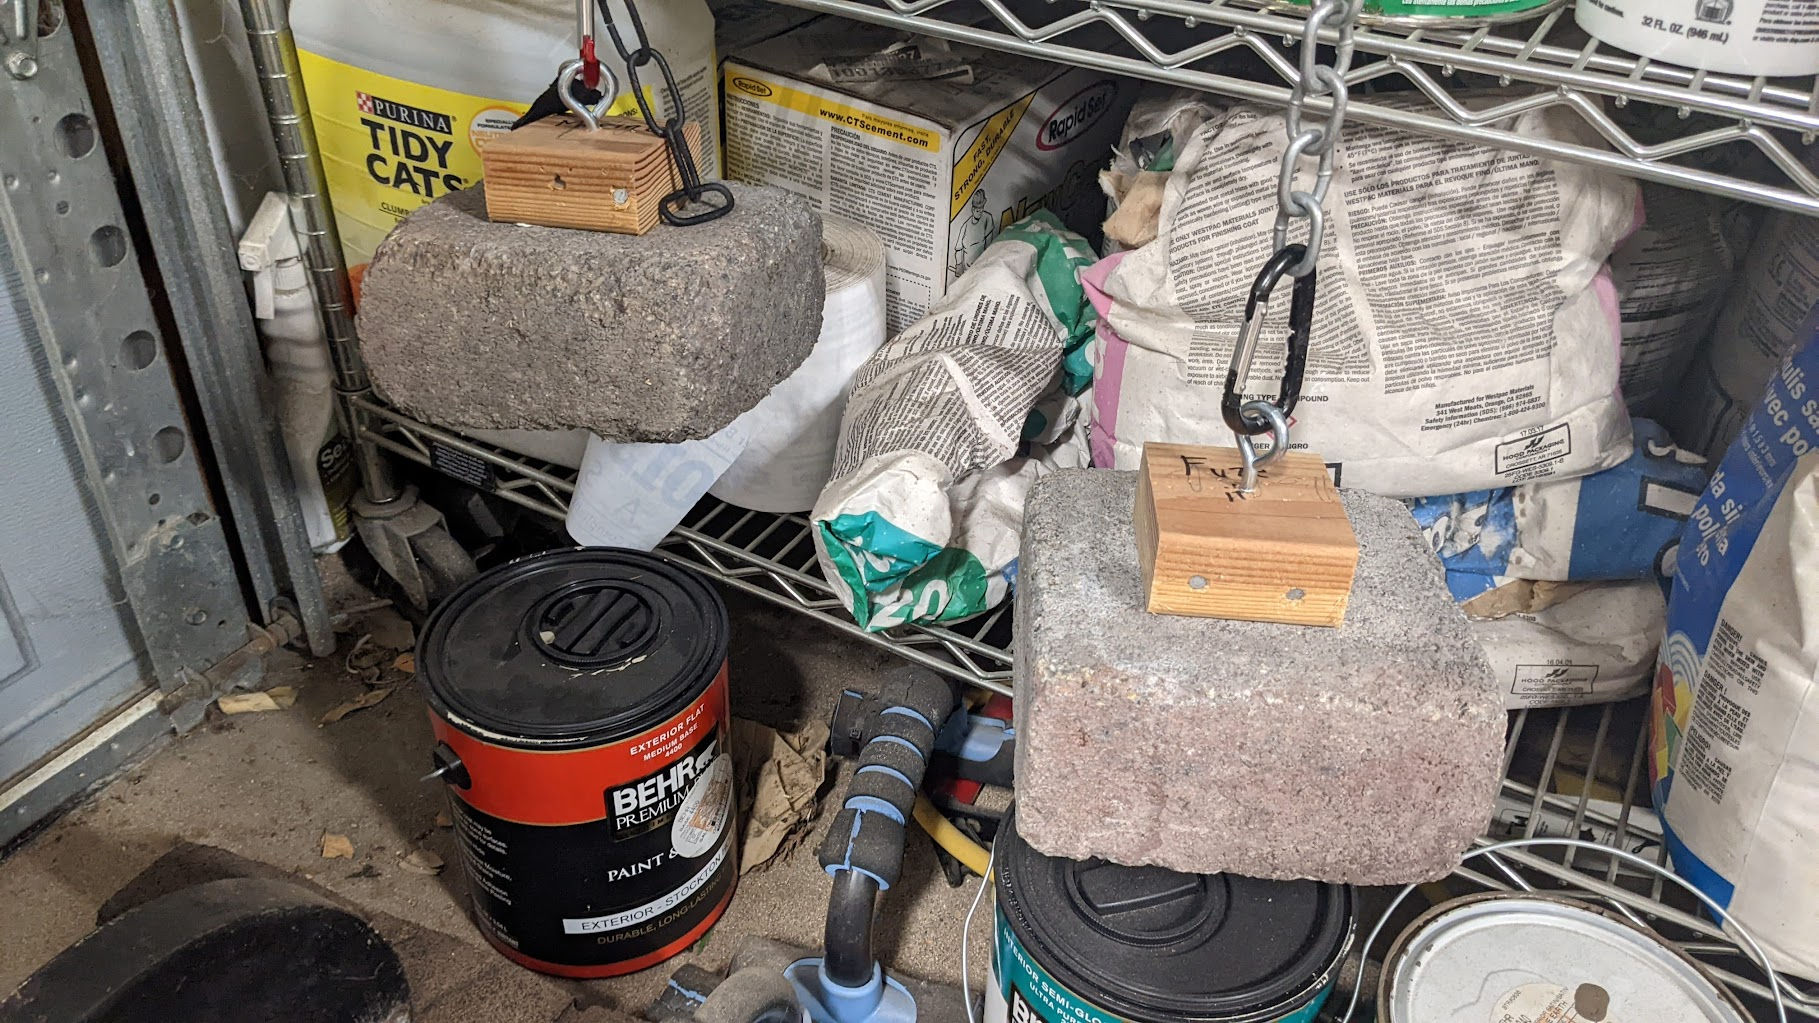
After waiting 1.5 to 2 days to fully cure, I attached each piece of wood to a chain to suspend the wood / concrete block combo in the air.
After 2 days, both adhesives kept the wood attached to the concrete block. I then wanted to see if water would affect the bond. I submerged each test in water without having it touch the bottom of the bucket of water.
LeftL Fuze-it | Right: PL Marine
After 12 hours, the wood pieces were still connected to the concrete blocks. But, after 23 hours, the Liquid Nails Fuze-It MAX lost its strength and the wood piece became disconnected from the concrete block.
Left: Fuze-It MAX, Right: PL Marine
So, the winner is Loctite PL Marine, although if you are gluing something in a dry environment, Liquid Nails Fuze-It MAX is probably sufficient. Unsurprisingly, the Marine adhesive is stronger both in dry and wet environments, including while being completely submerged in water.
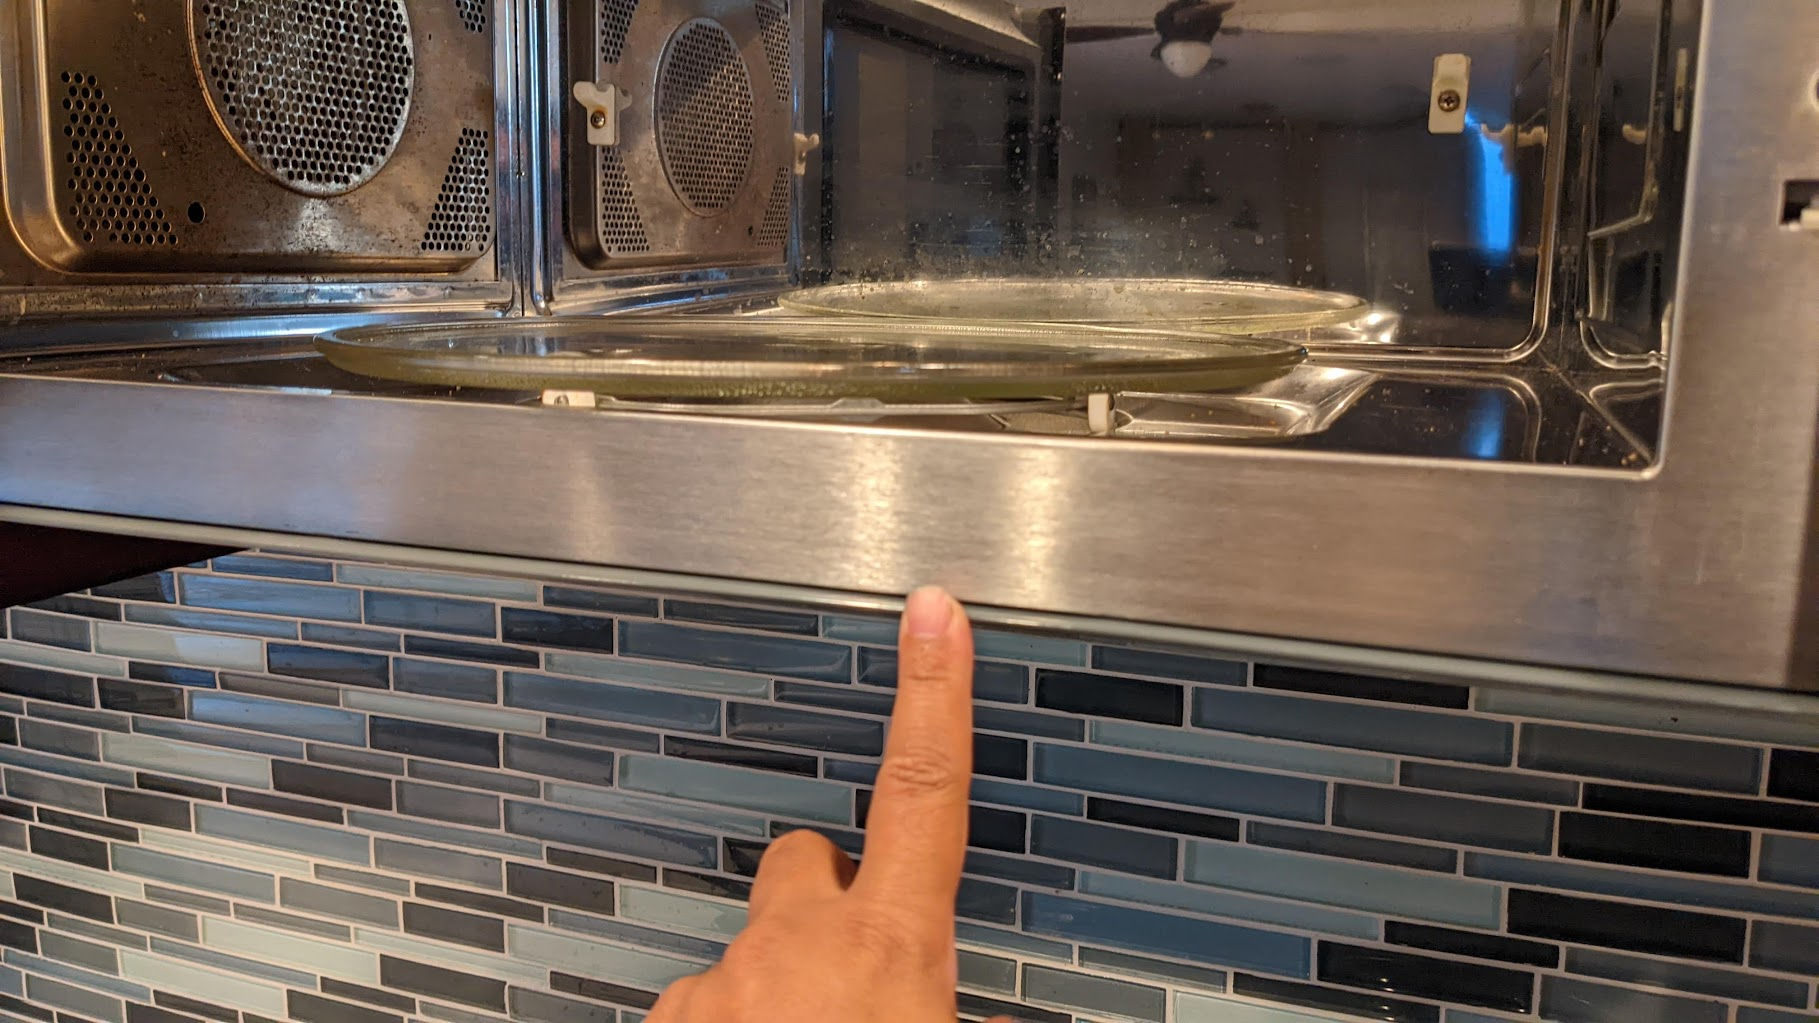
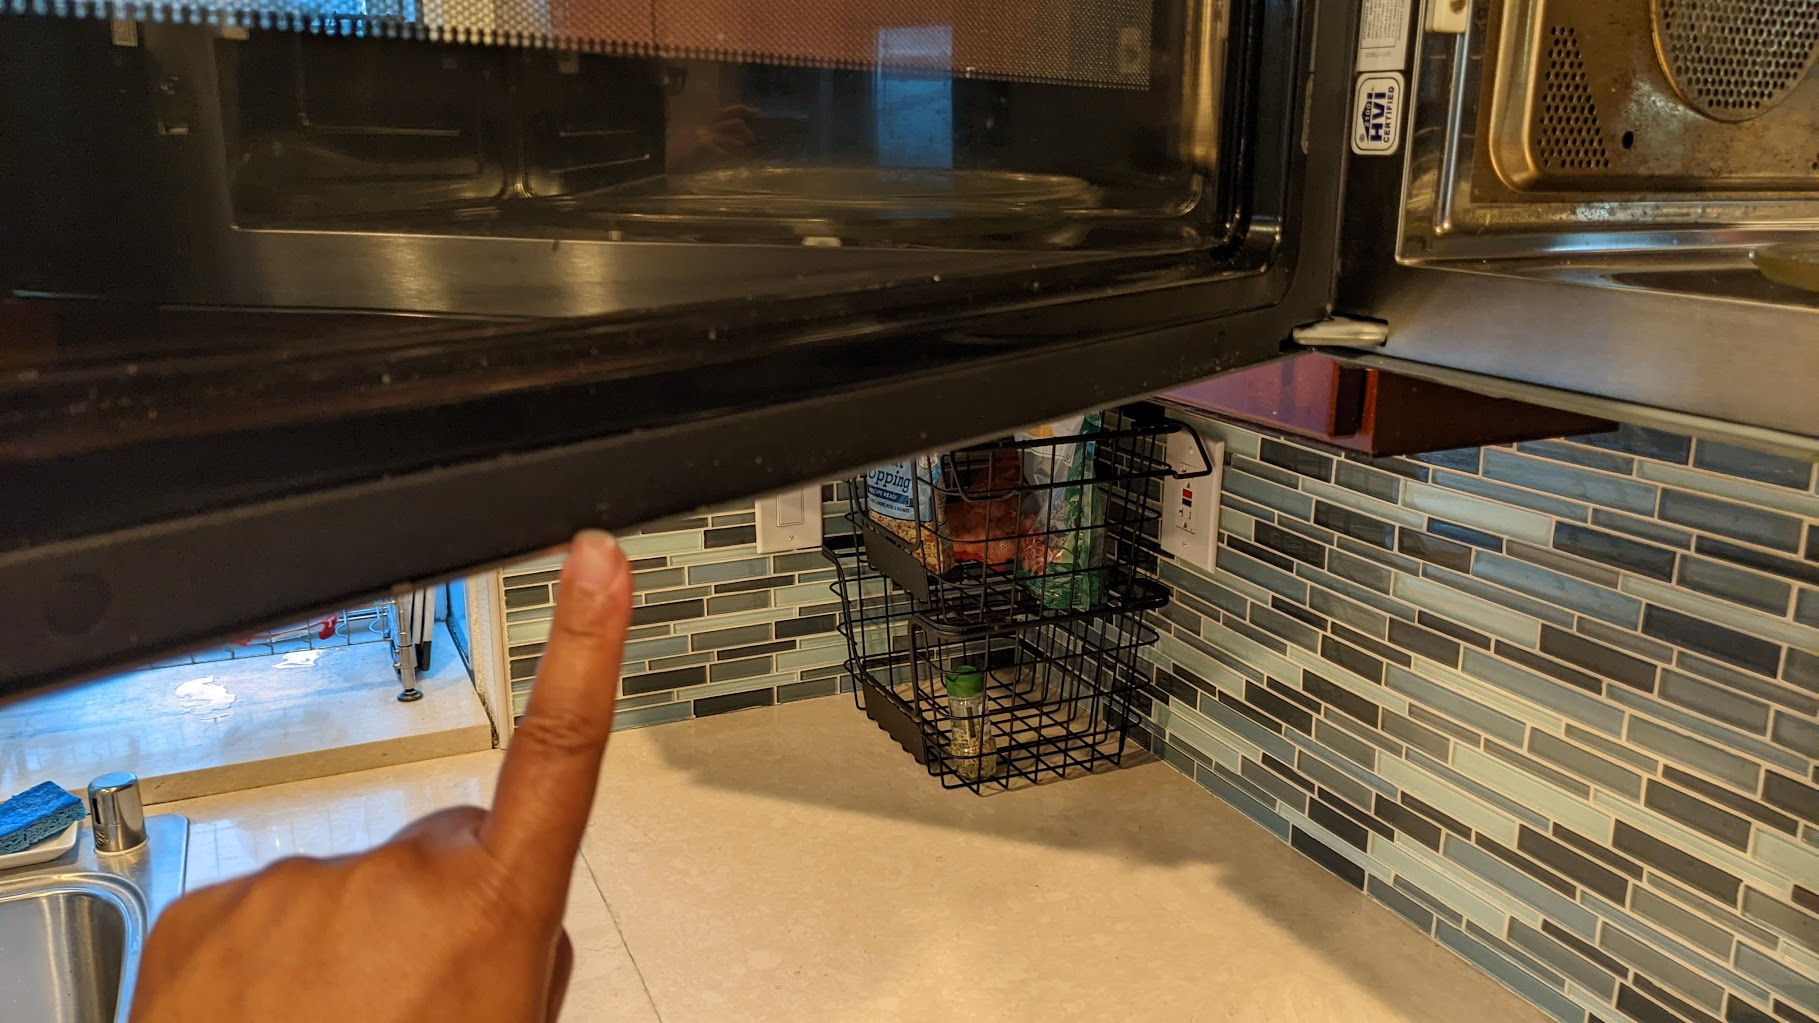
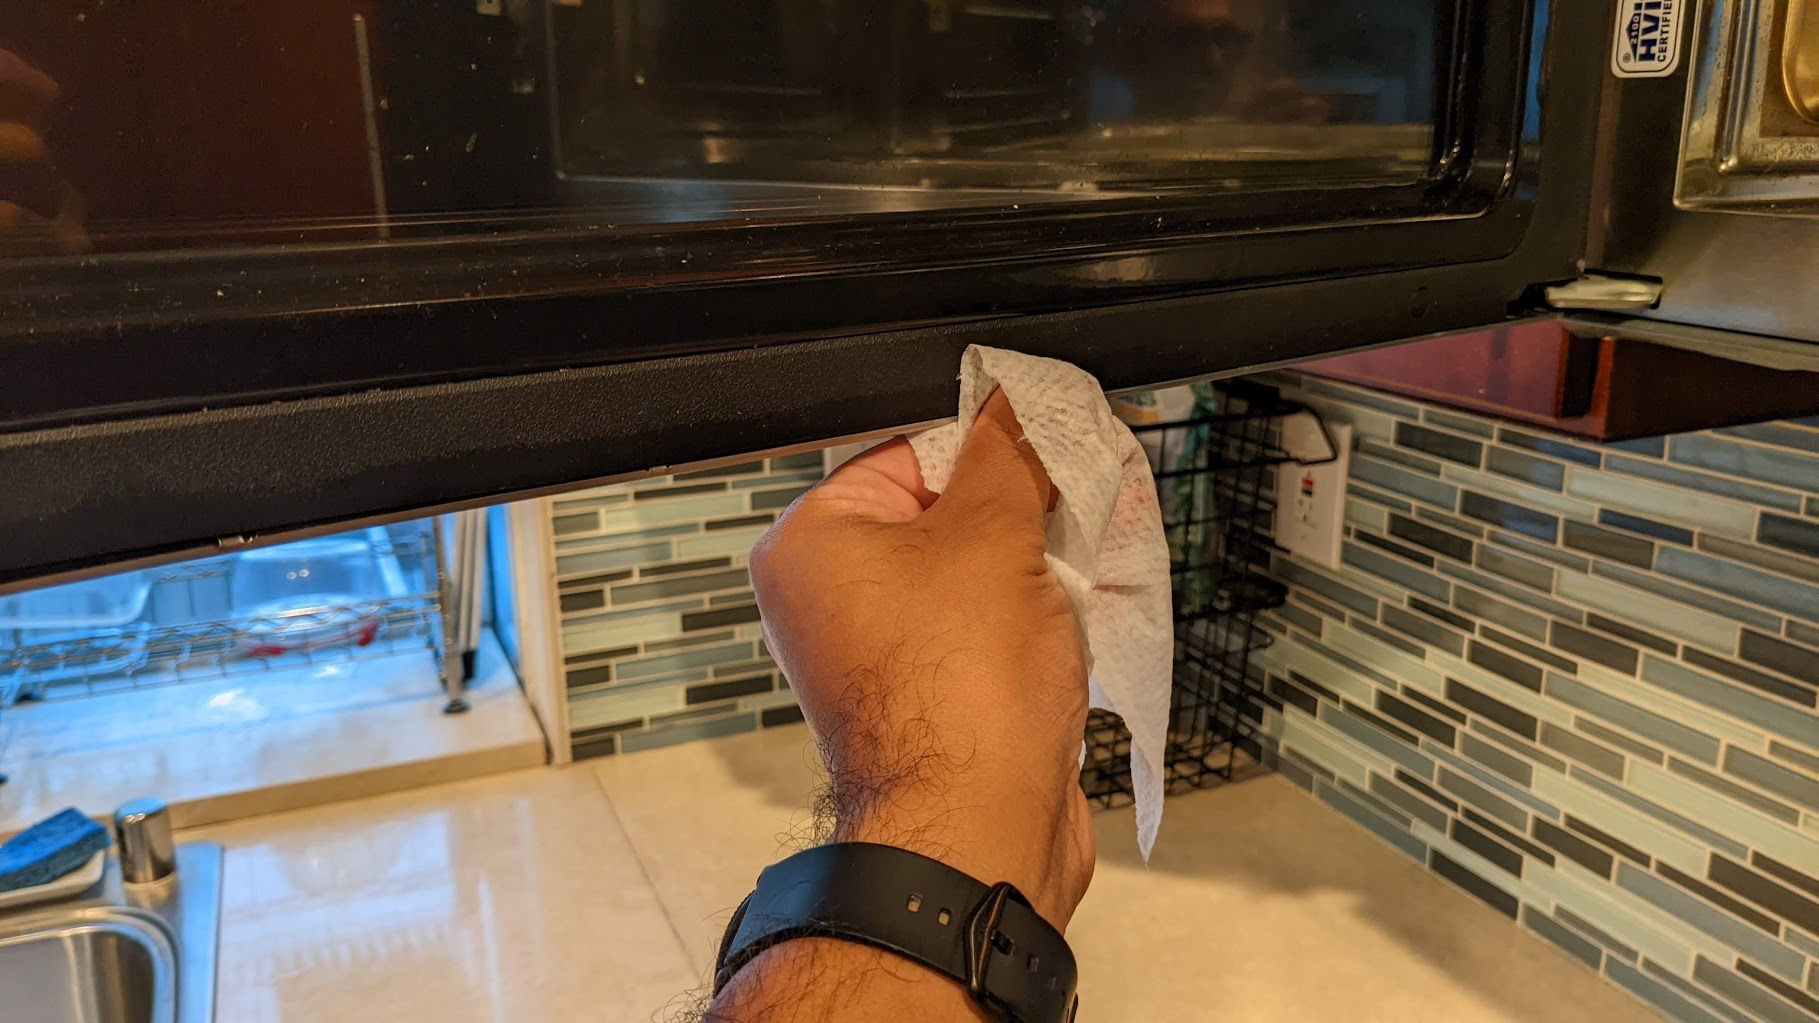
Recently, the microwave would keep giving an error saying I needed to “open / close door” no matter how many times I open and close the door. This prevented me from microwaving anything. Since this was an expensive microwave, I didn’t really want to buy a new one. Fortunately, fixing this error was easy. It turns out that there is a sensor along the inside front bottom edge that detects whether the door is closed or not. I prefer to clean using wet Clorox disinfectant wipes. I find that they lift dirt up easily. I’d then wipe again using a dry paper towel. After doing that, the open/close door error goes away and the microwave can start.
Door sensor along inside bottom edge of microwaveDoor sensor along inside bottom edge of microwave doorCleaning the door sensorCleaning the door sensor
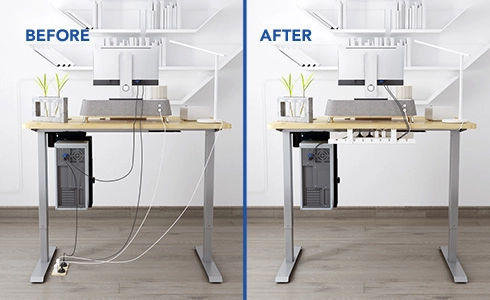
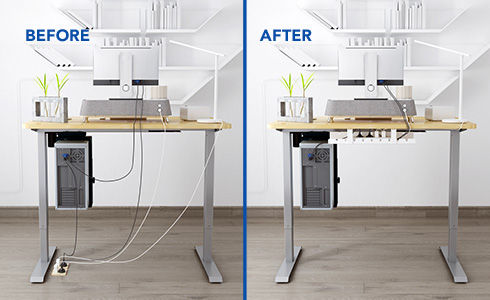
I hate seeing lots of cables everywhere. In this post, I will list various options for managing and hiding cables.
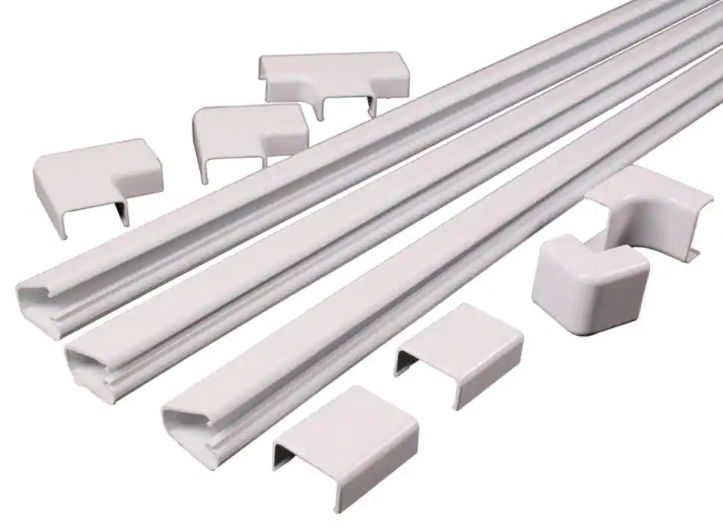
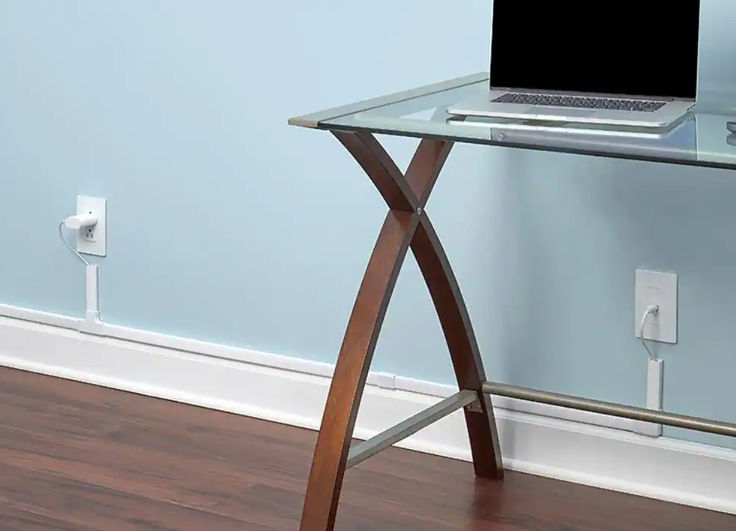
Cord Covers / Cable Raceways
These are useful for hiding cables in a paintable conduit. The cable cover can be made of plastic or metal. Some have an adhesive backing and some you can screw to a wall. They come in various sizes and lengths and include various connectors. These are great for when you can’t hide cables behind or underneath something.
Cable Ties
Cable ties are great for holding multiple cables together. Usually, once you pull to tighten the cable tie, you can’t release it.
If you need to release a cable tie, you can buy the releasable type.
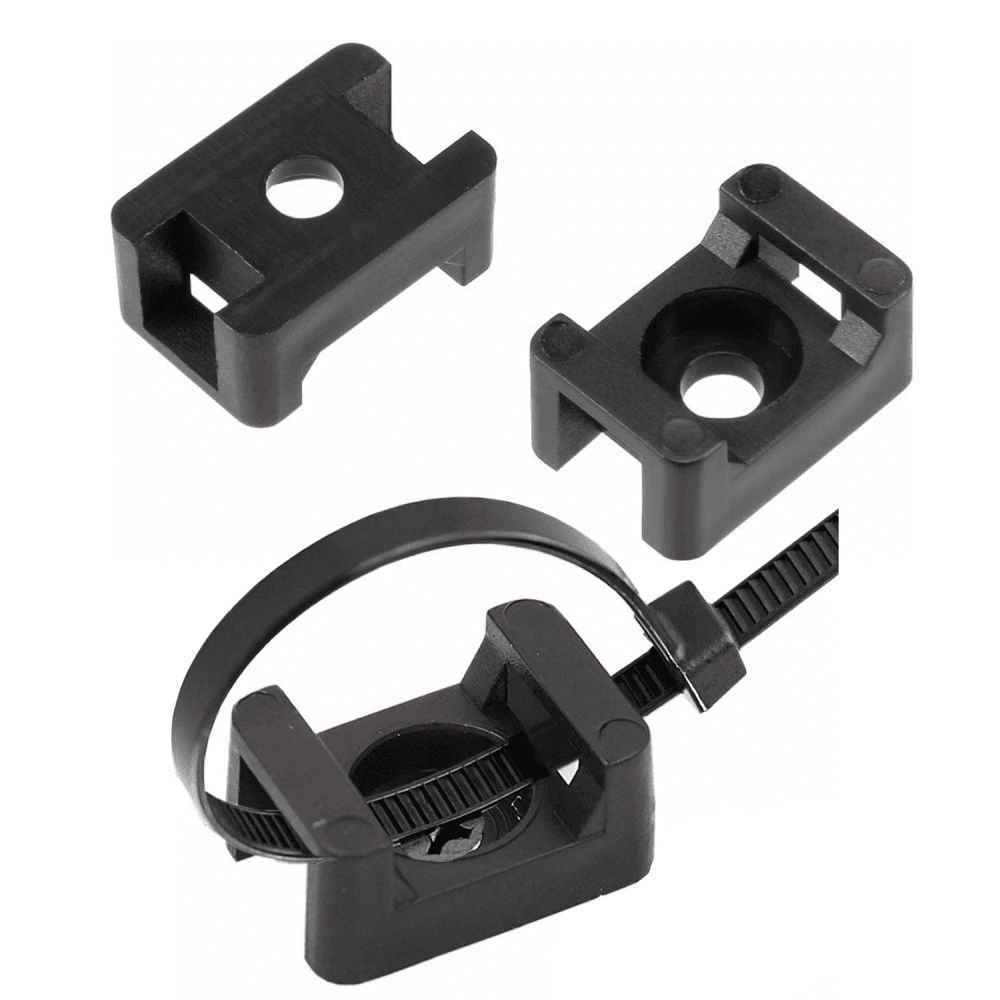
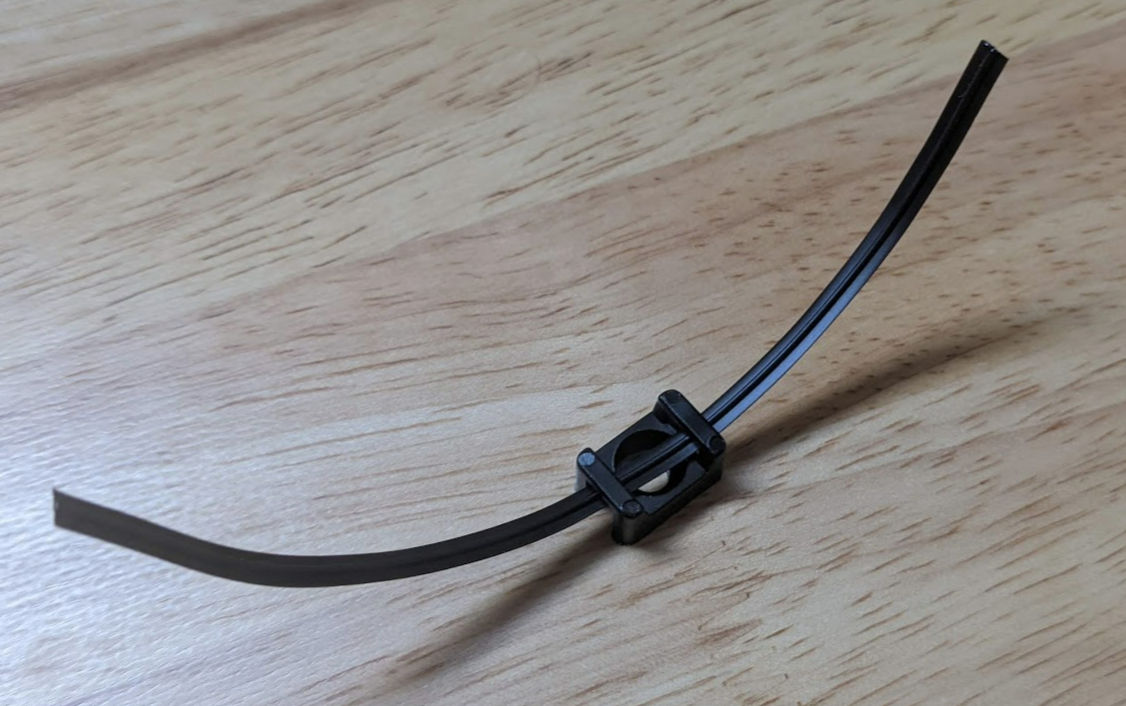
Cable Tie Base Mount
Cable ties will bundle cables together, but oftentimes you’ll need to attach them to a wall or something. You can buy cable ties with a screw hole.
However, you may have a hard time finding these with releasable cable ties. In that case, you can buy the base mounts themselves and insert releasable cable ties in them, or just use a twistie tie.
Cable box
Oftentimes, you’ll have an ugly power strip with a bunch of cables going to it. You can hide this ugliness in a cable box.
Cable Clips
If you need to clip some cables in a removable way, cable clips with adhesive backing can help with that.
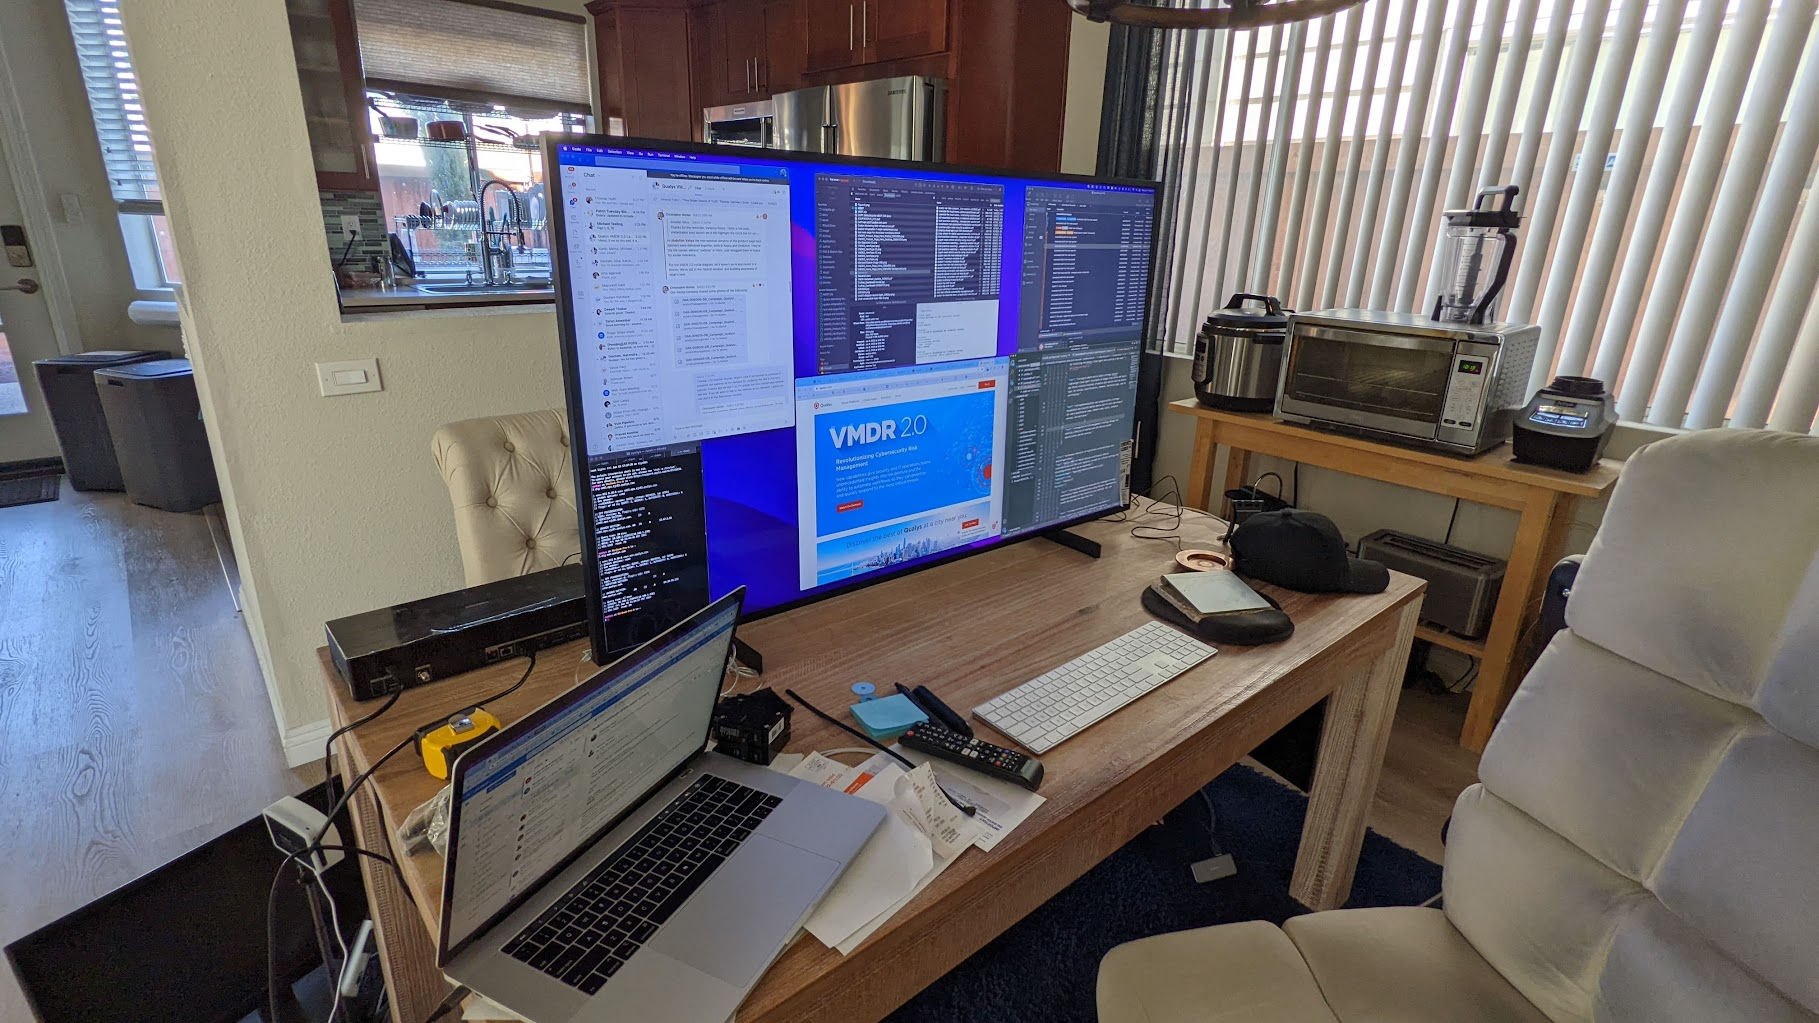
As a web developer, I absolutely need multiple windows open – maybe more than for people in other professions. Due to the pandemic, like many people, I had to create a home office. I could have used the unused loft upstairs but I didn’t know I’d still be working from home after 2 years and I like being close to the kitchen so I converted the dining table into my work desk. Since I had some old monitors lying around, I used them to have multiple windows open. I thought we’d all just work from home for a month or two max so it didn’t seem worth it to spend money on fancy monitors.
April 2020
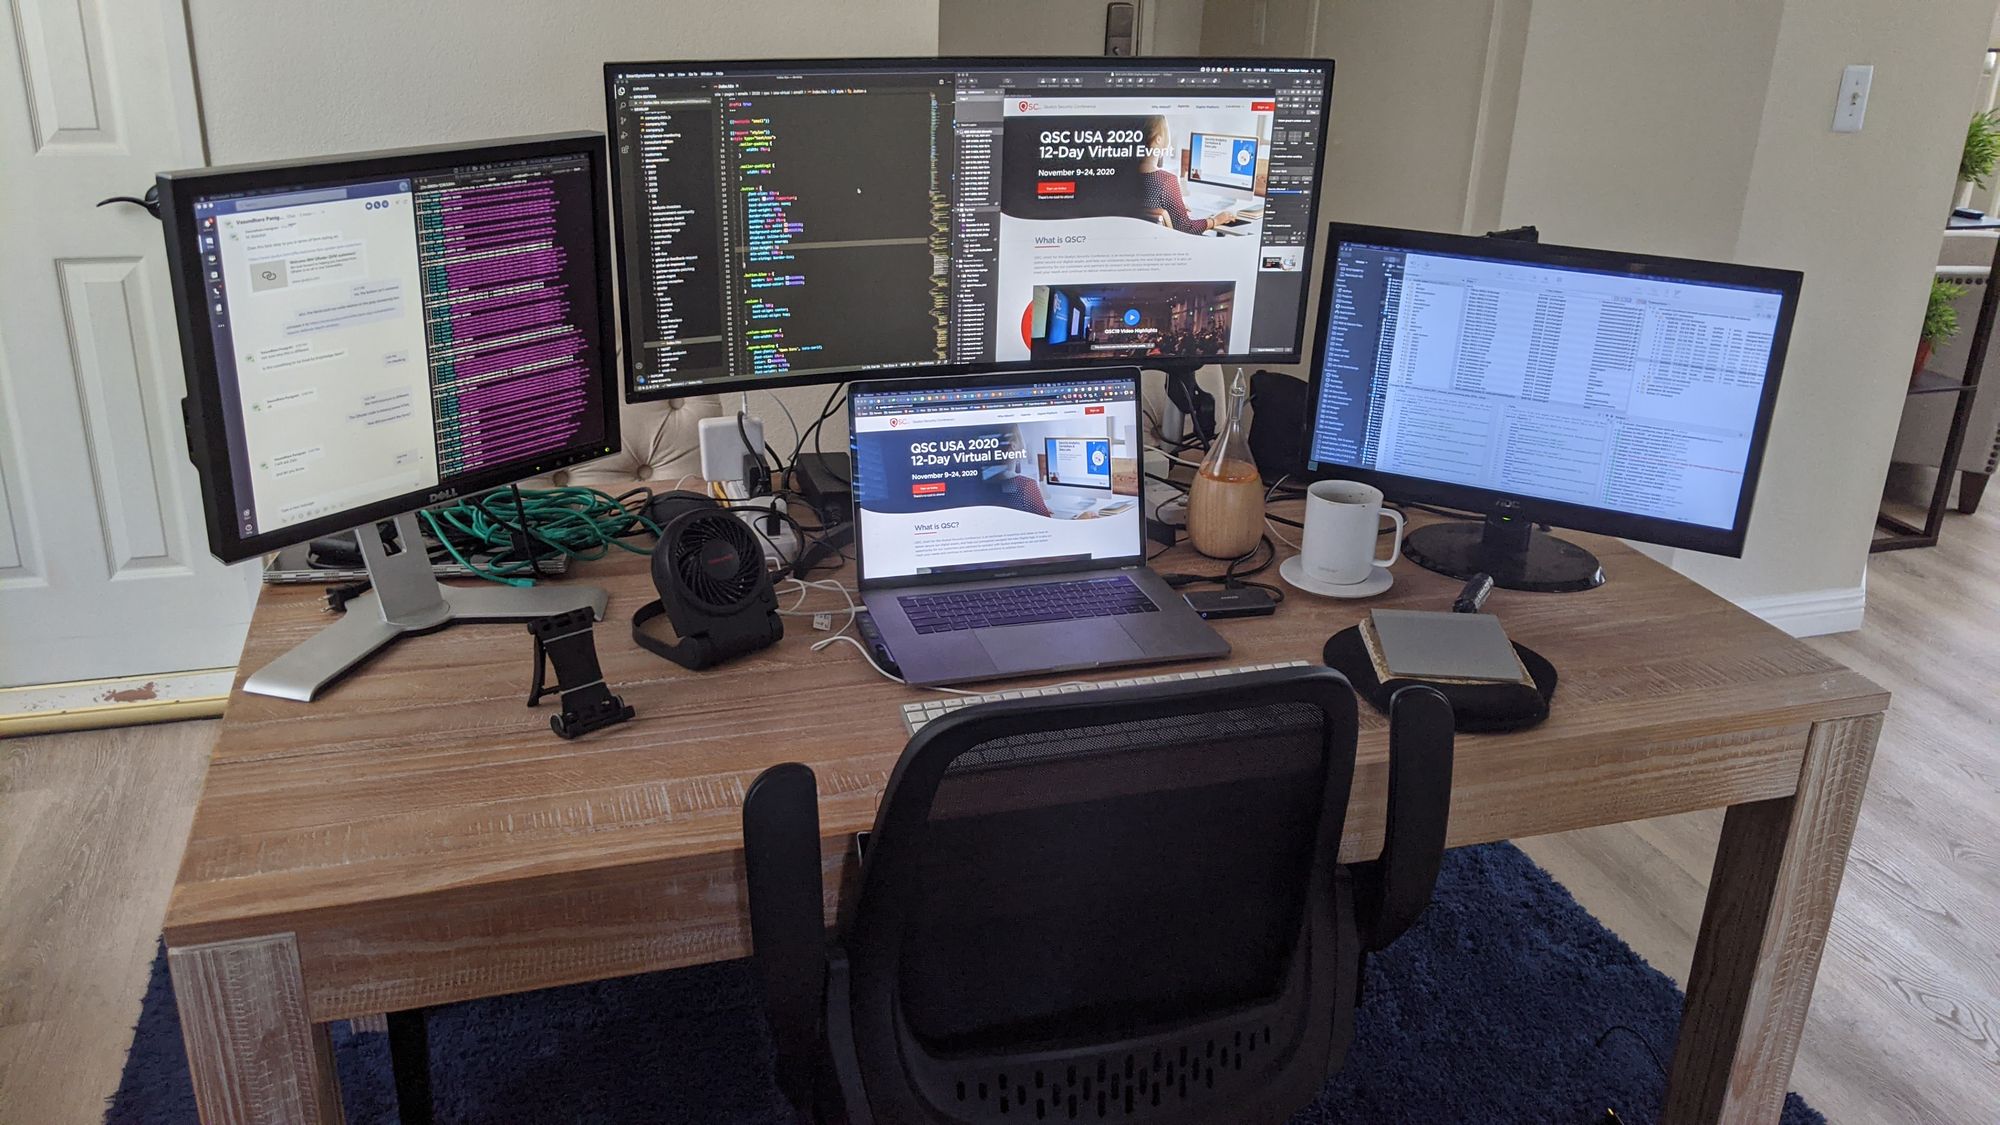
As the pandemic progressed, I got a work allowance to buy office equipment for work from home (WFH). I badly needed an ergonomic and comfy work chair. I also got an ultrawide monitor to have even more screen real estate.
This photo does not show the upgraded chair.
I thought about using my 65″ inch LG OLED TV as a monitor but the screen was WAY TOO BIG!
I then read an article about people using 43″ and 50″ TVs with a low input delay as their work monitor and how happy they’ve been. I got the Samsung 50″ ‘The Frame” TV at a 50% open-box discount at BestBuy. As much as it was nice reading code on it, anything on the left and right was uncomfortable to read.
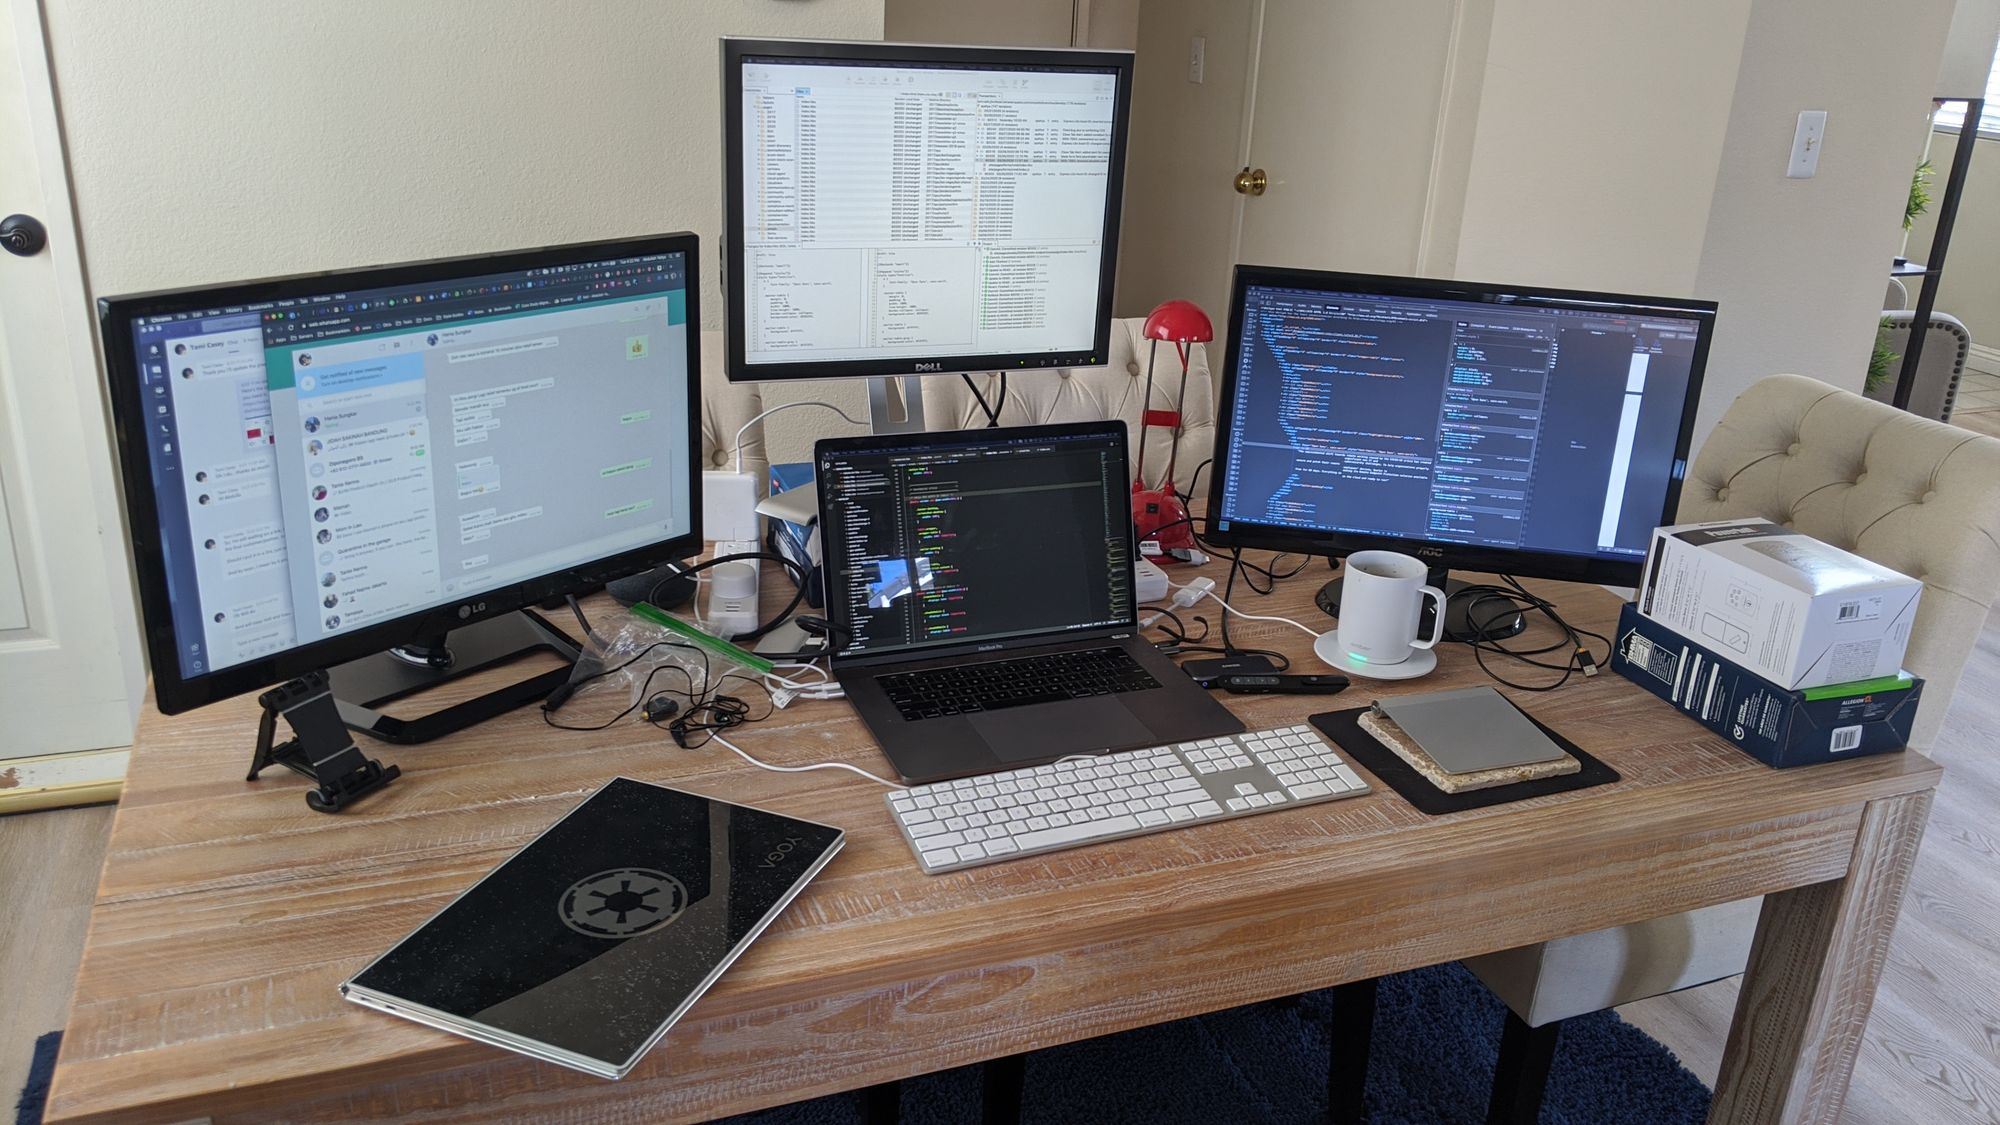
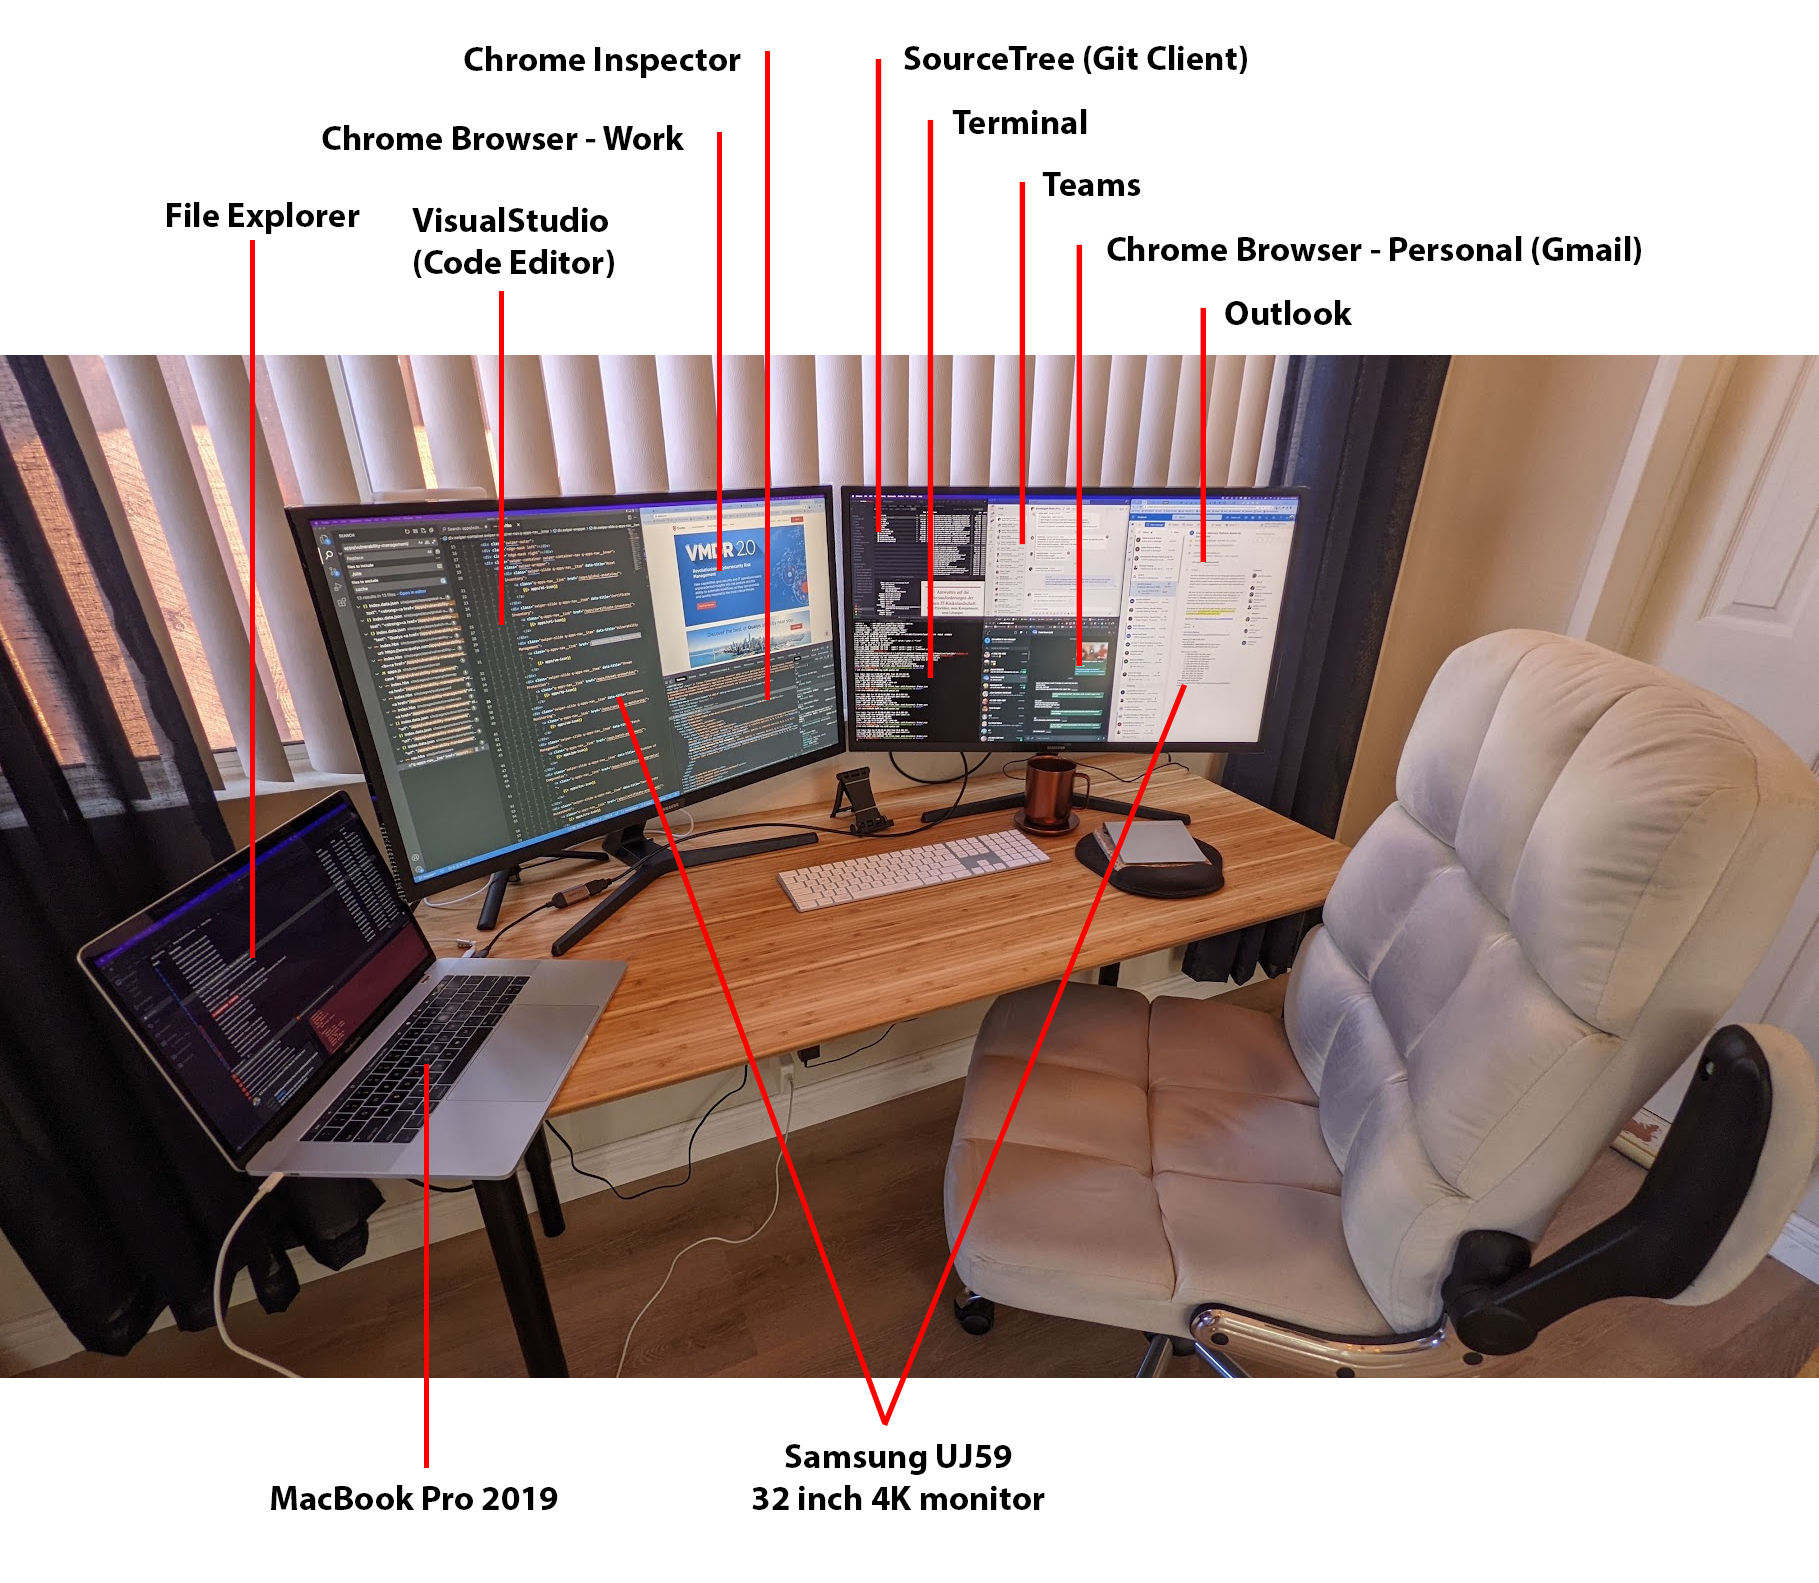
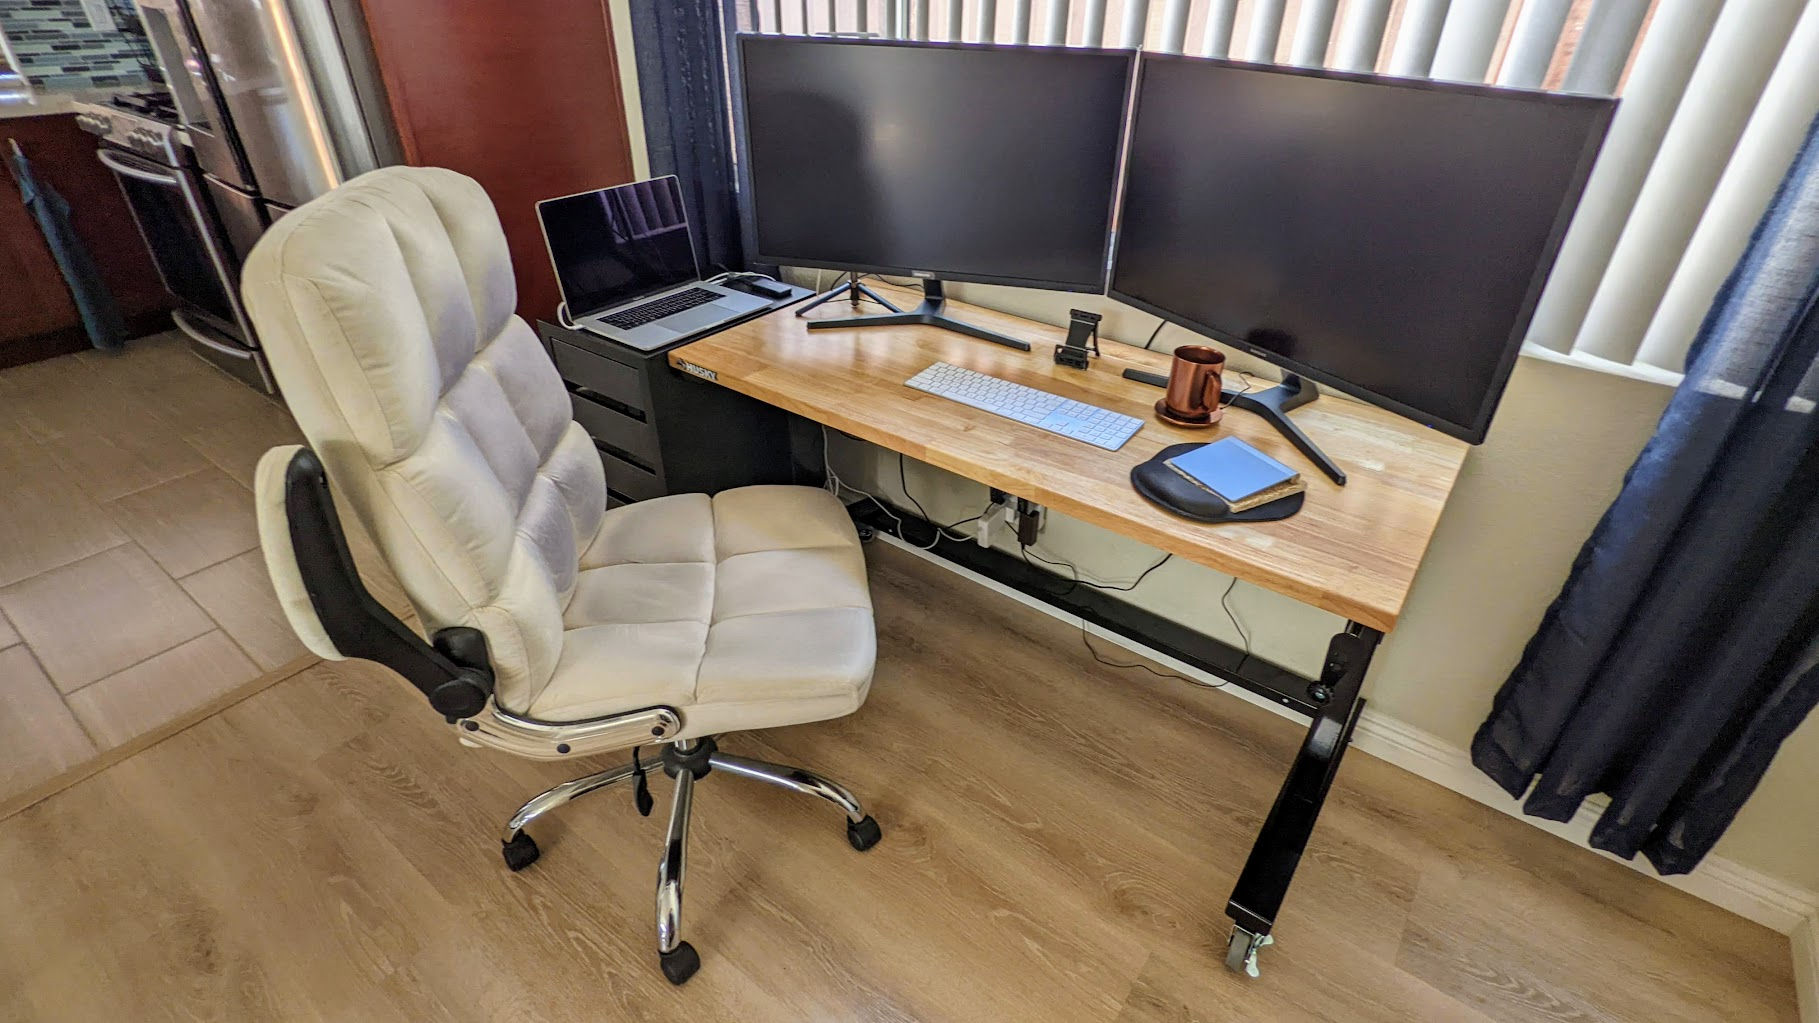
I could have tried the 43″ model of the same TV but it cost more than I wanted to spend. Plus, I wanted more windows open at the same time. Fortunately, BestBuy had some open-box 32″ Samsung UJ59 4K monitors. Regular price: $340. Sale Price: $300. Open box price: $250 and $195 (both looked brand new even though they were open box items). After being tired of a messy dining room / office where I could see the back of my monitors, I decided to rearrange the dining room and get a more suitable desk.
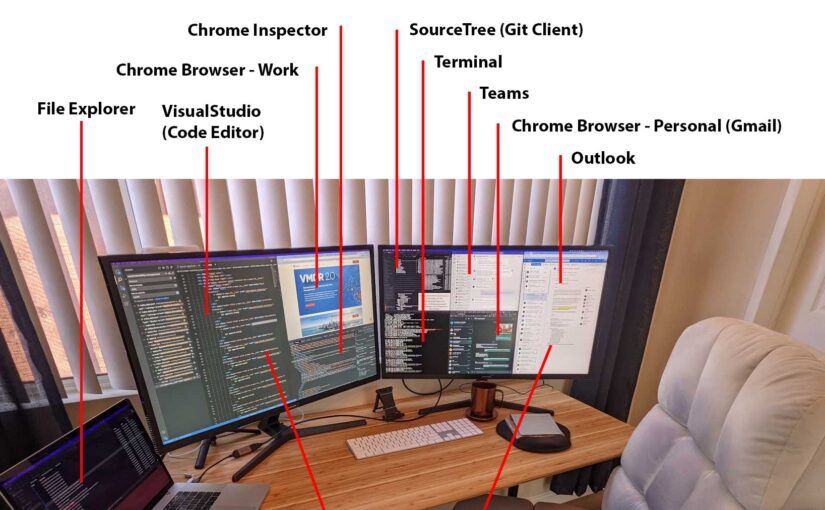
I know what you’re thinking. Why is the laptop halfway off the desk. Since with two 4K monitors, I didn’t think I needed the laptop screen but, how can I resist an extra screen? I’ll get a drawer unit the same height as the desk, put it on the left side of the desk, and put the laptop on it. More importantly: why in the world didn’t I buy two 4K monitors before? This setup makes working so much better I regret not doing this sooner. Now, this setup works for me but you may need to adjust some settings to better suit yours.
Setting up the monitors
Before you go out and buy a bunch of 4K monitors, make sure you laptop / computer supports them. I have a MacBook Pro (2019) and according to Apple, I can run multiple 4K monitors.
My particular Samsung UJ59 monitors don’t have USB-C input – only HDMI – so I have to use a USB-C to HDMI adapter.
Monitor Layout
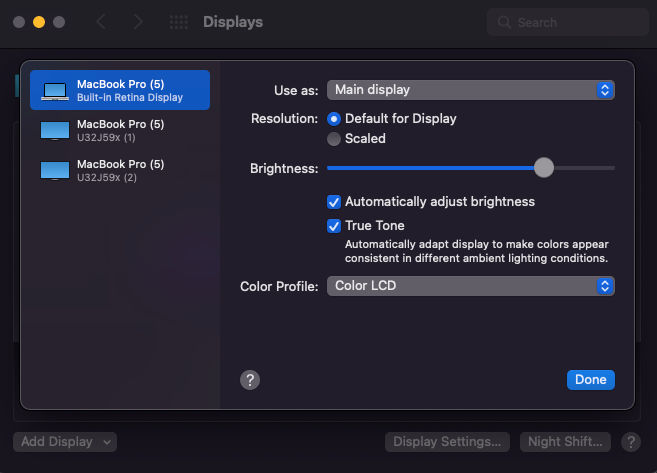
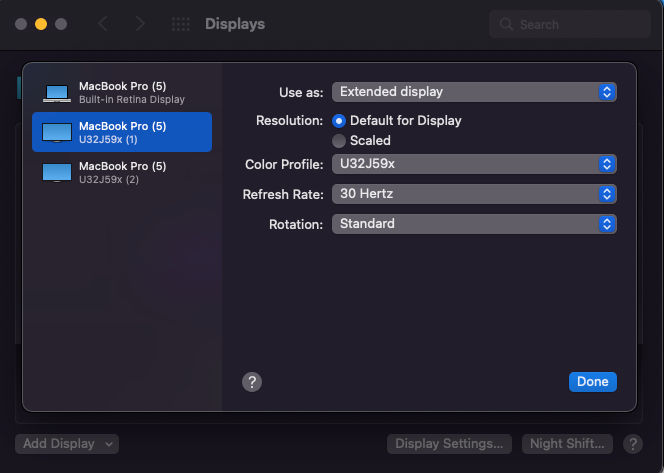
On MacOS, I chose to have my laptop screen be my main display and my 32″ monitors both be extended displays. You can then drag the squares representing screens to match your physical layout so that when you drag your mouse (I use a trackpad) off the edge of a screen/monitor, the pointer seamlessly appears on the adjacent screen, as you’d expect.
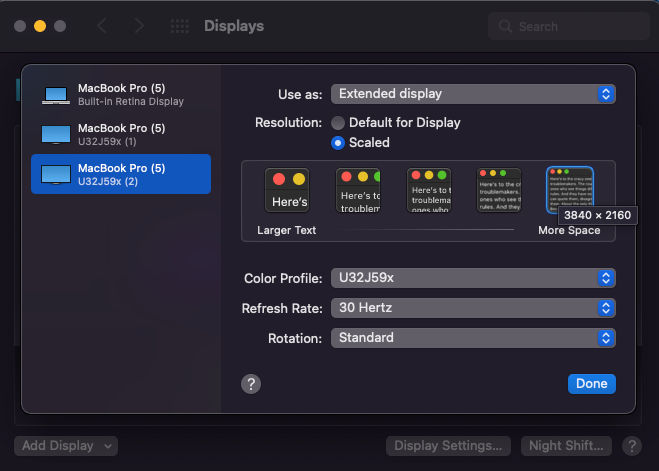
Monitor Resolution
4K screens/TV support a native resolution of 3840 x 2160 pixels. But, you may find that reading code or blog posts difficult when the font is too small. There are two things you can do to address this:
Scale down the resolution
You can have your monitor show a picture at a lower than 4K resolution such that everything appears bigger.
I set my laptop as the main display with a default resolutionThe first 4K monitor is set as “Extended display” with a default (4K) resolutionThe 2nd 4K monitor is also set as “Extended display” with a default resolution. When I click the “Scaled” option, you can see the default resolution is 3840 x 2160, which is 4K.
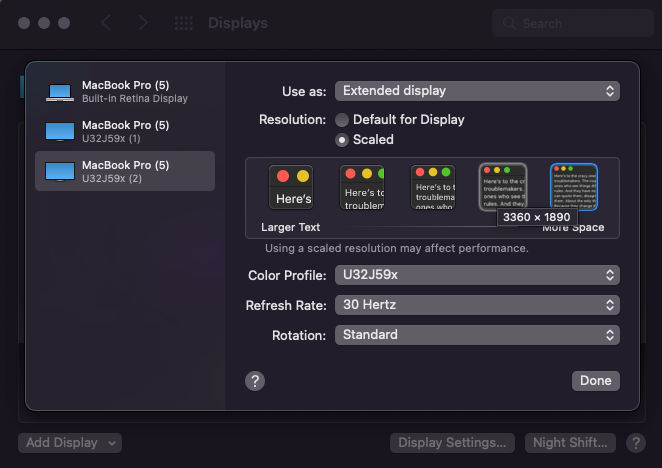
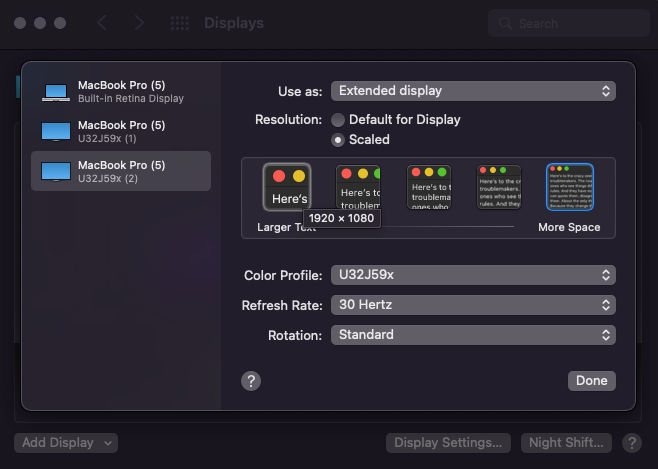
Below are lower scaling options.
The scaling option right below 4K is 3360 x 1890 px.The lowest scaling option is 1920 x 1080 px.
Increase the font size of some or all browser tabs / apps
If you’re in 4K mode and you feel the font is a bit too small to read, you can increase the font size of just that window or browser tab. I use VisualStudio Code as my code editor and I find that increasing the font size makes for a much more pleasant coding experience. Plus, since I have laid out my screen such that VS Code takes up the full height of the screen, I can still see a ton of code without having to scroll a lot.
Conclusion
One survey indicated that slightly more people preferred a single 4K TV as their monitor than people who prefer multiple 4K monitors. This all boils down to your use case. If you don’t need a million windows open like I do, then a single 43″ 4K TV may be better for you (don’t get a 50″ TV – it’s too big if you are sitting 2-3′ from the screen). Otherwise, multiple 4K monitors is definitely the way to go (with some custom setting adjustments to suit your viewing comfort).