There are many different types of website content management systems. This post will explain the different types and include some examples.
No-Code CMS
A no-code CMS is one where the entire website is managed by the CMS. For example, with webflow, all changes to your website must be done in the CMS using a WYSIWYG. You can only edit the HTML of the code widget. All other changes must be done using the UI. If you want to edit the source code of the entire site, you must export the entire site. But, you can’t import any changes you made from the export.
A database-driven CMS is one that stores some or all data in a database. For example, WordPress is one such CMS. Web pages and blog post content are stored in a database (usually mySQL). Unlike webflow, however, you can edit the source code of the web page templates. WordPress has a built-in versioning system, so you can see a history of changes made to a page.
A headless CMS is one that stores data remotely. Data is integrated with your website using an API. For example, Contentful is one such CMS. You can create custom content models in Contentful. Your website will need to access the data at a particular URL that returns JSON data. Your website will then need to consume that JSON data to process it to show it on a web page, e.g. by using a template engine. Data in Contentful is likely stored in a database.
A git-based CMS stores data in git version control. Unlike many of the other CMSs, this CMS connects to your git repository as a web developer does. It then shows an interface that allows content editors to make edits to files in the repo. CloudCannon is one such CMS. With CloudCannon, web developers can add the class “editable” to HTML tags with a page’s source code. Then, the content of those tags will be the only elements that content editors can edit.
Websites that are built using a static site generator (SSG) often include front matter. Frontmatter can come in different formats. One popular format is YAML. You can have YAML at the beginning of a page’s source code. Or, you can have a separate, standalone .yaml file. YAML contains contain name-value pairs, so they basically represent data. Netlify CMS is one type of CMS that supports editing YAML. It also supports editing pages like blog posts. However, unlike WordPress, where editors can add blocks of content to a page’s body, Netlify CMS requires the blocks of content to be predetermined upfront. So, for a blog post using Netlify CMS, editors can only use one widget to entire the entire body of the page. That widget is a rich text or markdown editor.
The CMSs above can be categorized as CMSs that support structured and unstructured data. CloudCannon supports unstructured data because you can let editors edit specific elements of a complex page by marking those elements as “editable”. YAML and database-backed CMSs support structured data because there is a clear name/value mapping.
My Preference
Since WordPress is the most popular CMS and it allows editors to add blocks of different types of content to the body of a page, I think it’s worth using. However, I don’t like that WordPress keeps data in a database and relies on PHP to build pages before serving them. Also, not all pages need to be edited by non-technical people. In fact, most pages will still be edited by developers who need full access to the source code. To accommodate the needs of both developers and non-developers, I would use GitHub to version all code changes and I would use a static site generator like Eleventy that is integrated with WordPress using the WordPress API. When a WordPress editor saves or publishes a page, WordPress can trigger a save_post() action with a callback function that calls a URL, e.g. a PHP script on Heroku at myapi.com/?postid=123.
function call_commit_script( $post_id ) {
    $remote_url = 'https://www.myapi.com/?postid='.$post_id;
    $access_token = '3&^&2lhl3@#lsjk756'; //some secret password
    $args = array(
    'headers' => array(
       'Authorization' => 'Bearer ' . $access_token,
       ),
     );
    $response = wp_remote_get( $remote_url, $args );
    if ( is_array( $response ) && ! is_wp_error( $response ) ) {
        $headers = $response['headers']; // array of http header lines
        $body    = $response['body']; // use the content
    }
    $post_title = get_the_title( $post_id );
    $post_url = get_permalink( $post_id );
    $subject = 'A post has been updated';
    $message = "A post/page has been updated:\n\n";
    $message .= $post_title . ": " . $post_url\n\n$body;
    // Send email to admin.
    wp_mail( '[email protected]', $subject, $message );
}
add_action( 'save_post', 'call_commit_script' );
The PHP script on Heroku could then
verify the Authorization Bearer header contains the predetermined access token value, e.g. 3&^&2lhl3@#lsjk756. If it doesn’t, then the request didn’t come from an authorized origin and should be rejected.
pull any latest changes from GitHub
call the WordPress API to get the page content in JSON format, e.g. https://www.mywordpresssite.com/wp-json/wp/v2/pages/123
commit the JSON data to GitHub
use the static site generator to build the page using the JSON data as the data source
Note: the PHP script on Heroku, e.g. https://www.myapi.com/?postid=’.$post_id, must be secured by SSL/TLS to encrypt the URL and headers so that attackers can’t see the authorization header value.
For allowing non-technical people to
edit simple YAML files or frontmatter, I’d use Netlify CMS.
edit complex, structured data, I’d use Contentful.
edit specific, unstructured content, I’d use CloudCannon.
This tutorial will guide you to create a documentation website using Github and Netlify using the MkDocs static site generator. Even though MkDocs is designed for documentation, it can be used to quickly create simple websites with a navigation menu. Since I’m on Windows, this tutorial is for users on Windows.
Let’s create a folder where our website project will be. I’ll call mine mkdocs at C:\Users\abdul\OneDrive\Documents\Websites\mkdocs.
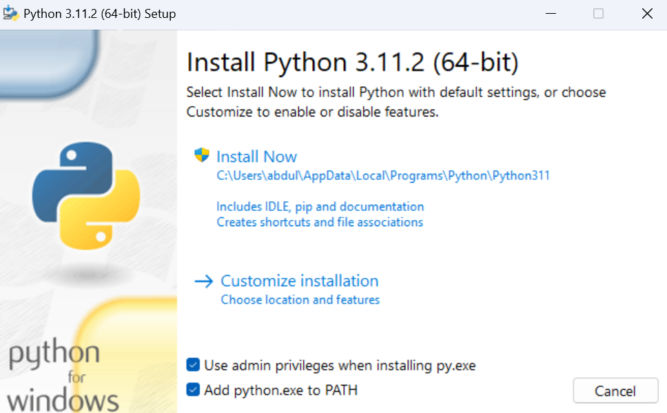
Install Python
If you don’t have Python installed, you’ll need to install it. Visit Python and download the executable. When installing, be sure to check the box to “Add python.exe to PATH” is checked.
Verify python was installed by running
python --version
You may need to close and reopen the command prompt for this to work.
Install pip
pip is a package manager for python. If you just installed python, then pip will likely be installed. Test this by running the following command
pip --version
I have pip version 22.3.1. This version may be out of date, so let’s update it with
python.exe -m pip install --upgrade pip
Now, when I run pip --version, I see a newer version installed.
Create a Virtual Environment
A python virtual environment is a tool that helps to keep dependencies required by different projects separate by creating isolated python virtual environments for them. This is one of the most important tools that most Python developers use. In a terminal, go to your project folder and run the following command. venv can be any name you want.
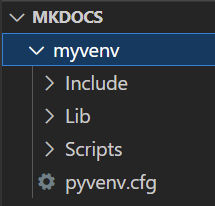
python -m venv myvenv
This creates a folder called myvenv in your project folder containing a bunch of folders and files.
Activate Virtual Environment
Now we need to activate our virtual environment. Remember: this must be done every time you begin working on your project. You’ll know you’ve activated the virtual environment if the command prompt prefix shows the name of your virtual environment.
Windows
On Windows, we have to activate it by moving into the virtual environment folder and running Scripts\Activate.
Notice how the command prompt prefix is now myvenv.
Linux/Mac
If you’re on Linux or Mac, use the following command from the project root folder.
source myvenv/bin/activate
where myvenv is whatever name you gave your virtual environment.
Install mkdocs-material theme
You can have different themes with mkdocs. The best theme is mkdocs-material so we’ll install that one. Go back to your project root folder and run the following command.
pip install mkdocs-material
This will download the mkdocs-material dependencies in myvenv\Lib\site-packages folder.
Create a New mkdocs Site
Now, let’s create a new mkdocs site by running the following command in our project root folder.
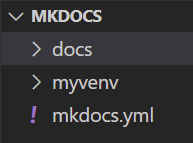
mkdocs new .
This will create 2 files.
mkdocs.yml is a configuration file.
index.md is a documentation page.
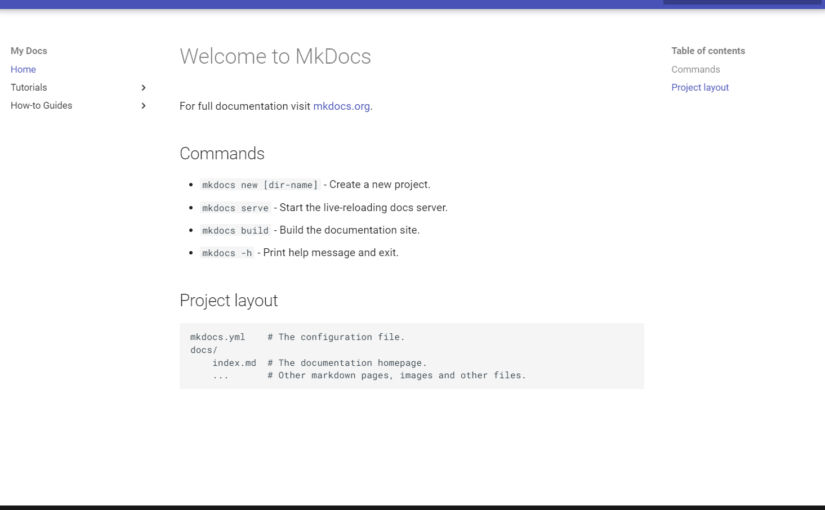
Preview the Site
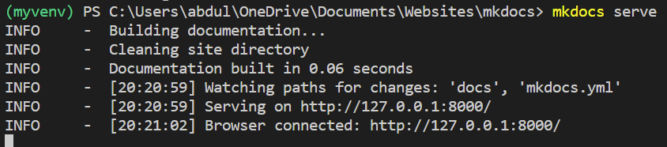
MkDocs comes with a built-in dev server that lets you preview your documentation as you work on it. Make sure you’re in the same directory as the mkdocs.yml configuration file, and then start the server by running the following command:
mkdocs serve
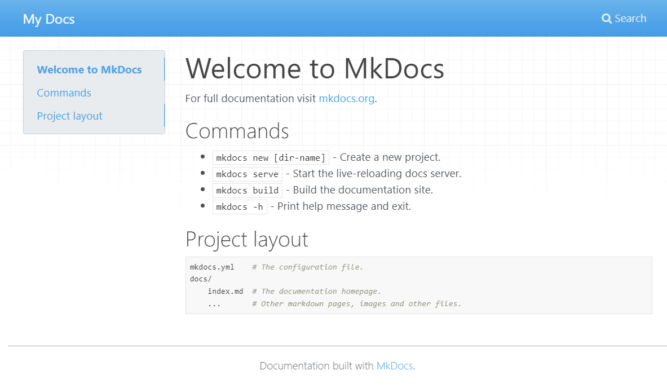
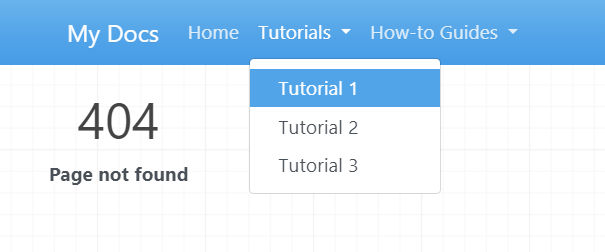
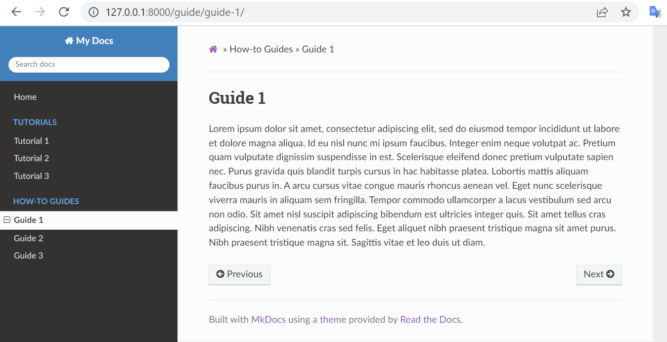
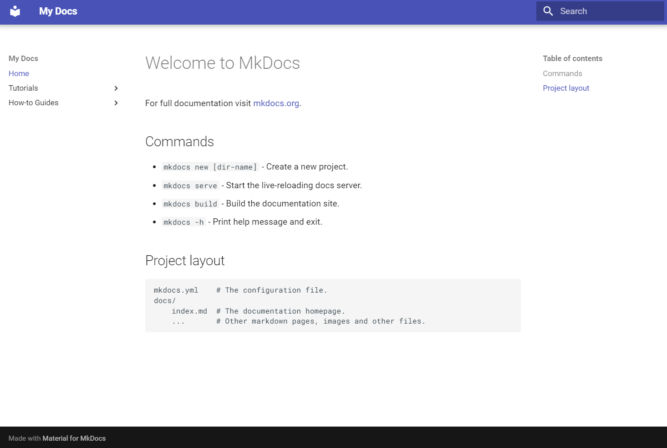
Now we have a dev server. If you open http://127.0.0.1:8000/ in a browser, you’ll see the index page.
Customize The Site
Open mkdocs.yaml to make the following changes.
Change Site Name
The default site name is “My Docs”. You can change it here.
site_name: My Docs
Add Pages to Site
Add an order, title, and nesting of each page in the navigation header by adding a nav setting. For example,
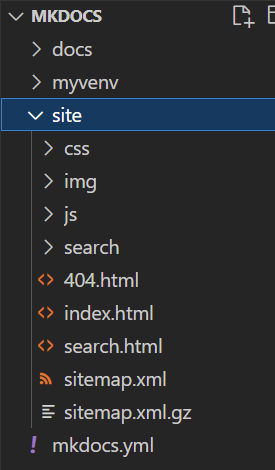
So far, we’ve been previewing the changes to the site. There are still only 2 files. Let’s build the site. In another terminal window, run the following command.
mkdocs build
This creates a site folder containing the built HTML files and other files.
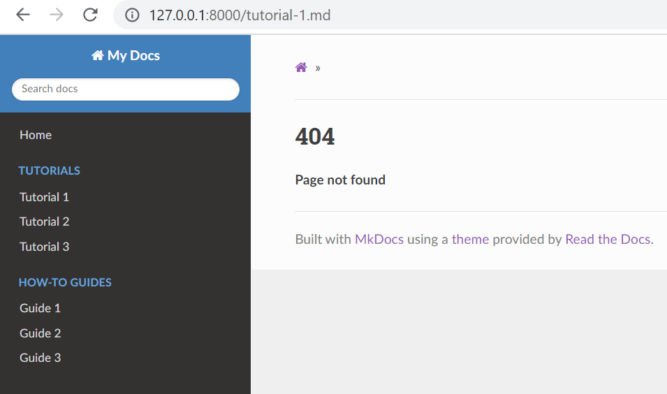
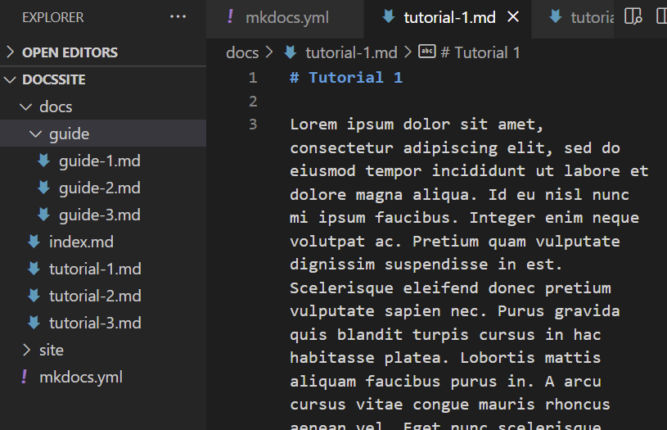
Create Pages
We have our nav menu, but we don’t have pages the nav links to. Let’s create those pages now. The file name and path should match what’s in the mkdocs.yaml config file and the source files should be in the docs folder. I just created some placeholder page content for demonstration purposes.
Now, our documentation website is starting to look good.
Change the Theme to the Material Theme
Let’s change the theme to the Material theme by updating the mkdocs.yaml file.
theme:
    name: material
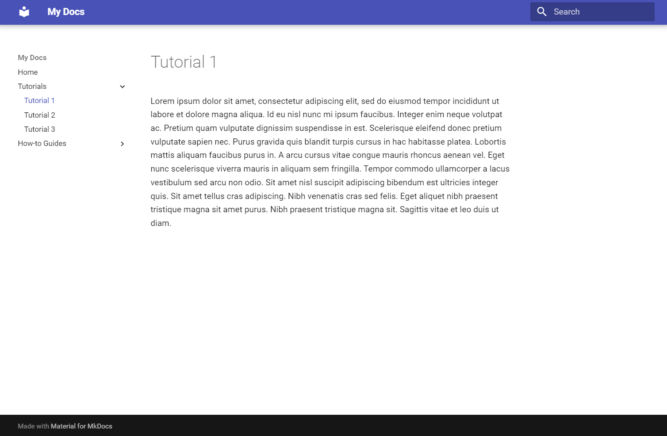
When you do this, your dev server may crash. Just restart it with mkdocs serve. And just like that, our theme is now the Material theme.
Customize the Theme
You’ll notice that in your source code, there are no theme files. There are different ways you can customize the theme as described in the official manual. You can also create a new theme. Theme files use the Jinja2 templating engine.
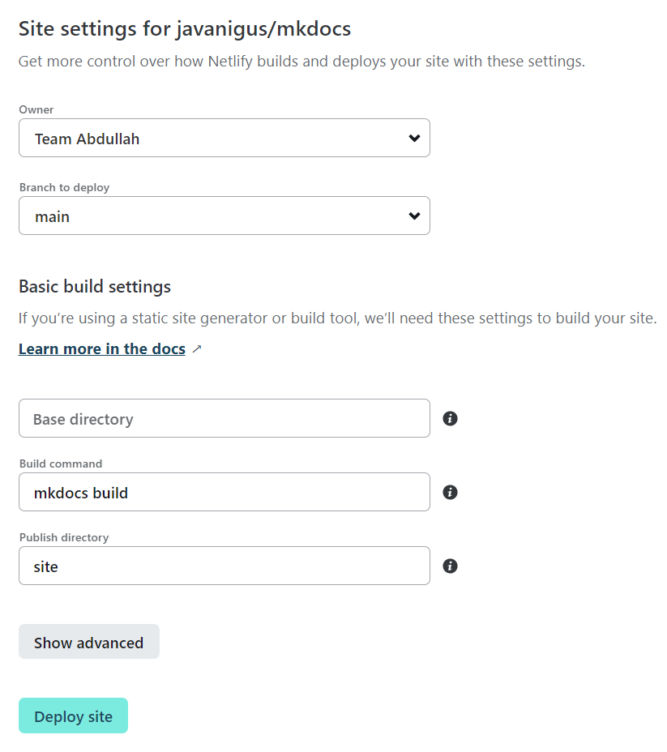
Deploy to Netlify
In order to deploy to Netlify, we need
runtime.txt (a file that specifies the version of python to run)
requirements.txt
netlify.toml
GitHub account
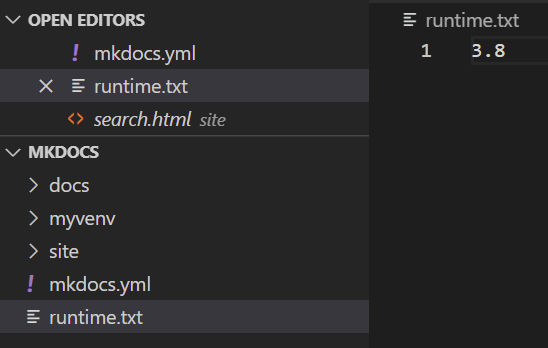
Create runtime.txt
Create a file in the project root with the version of python you want Netlify to use when building the site. The current latest version of python that Netlify supports is 3.8. The version number must be x.y (major and minor versions only, no patch numbers).
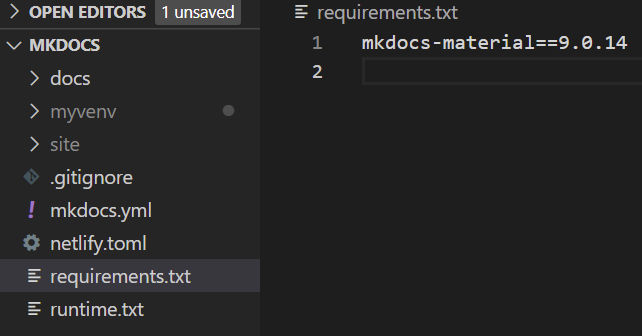
Add requirements.txt
This file will list software dependencies and versions. Create a requirements.txt file with the following
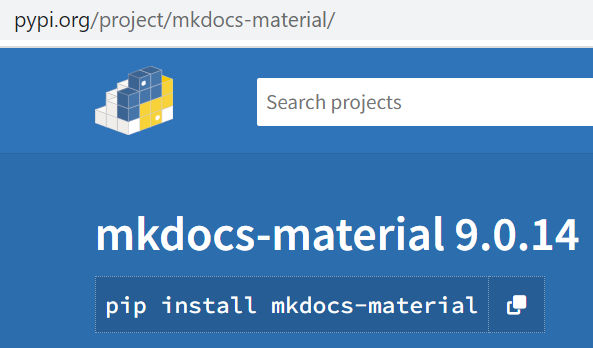
mkdocs-material==9.0.14
You’ll end up with a requirements.txt file similar to this. 9.0.14 is the current version of mkdocs-material pip package at https://pypi.org/project/mkdocs-material/.
Create netlify.toml
netlify.toml is a Netlify configuration file. Create the file and add the following to it.
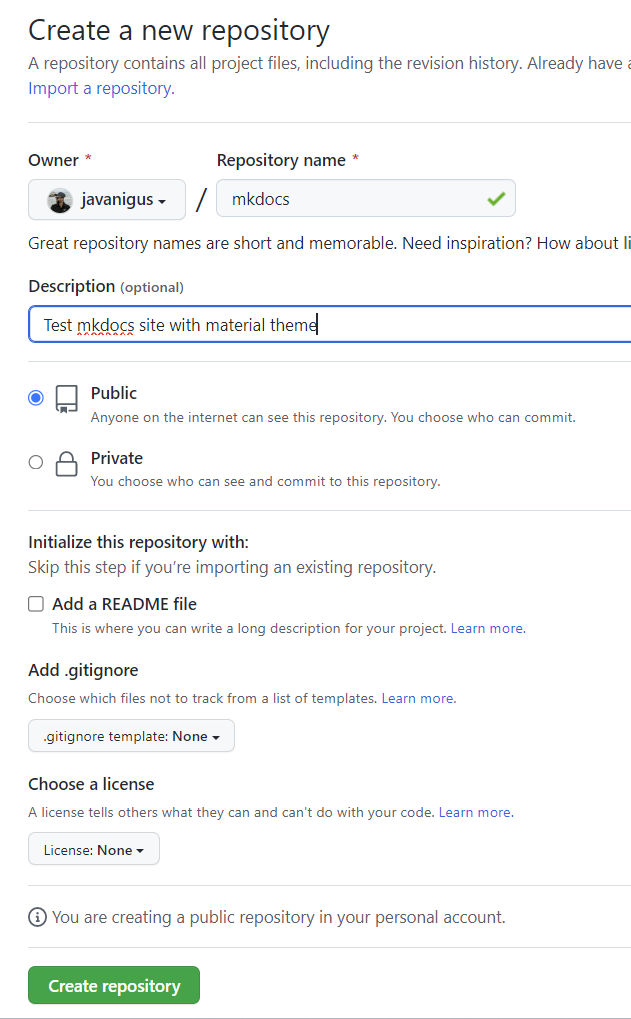
To avoid errors, do not initialize the new repository with README, license, or gitignore files. You can add these files after your project has been pushed to GitHub.
Initialize the local directory as a git repo. If you don’t have git installed, you’ll need to install it first.
Run git init -b main in our project folder. This will create a hidden .git folder.
Create a .gitignore file with the following entries to ignore them from being tracked by git.
site
myvenv
Add the files in your new local repository. This stages them for the first commit.
git add .
Commit the files that you’ve staged in your local repository.
git commit -m "First commit"
At the top of your repository on GitHub.com’s Quick Setup page, click to copy the remote repository URL.
Svelte is similar to React and Vue, but instead of doing most of the work in the browser, Svelte does it in a compile step. Also, Svelte doesn’t do virtual DOM diffing or require HTML/CSS within JavaScript. Here’s a video showing code to create a simple to-do list app using 10 different JavaScript frameworks. Personally, I find the Svelte code to be the simplest and most elegant.
UPDATE: You can quickly set up preconfigured web stacks using Amazon Lightsail.
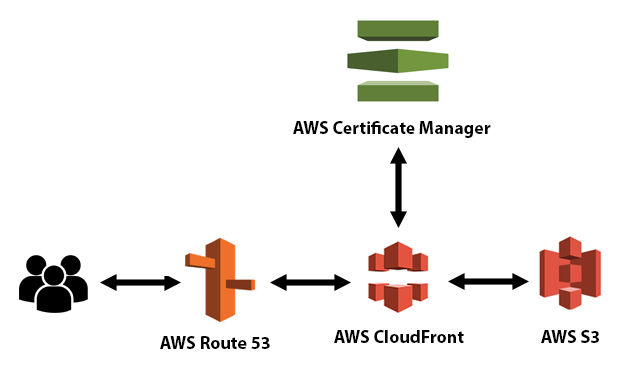
This tutorial will show you how to host a website on Amazon S3, Amazon CloudFront, and Amazon Route 53 using SSL and a custom domain.
Amazon S3 Amazon S3 is an object storage service. Files are objects.
Amazon CloudFront Amazon CloudFront is a content delivery network (CDN) service.
Amazon Route 53 Amazon Route 53 is a Domain Name System (DNS) web service. Route 53 connects user requests to internet applications running on AWS or on-premises.
AWS Certificate Manager AWS Certificate Manager (ACM) is used to provision, manage, and deploy public and private SSL/TLS certificates for use with AWS services and your internal connected resources. ACM removes the time-consuming manual process of purchasing, uploading, and renewing SSL/TLS certificates.
Create an S3 bucket
Go to your AWS console and search for S3. Click it.
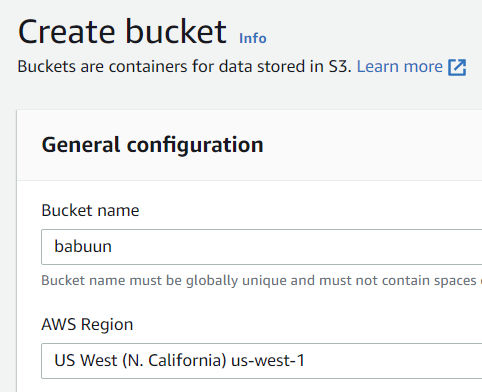
Click ‘Create Bucket’. Choose a globally unique bucket name and AWS region.
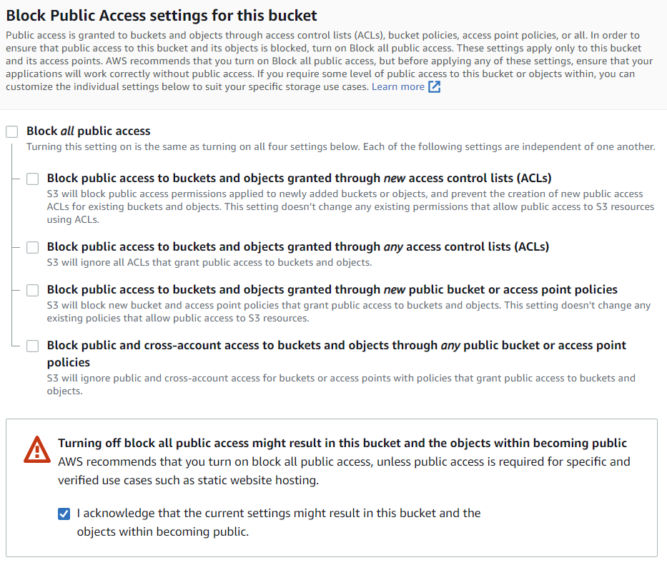
Untick “Block all public access” and confirm it, since we want our static website accessible from the internet.
Leave everything else as is and click ‘Create bucket’.
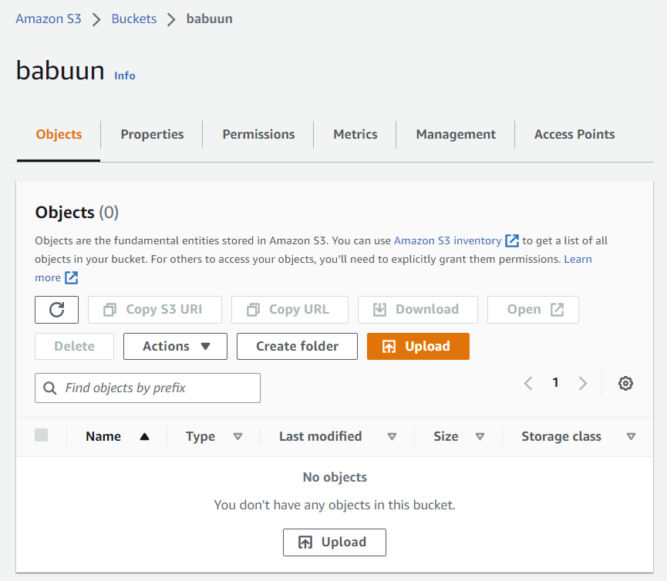
Open the bucket you just created from the console. The bucket should be empty.
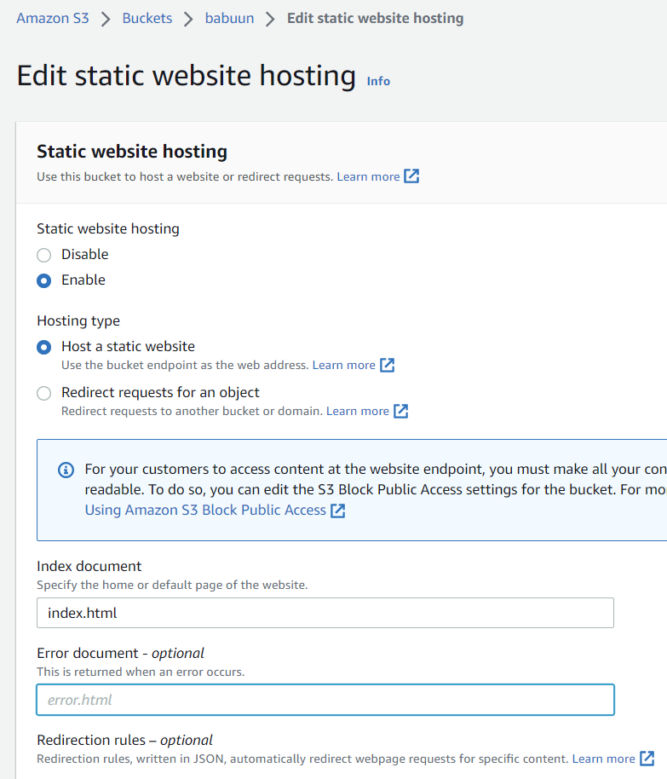
Click the Properties tab, and then sroll down to Static website hosting and click ‘Edit’.
Choose ‘Enable’ under “Static website hosting”
Choose “Host a static website”.
Choose an Index document. You can fill in “index.html”.
Hit Save changes.
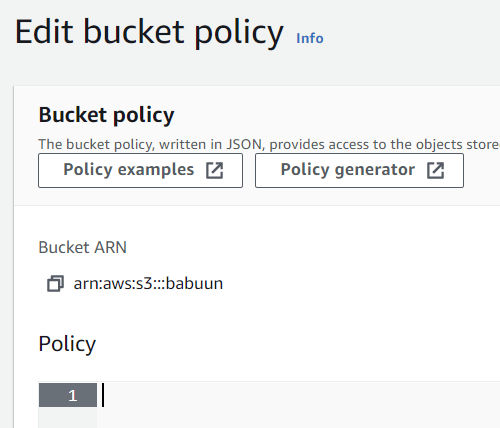
In S3, click the Permissions tab. Then Bucket Policy.
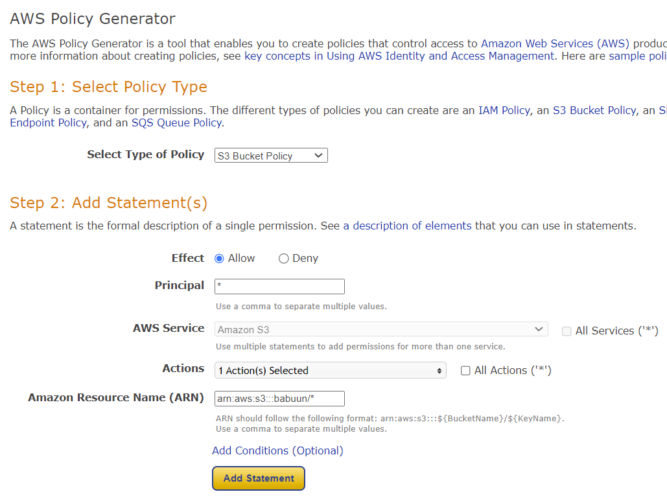
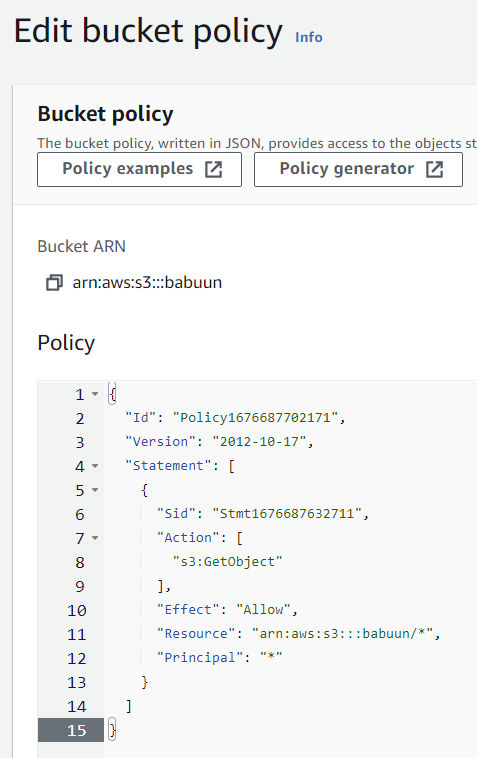
Here you need to fill in a policy that will allow the bucket to be publicly accessed. Open the official AWS policy generator at AWS Policy Generator in a new tab and generate a policy.
At the generator, choose S3 bucket policy as the Type of Policy. Principal will be an asterisk “*” (without quotes), and Actions will be “GetObject”.
Fill in your ARN. It can be found in AWS Console where you were about to fill in the bucket policy. There, at the top of the page, you should be able to find the ARN in the format of arn:aws:s3:::<bucket_name>.
Important: before you paste in the ARN, append a slash and asterisk at the end, so it will look something like: arn:aws:s3:::babuun/* (my bucket name is “babuun”). This will allow access to everything inside the bucket.
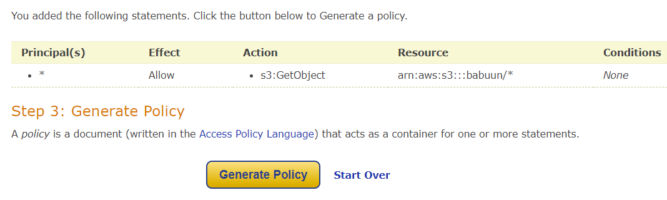
Click Add Statement and then Generate policy.
Copy the whole policy over to the S3 AWS console in the Edit bucket policy page and click Save Changes.
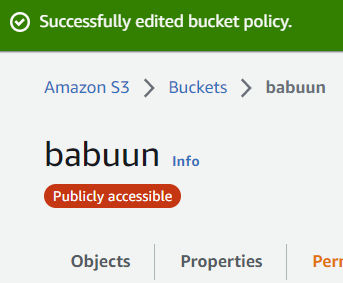
Now, when you open your bucket, you should see a red bubble with white text Publicly accessible under the name of your bucket. If you do, everything is correct and we can proceed.
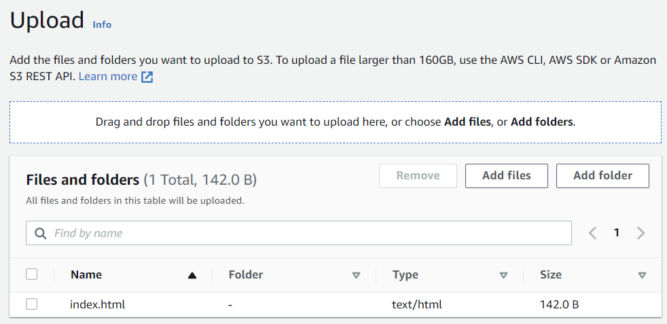
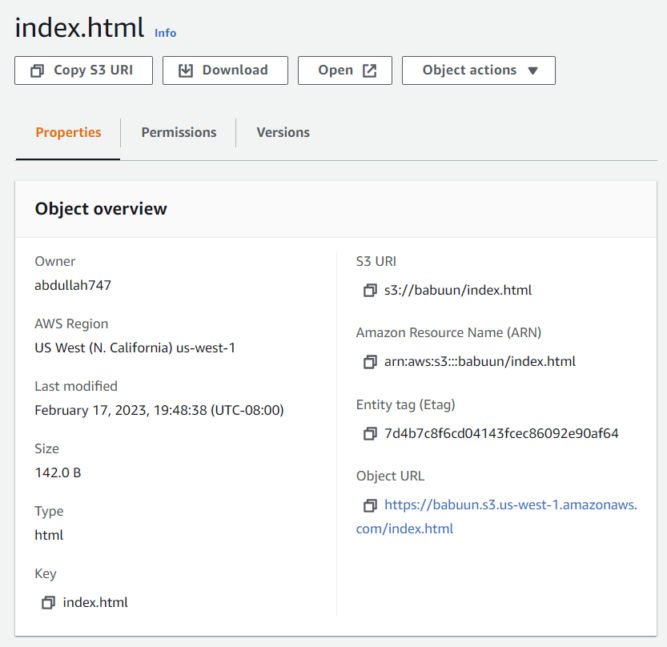
In your AWS console inside your S3 Bucket hit Upload, then Add files and upload your website. If you don’t have one yet, just create an index.html file with the following content and upload it. You can also create a folder, e.g. for images.
In your AWS Console search for Route 53 under Services.
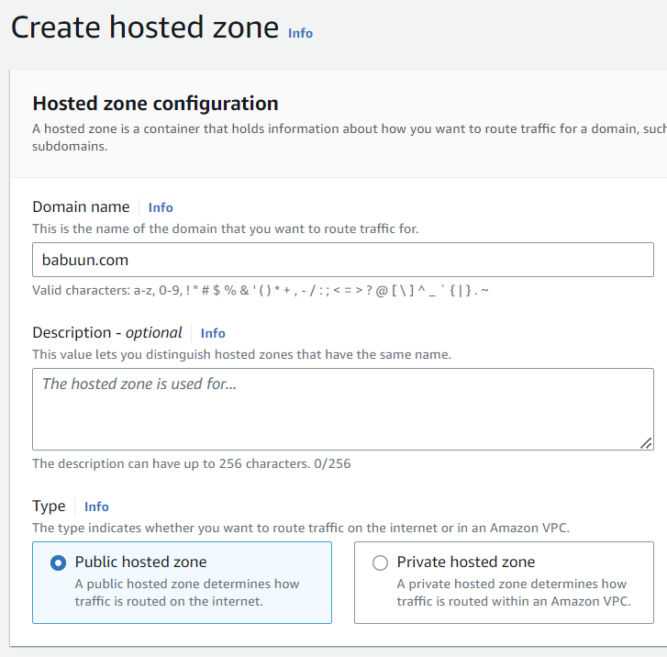
Under ‘DNS management’, click Create hosted zone.
Inside the ‘Domain name’ field, input your domain name. You can get one from any domain registrar like GoDaddy.
‘Type’ will be Public hosted zone.
Click Create hosted zone.
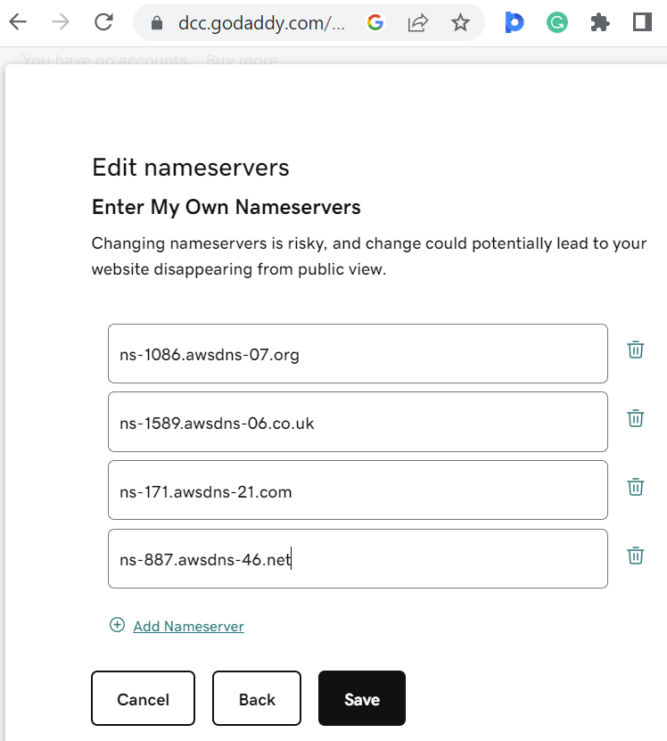
Now we need to link our domain with the records in Route 53. For the zone we just created, you’ll see 2 types of records. The first on is “NS”, which stands for “name server”. There are 4 name servers in this record.
Open a new browser tab and go to your domain’s DNS management page. There, you’ll see a section to update nameservers. My domain is babuun.com and I registered it with GoDaddy. Copy the name server values in Route 53 to your DNS management page. Make sure to remove the dot at the end. In doing so, when someone tries to reach your domain, you redirect them to one of these name servers. Save your nameserver changes. Keep this browser tab open as you’ll need it in the next section.
Set up a certificate
In your AWS Console, search for Certificate Manager and click the link.
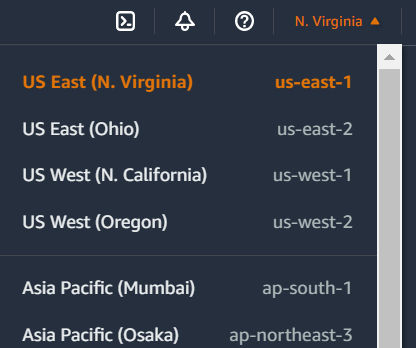
IMPORTANT: In the region dropdown, choose “US East (N. Virginia)”.
Click “Request Certificate” > “Request a Public Certificate”.
Fill in the domain name. In my case, it’s “babuun.com”.
For “Validation Method”, use the recommended value (DNS Validation).
Leave everything else as is and click the Request button.
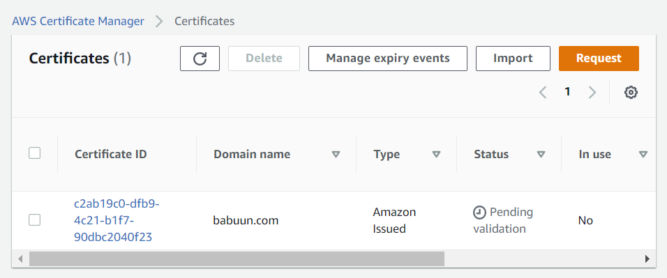
On the next screen, you’ll see the certificate is “pending validation”. In order to validate it, we need to link it to our Route 53 records. Click on the link under “Certificate ID”.
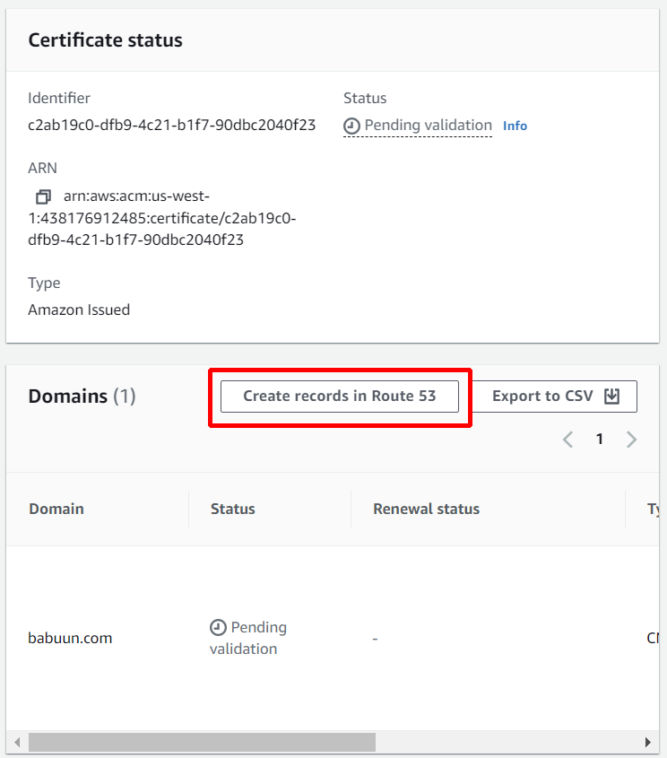
Click on “Create records in Route 53”.
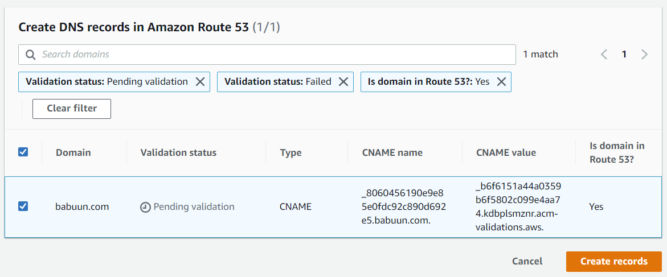
Then, click the “Create records” button.
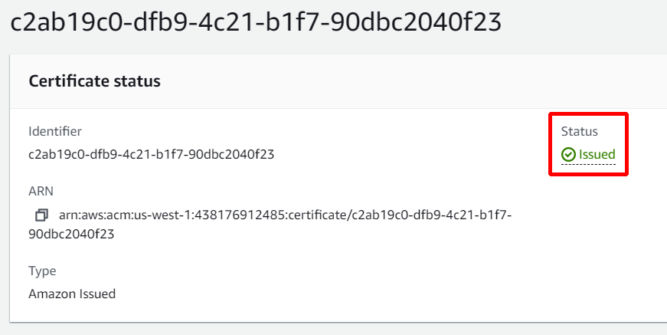
Wait up to 30 minutes for the certificate to be issued. The status will change from “Pending validation” to “Issued”.
Set up a CloudFront distribution
We will create a CloudFront distribution that is connected to our S3 bucket. When anyone tries to access our distribution, they will actually be accessing our S3 bucket while taking advantage of the speed of CloudFront.
In your AWS Console search for CloudFront and click the link.
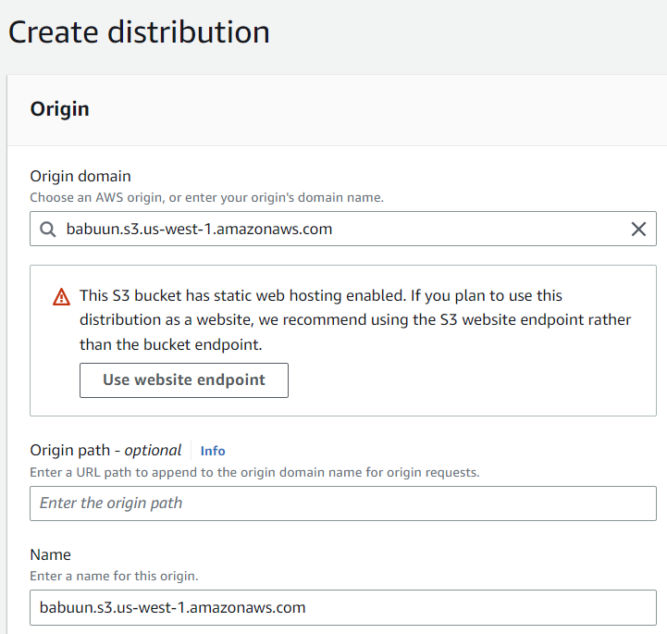
Click Create Distribution. On the next page, under “Origin domain”, select the S3 bucket we created earlier.
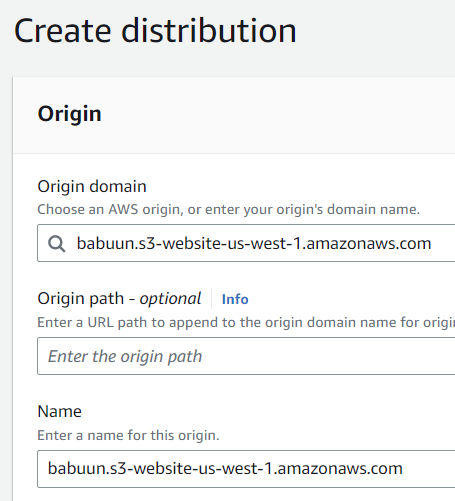
CloudFront will notice that the bucket was set up to host a website. Click the “Use website endpoint” button. CloudFront will automatically update the values for you.
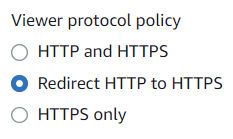
Under Viewer Protocol Policy choose Redirect HTTP to HTTPS
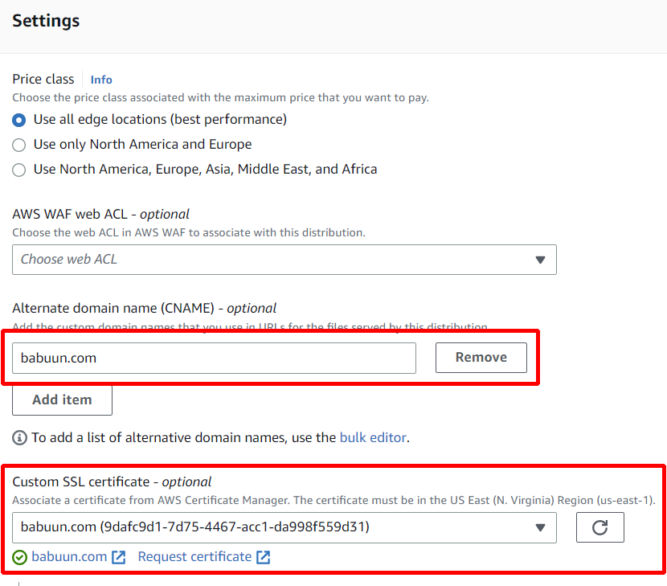
Under “Alternate Domain Names (CNAMEs)”, enter your domain name, e.g. babuun.com.
Under “Custom SSL certificate”, choose the certificate we created earlier. If it’s not available, the certificate may not have been issued yet. Wait 30 minutes or so and click the refresh button until you see the certificate. Select the certificate.
Click Create Distribution at the very bottom of the page.
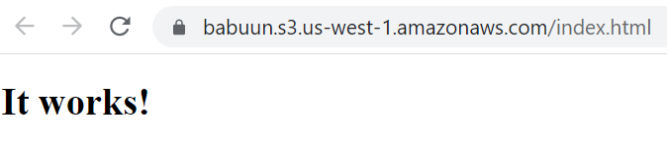
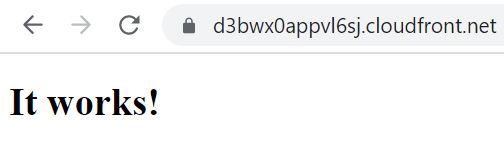
The distribution takes about 10-20 minutes to provision. Once it is provisioned (Status = Enabled, Last modified = a date), you can test it by pasting the URL into your browser. You should see the website you uploaded into S3.
However, your custom domain won’t load in a browser yet. To fix that, we need to create a record in Route 53.
Set up a record in Route 53
Go back to Route 53 and click on your domain.
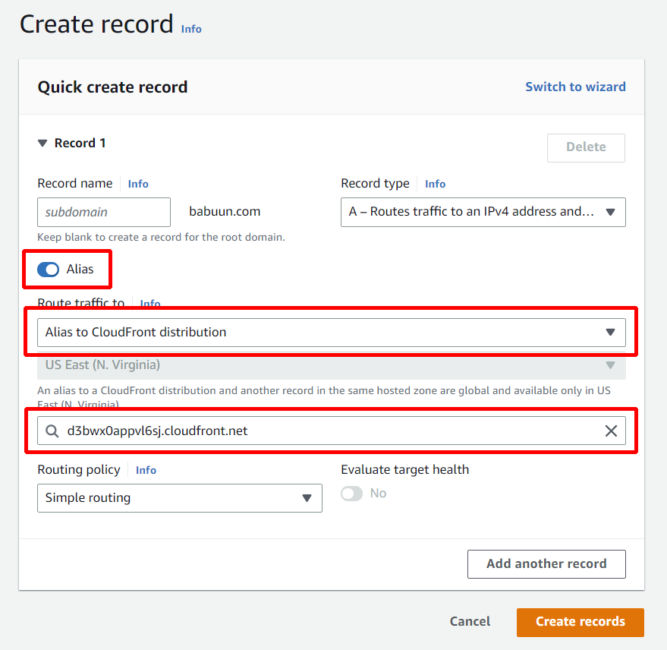
Click Create record.
Click Alias.
Click the dropdown menu at Value/Route traffic to and choose Alias to CloudFront distribution.
Choose the distribution you provisioned previously.
Notice that the only available region is US East (N. Virginia)[us-east-1]. This is due to the fact that we provisioned an SSL Certificate via AWS Certificate manager. This service is only available in US East 1.
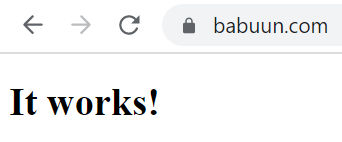
Now, just wait a few minutes for the DNS records to update and try to load your domain name. If everything went correctly, you should see your static website distributed via CloudFront.
And there it is…
Alternate Domain (CNAME)
The instructions above involve using Route 53 as the DNS manager for the domain by updating the nameservers for the domain at the domain registrar to point to AWS’ nameservers. By having Route 53 manage the DNS records, you can have the root domain (babuun.com) point to AWS CloudFront and you can add a CNAME (alternate name) such as www.babuun.com point to AWS CloudFront as well. So, your website would be accessible at both https://babuun.com and https://www.babuun.com.
If you don’t want to use AWS Route 53 as your DNS manager, you would only be able to create a CNAME in your external DNS manager that points to your CloudFront URL as shown below.
In this example, I made www.babuun.com point to d3bwx0appvl6sj.cloudfront.net in GoDaddy.com’s DNS manager. You can’t have the root domain (babuun.com) point to CloudFront because the root domain destination can only be set in the A record, which must point to an IP address, not a domain. Since we don’t know the IP address of CloudFront, then babuun.com will not point to CloudFront. As a workaround, you could have the root domain point to an IP address of a server you have access to, and then add a redirect from there to www.babuun.com.
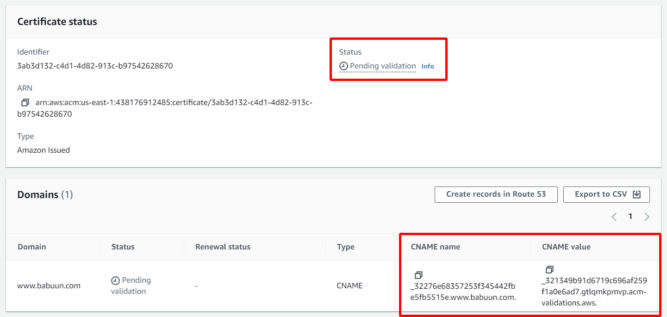
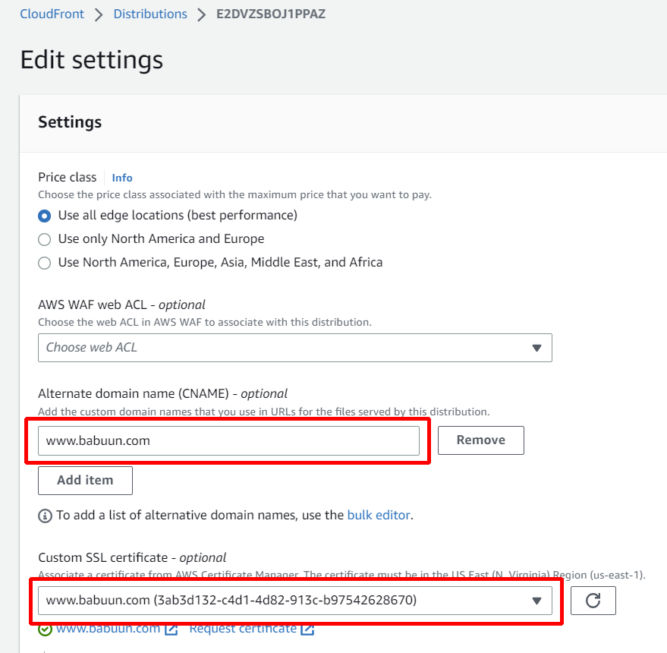
Since you’ll need a certificate specifically for www.babuun.com, or use a wildcard cert like *.babuun.com, you need to create a new certificate in ACM. The instructions are the same as above. After requesting a new certificate, you’ll see the status is “Pending validation”. Since you chose DNS validation, you’ll need to create a new CNAME record in your external registrar with the CNAME name and value provided.
The screenshot below shows the relevant records in my DNS manager on GoDaddy.
ACM will take up to 30 minutes to verify the changes after which time the certificate’s status will change to “Issued.
Now that the certificate is issued, you can update the CloudFront distribution settings by adding the newly issued certificate.
If you are using AWS CloudFront only for static assets, e.g. PDFs and images, then it makes sense to just create a CNAME record with an alternate name like “cdn.babuun.com” or “static.babuun.com” or “assets.babuun.com”.
Bucket Versioning
Versioning is a means of keeping multiple variants of an object in the same bucket. You can use versioning to preserve, retrieve, and restore every version of every object stored in your Amazon S3 bucket. With versioning, you can easily recover from both unintended user actions and application failures.
In S3, choose your bucket, then click the Properties tab, then enable bucket versioning.
UPDATE: A better alternative to Heroku is Render. Your code repo is in GitHub and you don’t need to download any CLI like you do with Heroku. Render also supports static site generators like Netlify. Render is like Netlify + Heroku.
I’ve decided to move my PHP-based websites from GoDaddy shared hosting to Heroku (PaaS / Platform as a Service). Here are the steps I followed so if I need a quick reminder of how I did it, I can just look here. I decided not to go with IaaS (Infrastructure as a Service) options like AWS, Azure, and GCP (Google Cloud Platform) because they are overkill for my needs, are more complicated, and, as a developer, I want to focus on development, not infrastructure.
1. Get PHP Locally
Download PHP. Since I’m on Windows, I downloaded the VS16 x64 Thread Safe (2022-Dec-06 16:15:24) Zip file. I then extracted it to C:\php-8.2.0-Win32-vs16-x64
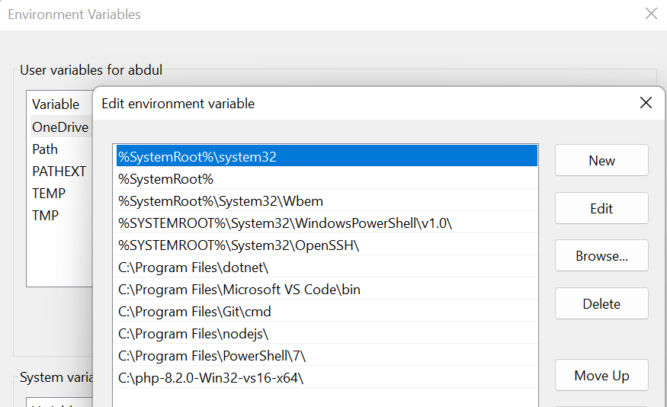
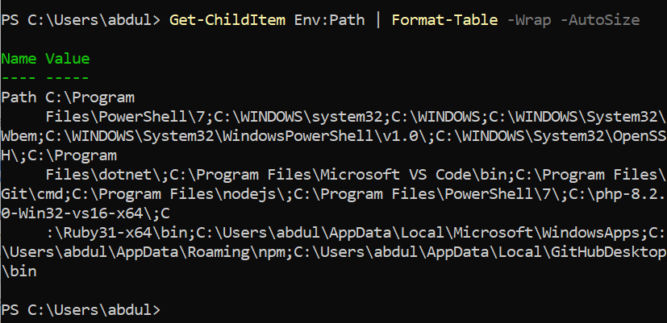
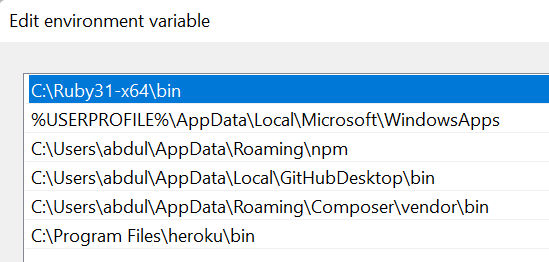
2. Update Path
Add the PHP path to your system PATH or user environment variable.
Verify the updated Path environment variable is loaded by running the following command on the command line.
If you see the PHP path in the output, then the updated Path environment variable has been loaded. If you don’t see it, then restart Explorer or your computer (there may be easier ways to load updated environment variables).
Test PHP by checking the version on the command line. Run the following command:
php -v
If you see the PHP version, then PHP is working.
3. Start a web server
PHP comes with a built-in web server. In your project folder, run the following command.
php -S localhost:8000
You can then open your PHP website in a browser at http://localhost:8000/.
4. Install PHP Composer
Composer is a dependency manager for PHP. Even if you don’t need it, it’s required by Heroku. Heroku will know that your website runs PHP by detecting the presence of the file composer.json.
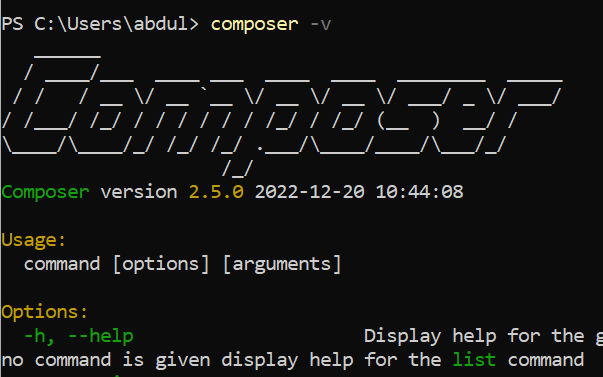
Since I’m on Windows, I’ll download and run Composer-Setup.exe. It will install the latest Composer version and set up your PATH so that you can call composer from any directory in your command line. Follow the instructions to install Composer. Then, verify it is loaded by running the following command to check its version.
composer -v
5. Add composer.json file
Create a file in the root of your project folder called composer.json. In my case, I don’t need any dependencies so I will just add {} to the file which is an empty JSON object. (In my case, I guess I didn’t really need to install composer since my composer.json file is empty).
6. Commit to git
This step assumes you have git installed. In my case, I will also commit my project to GitHub.
Create a new repository in GitHub To avoid errors, do not initialize the new repository with README, license, or gitignore files. You can add these files after your project has been pushed to GitHub.
Initialize the local directory as a git repo. Run git init -b main in our project folder. This will create a hidden .git folder.
Add the files in your new local repository. This stages them for the first commit.
git add .
Commit the files that you’ve staged in your local repository.
git commit -m "First commit"
At the top of your repository on GitHub.com’s Quick Setup page, click to copy the remote repository URL. In the Command prompt, add the URL for the remote repository where your local repository will be pushed.
$ git remote add origin  <REMOTE_URL>
# Sets the new remote
$ git remote -v
# Verifies the new remote URL
5. Set tracking information for the main branch
git branch --set-upstream-to=origin/main main
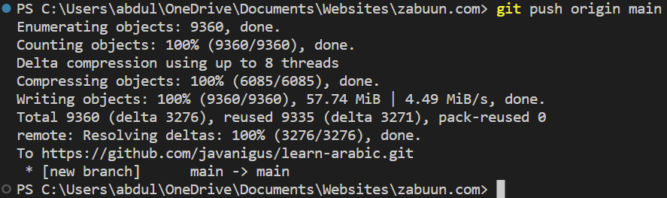
6. Push changes to GitHub
git push origin main
7. Add gitignore file
Create a .gitignore file in the root of your project folder and add the following lines.
vendor/
.env
That way, when you commit files, you will not commit the .env file, if any, and any files in the vendor folder, if any.
8. Create a procfile
Create a file in the root of your project folder called Procfile. It should not have an extension. Add the following line to it.
web: vendor/bin/heroku-php-apache2
This will tell Heroku to set up a web server using Apache and PHP. If you want nginx instead of Apache, add the following line instead.
web: vendor/bin/heroku-php-nginx
9. Install Heroku CLI
The Heroku CLI (Command Line Interface) is necessary to push (publish) changes to your website to Heroku. Since I’m on Windows, I’ll download the Windows installer. The installer will add Heroku to the Path environment variable.
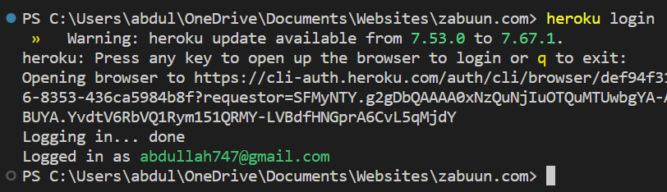
To load the updated environment variable, close all Explorer and command line / PowerShell windows. Reopen a command line / PowerShell and type enter the following
heroku login
A browser tab will open asking you to log in to Heroku CLI. Log in.
Once you’ve logged in you, you can close the browser tab and return to the command line.
The command line will get updated to show that you’ve logged in.
10. Deploy your website
Create an app on Heroku, which prepares Heroku to receive your source code. Run the following command.
heroku create
When you create an app, a git remote (called heroku) is also created and associated with your local git repository.
Heroku generates a random name (in this case sharp-rain-871) for your app, or you can pass a parameter to specify your own app name.
To deploy your website, run the following command.
git push heroku main
11. Run the app
Now that the website has been deployed, ensure that at least one instance of the app is running. Run the following command.
heroku ps:scale web=1
12. View the website
heroku open
The website will magically open in a browser.
13. Make changes
Whenever you make changes to the website, commit and push them to Heroku. To simplify deployments, you can tell Heroku to use GitHub instead of the Heroku CLI.
Having a website without a reporting tool like Google Analytics (GA) is like flying blind. The data available is very useful, if not critical, in making business decisions. Yet, it surprises me how many people continue to make website changes based on pure assumption and without considering user behavior and traffic data at all.
Before looking at various reports, it’s important to understand some background information.
Terminology
Pageviews: # of times a page was viewed, including by the same visitor.
Unique Pageviews: # of times a page was viewed by unique visitor sessions
Avg Time on Page: The higher the avg time on page, the more the user is engaged with the content. If pageviews is high but avg time on page is low, then people probably aren’t finding what they are looking for.
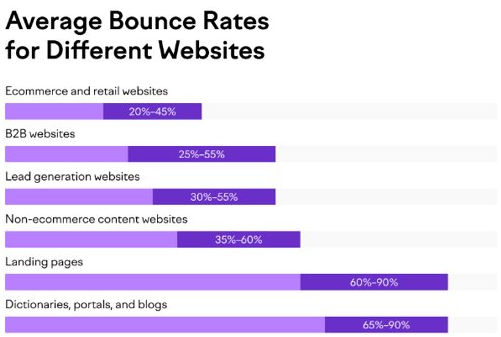
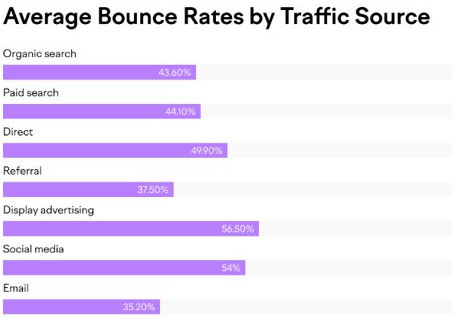
Bounce Rate: A “bounce” is when someone lands on qualys.com from an external source and leaves without clicking on any internal links. They see only one page. Lower bounce rates are better, but a high bounce rate may be reasonable, depending on intent and context. For example, blogs tend to have higher bounce rates (70-90%)[1] than e-commerce/retail websites (20-45%)[2] because people read an article and leave whereas on retail sites, they tend to browse multiple product pages while shopping.
When interpreting data, it’s important to understand visitor intent.
Informational: people intend to find an answer to a specific question or general information. If a blog post has a high bounce rate but high avg time on page, that is to be expected because people come for information and nothing more.
Commercial: people intend to investigate brands or services. If people visit Qualys product pages, spend time reading the page, but bounce instead of sign up for a trial, that is reasonable if they are still investigating/comparing brands/products.
Transactional: people intend complete an action or purchase.
Navigational: people intend to find a specific site or page. If people come to the Qualys home page and the avg time on page is < 10 secs, that is to be expected if they know they are looking for a specific product page.
Channels (Traffic Source)
When interpreting data, it’s important to know where traffic came from.
Direct: Source is unknown or visitor typed the URL directly in a browser
Organic Search: Source is from non-paid search engine results, e.g. Google
Paid Search: Source is from paid search engine ads, e.g. Google CPC
Social: Source is a social network, e.g. LinkedIn, Facebook, etc
Paid Social: Source is from paid ads on a social network, e.g. LinkedIn, Facebook, etc
Email: Source is an email
Affiliates: Source is an affiliate/partner
Referral: The visitor came from some other website
Display: Source came from ad distribution network, e.g. banner ads on some websites
Q: How do I know if people are finding a particular page?
A: If the page has many unique pageviews, then many people are finding it.
Q: How do I know if people are engaged in consuming the content of a particular page?
A: If the avg time on page is high, then we can assume people are engaged in it (reading, watching videos, etc).
Q: How do I know where people are finding a particular page?
A: Look at the page’s source / medium, e.g. Google / organic, Email, Social, etc
Q: How do I know what people are clicking on on a particular page?
A: Look at the page’s next page path (page flow).
Q: One of my pages is long. The avg time on page is high but how do I know people are scrolling down to see the whole page?
A: Look at the page’s scroll depth. It will tell how what percentage of visitors see 25%, 50%, 75% and 100% of the page.
Now, let’s look at some reports in Google Analytics that are interesting and useful and that can be used to make data-driven decisions about website changes.
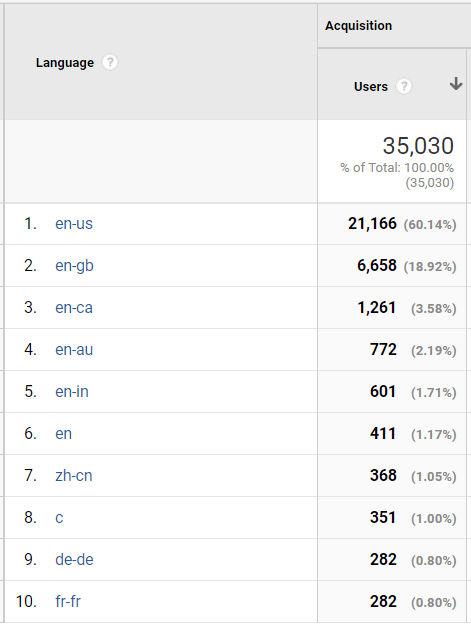
Audience > Geo > Language
Knowing what language your users speak can help you make a decision on which languages you should have your website in. GA gets language data from a user’s browser which are in specific language-country codes. en-US is English-US, en-gb is English-Great Britain, en-ca is English-Canada, and so on. In the screenshot below, we see that most users have their browser language set to some variant of English, but some (1.05%) have it set to zh-cn (Chinese-People’s Republic of China), de-de (German-Germany), and fr-fr (French-France).
Audience > Geo > Country
Google Analytics tracks user location based on their IP address. It’s always interesting to see where your website visitors are viewing your site from. In the screenshot below, almost 8% of website visitors are in India yet, compared to the language report above, hi-IN (Hindi-India) wasn’t in the list. I guess people in India set their browser language to English (en).
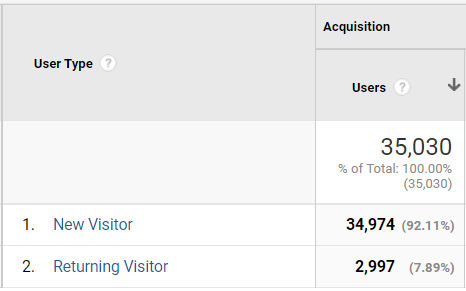
Audience > Behavior > New vs Returning
This report compares how many visitors are new versus returning. If many people are returning visitors to your website, then the website must have a lot of interesting content that makes them want to keep returning.
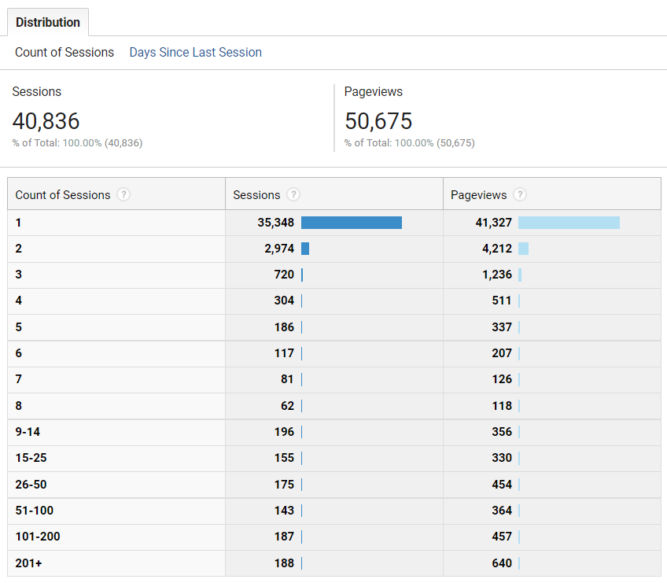
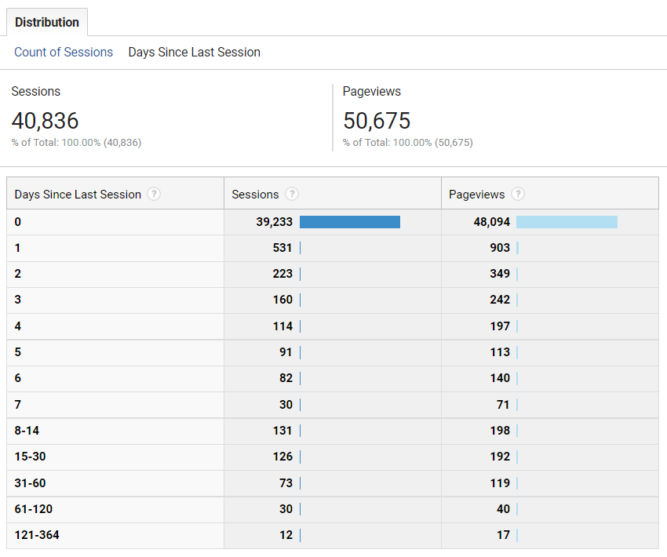
Audience > Behavior > Frequency & Recency
Frequency
If you click the “Count of Sessions” distribution, you will see how frequent the same individual visits your site in a given time period. For example, in the report below, 720 people visited the website 3 times (e.g. once a week over 3 weeks).
If you click the “Days Since Last Session” distribution, you will see how long it’s been since your visitors last came to your site in a given time period. For example, in the report below, it has been 2 days since 223 people last visited the website.
Recency
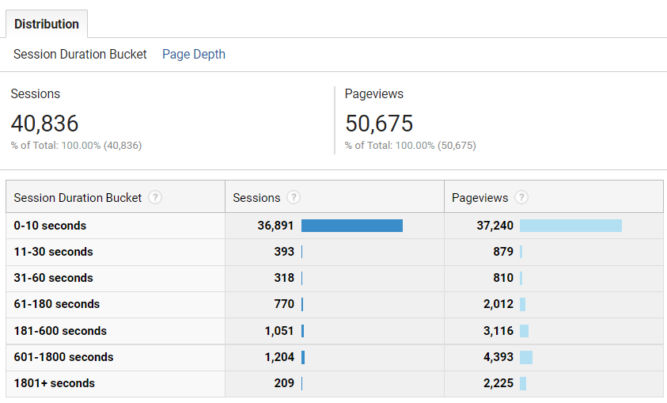
Audience > Behavior > Engagement
Session Duration Bucket
This report tells you how many visitor sessions are within a particular duration. For example, in the report below, there were 1204 visitor sessions that lasted between 601 and 800 seconds.
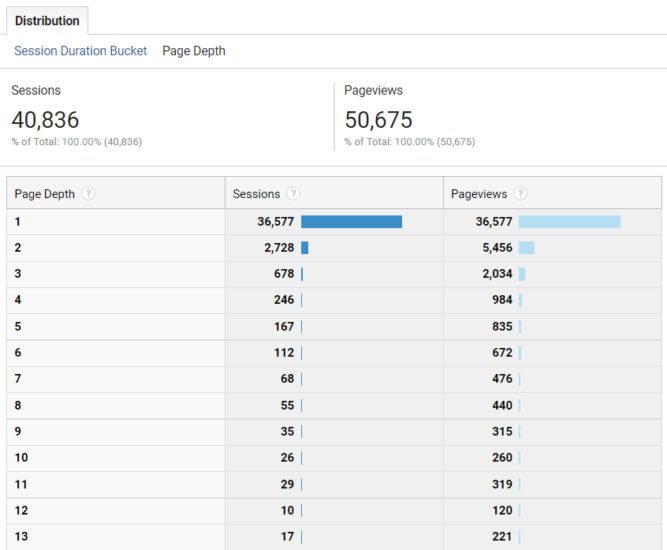
Page Depth
This report tells you the number of sessions where the page depth (number of pages visited) was 1, 2, etc. In the report below, there were 678 sessions where the visitors visited 3 pages during their session.
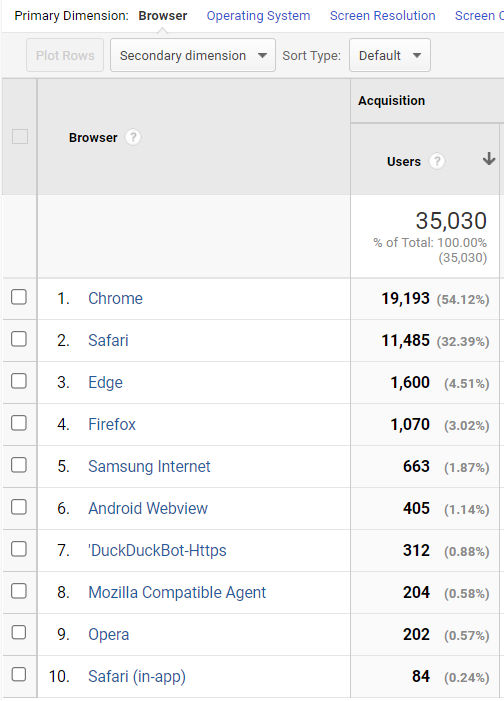
Audience > Technology > Browser & OS
Browser
In this report, you can see what percentage of users use a particular browser. In the report below, more than 50% of users use Chrome. So, if your website has a feature that is broken in Chrome, you should fix it. We also see that 0.58% of visitors use the Opera browser. So, if your website doesn’t work in Opera, who cares. Well, 0.58% of your visitors might care but so what.
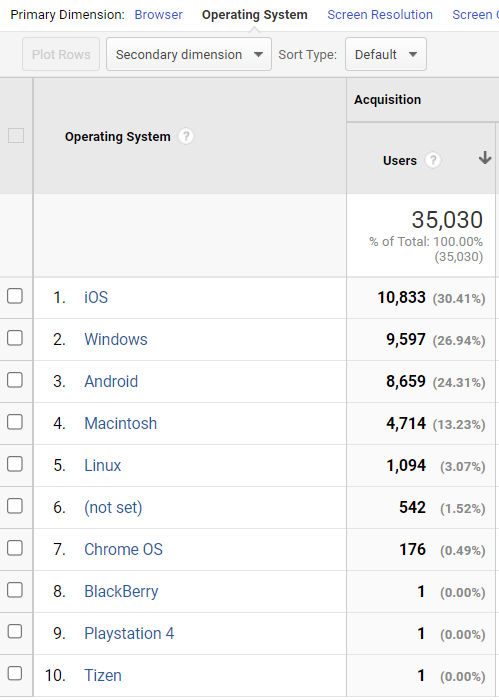
Operating System
In this report, you can see what percentage of your visitors use a particular operating system. In the report below, the majority of visitors (30.41%) visit the website on iOS.
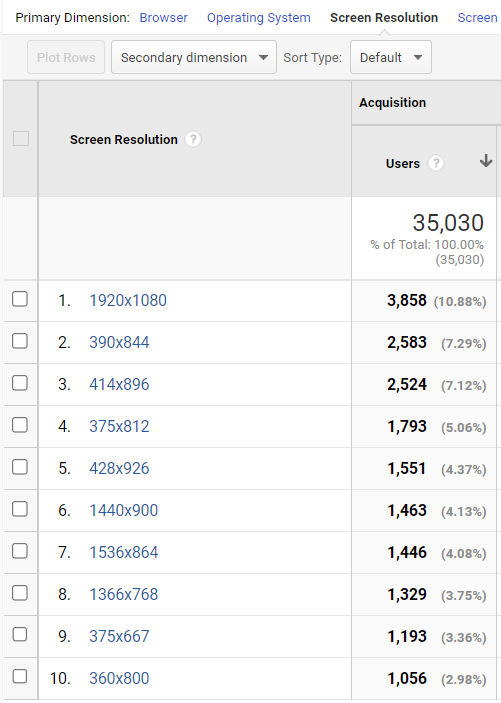
Screen Resolution
In this report, you can see what percentage of your visitors view your website at a particular screen resolution. In the report below, we see that 10.88% of people view the website on desktop at a resolution of 1920×1080. Many others view the site at screen widths below 500px. This means they are probably viewing the site on their phones. Notice how the smallest screen resolution is 360×800. In this case, you would want to ensure the mobile version of your site looks good at a width of 360 px.
Audience > Mobile > Overview
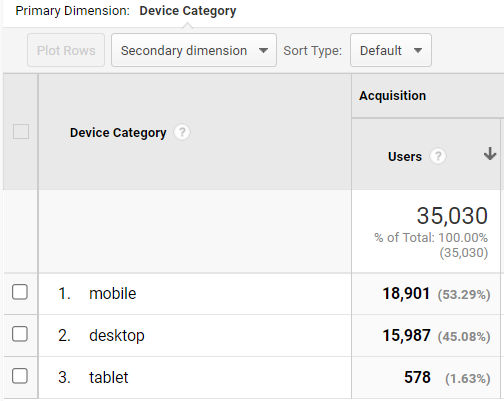
Device Category
In this report, we can see what percentage of people are visiting your site on mobile, desktop and tablet. In the report below, very few people (1.63%) view the site on tablet so ensuring the site looks good on tablet isn’t particularly important. However, the majority of visitors visit the site on mobile so it’s important to ensure the site looks good on mobile.
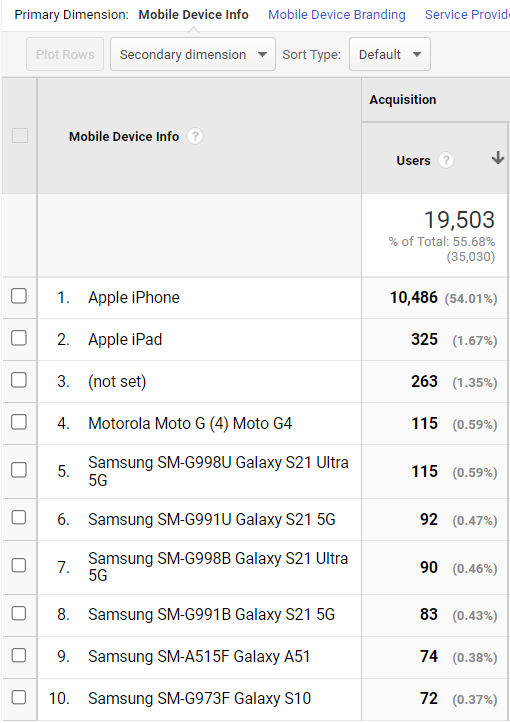
Audience > Mobile > Devices
In this report, we can see what percentage of people visit your site on a particular device (iPhone, iPad, etc). In the report below, more than 50% of the website visitors visit the site on mobile using an Apple iPhone.
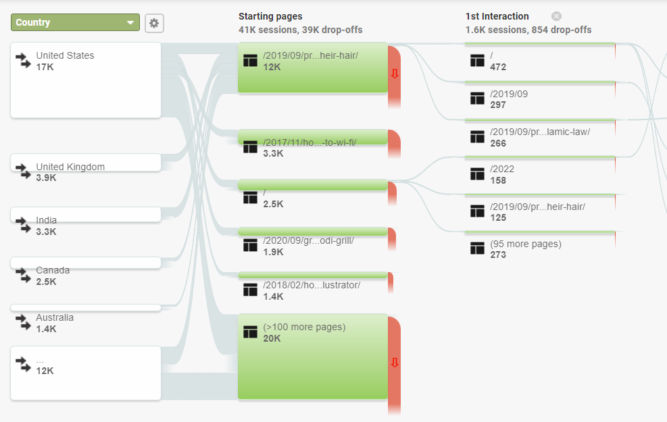
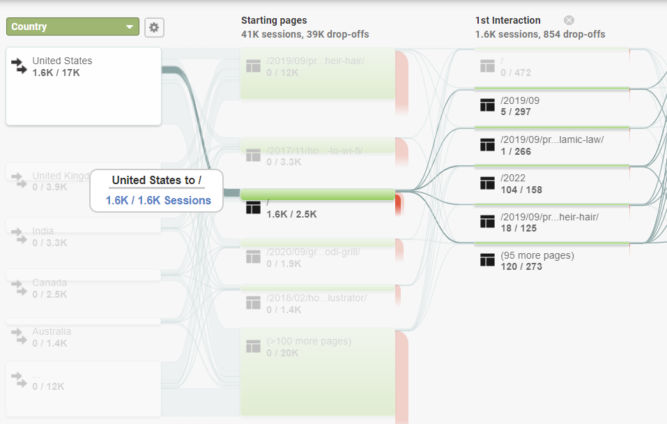
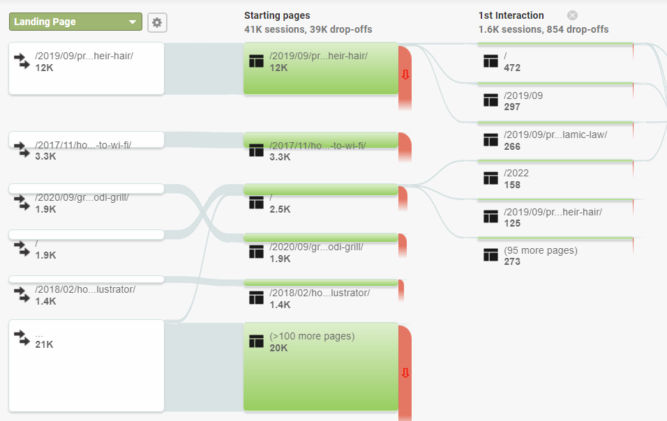
Audience > Users Flow
In this report, you can see how people flow through your site. The first column is the primary dimension. In the report below, the primary dimension is “Country”.
Of the 17K sessions from the US, 1.6K land (start) on the home page, and from there, they go to some other pages shown in the 1st Interaction column.
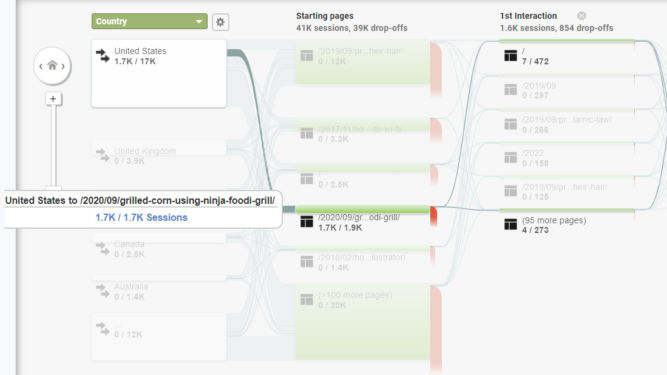
If we click another band, we can see that of the 17K visitors from the US, 1.7K land (start) on the blog post about grilling corn using a Ninja Foodi grill.
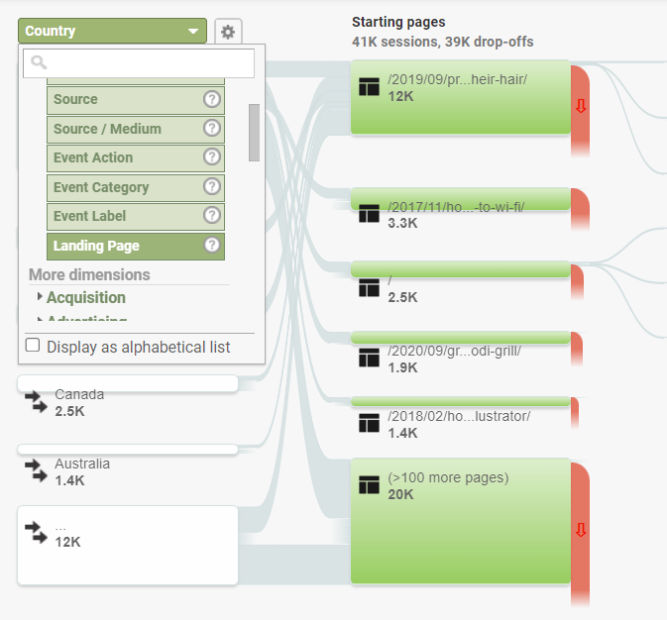
You can also change the primary dimension to something else like “Landing Page”.
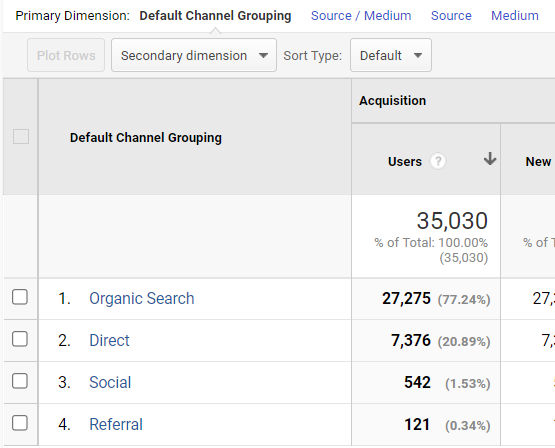
Acquisition > All Traffic > Channels
In this report, we can see what percentage of users visit the site from different channels (organic search, direct, social, etc). In the report below, 77.24% of visitors find the site from organic search, e.g. searching from Google.
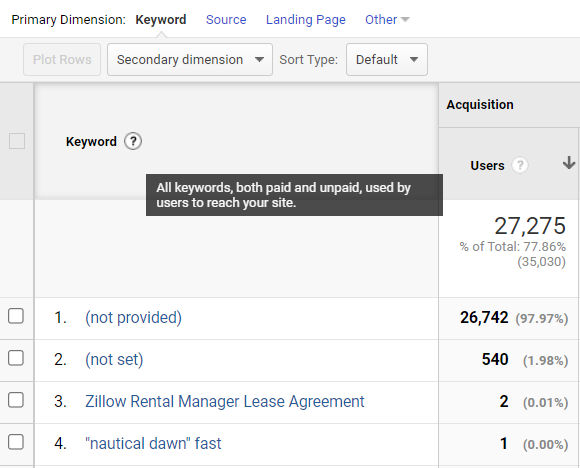
If you click “Organic Search”, you’ll see another report like the one below. The default primary dimension is keyword. Almost all of the keywords used to find the site in a search engine have value of “(not provided)” or “(not set)”. Obviously, this is incorrect because people must have searched for something to find the site in Google. The reason why it says “not provided” or “not set” is because Google decided to hide this keyword data to protect users’ privacy.
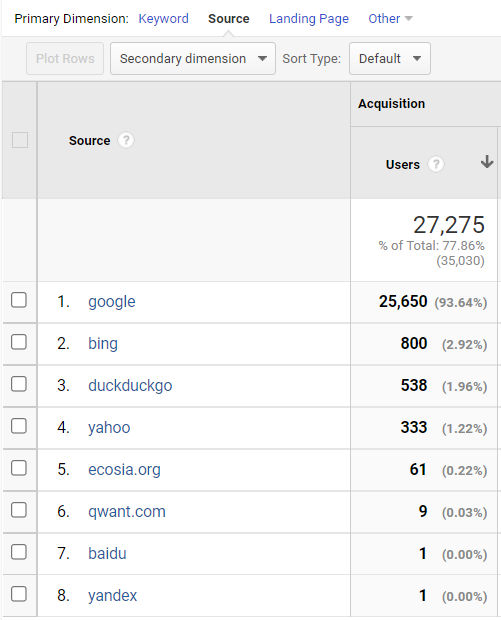
If you click on the “Source” primary dimension, you can compare visits by search engine. In the report below, clearly, the majority of visitors found the site from Google.
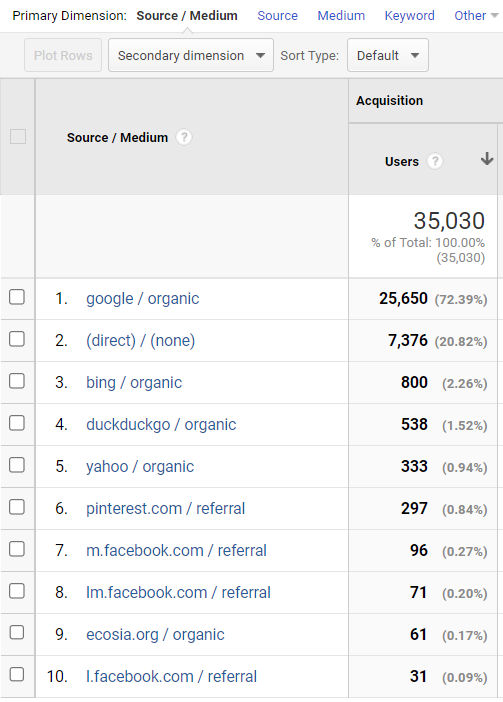
Acquisition > All Traffic > Source/Medium
Sometimes, it’s more helpful to see how people are finding your website by a combination of source and medium as shown in the screenshot below.
Behavior > Behavior Flow
This report is similar to the Users Flow report mentioned above. You can see how people flow / traverse through your website as they click from one page to another.
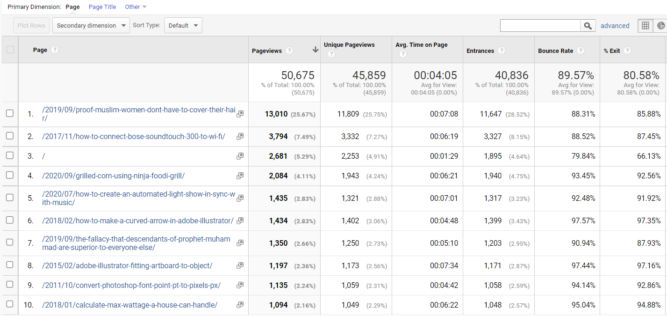
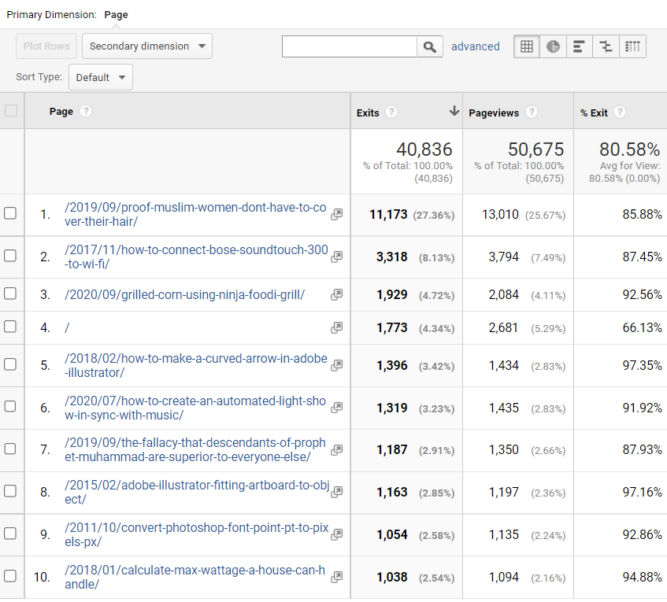
Behavior > Site Content >All Pages
When the primary dimension is set to “Page” (default), in this report you can see traffic and behavior by page, e.g. how many pageviews, unique pageviews, average time on page, entrances, bounce rate, and % exit a particular page got. This report clearly tells you your most visited pages.
Secondary Dimension
The secondary dimension option allows you to see reports in other ways. This is extremely useful. For example, let’s say you have a registration page and you want to promote it by linking to it from many places, both internally on the same website, e.g. on your home page or a product page, and externally on other websites.
Internal referrals
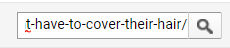
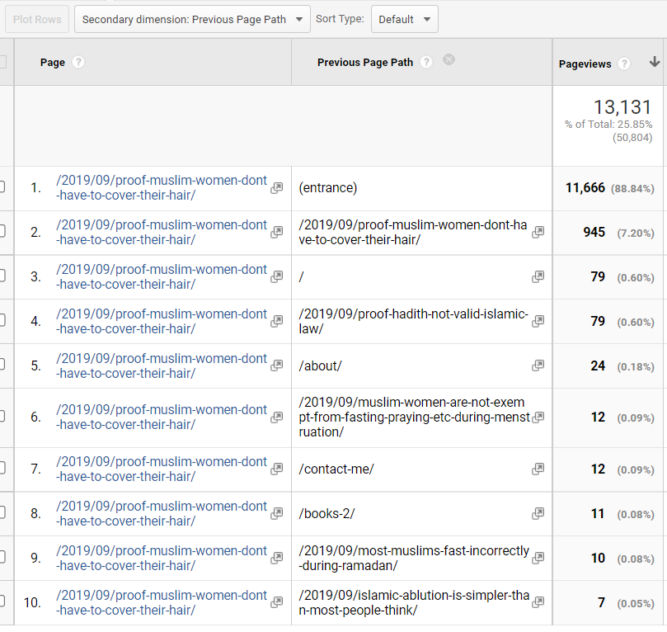
To find which pages on your website are generating traffic directly to a particular page on your website, first, type part of the page URL in the filter field and click the search button. This will filter out all other pages and only show the specific page you are interested in
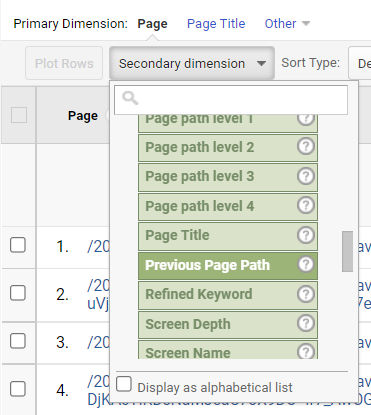
Then, in the secondary dimension dropdown, choose Behavior > Previous Page Path.
Now, in the resulting report (below), we can see that for the specific page we’re interested in, we find that 88% of people landing on that page (entered it from some other website like from Google search results). 0.6% got to that page from the home page and another 0.18% got to it from the About page.
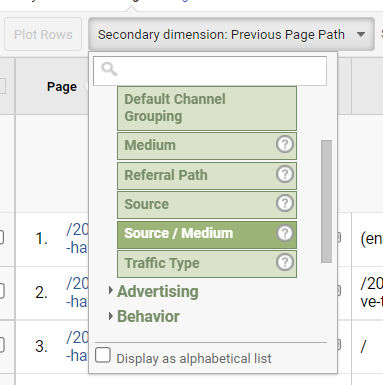
External referrals
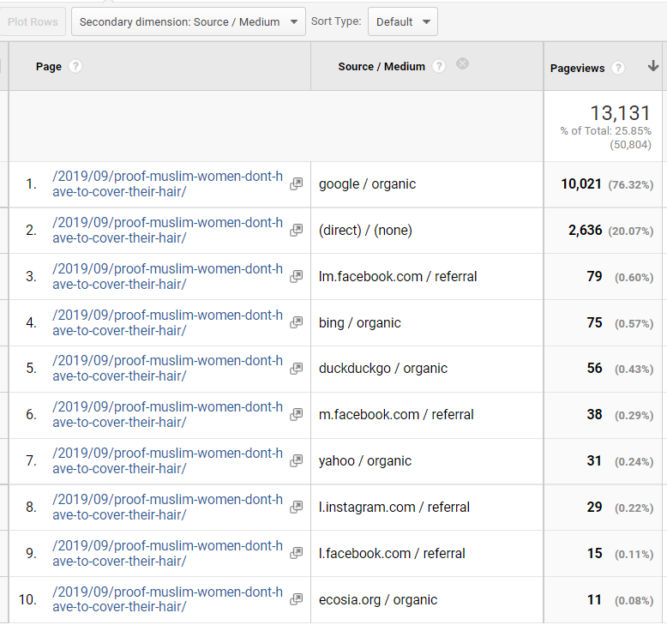
To find how people got to that page from an external source, change the secondary dimension to Acquisition > Source / Medium.
Now we see that 76% came from Google organic search results and 20% directly, e.g. they typed the URL in from somewhere or clicked a link in an email.
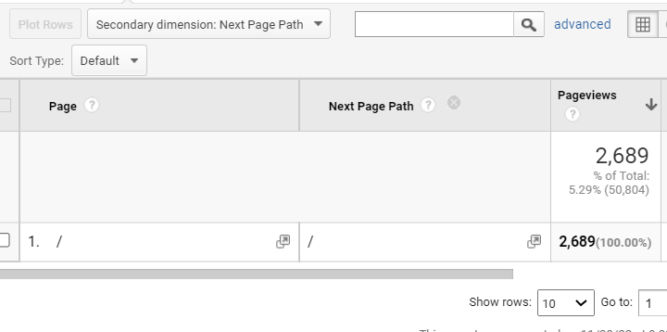
Next Page Path
What if we want to know what pages people are getting to from, say, the home page? If we change the filter to just “/” (the home page) and set the secondary dimension to “Next page path”, we see the following report.
The report above looks wrong because it says that 100% of visitors went from the home page to the home page (next page). To find out the correct next pages, click the Navigation Summary tab.
Now we can see what pages people came from before hitting the home page and what pages people went to after hitting the home page.
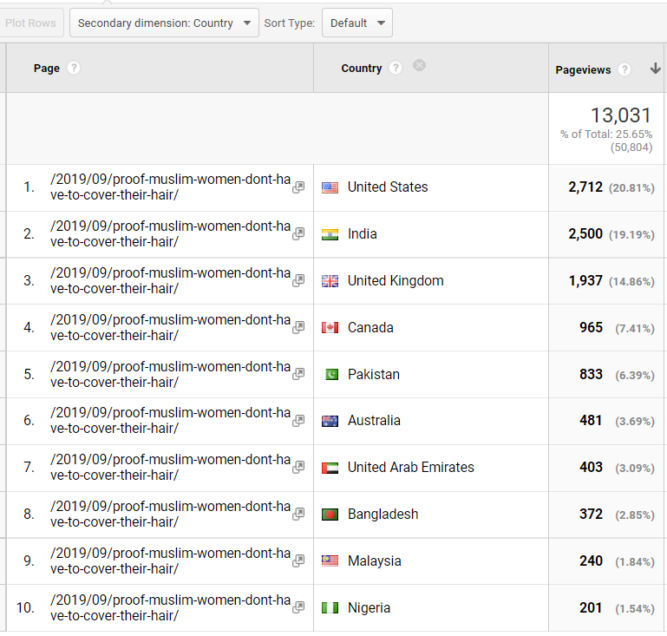
There are many other secondary dimensions so it’s worth spending time browsing the different types of reports you can get from other dimensions. For example, you can see how many people visited a specific page by country.
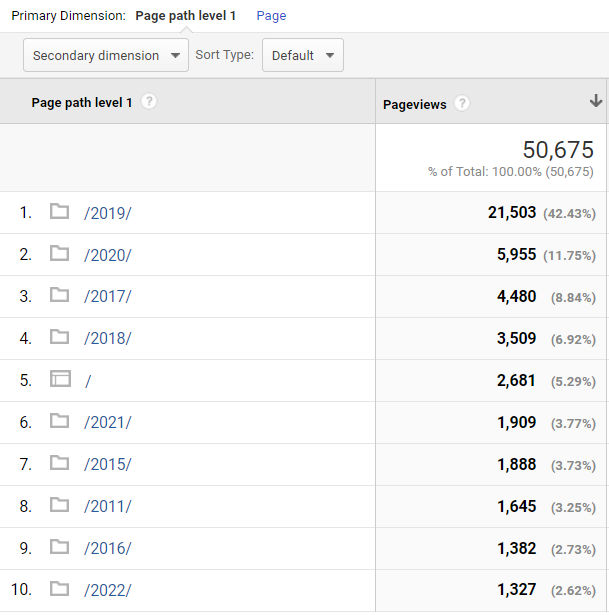
Behavior > Site Content >Content Drilldown
In this report, you can see pageviews (and other data) by folder structure (URL structure). For example, in the report below, there were 21,503 pageviews of pages in the 2019 folder (blog posts published in 2019).
If you click a folder like /2019/, you can drill down to subfolders. In the report below, the subfolders are numbers indicating months. For example, in the report below, there were 18,267 pageviews to pages in /2019/09/.
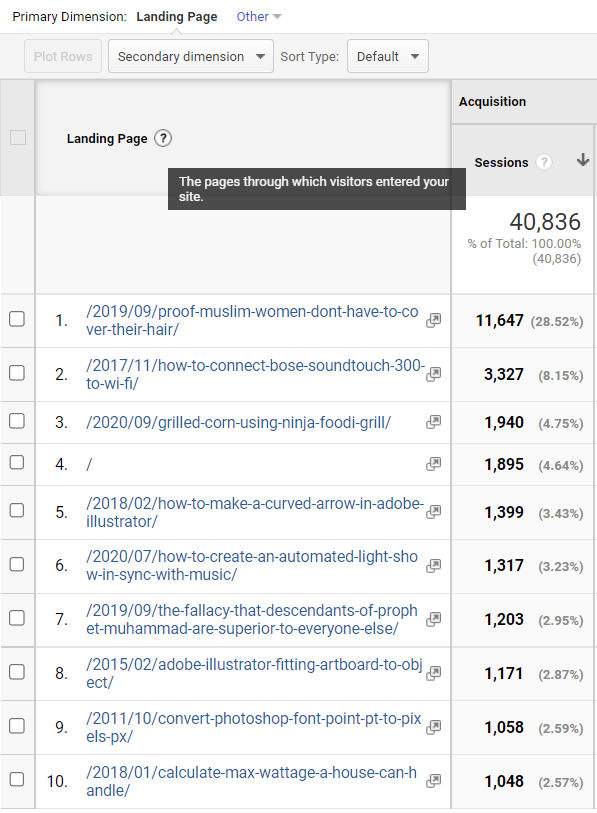
Behavior > Site Content >Landing Pages
This report is similar to the one under Behavior > Site Content > All Pages, but this one is specifically for landing pages, i.e., the pages through which visitors entered your site. You can think of “landing pages” as “entrance pages”.
Behavior > Site Content >Exit Pages
Opposite of landing pages is exit pages, i.e. pages from which people exited your site.
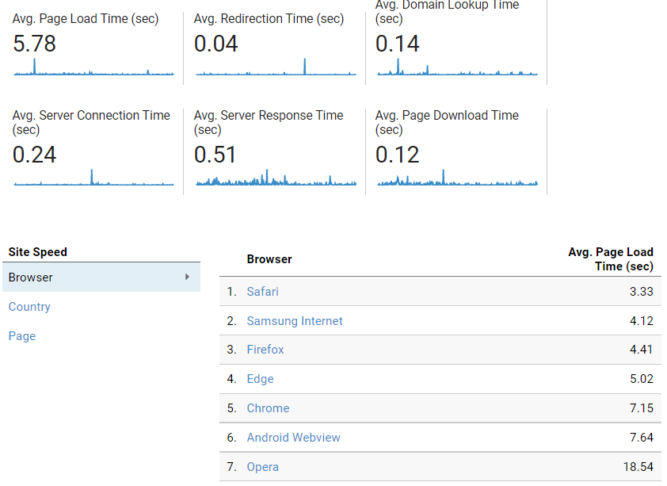
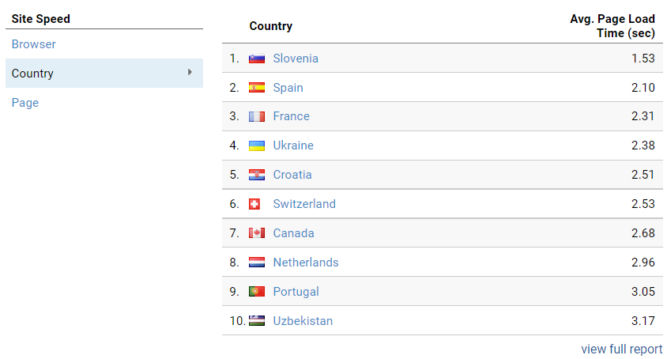
Behavior > Site Speed > Overview
In this report, you can see how fast your website loads on average by browser, country, and page. Of course, you want your website to load as fast as possible. In the report below, we see that the average page load time is 5.78 seconds. Interestingly, the average page load time in Chrome is much higher (7.15 sec) compared to Safari (3.33 sec).
If we look at the average page load time by country, we see that the website loads the fastest (1.53 sec) from Slovenia for some reason.
Behavior > Site Speed > Page Timings
In this report, we can compare the average page load time of individual pages against the site average page load speed. This is helpful to find specific pages that aren’t performing well, e.g. the one with the red bar in the screenshot below.
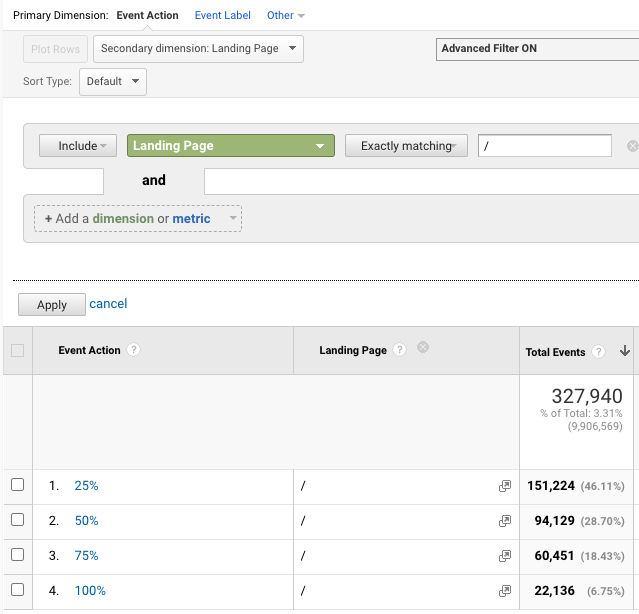
Behavior > Events > Top Events > Scroll
If you’ve added an event category of “Scroll”, you can see what percentage of people scrolled 25%, 50%, 75% and 100% down a page. In the example below, 46% of people only saw the top 25% of the home page and only 7% of people scrolled all the way to the bottom.
If you’re getting on the Jamstack bandwagon, you’ll probably get to a point where you need to figure out a way to handle web forms. That’s what happened to me when I migrated from WordPress (PHP) to static HTML. I needed a way to handle my contact form. Fortunately, there are many form backend services like
After reviewing each one, I find KwesForms to be the best, but to have one of the worst costs because it’s one of the most expensive.
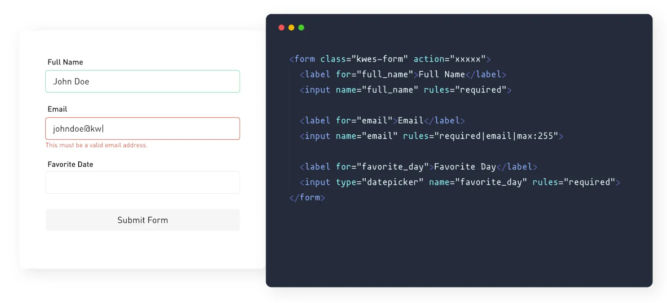
At $29 / month, that’s cheap for a company but more than I would want to pay for a personal blog. There is a free version but it has some limitations and has the KwesForms logo on confirmation emails. Anyway, KwesForms has the best features, what super easy to integrate, includes form validation, custom redirects, clear documentation, and more. You can view and edit form data and export it all as a CSV file.
Since I don’t want to pay $29 / month for a contact form, and since I’ll be hosting my new blog on Netlify, I’m just going to use Netlify Forms. It’s not as user-friendly and feature-packed as KwesForms, which is to be expected since Netlify specializes in static site hosting, not form handling, but it’s free (up to 100 submissions per month). However, unlike KwesFroms, which comes with form validation, I’ll have to add my write my own form validation code. Instead of reinvent the wheel, I’ll use .validate, a jQuery validation plugin.
As you can see from their website and the video below, it’s dead simple to use.
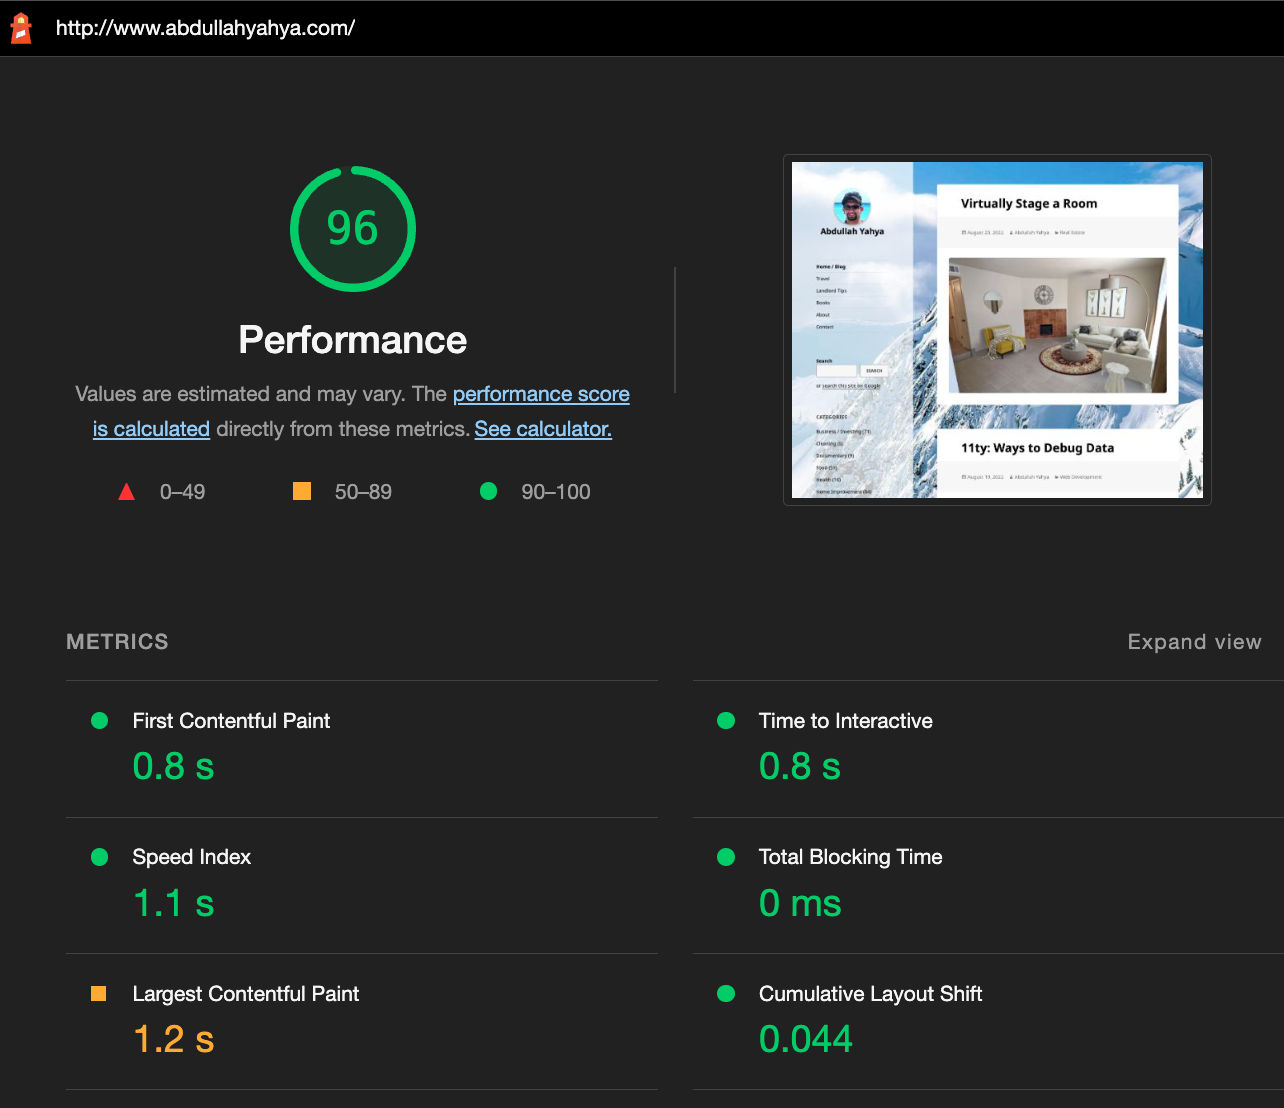
I’m in the process of migrating this blog from a managed WordPress instance on GoDaddy to a static HTML site on Netlify. Before I switch over the domain, I wanted to compare the Google Lighthouse performance scores for each site. In Google Chrome Developer Tools, I clicked the Lighthouse tab and ran a test for each site. Here are the results.
Performance score for WordPress (PHP) version of site on GoDaddy
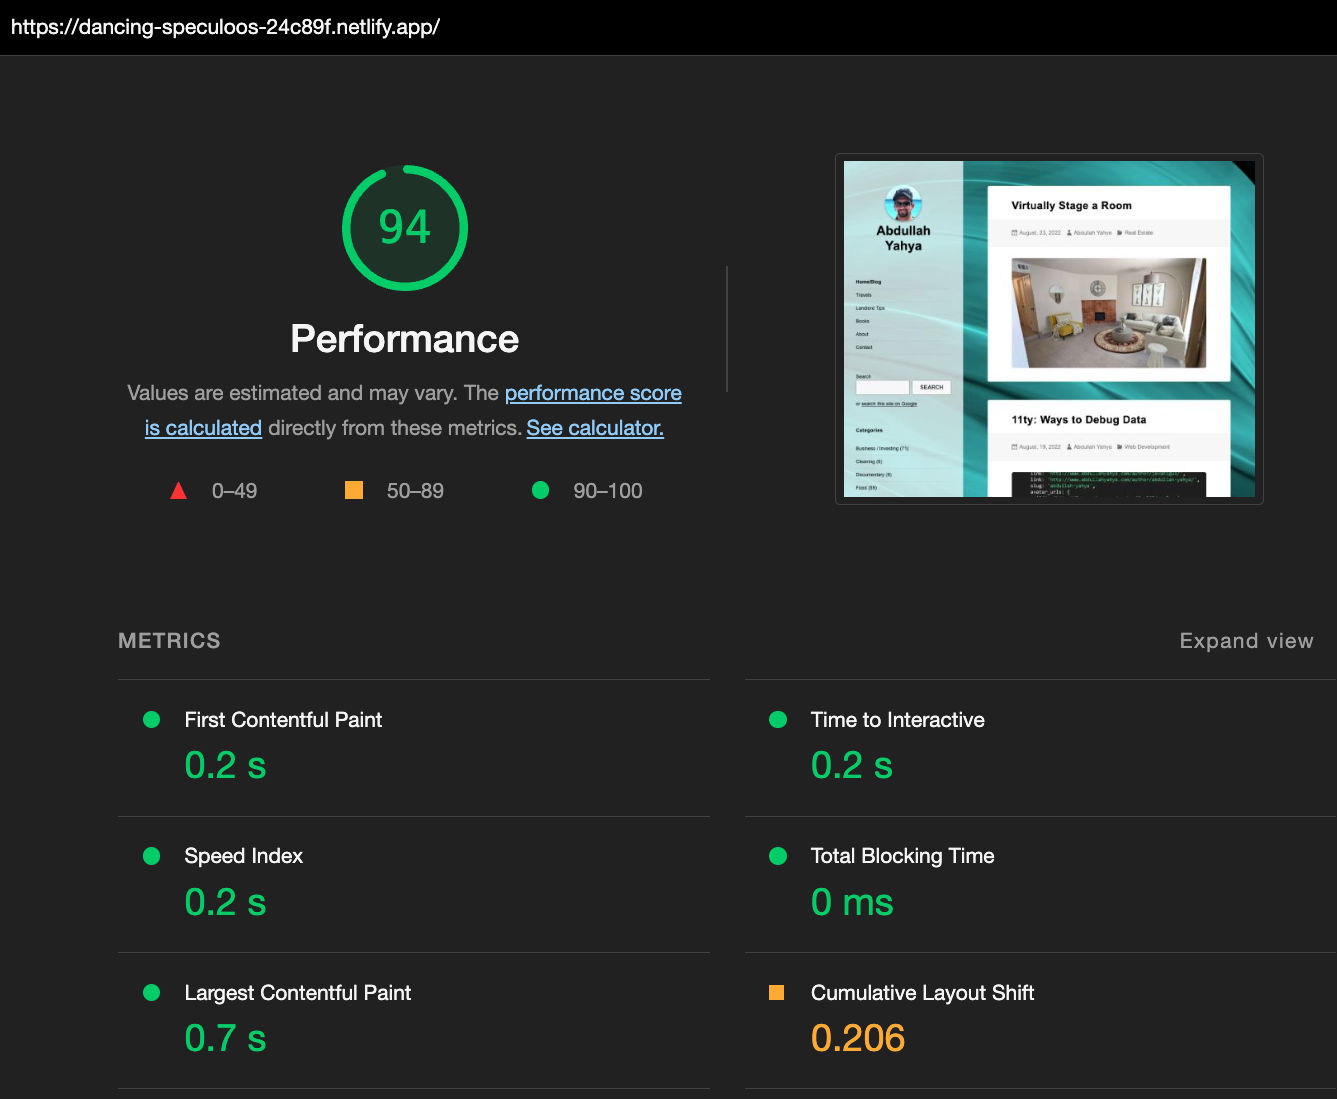
Performance score for static HTML version of site on Netlify
Now, you might be thinking, why would the PHP site get a slightly higher score than the static HTML site? The static site has a lower cumulative layout shift score (see definition below). This factor has nothing to do with PHP vs HTML or GoDaddy vs Netlify. This factor has to do with how elements on the page shift their position. The original theme in the WordPress site came from one developer and the theme in the static HTML site came from another developer who recreated the original theme. This tells me that the original theme was coded better than the recreated theme. Since I’m more concerned with speed rather than layout shift, we can see that the static HTML site on Netlify is much faster than the PHP site on GoDaddy. This is to be expected. If we add up all scores except for the Cumulative Layout Shift score, we get
PHP on GoDaddy Performance Score: 3.9 s
HTML on Netlify Performance Score: 1.3 s
The new site performs 3x faster than the old one! That’s a speed gain of 300%!
First Contentful Paint
First Contentful Paint marks the time at which the first text or image is painted. Learn more.
Time to Interactive
Time to interactive is the amount of time it takes for the page to become fully interactive. Learn more.
Speed Index
Speed Index shows how quickly the contents of a page are visibly populated. Learn more.
Total Blocking Time
Sum of all time periods between FCP and Time to Interactive, when task length exceeded 50ms, expressed in milliseconds. Learn more.
Largest Contentful Paint
Largest Contentful Paint marks the time at which the largest text or image is painted. Learn more
Cumulative Layout Shift
Cumulative Layout Shift measures the movement of visible elements within the viewport. Learn more.
I’m in the process of migrating this blog from Managed WordPress on GoDaddy to Eleventy, GitHub and Netlify. Since I like the convenience of writing content in WordPress, I decided to continue to use it, but just as a headless CMS. When 11ty builds the site, it would fetch WordPress post, page, category, tag, and author data and, using the eleventy-fetch plugin, cache the data locally for a customizable period (I chose 1 day). Since Netlify automatically triggers a build when it detects a commit or push to GitHub, an automated build only happens when I make changes that are tracked by git and not changes in WordPress. For WordPress changes that I want published, I would manually trigger a build in the Netlify admin panel.
During this migration project, there were coding bugs that needed to be fixed. Following are some of the ways I discovered helped me to debug in Eleventy.
Debugging data in JavaScript files in the _data folder
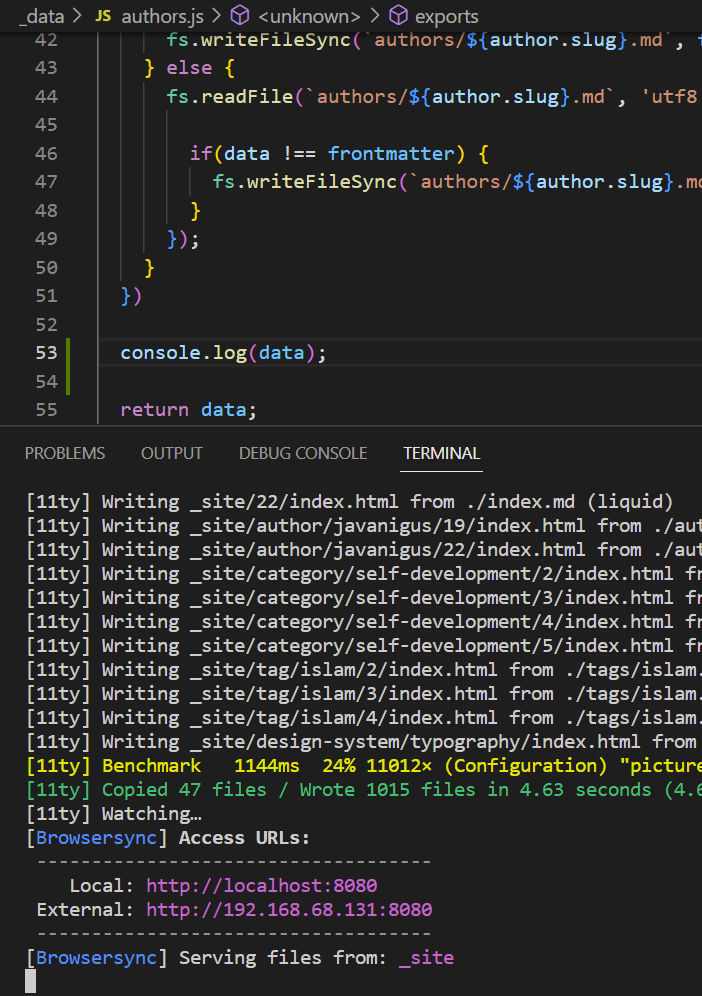
As mentioned above, my project fetches data from WordPress to dynamically build pages. For example, I have a file at _data/authors.js that fetches data from the WordPress remote API endpoint, does some custom processing, and returns the data. It is often necessary to see if the data at different points of the code is as expected. To see this data, you can simply console out the data variable (see line 53 in the screenshot below).
When 11ty builds the site, the console.log statement will output the data in the console / terminal. However, f you are running the default 11ty build command, depending on how many files are being built (in my case, 11ty wrote 1015 files), the data dump may get truncated or lost in the console output. To remove the noise and status messages in the 11ty output, enable quiet mode. Since I’m on Windows, I use the following command.
npx @11ty/eleventy --serve --incremental --quiet
Now, the output is much simpler, and I can see the data dump immediately.
Debugging data in template files
If you’d like to view the value of data variables in template files, you can do that by outputting the value and passing it to the log function (see example on line 9 below). This will tell 11ty to output the data to the console / terminal.
Dumping all data to a built page
Viewing data in the console terminal is handy for some situations. But, sometimes you can have a lot of JSON data that you’d like to see. In this case, it can be easier to dump the data to a page that you can view the entirety of in a file or at a URL To do this, first add a filter with the following code to .eleventy.js.
eleventyConfig.addFilter('dump', obj => {
    const getCircularReplacer = () => {
      const seen = new WeakSet();
      return (key, value) => {
        if (typeof value === "object" && value !== null) {
          if (seen.has(value)) {
            return;
          }
          seen.add(value);
        }
        return value;
      };
    };

    return JSON.stringify(obj, getCircularReplacer(), 4);
  });
Then, create a file to dump the data. In the example below, I have 2 files.
I wanted to find a glue that was simple to use, not too expensive, was very strong, and would maintain its strength in wet conditions. There are many glue options to choose from. I ended up choosing two popular brands: Liquid Nails and Loctite. For each brand, I chose either the strongest option or the option that was designed for wet environments. I didn’t include epoxy in my test because I didn’t want to mix two parts together and apply the mixture using a stick. Below are the two options I chose.
I first glued a piece of 2×4 to a concrete landscape block.
After waiting 1.5 to 2 days to fully cure, I attached each piece of wood to a chain to suspend the wood / concrete block combo in the air.
After 2 days, both adhesives kept the wood attached to the concrete block. I then wanted to see if water would affect the bond. I submerged each test in water without having it touch the bottom of the bucket of water.
LeftL Fuze-it | Right: PL Marine
After 12 hours, the wood pieces were still connected to the concrete blocks. But, after 23 hours, the Liquid Nails Fuze-It MAX lost its strength and the wood piece became disconnected from the concrete block.
Left: Fuze-It MAX, Right: PL Marine
So, the winner is Loctite PL Marine, although if you are gluing something in a dry environment, Liquid Nails Fuze-It MAX is probably sufficient. Unsurprisingly, the Marine adhesive is stronger both in dry and wet environments, including while being completely submerged in water.