


The countdown timer will disappear after it reaches zero.
See the Pen KrMRvd by Abdullah Yahya (@javanigus) on CodePen.
The countdown timer will disappear after it reaches zero.
See the Pen KrMRvd by Abdullah Yahya (@javanigus) on CodePen.
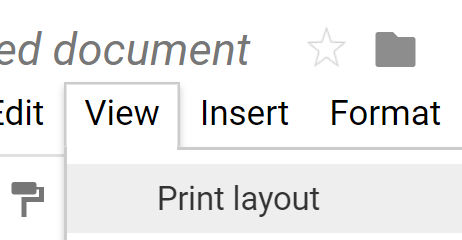
In this day in age, we don’t need to print as much as we used to. While Google Docs will allow you to print pages of content, sometimes you just want to use it as a digital document to keep notes and pictures that you’ll never print. When you insert pictures into a Google Doc, due to their size, you’ll often find that they move onto the next sheet leaving a large white space before. This is annoying but easily solved by making it appear as if you were working with one page / sheet of unlimited length. In Google Docs, just uncheck the Print Layout under the View menu.
Searching for new eyeglass frames isn’t easy. There are so many brands and shapes and sizes. And even if you find one that fits your face, you may just find it uncomfortable to wear. Here are some tips to help minimize disappointment.

On one side of eyeglass frames are some numbers.
These numbers are the
There is one more important dimension which unfortunately isn’t listed. It’s the height of the lens opening, which is prefixed with the left B.
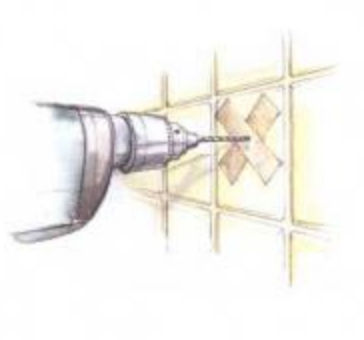
Continue reading Tips on Finding Eyeglass Frames You’ll LikeCutting curves in ceramic tile, plywood, and plexiglass / acrylic
Cutting straight lines in ceramic tile is easy with a tile saw. But cutting curves, e.g. for toilet drains, can be tricky. Diamond hole saws are expensive. Instead, use a rotary tool (e.g. Dremel) with either a tile cutting bit or a tile cutting wheel. Or, use a jig saw with a carbide grit blade. You can also cut wood and plexiglass using the appropriate bits as well.


Drilling a hole in ceramic tile
Drilling a hole in ceramic or porcelain tile can’t be done with a regular twist drill bit. Use a diamond or carbide-tipped masonry bit. To keep the bit from slipping off the glossy surface, put masking tape on the surface.
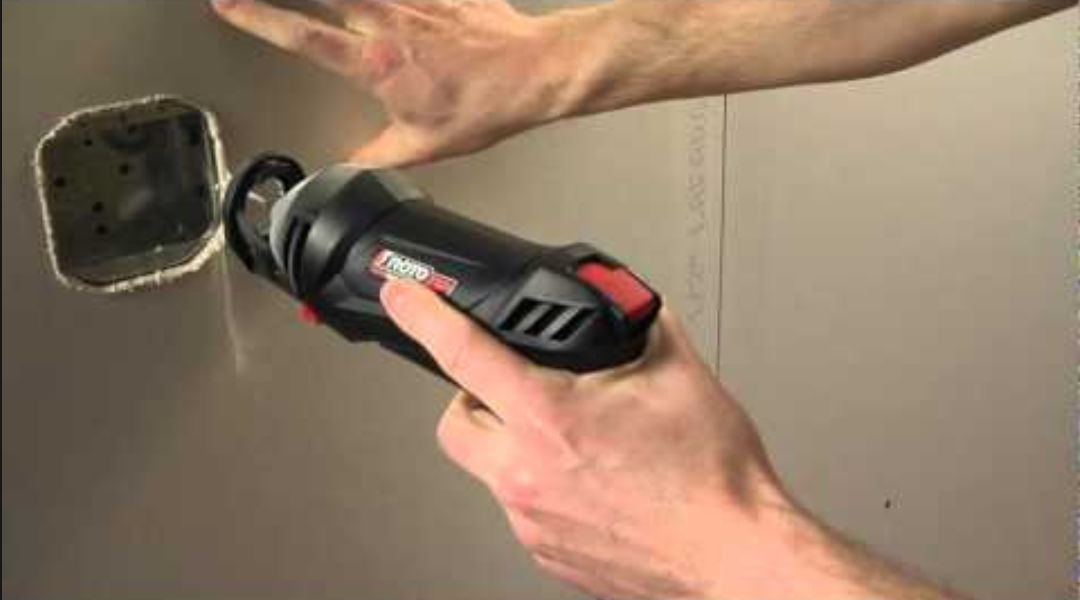
Cutting drywall
Cutting drywall can be done manually with a drywall saw but you can also use a power tool. Though oscillating tools and reciprocating saws can do the job, they won’t give a fine cut. Instead, use a rotary tool with a drywall bit.
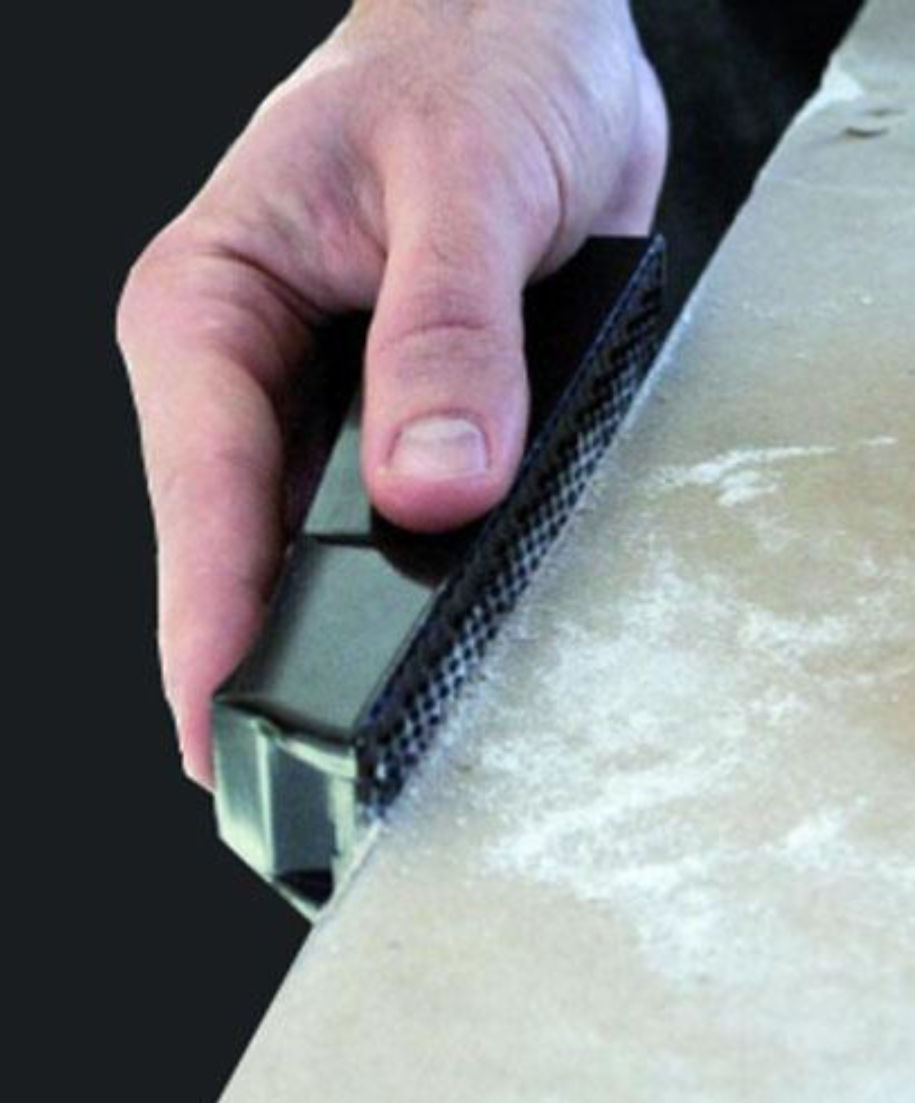
Trimming drywall
If you cut drywall that is slightly too large to fit an opening, instead of trying to trim it with a utility knife or saw, use a rasp plane.
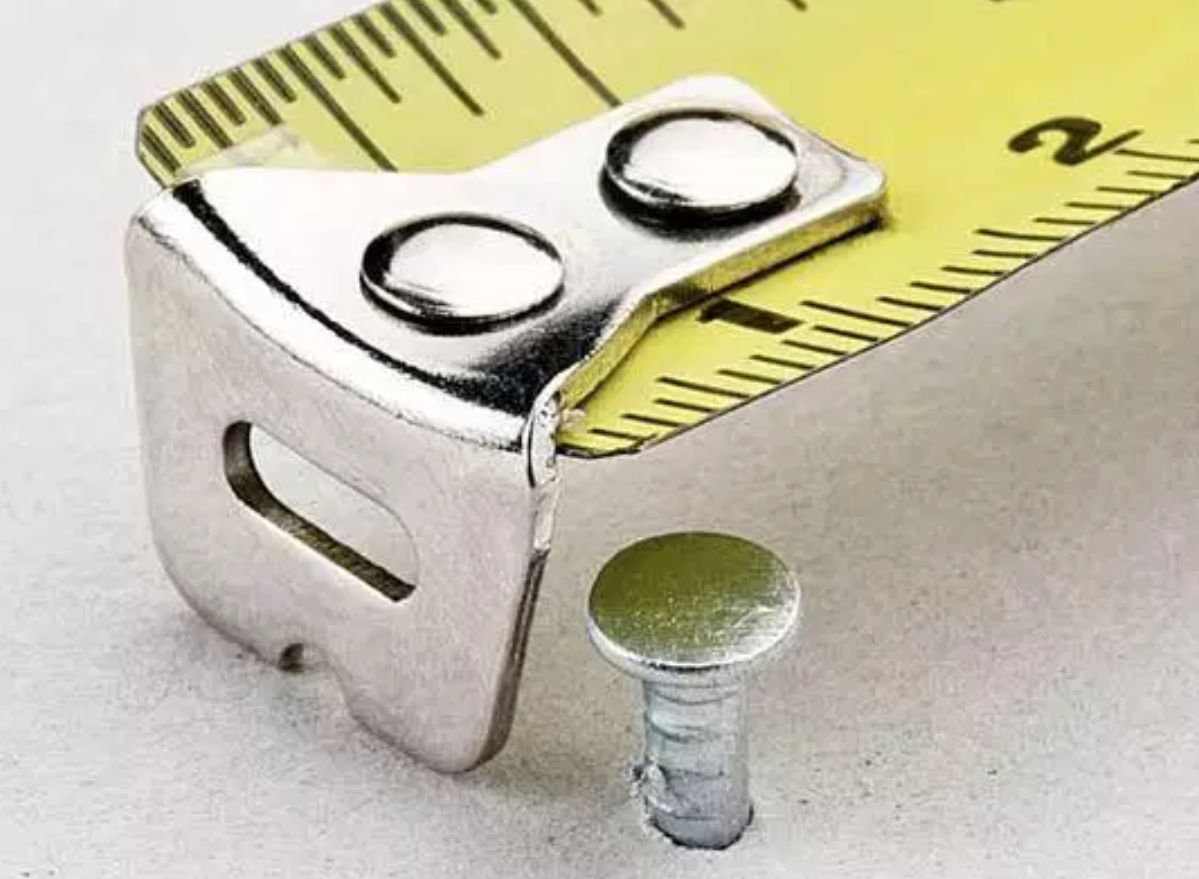
Measuring long distances by yourself
Put a nail into one end of the distance you want to measure. Put the end of the measuring tape into that nail to keep the measuring tape end in place. Pull the measuring tape end into the nail and pull.
Drawing circles
Put a nail into the material at the center of your desired circle. Hook the end of a tape measure into the nail. Hold a pencil against the tape measure at a distance equal to the radius of your desired circle. Rotate the measuring tape to draw a circle.
When you test interactivity of a web page by clicking a link or submitting a form, you sometimes don’t want to be redirected to a new page. Using JavaScript in your browser’s console, you can easily make this happen.
$0.addEventListener("click", function(e) {
     e.preventDefault();
});
Here’s how you f*$%-ing do it! Just wrap the content you want to f*$%-ing hide in this client-specific conditional.
<!--[if !mso 9]><!-->
This will not appear in Outlook on Windows.
<!--<![endif]-->
Since you’re probably using HTML tables to structure your emails, and you’re probably using CSS classes to hide and show different duplicate content for desktop and mobile, your code will probably look something like this:
<style>
.showOnMobile {
    display: none;
    overflow:hidden;
}
@media screen and (max-width:684px) {
    .showOnMobile {
        display: block !important;
    }
}
</style>
<!--[if !mso 9]><!-->
<td class="showOnMobile">
This will not appear in Outlook on Windows.
</td>
<!--<![endif]-->
There you have it. Now go and do something useful with your time instead of f*$%-ing around with HTML emails all f*$%-ing day long!
I recently need to build a simple PHP script but I didn’t feel like spending a lot of time configuring a web server, e.g. Apache. and having it support PHP. It turns out that PHP has its own built-in server and it’s super easy to use. Here are the steps:
If you want to start the server in a particular document root directory, e.g. c:/Downloads/foo, you can do
php -S localhost:8000 -t c:/Downloads/foo
View the PHP built-in server documentation
cd C:\Users\abdul\Documents\Projects\zabuun.com
C:\Users\abdul\Documents\Projects\zabuun.com>”C:/Program Files/PHP/php” -S localhost:8001
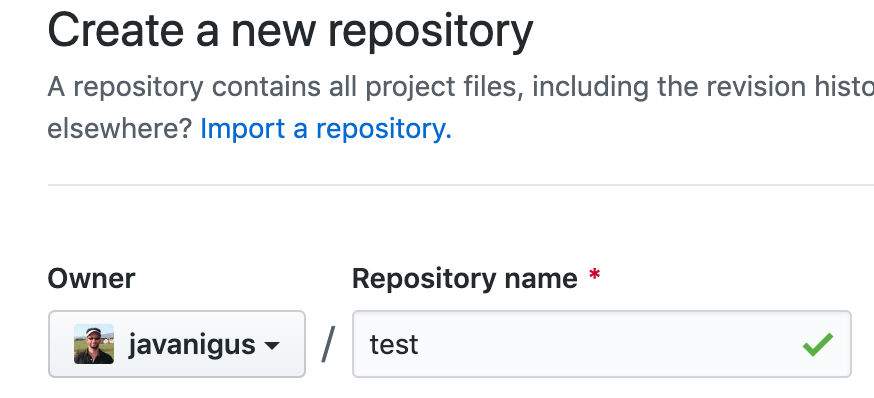
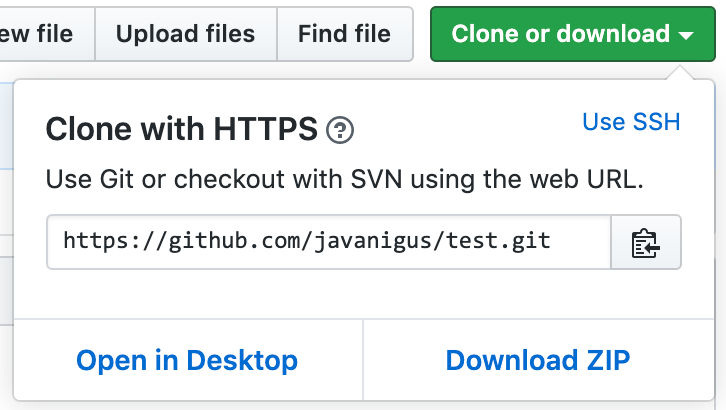
Create a new repo in GitHub called “test” and check the checkbox to initialize it with a README.md file.
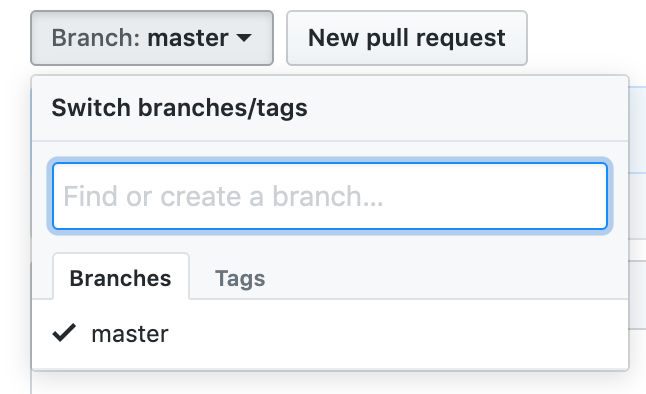
This repo called “test” will contain a default branch called “master”. On your local machine, this GitHub repo is called “origin” by default because it is the repo you “originally” cloned from. The “master” branch is usually used for production. Together, this repo and branch are referred to as “origin/master” (remote name / branch name).
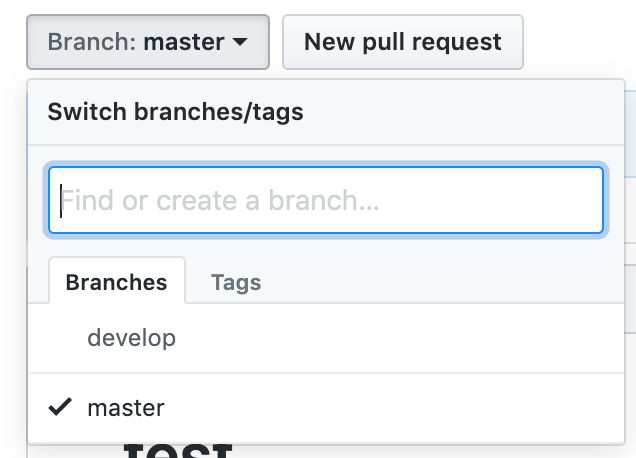
If you need a separate branch for development, you can create it and call it “develop”. If you create this branch in the “test” repo on GitHub, it will be called “origin/develop”.
In GitHub, get the URL to clone the repo, e.g. https://github.com/javanigus/test.git
On your locale machine, go to a folder where you want this project to exist, e.g. /Users/ayahya/Projects/
cd /Users/ayahya/Projects/
git clone https://github.com/javanigus/test.git
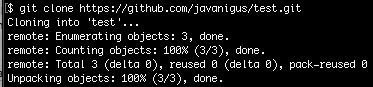
This will create a folder that is the name of the repo, e.g. “test”
cd test

Since it says “master*”, then the files within it are set up to track remote branch “master” from origin.
Using the “ls” command, we see the same, one file (README.md) that is in GitHub.

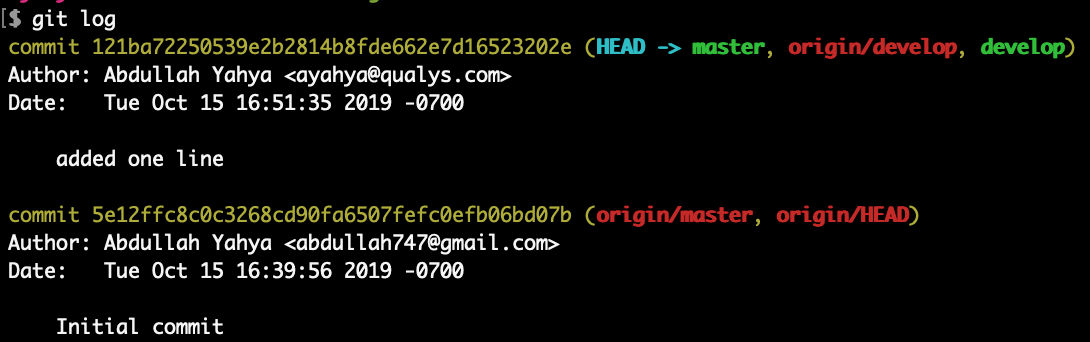
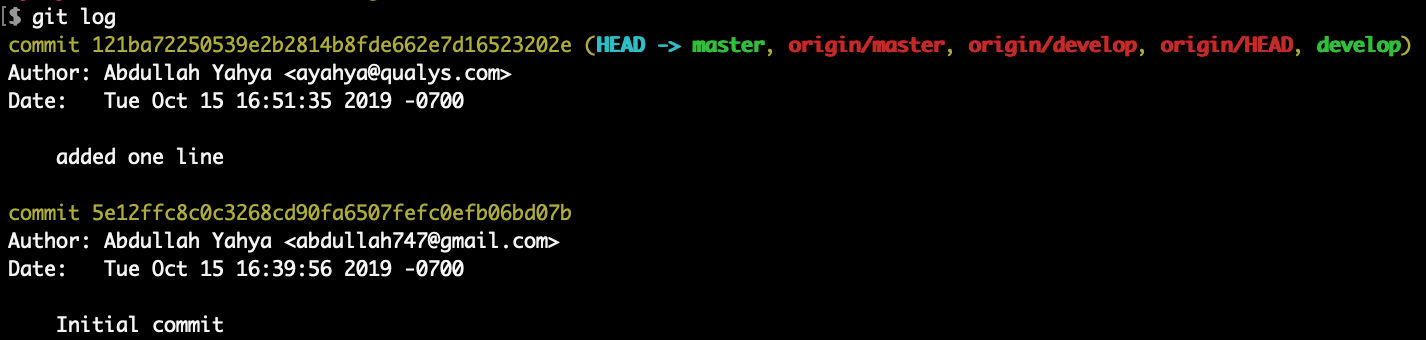
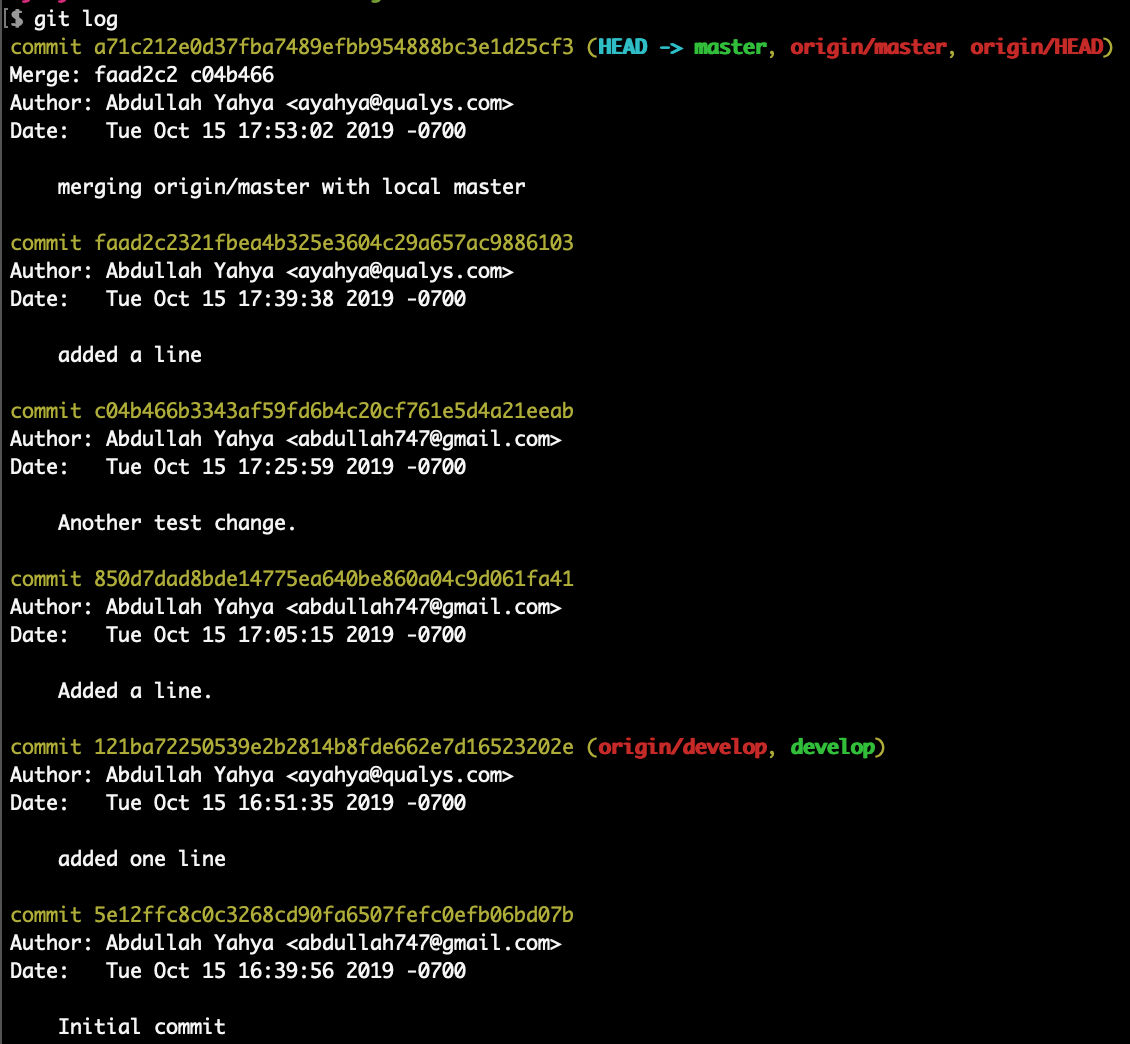
git log

HEAD is a reference or pointer to the last commit in the currently checked-out branch (master). Notice that origin/master (remote) and origin/develop (remote) and local master and local develop are in sync because they are listed on the same line.
git remote
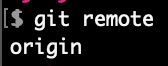
We see that we only have one remote repo called “origin”.
git checkout develop

Since it says “develop*”, then the files within it are set up to track remote branch “develop” from origin.
git branch
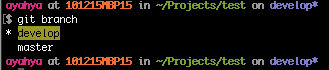
Since there is a * beside “develop” and it is highlighted, the local files are set to track remote branch “develop” from origin.
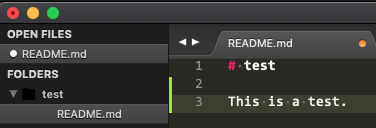
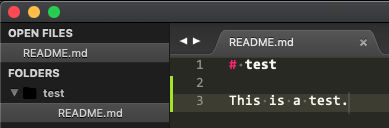
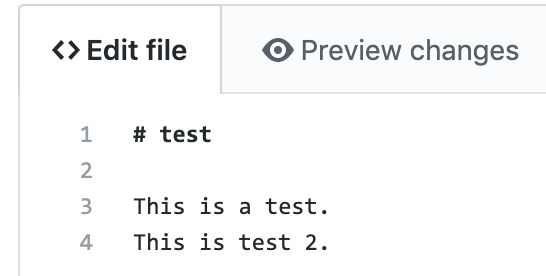
In this case, I added the text on line 3.
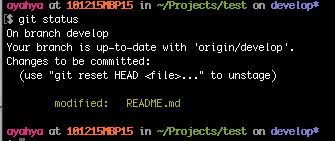
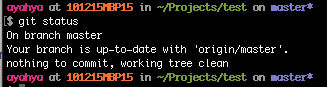
git status
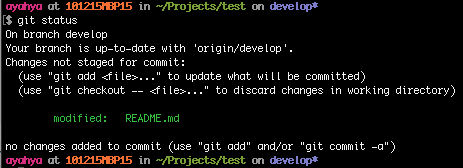
The README.md file has been modified.
git checkout - README.md

git status
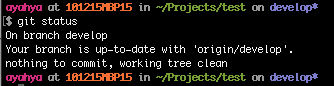
The local branch is up to date with origin/develop on GitHub.
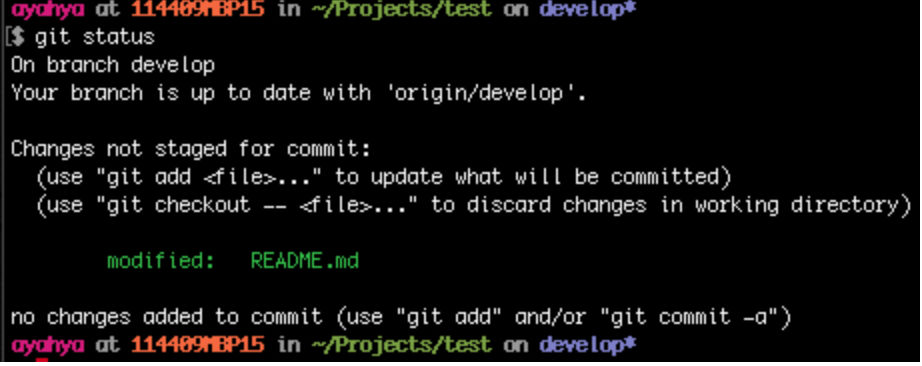
git status
git add README.md
or
git add .

git status
git reset HEAD README.md
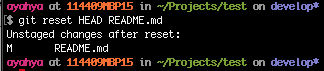
git status
git add README.md

git commit -m "added one line"

git status
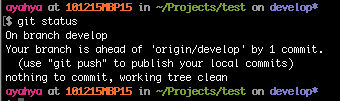
Now, the local “develop” branch is ahead of the remote “develop” branch (origin/develop) by 1 commit. Also, there is nothing else to commit and the working tree is clean.
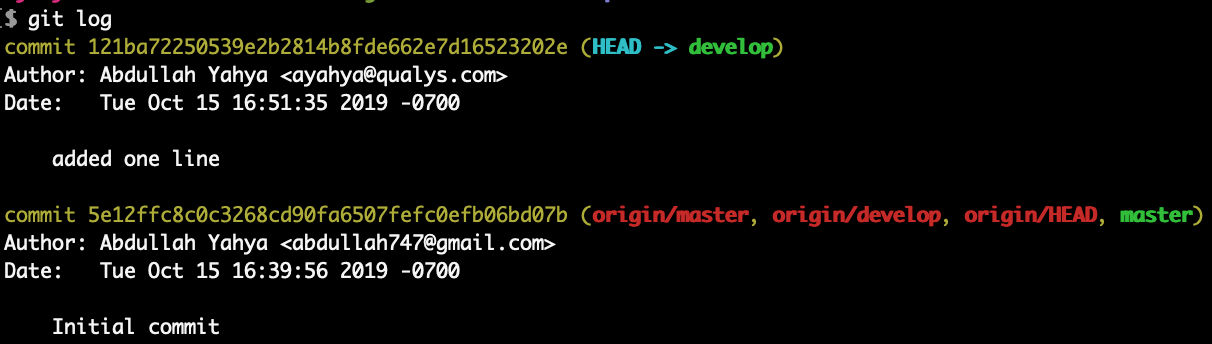
This shows that local “develop” branch is ahead of local “master” branch, remote “master” and remote “develop” by 1 commit.
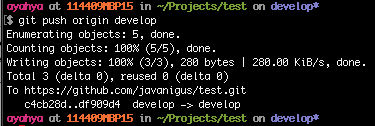
We’ll push local branch “develop” to origin/develop on GitHub.
git push origin develop
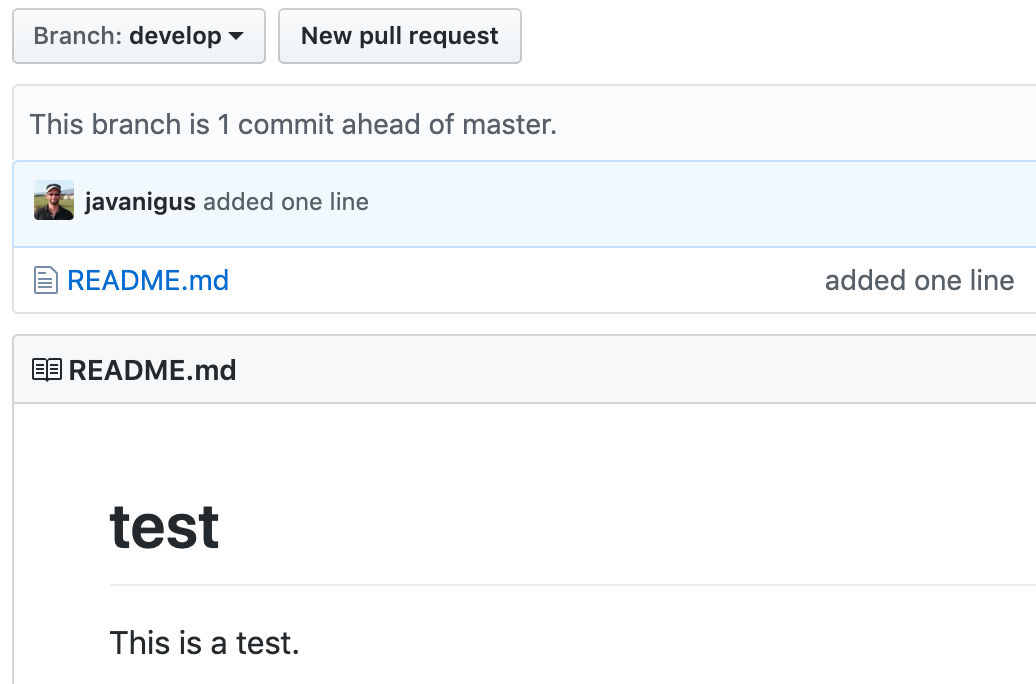
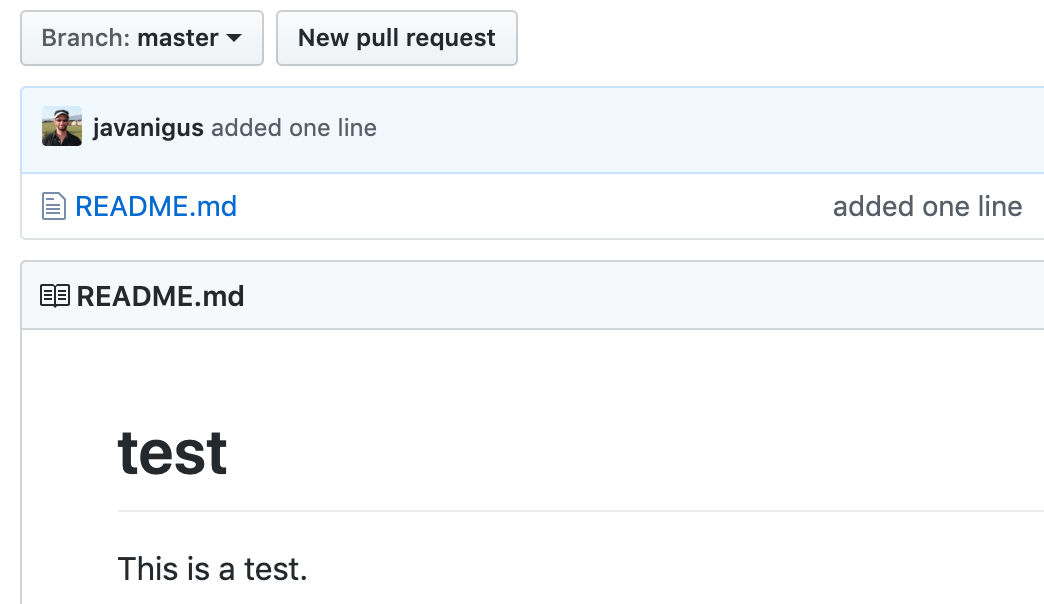
On GitHub, in the “develop” branch, you’ll see the added line.
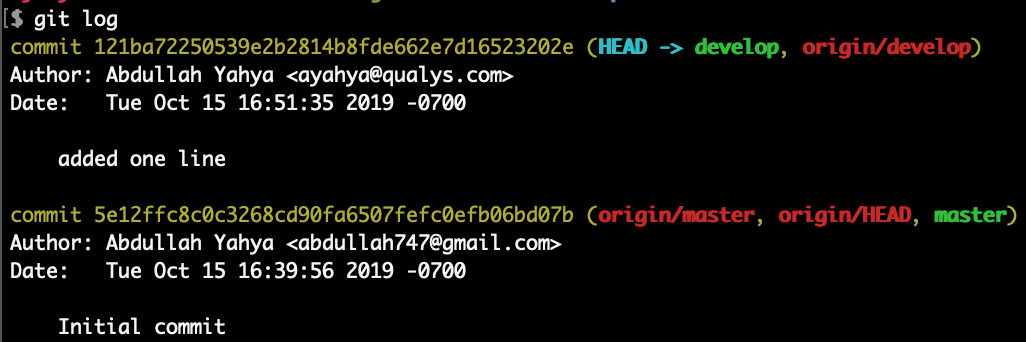
Now we see that both local and remote “develop” branches are in sync and ahead of local and remote “master” branches by 1 commit.
git checkout master
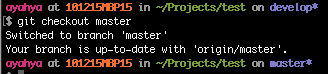
The local “master” branch doesn’t have the changes in “develop”. Let’s merge the changes from the local “develop” branch into the local “master” branch.
git merge develop

git status
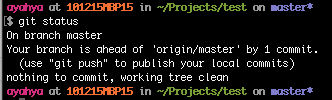
The local “master” branch is now ahead of the remote “master” branch (origin/master) by 1 commit.
Now we see that local “master”, local “develop”, and remote “develop” are in sync and ahead of remote “master” by 1 commit.
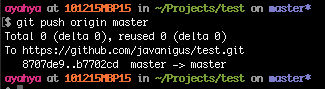
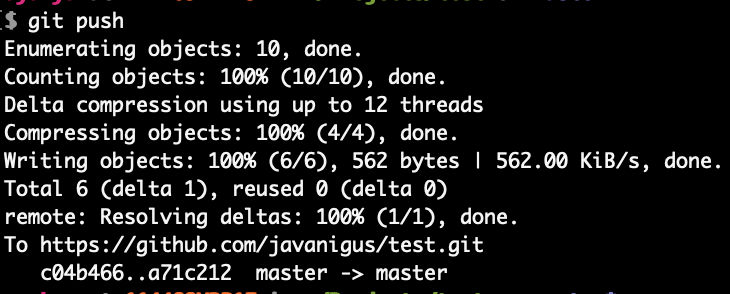
We’ll push local branch “master” to origin/master on GitHub.
git push origin master
git status
The local branch is now up-to-date with origin/master on GitHub.
On GitHub, in the “master” working tree you’ll see the added line.
Now all branches, local and remote, are in sync.
In this case, I added line 4.
git status
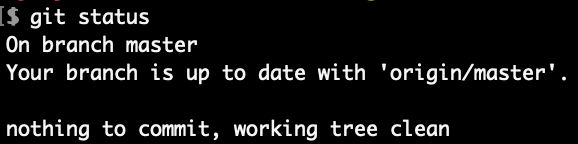
We see that our local “master” branch is in sync with remote “master” branch even though we just committed a change in remote “master”.
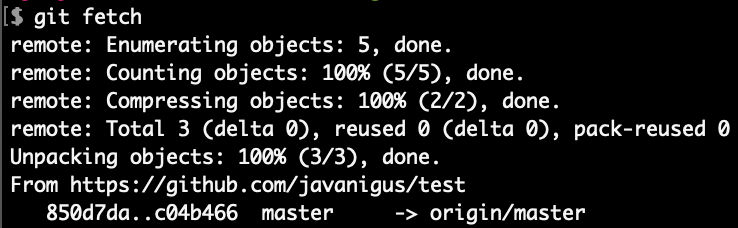
In order to see what has changed remotely, run git fetch.
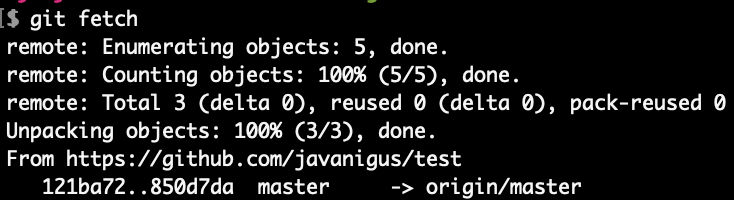

Now, we correctly see that our local “master” branch is behind the remote “master” branch (origin/master) by one commit.
git pull
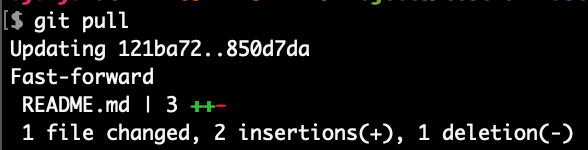
git status
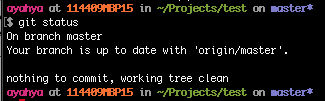
Local and remote “master” branches are in sync again.

Now we see that local and remote “master” branches are ahead of local and remote “develop” by 1 commit.
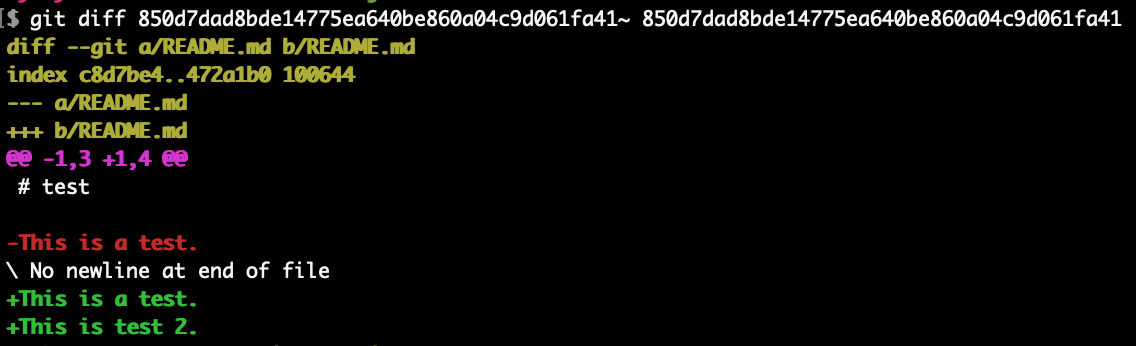
To see a change in a particular commit, run git diff on the commit, e.g. to see the most recent change (commit 850d7dad8bde14775ea640be860a04c9d061fa41), we run
git diff 850d7dad8bde14775ea640be860a04c9d061fa41~ 850d7dad8bde14775ea640be860a04c9d061fa41
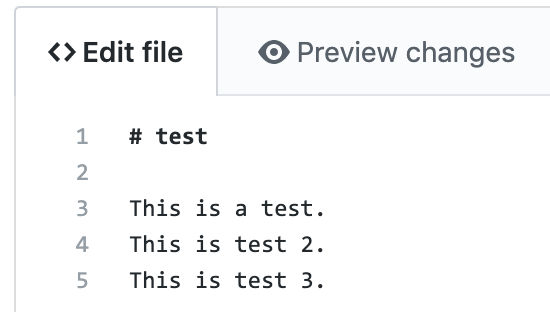
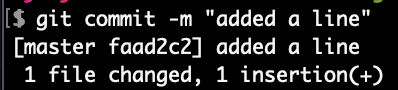
This time I added line 5.

We see that local “master” is behind remote “master” by 1 commit, as expected.
I added line 5
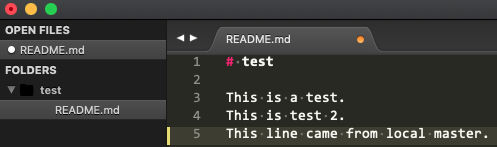
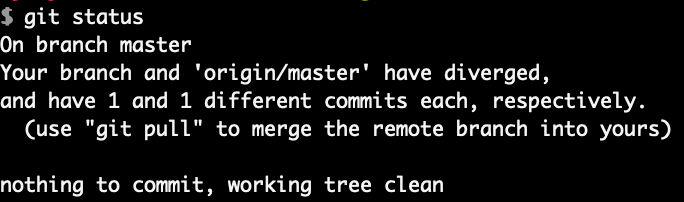
Now we see that local and remote master have each diverged because we didn’t do a pull before committing.

We see a conflict because the change in remote “master” and local “master” was in the same file and on the same line (line 5).
Open the file containing conflicts and edit it.
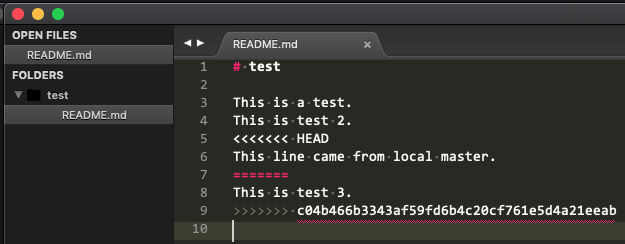
Since we want to keep both lines, just remove the conflict divider markers.
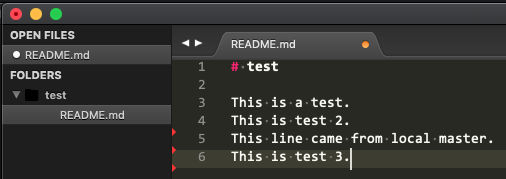
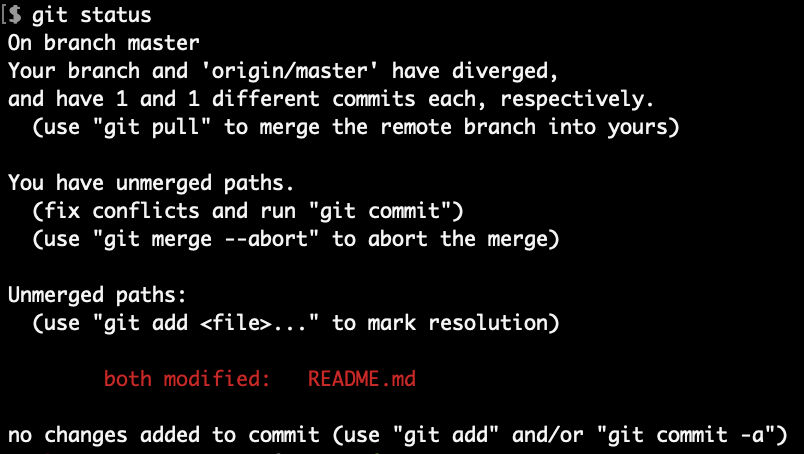
To mark the conflict as resolved, use “git add” and then check the status.
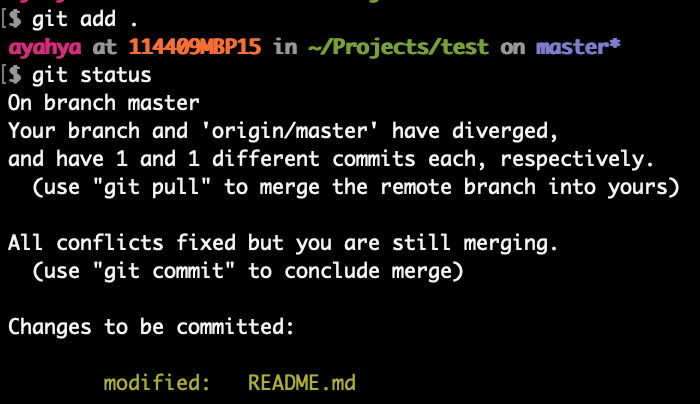
We see that the conflicts have been fixed but we are still merging.

To avoid having diverged commits and pull conflicts, always do a git pull before committing.
We see that
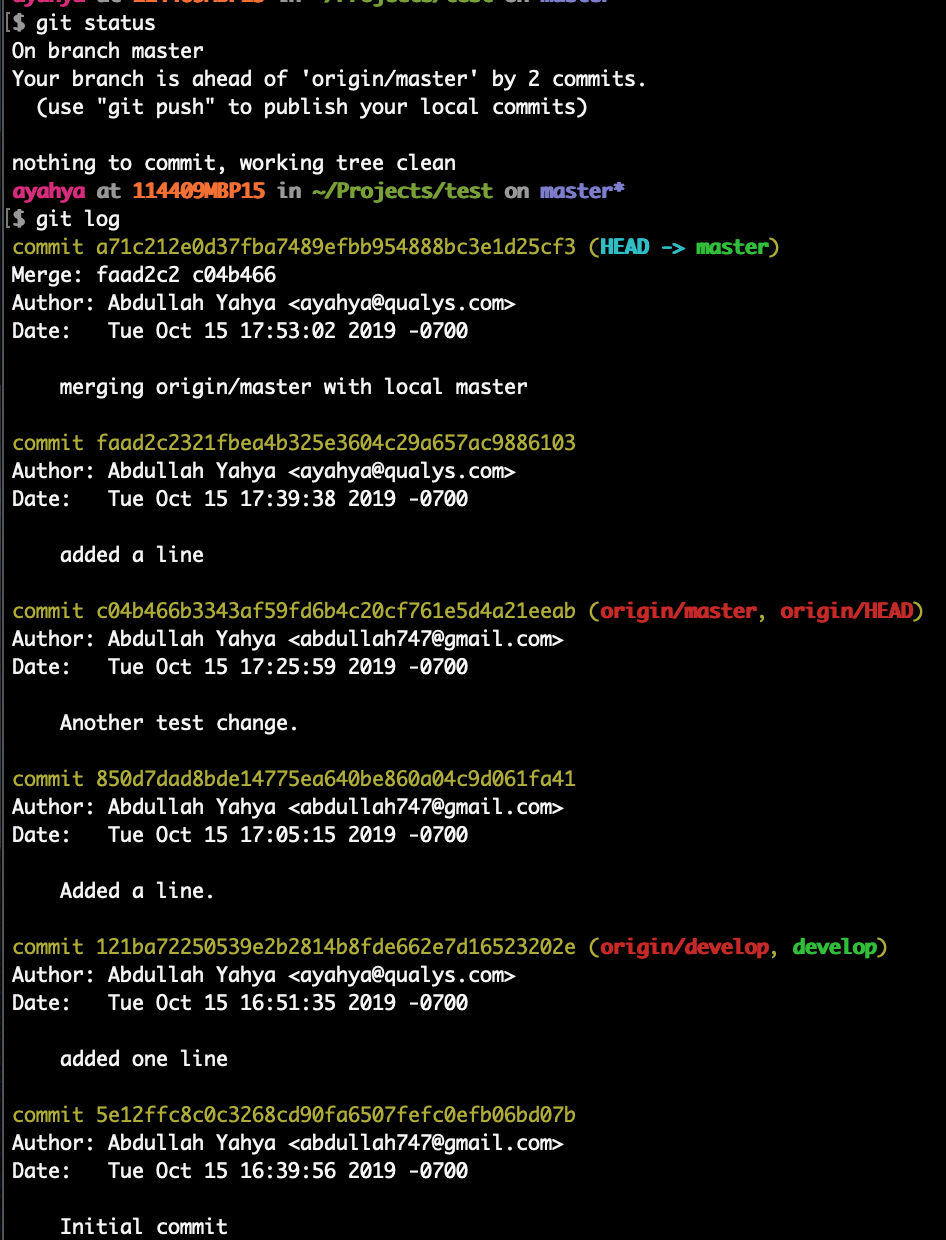
Now local and remote “master” are in sync and are ahead of local and remote “develop” by 4 commits.
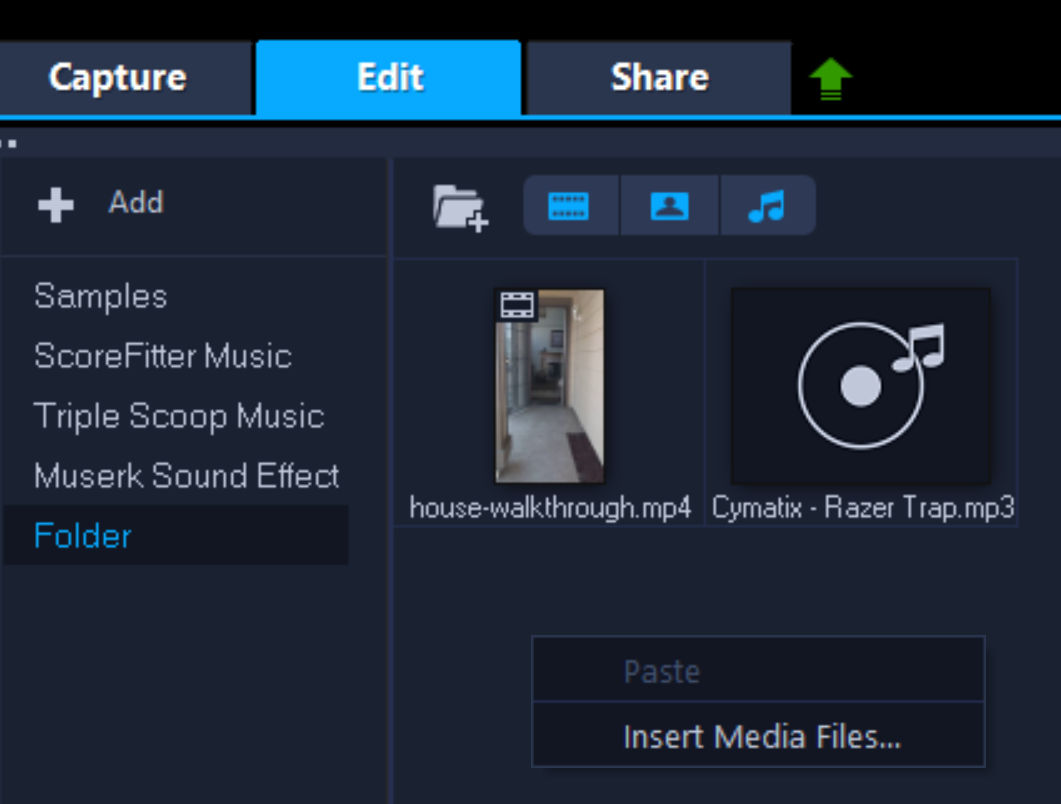
Adding your own music or audio to a video clip is something many people like to do. Fortunately, this is very easy using Corel VideoStudio. Below are steps to add music to a video.
Insert media files, e.g. a video and an audio file
 Continue reading Easily Add Music to Video Using Corel VideoStudio