Going to the gym is a hassle, and with our busy lives, it’s hard to go routinely to achieve fitness goals. That’s why I decided to just move the gym into my home by creating a home gym in my garage. Of course, space is limited, but I do have enough space for some equipment. Since space is limited, I decided to focus on upper-body workouts. To see the biggest gains, most people would agree that the upper-body muscles to target in descending order as follows: (each muscle’s relative size is also shown based on this article)
Delts / Deltoids (shoulders) – 380 cm3
Tri’s (triceps) – 370 cm3
Pecs / Pectoralis Major (chest) – 290 cm3
Lats / Latissimus Dorsi – 262 cm3
Traps / Trapezius
Bi’s (biceps) – 143 cm3
Dumbbells / Free Weights
Almost all exercises can be done using dumbbells or free weights, which don’t take a lot of space. However, I personally don’t like dumbbells or free weights because
it’s hard to lift heavy weights with them
they are more dangerous than using machines, which makes you opt for lower weights
it’s harder to balance them and use proper form compared to using a machine
they are not as comfortable to use compared to machines
you are limited to maybe 100 lbs per dumbbell
Machines
I find resistance machines way more enjoyable and safer to use, but they can take up a lot of space. Fortunately, there are some options that are designed for home gyms. Following are the machines I have and my opinion about them. They all accept 2″ Olympic plates.
This machine works well for working your biceps. It accepts 2″ Olympic plates. It’s not as comfortable to use as similar machines that use stacked plates. However, those machines are much more expensive.
This chest press machine works very well. You can incline the bench to train your upper chest, but it’s a little less comfortable in that position as your lower body is lower to the floor. The manufacturer claims you can use it to also do situps, but it doesn’t work well at all for that purpose.
As this machine is called a chest press machine, it primarily targets the chest. However, it also works the triceps to some extent. However, don’t expect much work on your triceps. A seated dip machine does a much better job for that.
Unlike the regular incline bench press, which targets your upper chest, the close-grip version targets your inner chest and triceps. In order to get better efficiency from this exercise, it is recommended to do high repetitions with low weights instead of lifting too much weight.
Log in to AWS and go to EC2 > Instances > Launch an Instance
Enter a name. I’m calling mine “My Web Server”.
For Application and OS Image, I’ll just choose the default, which is “Amazon Linux 2023”.
For Amazon Machine Image (AMI), I’ll choose the default, which is “Amazon Linux 2023 AMI”
Under Key Pair, click “Create new key pair”.
Amazon EC2 can easily create a key pair for you. Just enter a key pair name. I chose “aws-ec2”. OpenSSH is available on Linux, Mac, and Windows 10+, so keep the default key format of .pem. On Windows 10+, OpenSSH is an optional feature you must install. Click the “Create Key Pair” button. The private key will be downloaded to your computer. Keep it in a safe place. You will need it to SSH into your EC2 instance.
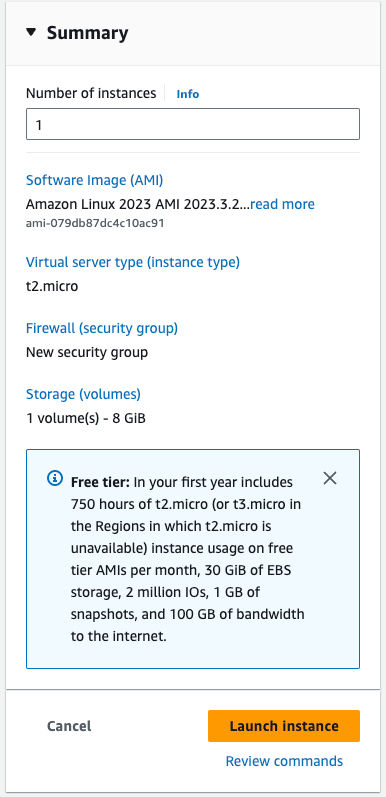
In the Network Settings section, since we want to SSH into the EC2 instance and we want to be able to browse our website over HTTP and HTTPS, check those checkboxes.
Leave everything else at their defaults. Review the summary and click the “Launch Instance” button.
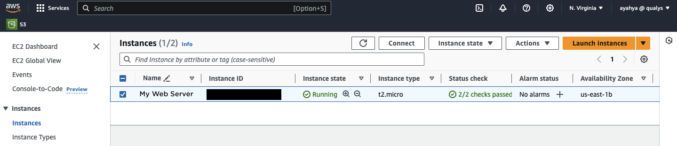
You will then see your EC2 instance listed. Wait for the “Status check” to change to “2/2 checks passed”.
Once your instance has been set up, click the button to connect to the instance.
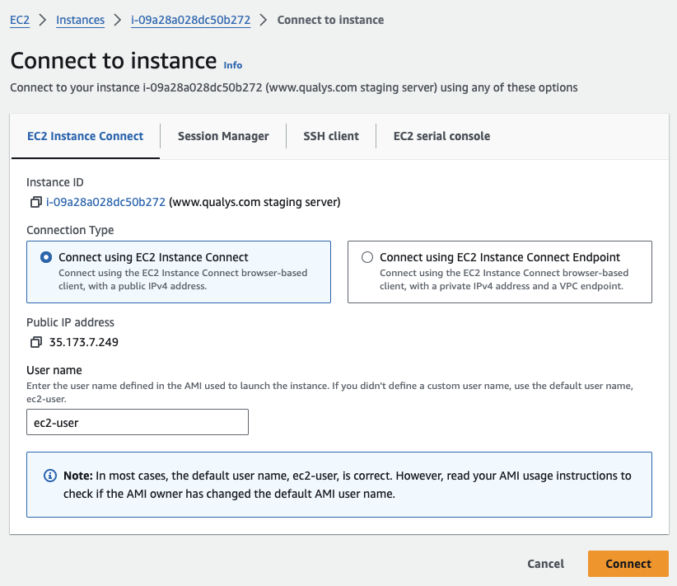
SSH into EC2 Instance
You have a few options to connect to the EC2 instance. For simplicity, choose EC2 Instance Connect. This will open a new browser tab with shell access. Leave the default username as “ec2-user”.
You’ll notice the command prompt changes to ec2-user@ip-172-31-47-114 which is my default username (ec2-user) followed by my EC2 instance’s private IP (ip-172-31-47-114).
Install Apache
Since we installed Amazon Linux 2023, follow these instructions to install Apache. Since we don’t need MySql and PHP, ignore the commands and instructions for those. For example, instead of
Make sure to follow the instructions to set the file permissions so that Apache can serve the website.
The Amazon Linux Apache default document root is /var/www/html
The Apache config is at /etc/httpd/conf/httpd.conf
The Apache logs are in /var/log/httpd/
To view Apache errors, run the following command
sudo tail -100 /var/log/httpd/error_log
Test that Apache works by going to the public IP address WITHOUT “https”, e.g. http://34.229.240.7/.
Set Up SSL/TLS
These instructions show how to create a self-signed certificate and a CA-signed certificate. For a self-signed cert, you don’t need a domain name. You can access your website over https by IP address, e.g. https://34.229.240.7/
For a CA-signed cert, you can follow these instructions to automate certificate renewals using Let’s Encrypt with Certbot. You can also use AWS Certificate Manager to manage and automatically renew certs.
Get a Fixed IP Address
The default IP address that AWS gives you is dynamic (will change whenever the server restarts). To get a static (fixed) IP address, get an Elastic IP Address. Once you get one, try to access your website over https, e.g. https://35.173.7.249/
Put Your Website in a GitHub Repo
Create your website locally in a folder. If you have an existing website under git version control with a lot of history and you want to remove the history, git clone the repo into a new folder, delete the “git” folder, and then run git init.
Clone your GitHub repo to your EC2 instance. I’m going to clone it to my home folder.
In GitHub, get the SSH URL of your repo.
Then, in your home folder, clone it
You will then see a new folder containing your website files from the GitHub repo.
Since my website document root is at /home/ec2-user/my-website/www, we need to update the Apache default document root (/var/www/html) to reference that path by editing the Apache config.
sudo nano /etc/httpd/conf/httpd.conf
Change all references of /var/www/html to /home/ec2-user/my-website/www
Change all references of /var/www to /home/ec2-user/my-website
Restart Apache (sudo systemctl restart httpd)
Update Folder Permissions
If you try to view your website, e.g. by going to https://35.173.7.249/, you will probably get a “Forbidden” error. To better understand this error, view the Apache error log.
sudo tail -100 /var/log/httpd/error_log
You will probably see an error like this
[Sat Dec 23 01:36:55.545345 2023] [core:error] pid 89394:tid 89446 Permission denied: [client 135.125.246.189:49368] AH00035: access to / denied (filesystem path '/home/ec2-user/my-website') because search permissions are missing on a component of the path
To fix this, follow these instructions on how to update file permissions
But replace /var/www with your website document root. In my case, I changed it to /home/ec2-user/my-website
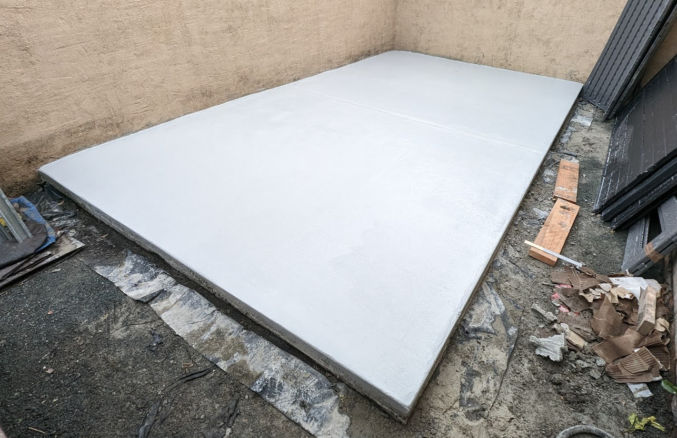
I recently added a slab of concrete in the backyard of one of my rentals. Unfortunately, I made some mistakes along the way. Specifically,
I removed too much dirt from the area where the slab would go
I could have paid less for a contractor to do the concrete work
I should have verified the quality of the contractor’s work
Preparing the Foundation
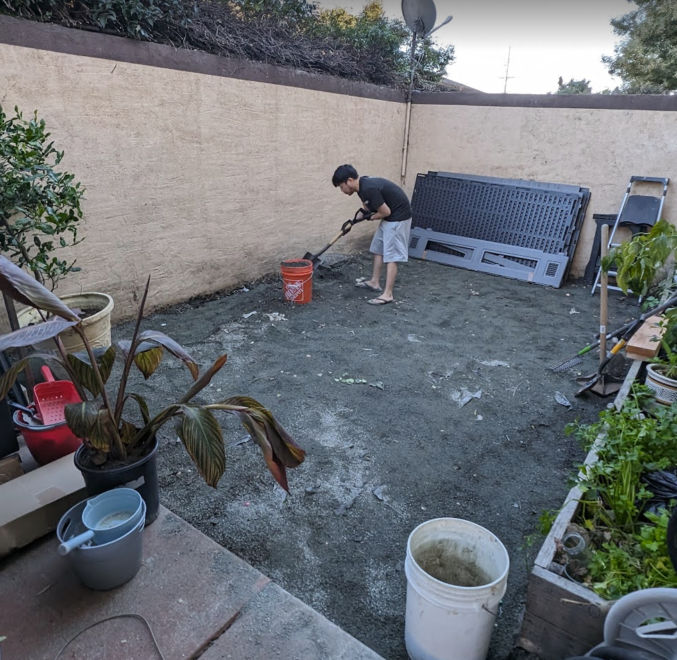
We first removed a lot of dirt and gravel by scooping it into some buckets. We did this so the 3.5″-thick concrete slab would be level with the existing concrete slab.
I rented a pick-up truck from U-haul and put tarp on the truck bed to protect it. This also made cleanup easier because I could pull the tarp off the truck along with any remaining dirt on it.
Driving with a full load of dirt made the truck swerve slightly at higher speeds so we took local roads to go to the city dump.
At the dump, we just shoveled the dirt onto the ground. The problem was the cost to dump dirt and gravel. If I had paid by weight, the cost would have been about $500. The clerk instead calculated the cost by volume, which lowered the cost to $372.
After making one trip, I regrettably thought I needed to remove more dirt and gravel. So, we made another trip and I spent another $372. After creating the wood form for the concrete slab, we realized that we had removed too much dirt, which meant I needed 2.5 times the amount of concrete I should have needed.
Getting Quotes
I called around to get quotes from concrete contractors. The slab dimensions would be 9′ x 15.5′ (140 sq ft). The first contractor quoted me $2000, but then lowered it to $1700. He quoted me without seeing the work area.
The second contractor came to see the work area and then quoted me $1500. That meant his rate was $1500/140 = $10.71 / sqft. According to one source, the cost in the California Bay Area to install a concrete slab including materials and delivery is between $8 to $14 / sqft. Therefore, I went and chose the 2nd contractor and paid $10.71 / sq ft.
Creating the Concrete Slab Form
The contractor came and created the wood form. I first compacted the soil using a hand tamper and put down some pond liner where the edge of the concrete would be. Half of the pond liner would be under the concrete. The other half would be under rocks or mulch. The reason for doing this is so that weeds don’t grow along the edge. I left a 30″ gap between the old concrete slab and the new one for rainwater to drain into the ground.
This is when I realized that I had removed too much dirt and gravel. I wanted the top of the new concrete slab to be level with the existing concrete slab in the backyard. Using a level, the contractor drove a wood stake into the ground and marked on it where the top of the 2×4 wood form would go. Screws were screwed through the vertical stakes into the 2x4s. Wood stakes were also used at an angle. This was necessary because without them, the weight of the concrete could push the vertical stakes and cause a deformity in the form. As you can see in the photo below, too much dirt and gravel had been removed, so the contractor had to put another 2×4 below the first set of 2x4s. This resulted in a slab thickness that was approximately 3.5″ x 2 = 7″ (one 2×4 is actually 1.5″ x 3.5″). That’s twice as much as is needed for a standard slab and therefore twice the amount of concrete would be needed.
Furthermore, I wanted the slab to slightly slope towards the long edge so that rainwater could flow into the ground rather than puddle on the slab and weaken it (concrete is porous). To determine the slope, the contractor used a level on the 2×4 and tilted it slightly before screwing it into the wood stakes. Then, he used a red chalk string to snap a line on the wall, marking the desired height of the slab along the wall. Since the red chalk wasn’t clear, he went over parts of it with a black marker as shown below.
Lay Rebar
To reinforce the concrete, the contractor added rebar. He cut the rebar with a reciprocating saw and metal blade.
They then tied the rebar together in what appeared to be plastic-coated wires or electrical (romex) cable.
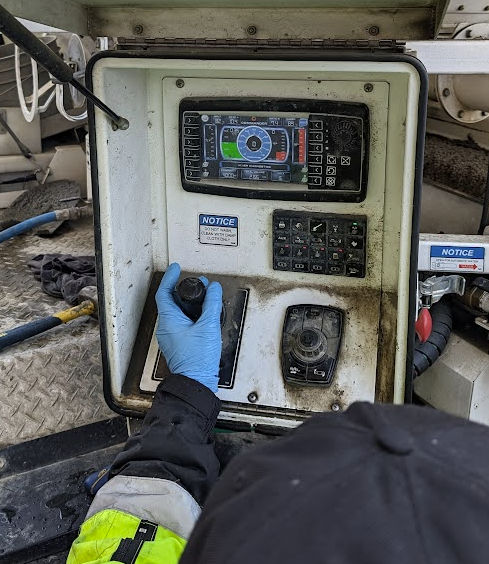
Pour Concrete
Instead of buying a bunch of bags of concrete and mixing them with water, the contractor ordered a truck to come and deliver premixed concrete.
The premixed concrete flowed down a channel into a wheelbarrow.
One person transferred the concrete to the work area while the other used a trowel to trowel the concrete.
Occasionally, they’d pull the rebar up so that it would settle in the middle of the slab rather than at the bottom.
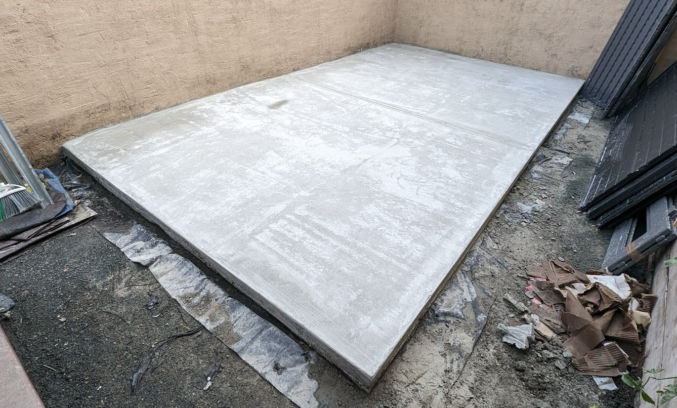
After pouring all the concrete and moving it into place using a hand trowel, this is how it looked.
The contractor then used a float attached to a pole to create a smooth surface. If necessary, he would spray a mist of water to soften the concrete.
On the truck, the concrete supplier could see how much concrete was supplied. As you can see below, I needed a total volume of 2.66 cubic yards. People in the business would just say “yards”, which makes no sense since that’s a measure of length rather than volume. What they really mean is cubic yards.
The unit cost of concrete is $169 / cu yd (cubic yard). Fortunately, the concrete supplier put down 2.5 cu yds rather than 2.66 cu yds to save me a little money. Had I not removed so much dirt and gravel, I could have only needed 1 cu yd for a 3.5″ thick slab. Instead, the resulting slab is now 6 to 6.5″ thick.
For small loads, the concrete supplier charges an extra $80 for 1 to 2.75 cu yds or $60 for 3 to 4.75 cu yds. Again, the supplier gave me a small discount by only charging me an extra $60 instead of $80. Then, there’s the delivery fee, which costs $80. The total cost for just the concrete was $607.91.
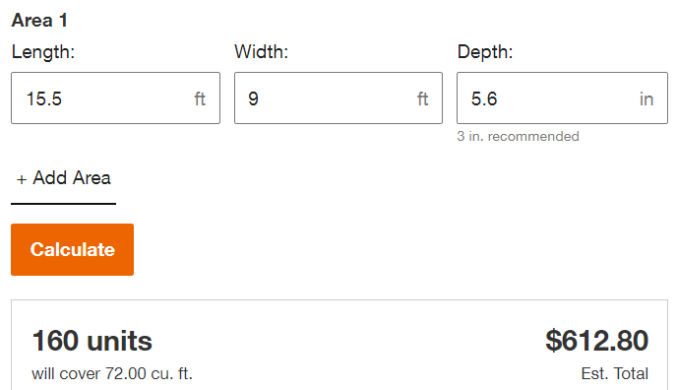
For comparison, if you buy bags of concrete at Home Depot, transport it yourself, and mix it with water, you’d pay $612.80 + 10% tax = $674 for the same 2.66 cu yds (72 cu feet) of concrete.
The concrete supplier cleaned his truck and washed the surrounding area.
The contractor then used an edging trowel to create a rounded edge.
He also used a special tool to create a control joint line.
Once the concrete dries a bit, he’ll give the concrete surface a brushed texture so it’s not slippery smooth. Then, tomorrow, he’ll remove the wood form.
Smoothen Uneven Spots
Unfortunately, the contractor didn’t do a good job. There were some uneven areas that drove me crazy. To fix this, I used a 7″ concrete grinder.
7″ Dust Shroud I bought the Dustless Technologies 7 in. Universal Dust Shroud Pro for Angle Grinders from Home Depot. It’s a bit expensive, but it works better than others I’ve tried.
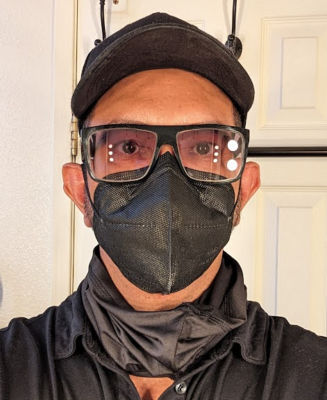
N95 Face Mask and/or Neck Gaiter and/or Balaclava Despite using a powerful shop vac, some dust will still escape. Wear an N95 face mask like this one coupled with a neck gaiter or a balaclava.
Rubber Strip and Hose Clamps To prevent the shop vac hose from detaching from the angle grinder, I wrapped a 2″-wide rubber strip around the connection and clamped it using two hose clamps.
Knee pads You will be on your knees when grinding concrete. Wear knee pads. I like this one on Amazon.
IMPORTANT: concrete dust is very dangerous if inhaled! Always wear protection.
N95 maskN95 mask with neck gaiter for added protectionN95 face mask and balaclava for even better protection
When grinding concrete, move relatively quickly and in a circular motion to avoid creating uneven spots.
Etch the Surface
Raw concrete doesn’t look that great. To beautify it, I’ll apply some epoxy to it. In order for the epoxy to stick, the smooth surface needs to be etched. The easiest way to do this is by renting a flooring tool with the Diamabrush concrete prep attachment. In my case, the surface wasn’t smooth, so I was able to skip this step.
Apply Epoxy
Since cars will not go on my slab, I’ll apply some 1-part epoxy. I like this one in silver gray:
Before applying epoxyAfter applying epoxy (it was still wet)
Lessons Learned
For some reason, it costs more to dispose of dirt and gravel at the dump than it is to be supplied the same amount of premixed concrete, including delivery.
Before removing dirt, create the wood form first so you’ll know how much dirt to remove. The concrete slab need only be 3.5″ thick.
Since I paid $608 for the concrete, assuming the other materials (2×4 lumber and wood stakes) cost $42 (conservative estimate), then that means I paid the contractors (2 people) $1500 – $608 – $42 = $850 for pretty much one day of actual work. So, each contractor got $425 a day or $425 / 5 hours = $85 an hour. That’s a high hourly rate. However, all concrete contractors charge a high rate even though the number of hours worked is low. Next time I’ll ask for a quote for the labor only since now I know the costs for the materials.
The quality of the contractor’s work was poor. There were uneven spots and the concrete was mostly level rather than slightly sloping in one direction for water runoff. There was also one lower area where water would puddle. Next time, verify the quality of the contractor’s work.
You can create timelapse videos using the Insta360 ONE X2/3. The resulting timelapse will be a 360-degree video that you can edit the same way you can non-timelapse videos. Unfortunately, the interval setting between when a picture is taken to create the timelapse can only be set from your phone. The interval options are 0.5s, 1s, 2s, 4s, 10s, 30s, 1min, 2min. Note that standard video is 29.97s, which is like making a timelapse video where the interval between still images is 1/29.97s or 0.03s. According to this timelapse calculator, if you film for 8 hours straight (event duration) with a shooting interval of 0.5s, then the camera will take 57600 photos. If you want the resulting timelapse video to have a frame rate of 29.97 fps, then the resulting timelapse video duration will be 32m 2s long.
Here are the number of photos and video durations for an 8-hour event duration for the shooting intervals supported by the ONE X2.
Interval
Number of Photos
Video Duration
0.5s
57600
32m 2s
1s
28800
16m 1s
2s
14400
8m
4s
7200
4m
10s
2880
1m 36s
30s
960
32s
1min
480
16s
2min
240
8s
I wouldn’t choose a timelapse interval greater than 10s since an 8-hour-long filming session would produce a video that’s longer than 1m 36s. If 1m 36s is too long, then in post-production, whether in Insta360 Studio or some other video editing program, you can speed up the timelapse to produce an even shorter video.
The battery that comes with the Insta360 ONE X2 is good for 80 minutes. You can buy additional batteries, but if you’ll be recording a long timelapse video, it would be annoying to have to keep changing the battery every 80 minutes. In this case, you’re better off recording with the USB charging cable plugged in. To prevent overheating, remove the battery. The camera can still operate and record while plugged in.
When taking a 360-degree timelapse video, make sure the following options are set
360-degree mode (not 150-degree mode)
Left to right: 360-degree mode, panorama mode, 150-degree wide-angle mode
Video timelapse mode
Slow Motion Videos
If you want to make a slow-motion video, e.g. a real estate tour video, then you definitely want to record at a high frame rate like 60 fps. Then, in your video editor, slow down the video and export it at 30 or 60 fps. If the original video is recorded at 30 fps, then the slowed-down video will be choppy.
https://www.youtube.com/watch?v=6ywQnh2gmX0
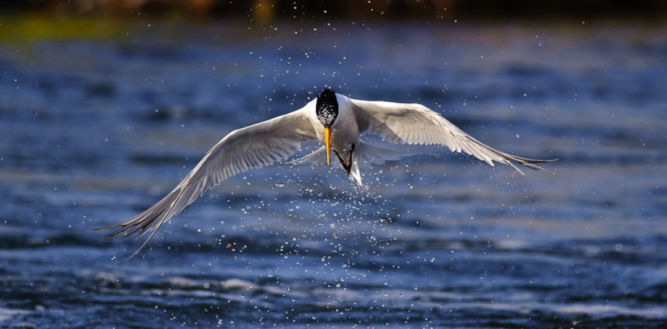
Action Videos
When filming action scenes, it’s better to record at a high frame rate so that playback will be sharp, more fluid, and not blurry.
Low-Light / Night Scenes
When filming in low light like at night, you’ll get much better results if you manually adjust the exposure.
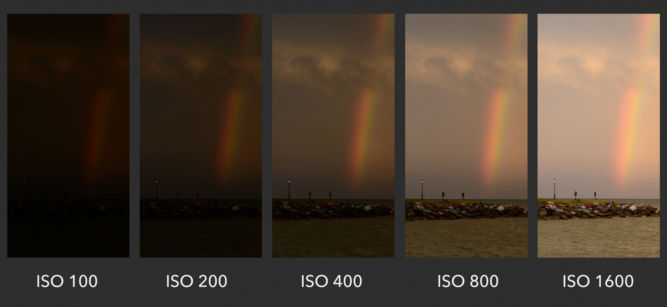
ISO
ISO is a camera setting that will brighten or darken a photo.
However, if you increase the ISO too high, you’ll see a lot of grain.
You should only raise your ISO when you are unable to brighten the photo via shutter speed or aperture instead (for example, if using a longer shutter speed would cause your subject to be blurry). The ISO 200 image on the left was brightened with a long shutter speed.
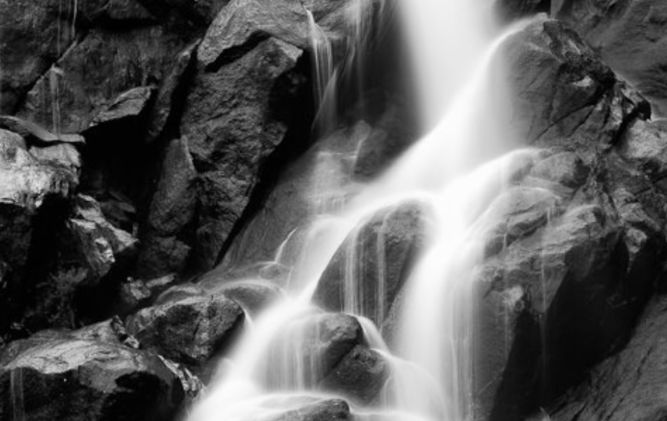
Shutter Speed
Shutter speed is responsible for two particular things:
changing the brightness of your photo and
creating dramatic effects by either freezing action or blurring motion.
Shutter speed is the length of time in seconds the camera shutter is open, exposing light onto the camera sensor. Essentially, it’s how much time your camera spends taking a photo. When the shutter is open, light passes through the lens and is collected on the camera sensor. The button that fires the camera is also called “shutter” or “shutter button,”
Fast / Short Shutter Speed > Freezes Action
A fast shutter speed is a small fraction of a second, like 1/250th of a second.
Slow / Long Shutter Speed > Motion Blur
A long shutter speed is 1 second or longer. A slow shutter speed is like 1/2 or 1/4 of a second.
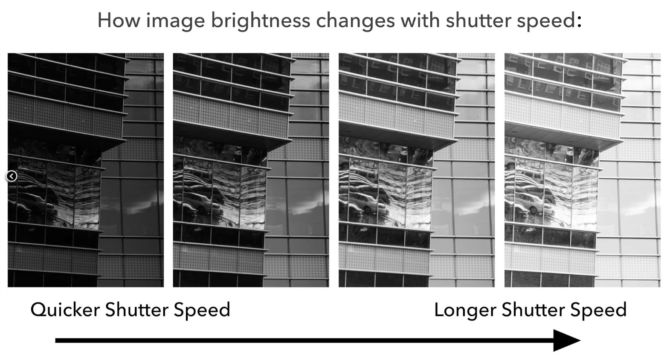
Shutter Speed and Exposure (Brightness)
If you use a long shutter speed, your camera sensor gathers a lot of light, and the resulting photo will be quite bright. If you use a quick shutter speed, your camera sensor is only exposed to a small fraction of light, resulting in a darker photo.
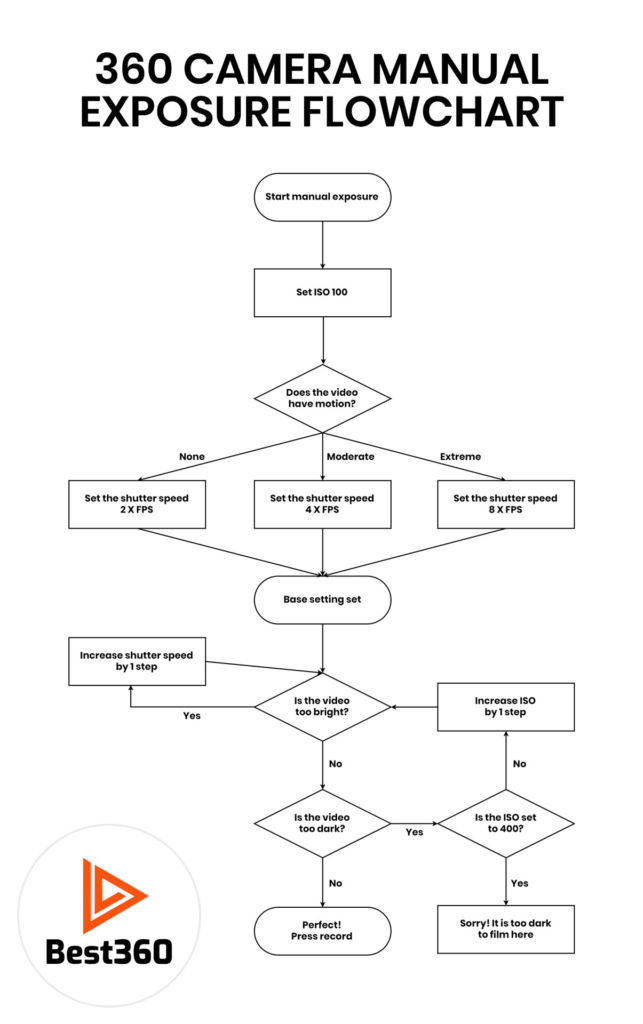
The following flowchart can help you tweak the ISO and shutter speed.
Following are how some videos look when using each stick.
3.4′-long selfie stick, front, face level
10′-long selfie stick extended to about 5′, front, face level
3.4′-long selfie stick, front, stomach level
3.4′-long selfie stick, 45-degree angle, face level
3.4′-long selfie stick, side, face level
3.4′-long selfie stick, side, face level
3.4′-long selfie stick, front, feet level
3.4′-long selfie stick, straight up
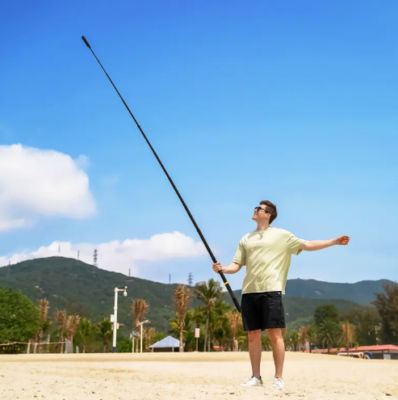
10′-long selfie stick, straight up
10′-long selfie stick, up, back
10′-long selfie stick, up, side
10′-long selfie stick, front spin, face level
10′-long selfie stick, low to high, facing down
10′-long selfie stick, low to high, facing up
Selfie Drone
For comparison, following are some videos taken with the Hover Air X1 selfie drone.
Bird’s Eye, no spin, 10 feet
Bird’s Eye, no spin, 10 feet, return
Bird’s Eye, no spin, 50 feet
Bird’s Eye, no spin, 50 feet, return
Bird’s Eye, fast spin, 50 feet
Bird’s Eye, fast spin, 50 feet, return
Bird’s Eye, slow spin, 50 feet
Bird’s Eye, slow spin, 50 feet, return
Dolly track
Dolly track
Follow
Hover with target tracking
Orbit, 5 feet
Orbit, 20′
Zoom out, down
Zoom in, down, return
Zoom out, flat
Zoom in, flat
Zoom out, up
Zoom in, up
Zoom out, up, far
Zoom in, up, far
Lens Care
The Insta360 X2/X3 camera has protruding lenses on two sides. As such, the lenses can easily get scratched, so extreme care must be taken to prevent that from happening. Also, before shooting, you should always clean the lens to remove any dirt or fingerprints. A dirty lens can easily result in a blurry shot. Following are comparisons of image quality when different lens conditions.
Brand New and Clean Lens
The image quality is relatively sharp.
Brand New Lens But Full of Fingerprints
The image is blurry, especially around the lights.
Scratched But Clean Lens
Despite being cleaned with a new cloth, the image is partially blurry due to the scratched part of the lens.
Here’s a collection of mounts for action cameras like the Insta360 X3 that I’ve found useful. These accessories can mostly be used with other cameras as well.
This clamp is lightweight. Since it’s curved, it’s ideal for clamping to cylindrical objects like bike handlebars. You can connect it to a long selfie stick or a 1/4″ rod that accepts a 1/4″ screw.
Example Use Cases
Clamp to a bike handlebar with or without a short selfie stick or rod
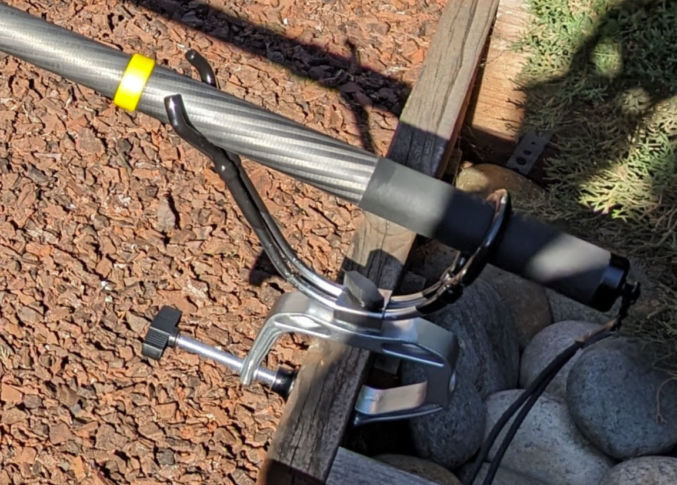
This clamp is designed for fishing poles, but it can be used for selfie sticks because selfie sticks are like fishing poles. You can adjust the angle of the stick.
Example Use Cases
Secure to cruise ship railing and insert 10′ selfie stick to get drone-like footage.
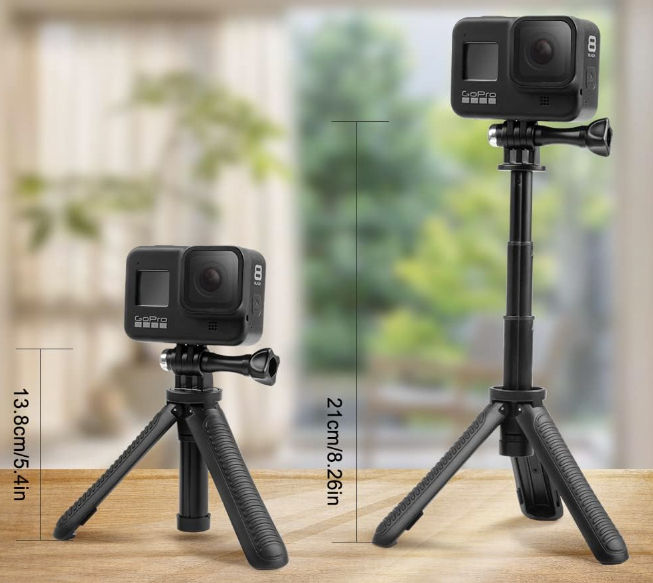
Medium (3.4′) Invisible Selfie Stick With Tripod and Invisible Quick Release Adapter
This selfie stick is invisible when used with the Insta360 X3 camera. To quickly attach and remove an Insta360 X3 camera, use the invisible quick release adapter designed specifically for the Insta360 X3.
Example Use Cases
Walking around
Placing it on the floor / ground using the tripod while you perform an activity, e.g. painting a room
When walking, I find it best to keep the camera at face level, unless you want to create some interesting perspectives like positioning the camera near your feet.
If you’re worried about dropping your selfie stick and losing it, you can attach a 1/4″ camera screw to the bottom of it and a wrist lanyard to the screw.
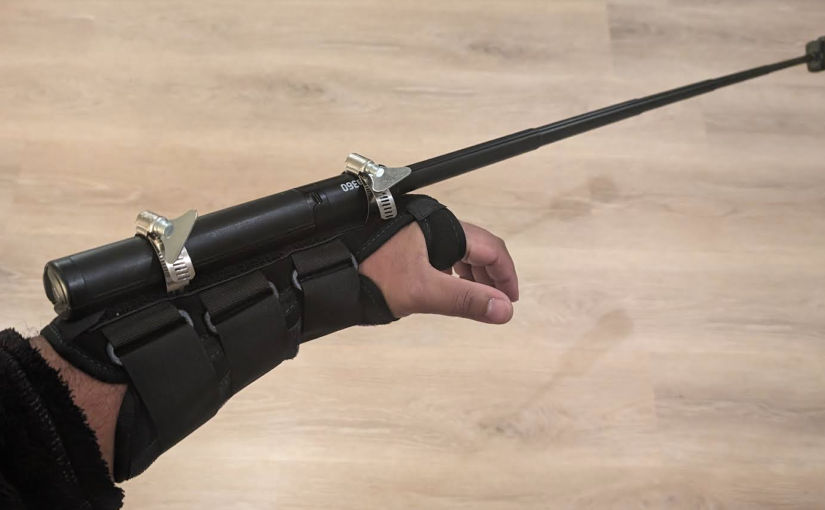
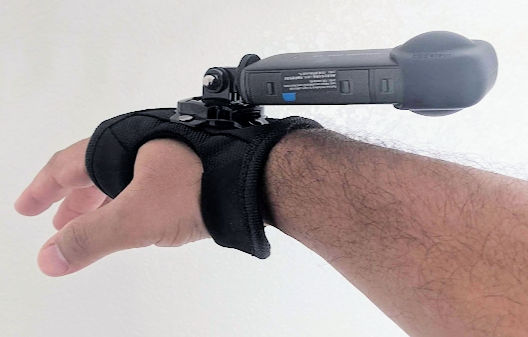
Having a selfie stick extended away from you allows you to get shots that look as if someone is filming you. You can also get more of yourself in the shot. In certain situations, however, you may not be able to hold the stick in your hand. That’s when having a forearm mount comes in handy. Since no one makes these, I had to engineer one myself using a forearm brace and an adjustable clamp.
The brace comes with a thin aluminum bar that is inserted in a pocket at the top of the brace. Using a utility knife, I had to make minor incisions to be able to insert the clamp into and underneath the aluminum bar.
At the front of the brace, I wasn’t able to slide the clamp underneath the bar, so I trimmed the bar to make it a bit narrower.
Like this.
This is the finished product.
The metal bar and clamp can cause discomfort on the top of your hand, especially when the selfie stick is extended and is shaking up and down. To address this, you can simply slide a dishwashing sponge above your hand as shown below to act as a cushion.
Example Use Cases
Any time you want to extend the selfie stick and you can’t mount it on something else and you need your hands free, e.g.
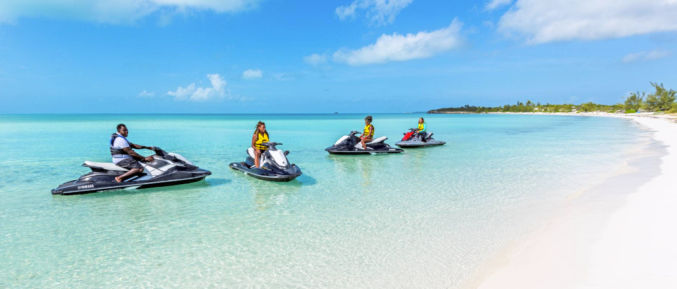
when you are driving a jet ski
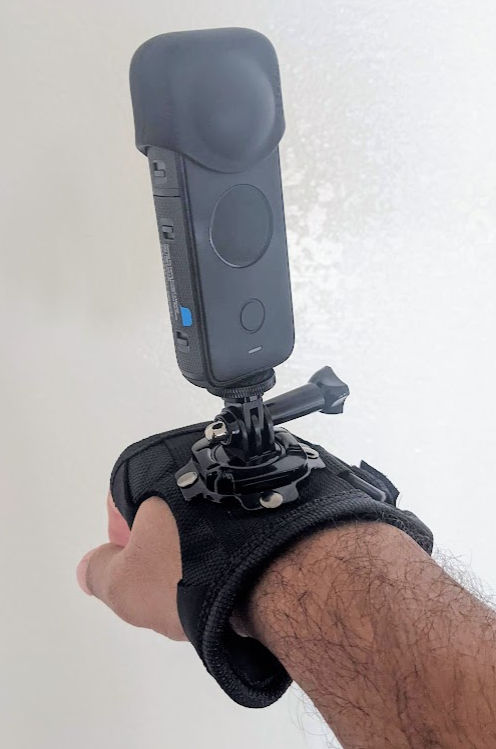
Wrist Mount
If the forearm mount is unavailable or can’t be used, then you can use a wrist mount. This is not as good as the forearm mount because the distance from the camera to your face is just the length of your arm extended.
This mount is very sturdy, but the handlebar clamp opening may be too big for some handlebars. In that situation, you can wrap some rubber around the handlebar, which will also protect it from damage. This mount includes the selfie stick.
This mount has a small footprint and includes a very strong magnet. You can add one or more 1/4″ rods to it. I find this setup particularly useful when eating at a restaurant. The mount doesn’t take a lot of space and it positions the camera high enough that you can film everyone’s food and their faces.
This mount can also stick to any metal surface like the side of a refrigerator.
If you’re out and about and want to stand your selfie stick on the ground, you can easily do that with the 3.4′ stick with built-in tripod. But, if you try that with 10′-long selfie stick extended at max length, then there’s the risk of it falling and destroying your camera. In this case, one thing you can do is strap the stick against an object like a rail. You can also try to use a c-clamp to clamp onto something flat and then strap the selfie stick to the clamp.
There are many adjustable and removable straps you can use, including
According to the Insta360 ONE X2 manual, you must use a UHS-I Micro SD card with a V30 or above speed class and exFAT format. UHS-II and UHS-III Micro SD/TF cards are not compatible with ONE X2. You can find V30 cards on Amazon. Note that the U3 symbol in the image below doesn’t mean UHS-III but rather U3. According to Wikipedia, U3 has to do with software rather than speed.
The cards below have been tested to work well with ONE X2 and X3.
SD Card
Model Number
Capacity
Speed Class
Sandisk Extreme V30 A1
SDSQXVF-032G-GN6MA
32G
V30
Sandisk Extreme Pro V30 A1
SDSQXCG-032G-GN6MA
32G
V30
Sandisk Extreme Pro V30 A1
SDSQXCG-064G-GN6MA
64G
V30
Sandisk Extreme V30 A1
SDSQXAF-128G-GN6MA
128G
V30
Sandisk Extreme V30 A2
SDSQXAF-128G-GN6MA
64G
V30
Sandisk Extreme V30 A2
SDSQXA1-256G-ZN6MA
256G
V30
Sandisk Extreme Pro V30 A2
SDSQXCZ-1T00-ZN6MA
1TB
V30
The first character of the 3rd part of the model number may differ, e.g. “G” in GN6MA vs “Z” in ZN6MA. According to this forum, that just identifies a different manufacturer.
The last character of the 3rd part of the model number may differ, e.g. “A” in GN6MA vs “N” in GN6MN. “A” means it comes with an adapter and “N” means it doesn’t.
SanDisk MobileMate USB 3.0 microSD Card Reader
Transferring video files from the Insta360 ONE X2 to your computer can be really slow. To speed this up, use a USB 3 card reader. I use this one: SanDisk MobileMate USB 3.0 microSD Card Reader- SDDR-B531-GN6NN. It supports transfer speeds of up to 170 MB/s. With USB 3.0, move content up to 10x faster than USB 2.0 readers.
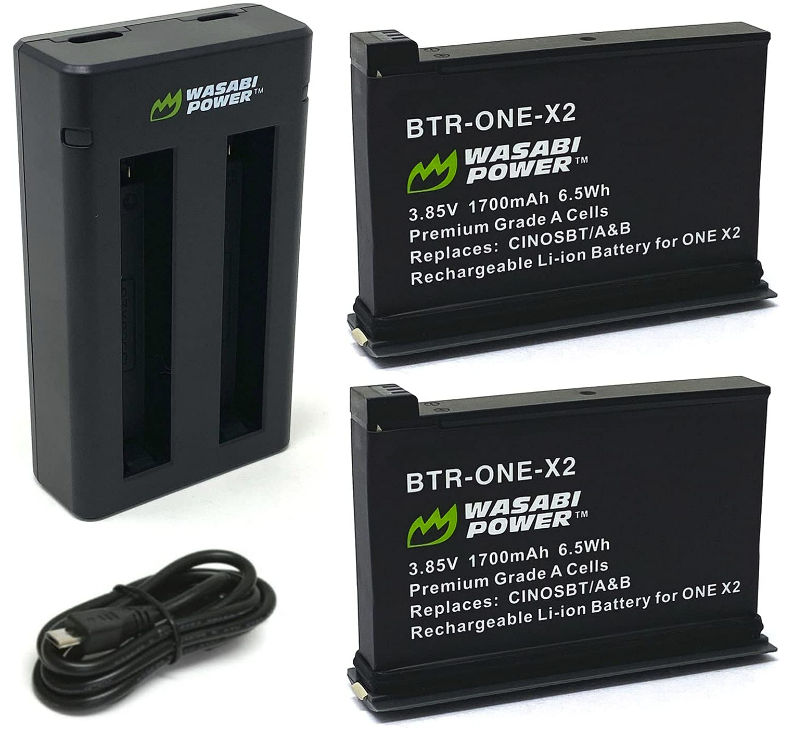
Extra Batteries + External Charger
The battery that comes with the Insta360 ONE X2 is good for 80 minutes. It may be a good idea to buy additional batteries just in case. I bought a pack of 2 batteries on Amazon. It comes with a charger and the batteries work.
Mount Adapter
For the adapters, this one is better because you can tighten it with the camera facing any direction you want.
Waterproof Pouches
When you’re swimming, having a waterproof pouch to keep your camera dry can give you peace of mind. Though the pouches pictured below are for phones, they fit the Insta360 X2/3 cameras as well.
Española Way is a historic street in Miami Beach, Florida. It’s located between 14th and 15th Streets, between Washington Avenue and Pennsylvania Avenue. It’s a pedestrian-only street with shops, galleries, restaurants, and bars.
Miami Beach’s Lincoln Road is one of the most unique shopping districts in the world, full of stunning architecture, world-class culture and destination retail stores spanning 8 blocks.
Must check in no later than 3 PM to board the cruise
3:30 PM
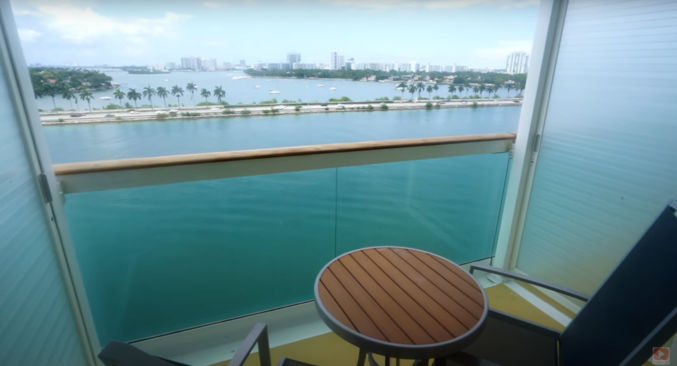
Board Cruise and Go to Stateroom (with Balcony)
Stateroom # 6236
4:30 PM
Cruise Departs to CocoCay, Bahamas
4:30 PM
Sailaway Spots
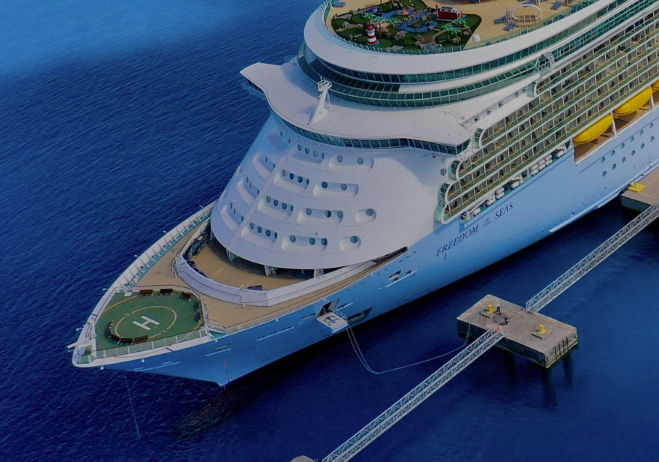
Go to the bow (front) of the ship where the helipad is.
There are 2 ways there:
Go outside on deck 4, walk forward, climb up a set of stairs and continue walking forward until you reach the helicopter pad.
Walk all the way forward on Deck 5, enter the Star Lounge, take an immediate right just past the DJ booth. There’s a set of unmarked doors to the helipad.
Middle (Midship): Studio B Ice Rink, Photo Studio, Art Gallery
Back (Aft): Main Dining Hall
Rooms: Ocean-View Rooms, Interior Rooms
Deck 4
Front (Forward): Royal Theater
Middle (Midship): Izumi Hibachi & Sushi, Schooner Bar, Casino Royale, Playmakers Sports Bar & Arcade, Boleros, Centrum
Back (Aft): Main Dining Hall
Deck 5
Front (Forward): Outdoor Deck
Middle (Midship): Star Lounge, Library Card Room, Sorrento’s, Bull& Bear Pub, Promenade Shops, Royal Promenade, Ben & Jerry’s Ice Cream, Cafe Promenade, Next Cruise, Shore Excursions, Guest Services, R Bar
Middle (Midship): Solarium, Whirlpool, The Lime & Coconut, Main Pool, Sports Pool, Splashaway Bay, El Loco Fresh, PADI, Chops Grille, Giovanni’s Italian Kitchen
Back (Aft): The Plaza Bar, Windjammer Cafe
Deck 12
Front (Forward): Spa
Middle (Midship): The Lime & Coconut, Running Track, Movie Screen
Back (Aft): Nursery, Adventure Ocean, Arcade, Johnny Rockets
Deck 13
Front (Forward): Freedom Dunes
Back (Aft): Rock Climbing Wall, Sports Court, The Perfect Storm Waterslides, Flowrider
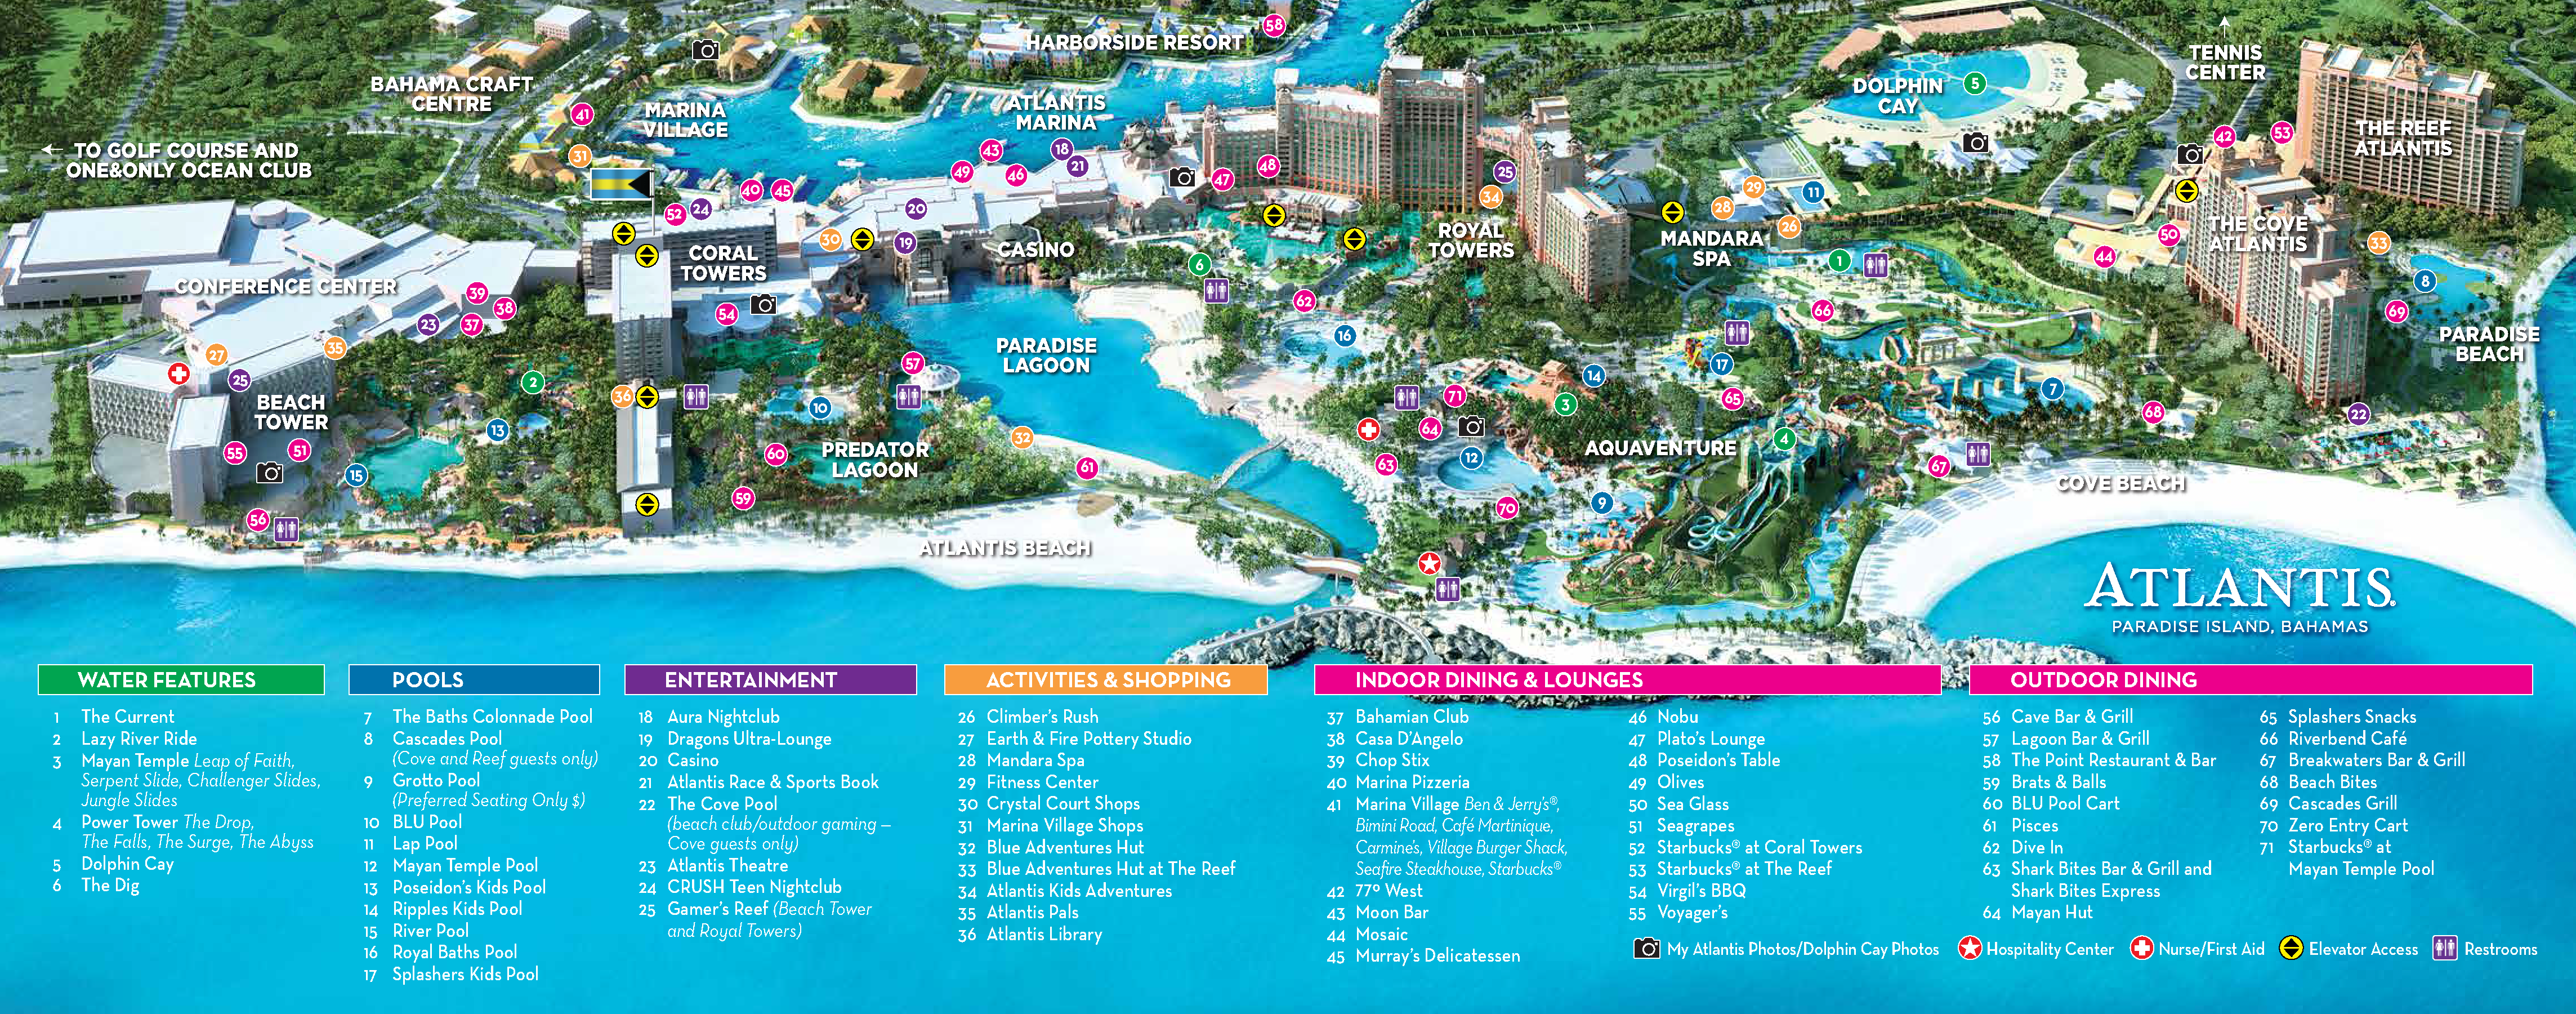
Wristbands are required and can be obtained at any towel hut
Aquaventure is cashless. Pay by credit card.
Lockers are available and subject to availability
Towers are provided for day use
Complimentary life jackets are provided for day use
Wear sandals or water shoes because the pathways can get very hot
Shortest wait times for the water slides and the rapids river are when the rides open at 10 AM
The center of the action is the Mayan Temple Pool
Action Plan
Get a locker
Go on Mayan Temple water slides (bring short and 3.4″selfie stick)
Go on Power Tower water slides (bring short and 3.4″selfie stick)
Go on river rides (bring short and 3.4″selfie stick)
Have lunch
Go to pools (bring 3.4′ and 10′ selfie stick)
Go to the beaches (bring 3.4′ and 10′ selfie stick)
Take photos at vista points (bring dry bag)
Explore the Royal Towers (bring dry bag)
Visit the Dig
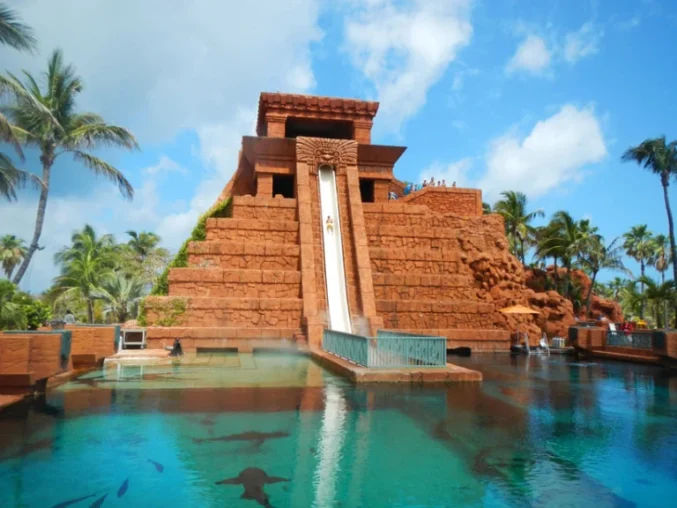
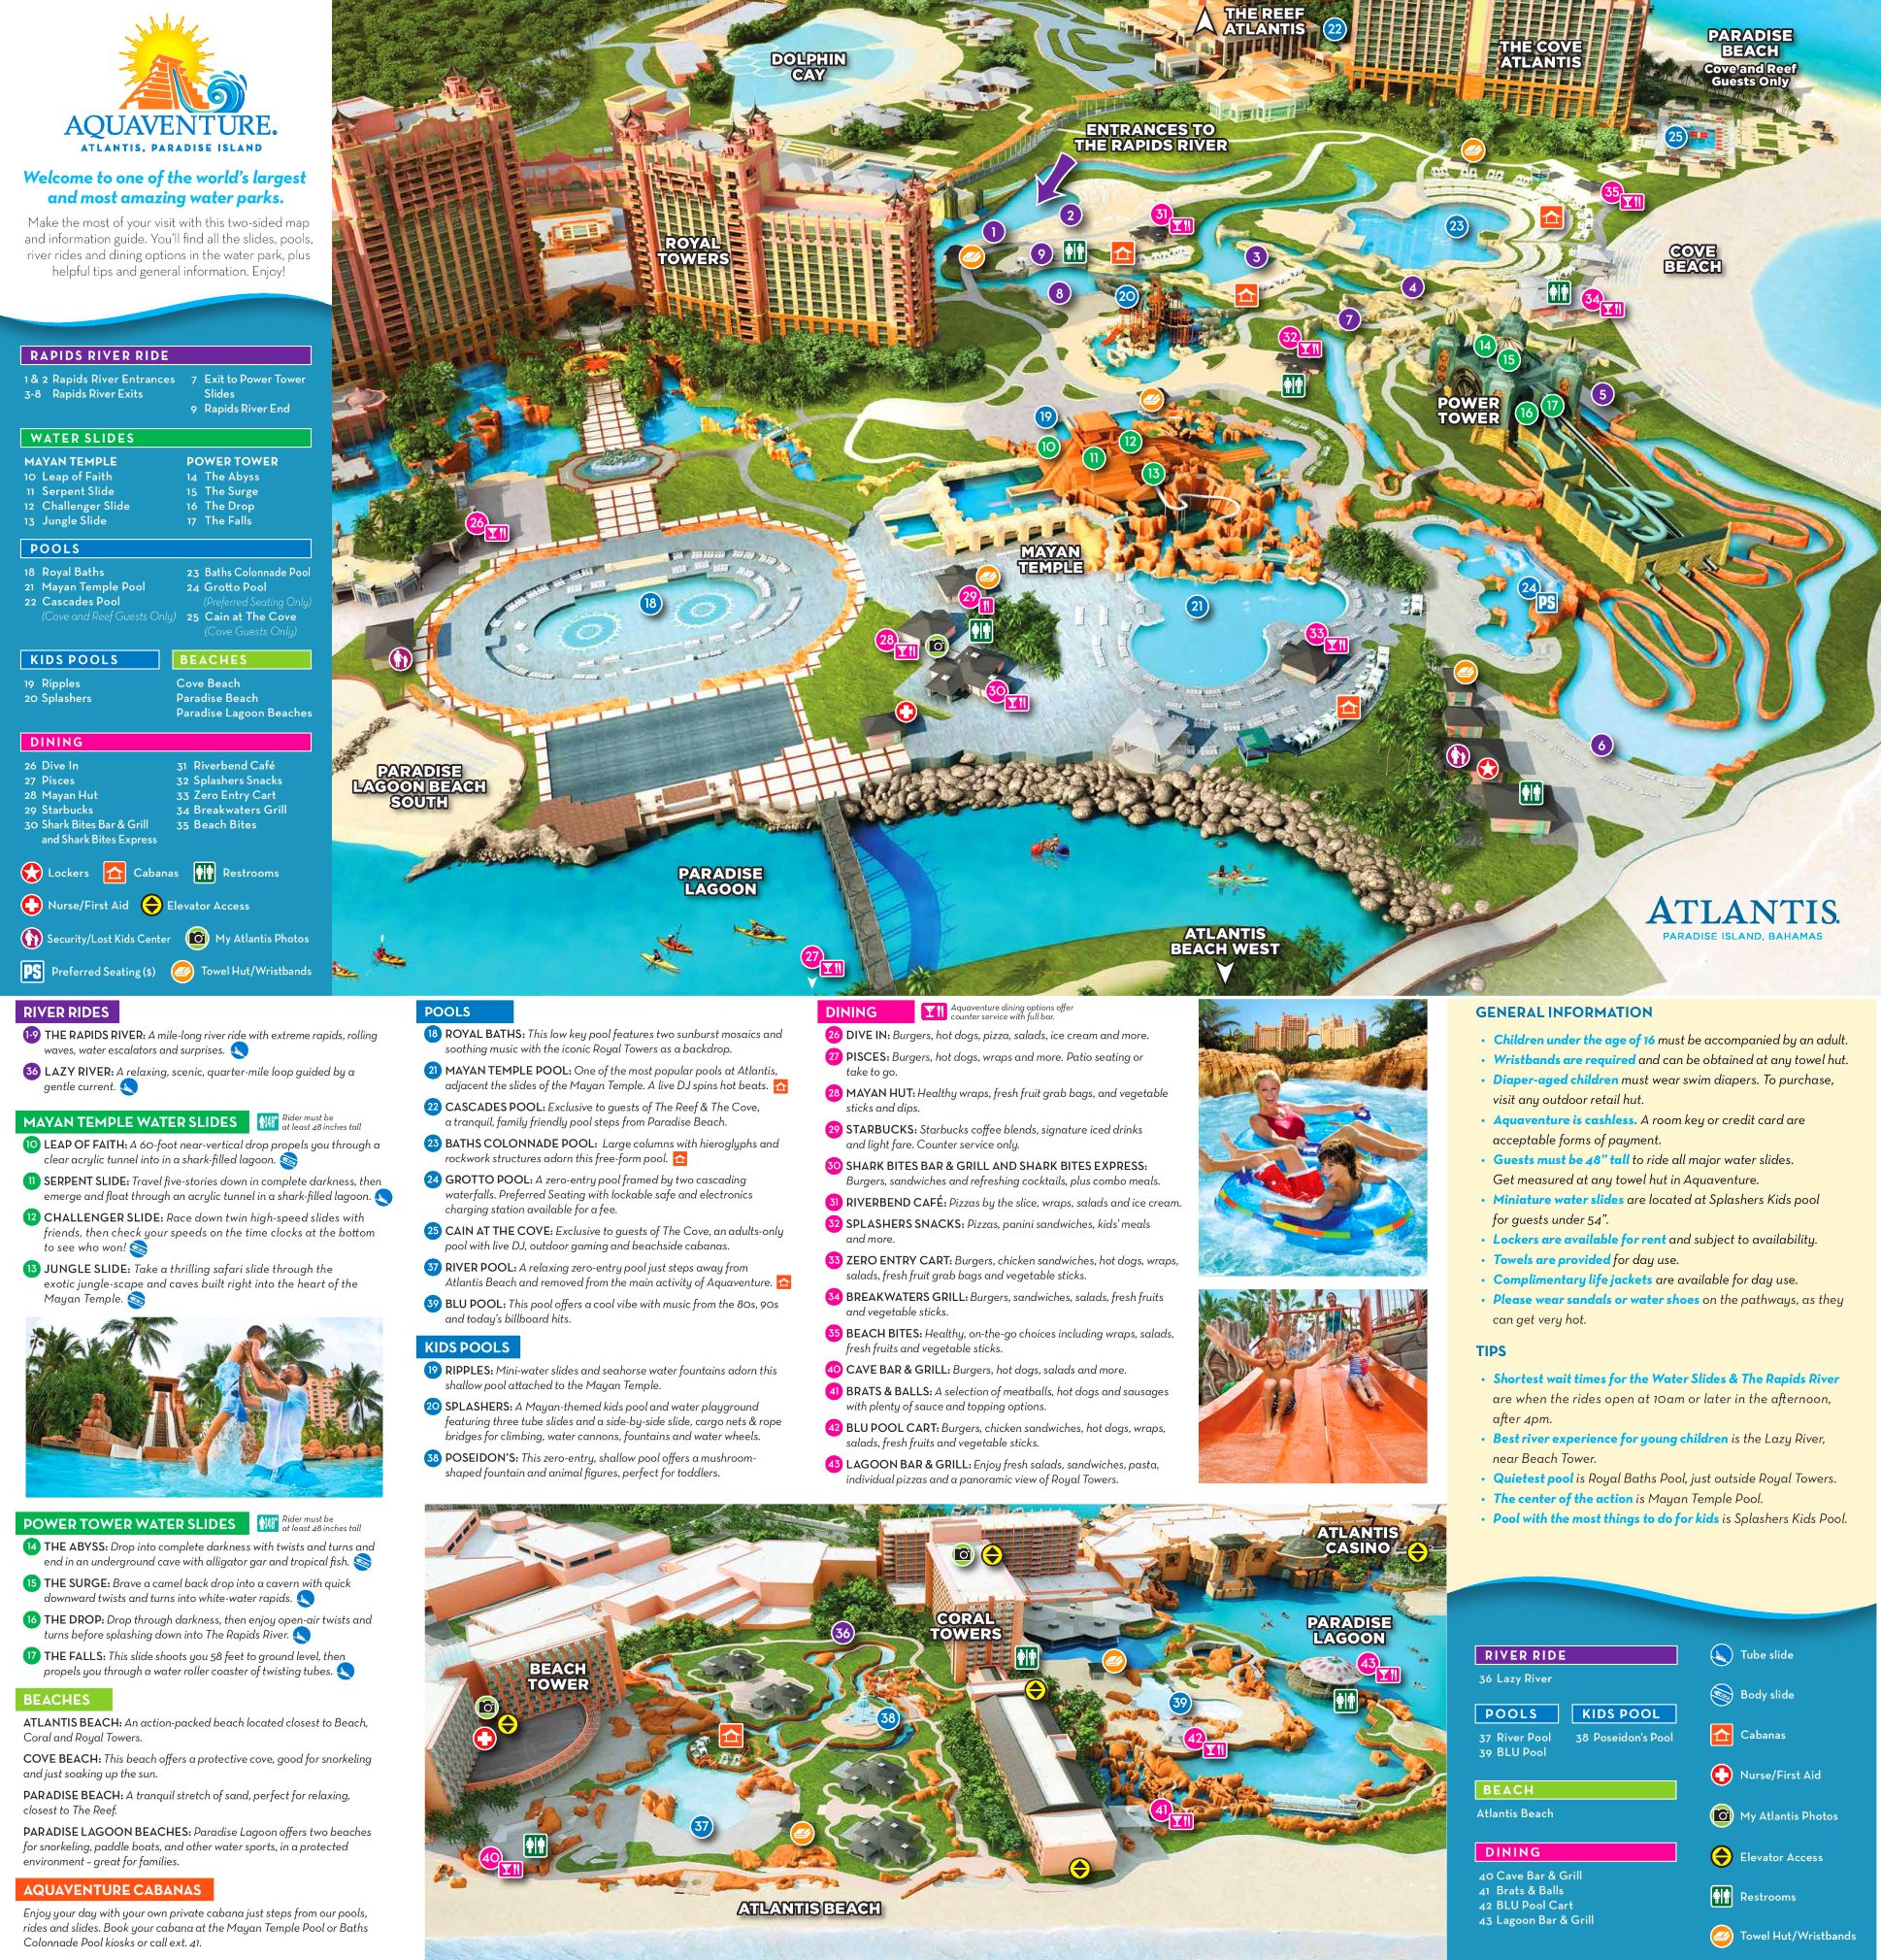
Mayan Temple Water Slides
Leap of Faith: a near 60-foot near-vertical drop propels you through a clear acrylic tunnel into a shark-filled lagoon [video]
Serpent Slide: travel 5-stories down in complete darkness, then emerge and float through an acrylic tunnel in a shark-filled lagoon [video]
Challenger Slide: race down twin high-speed slides with friends, then check your speeds on the time clocks at the bottom to see who won [video]
Jungle Slide: take a thrilling safari slide through the exotic jungle-scape and caves built right into the heart of the Mayan temple [video]
Power Tower Water Slides
The Abyss: Drop into complete darkness with twists and turns and end in an underground cave with alligator gar and tropical fish. [video]
The Surge: Brave a camel back drop into a cavern with quick downward twists and turns into white-water rapids. [video]
The Drop: Drop through darkness, then enjoy open-air twists and turns before splashing down into the Rapids River [video]
The Falls: This slide shoots you 58 feet to ground level, then propels you through a water roller coaster of twisting tubes. [video]
River Rides
The Rapids River: A mile-long river ride with extreme rapid, rolling waves, water escalators and surprises. [video]
Lazy River: A relaxing, scenic, quarter-mile loop guided by a gentle current. [video]
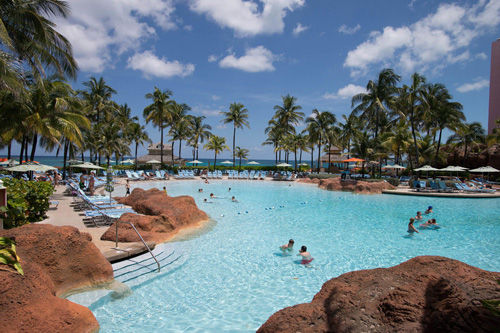
Pools
Royal Baths: This low key pool features two sunburst mosaics and soothing music with the iconic Royal Towers as a backdrop.
Mayan Temple Pool: One of the most popular pools at Atlantis, adjacent the slides of the Mayan Temple. A live DJ spins hot beats.
Baths Colonnade Pool: Large columns with hieroglyphs and rockwork structures adorn this free-form pool.
Grotto Pool: A zero-entry pool framed by two cascading waterfalls. Preferred seating with lockable safe and electronics charging station available for a fee.
River Pool: A relaxing zero-entry pool just steps away from Atlantis Beach and removed from the main activity of Aquaventure.
Blu Pool: This pool offers a cool vibe with music from the 80s, 90s, and today’s billboard hits.
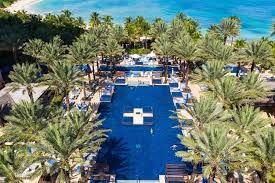
Beaches
Atlantis Beach: An action-packed beach located closest to Beach, Coral and Royal Towers.
Cove Beach: This beach offers a protective cove, good for snorkeling and just soaking up the sun.
Paradise Beach: A tranquil stretch of sand, perfect for relaxing closest to the Reef.
Paradise Lagoon Beaches: Paradise Lagoon offer two beaches for snorkeling, paddle boats, and other water sports, in a protected environment – great for families.
Other
The Dig: Polished marine life & aquarium exhibits in a series of tunnels at the posh Atlantis resort.
2:00 PM
Take Shuttle Back to Ship
2:30 PM
Explore Downtown – Straw Market
3:00 PM
Explore Downtown – Queen’s Staircase
4:00 PM
Go Back to Ship
5:00 PM
Depart Nassau Back to Miami
5:30 PM
Pack Bags
Cruise staff will pick up luggage at night. Keep a foldable overnight / duffle bag to store night clothes and toiletries.
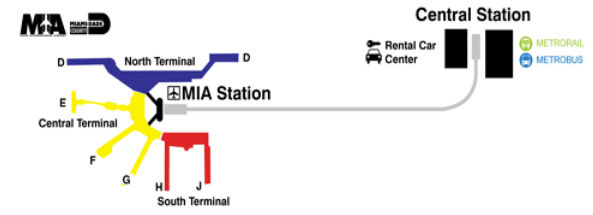
After purchase, you will receive a voucher via email.
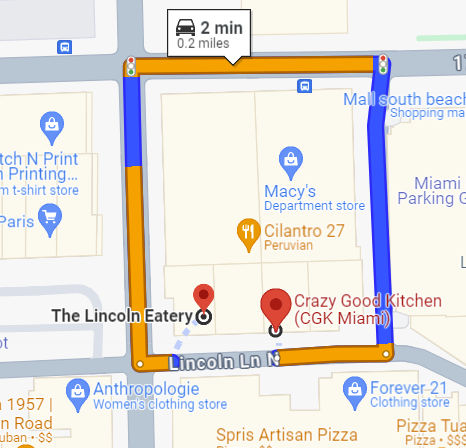
You must EXCHANGE this voucher at least 45 minutes prior to scheduled departure time at one of our ticket booths at Bayside Marketplace (NOT in the line where you will board) for a physical boarding pass.
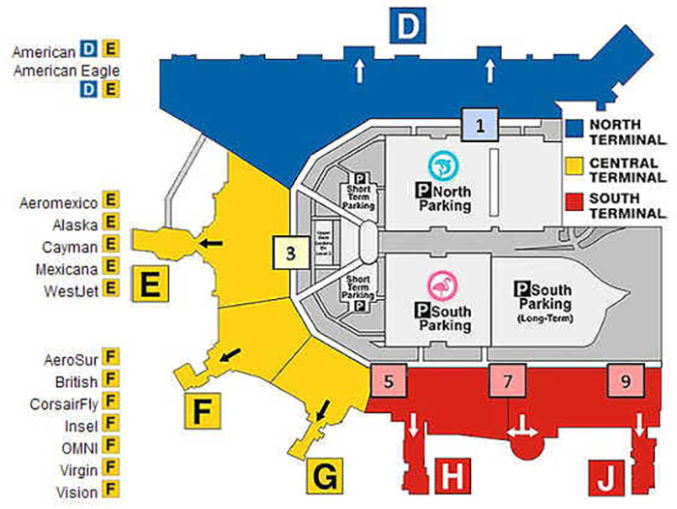
There’s no free food on the plane. Eat at the airport. Bring trail mix. American Airlines is in the north terminal (concourse D, 2nd Level Departures).
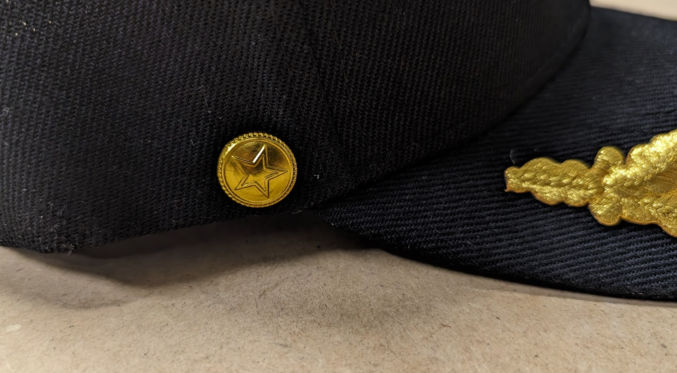
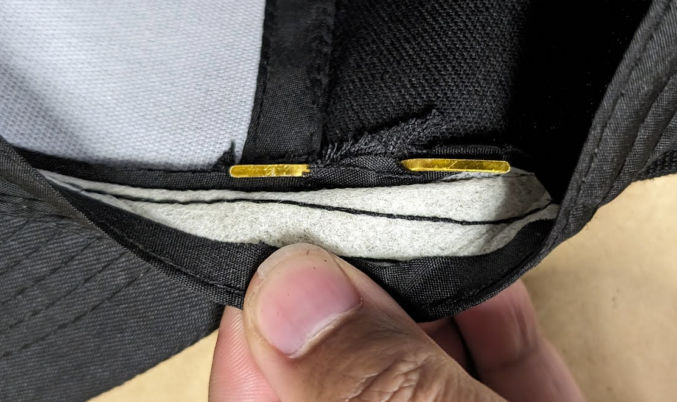
While there are many services that let you buy a hat and customize it, you may not like the style, quality or fit of the hat. Also, you are limited in how you can customize it. In this post, I explain how I customized a hat I already own. Since I’m planning to go on a cruise, I wanted a hat that kinda looked like a captain’s hat. My preferred hat is a black cap that I get at a nearby mall.
I wanted to customize it with design elements from the captain hat shown below.
After much research, trial and error, I ended up with this:
Place the patches on the hat and secure using sewing pins.
When you know where the patches should go, put sewing pins in hat at certain points along perimeter of patches to guide where the patches should go.
Add glue to the back of the patches and place patches on hat.
Insert sewing pins into hat through patches to secure patches in place. If necessary, clamp patches to hat using a clamp.
Decide where to put the gold buttons.
Drill hold in hat where gold buttons would go.
Fasten gold buttons to hat via the holes you just created.
For the buttons, I actually took mine off of a cheap hat I had bought on Amazon. The buttons have 2 flat metal pins that can be folded to secure the buttons.
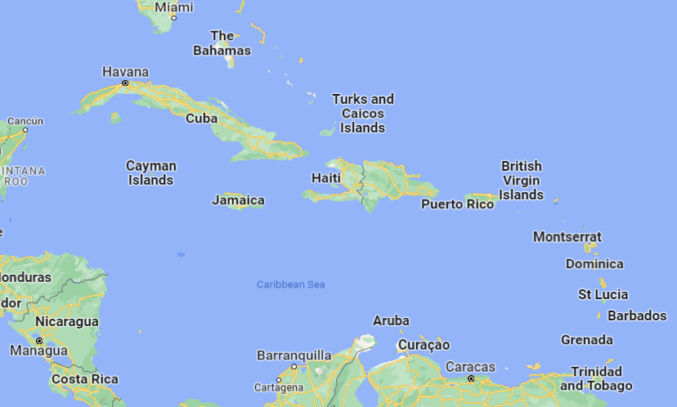
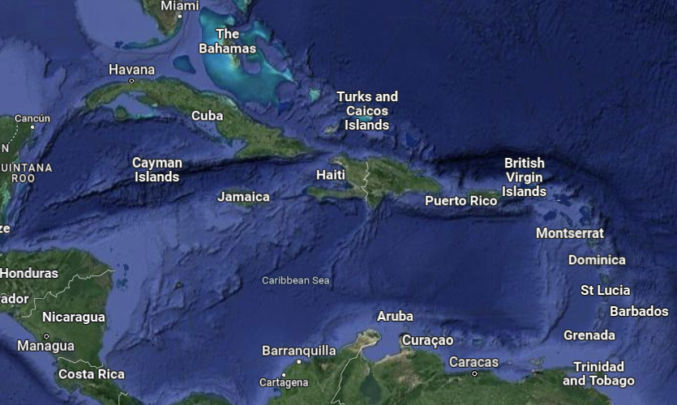
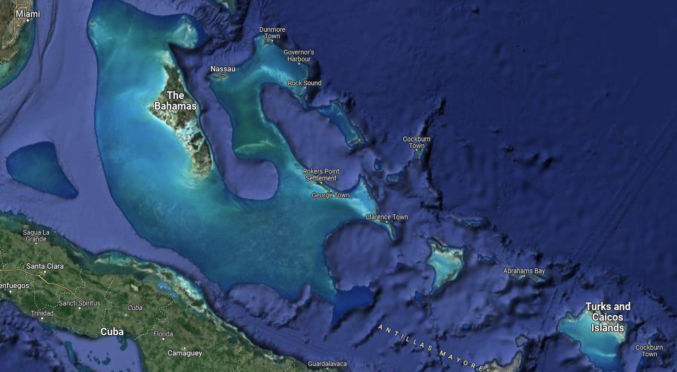
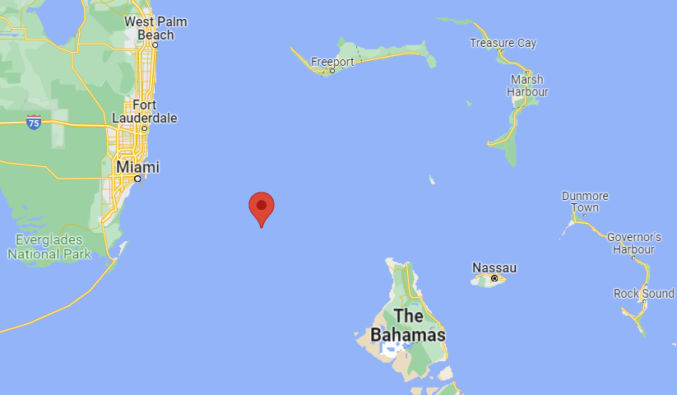
The Caribbean is a subregion of the Americas that includes the Caribbean Sea and its islands.
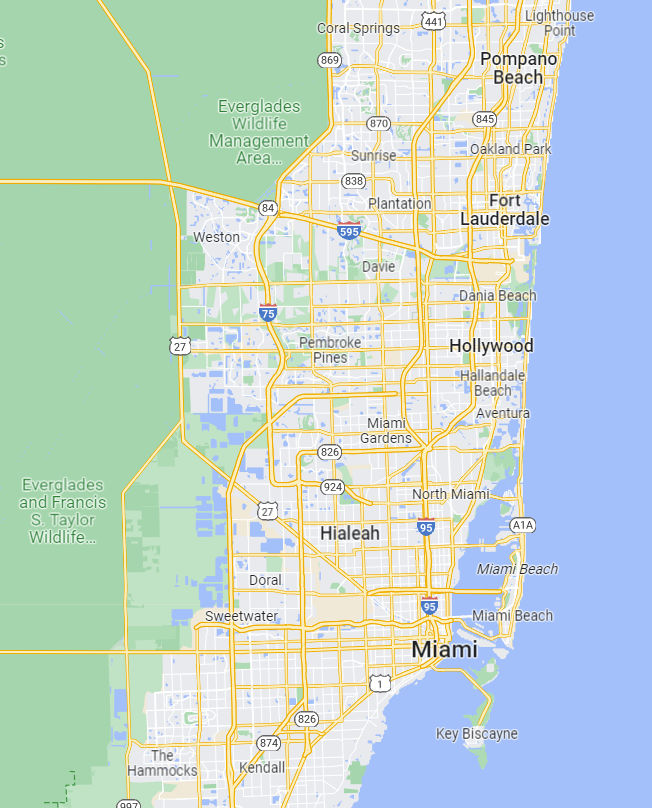
Best Beaches
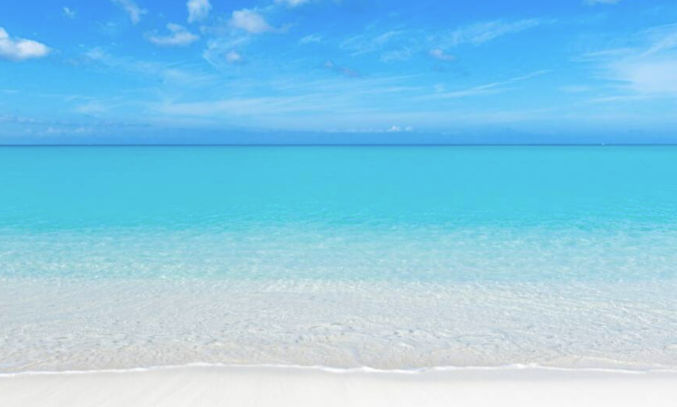
If your idea of the best beach is like mine, which are beaches that have
shallow turquoise or clear water,
fine white sand,
no garbage, seaweed, rocks and corral
like this
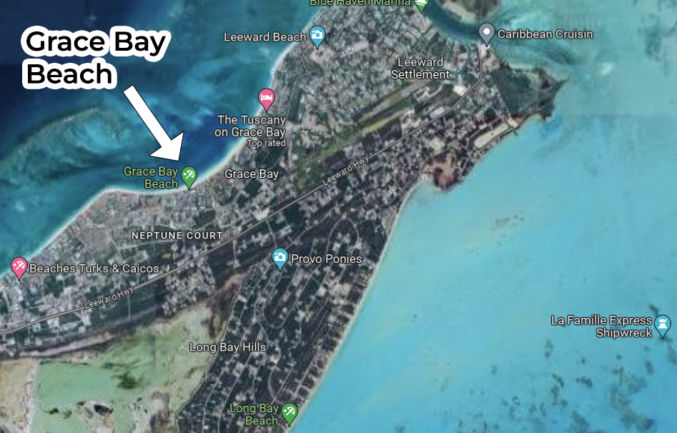
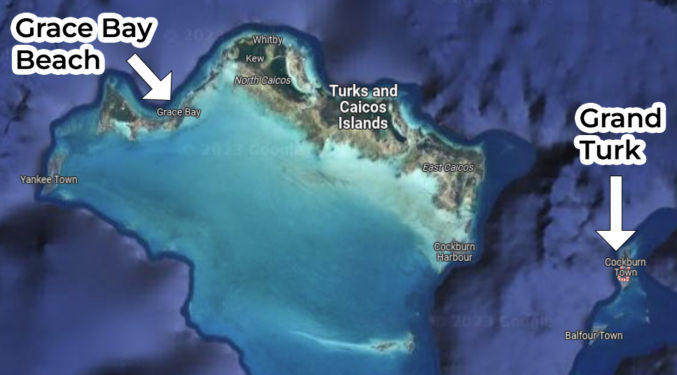
then, looking at the Google satellite image above, it should be evident that one spot stands out: The Bahamas! Actually, if we zoom in on that area, we’ll find that the Turks and Caicos Islands also have that same turquoise color.
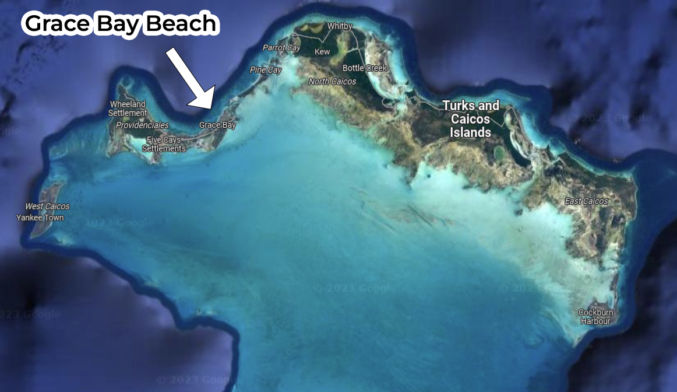
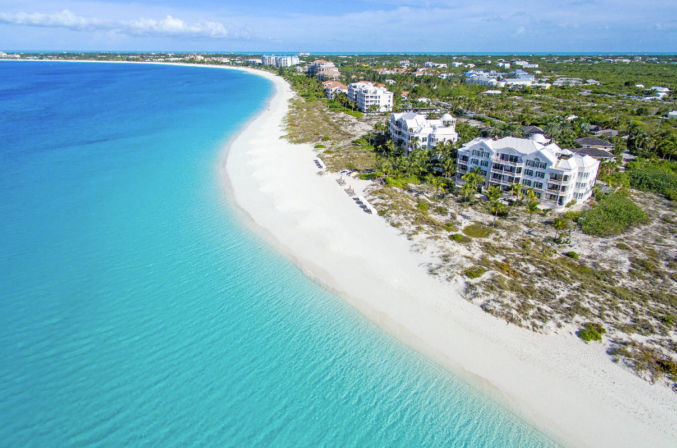
Grace Bay Beach is located on the west side of Providenciales island. As you can see in the picture above, it looks amazing. But, the beach and water on the eastern side looks even better according to the zoomed-out photo below.
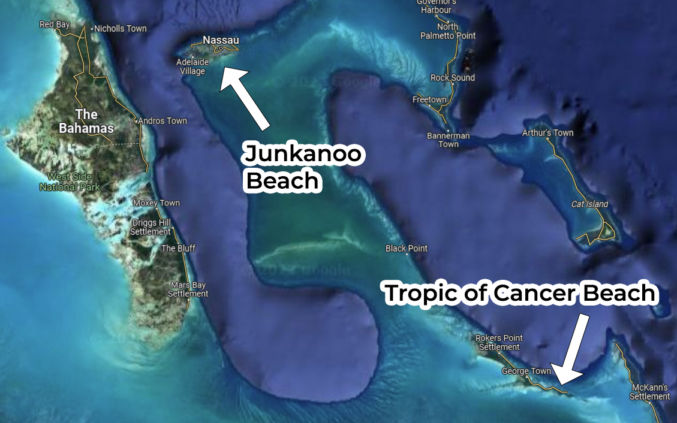
So, what about the Bahamas? According to Lonely Planet, two beaches that meet the criteria above are
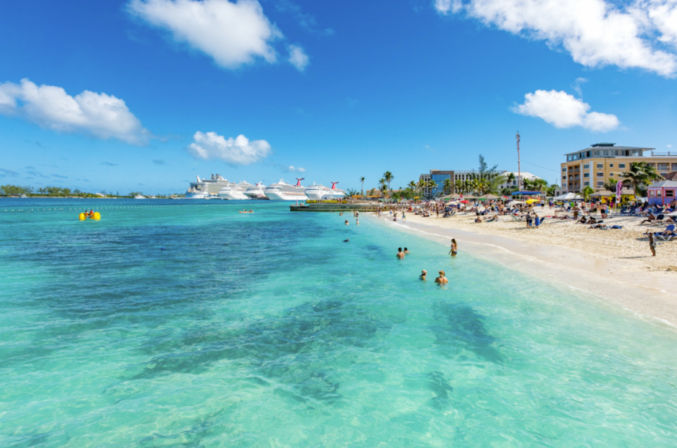
Junkanoo beach Located in the city of Nassau on the island of New Providence and near the cruise port, this beach gets really crowded.
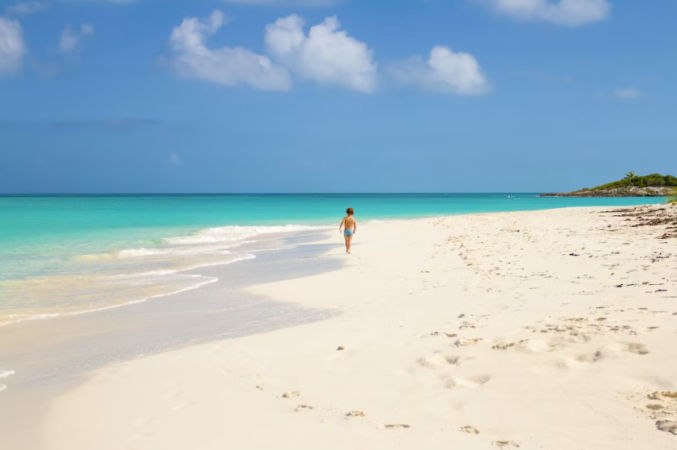
Tropic of Cancer Beach This beach is located in a small town far from Nassau. You may feel lonely at this beach.
Junkanoo BeachTropic of Cancer Beach
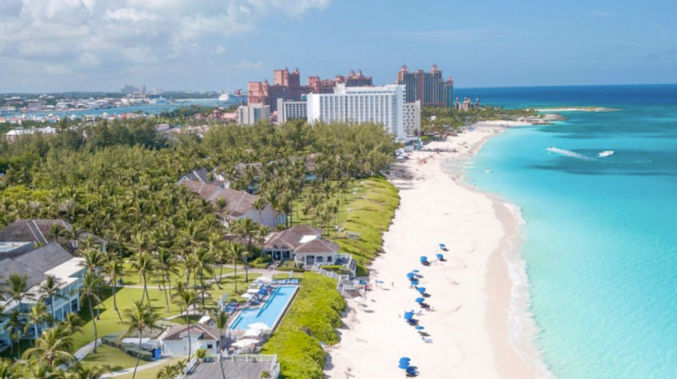
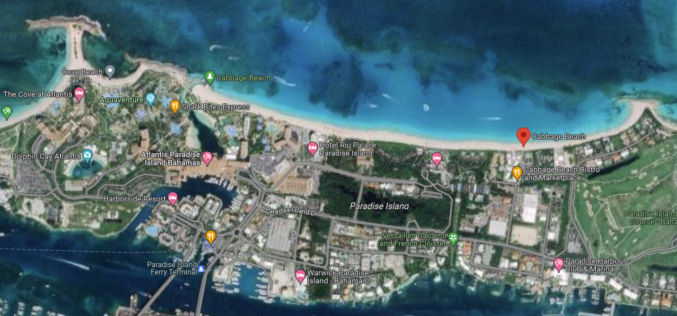
Another popular beach is Cabbage beach on Paradise Island where the Atlantis resort is in Nassau, Bahamas.
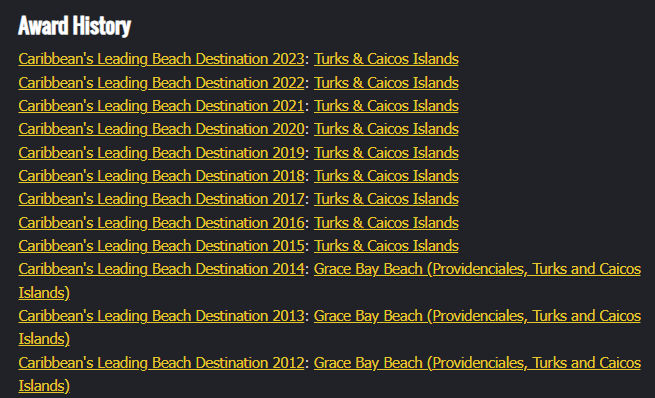
Best Luxury Island Destination
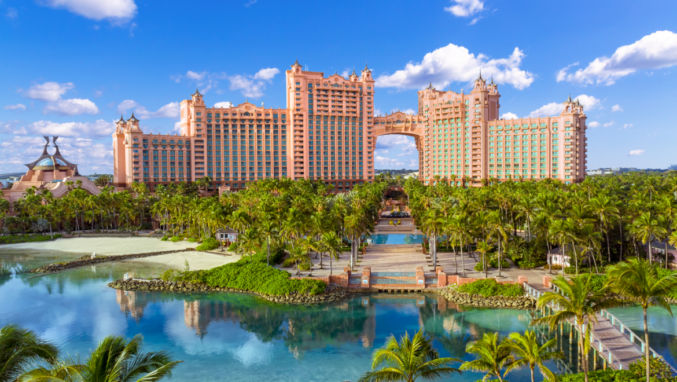
Though the Bahamas may not have won the record for having the best beach, it did consistently win for being the best luxury island destination in the Caribbean.
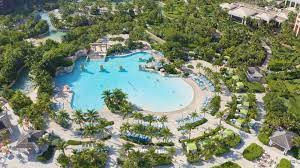
Probably the most notable luxury spot in the Bahamas is the Atlantis resort on Paradise island.
Other Islands
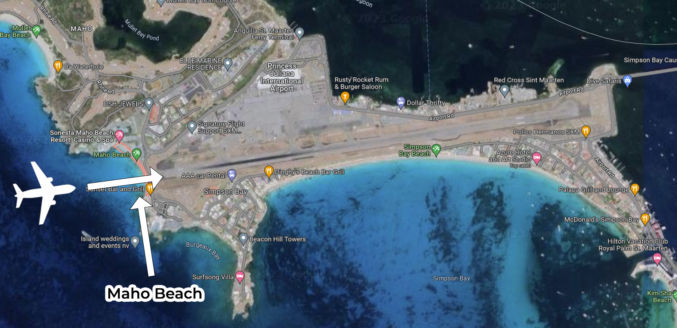
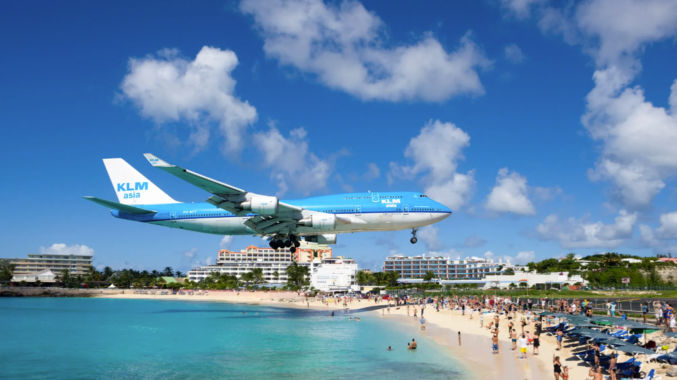
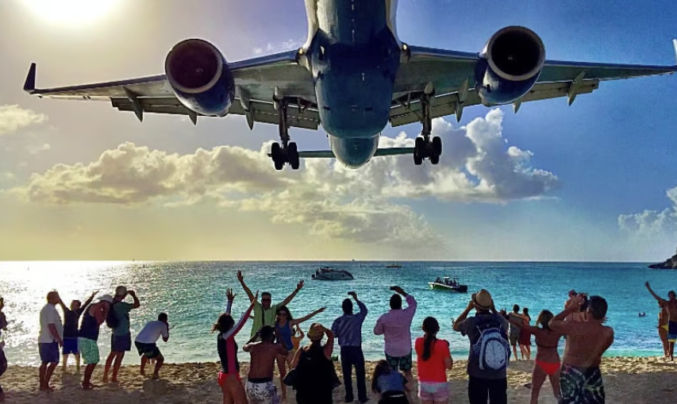
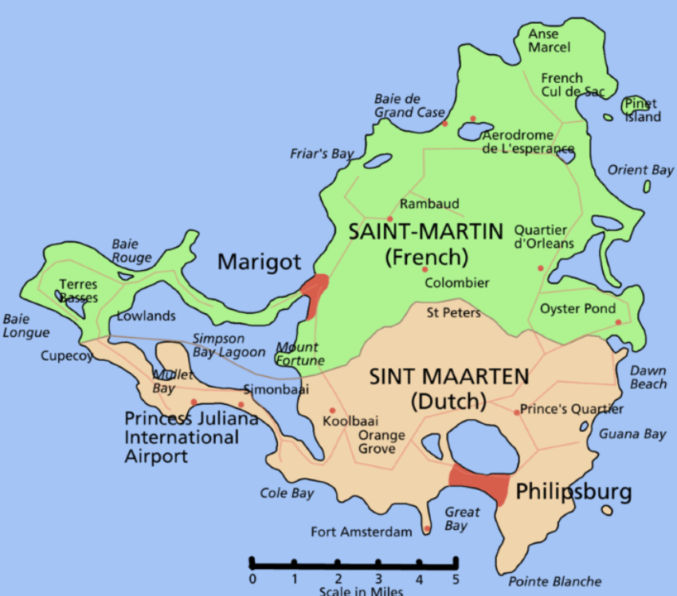
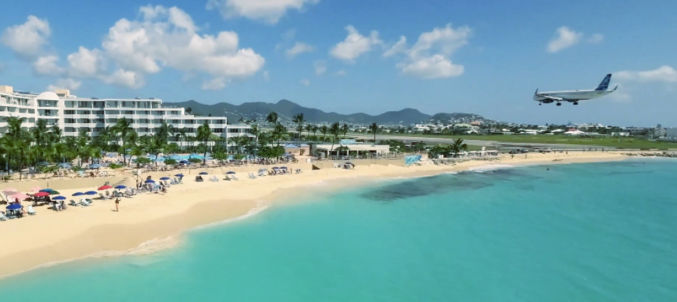
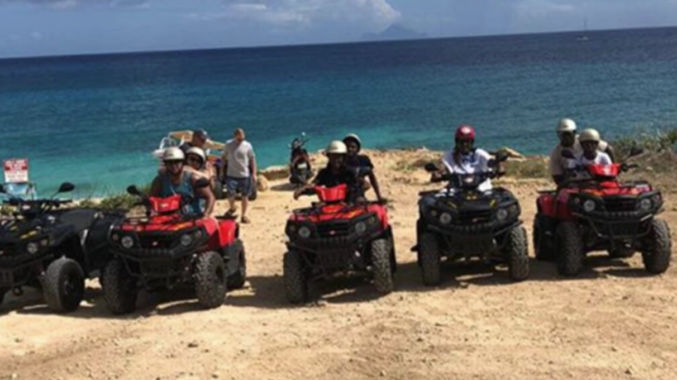
I’m sure there are many other islands with very nice beaches. Some may even be better than the ones mentioned above, but they may be so remote that they would be difficult to get to. You may think that the U.S. and British Virgin Islands (U.S.V.I and B.V.I.) have nice beaches, but from my personal experience visiting them, they are nowhere as nice as the ones mentioned above. There is one beach on Sint Maarten however that is nice and very unique and attractive among tourists. It’s the Sint Maarten Airport Beach or Maho Beach, where the airport landing strip is literally right next to the beach.
The airport runway is half the length of typical runways, so airplanes have to land close to the start of it to avoid overrunning the landing strip.
Tourists love taking photos of themselves standing right below a plane coming in for a landing.
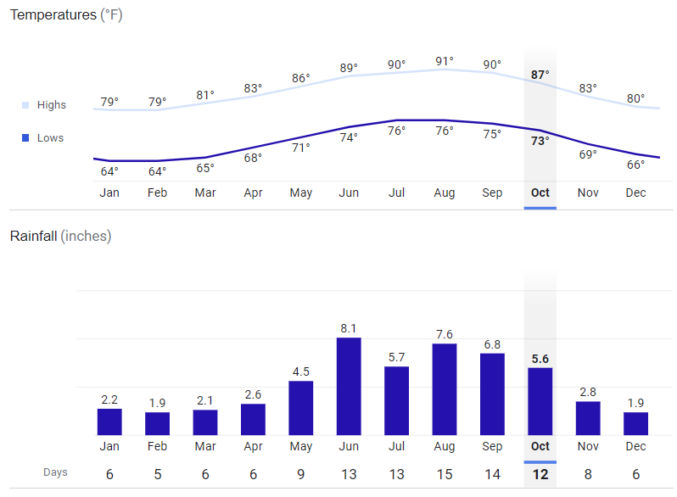
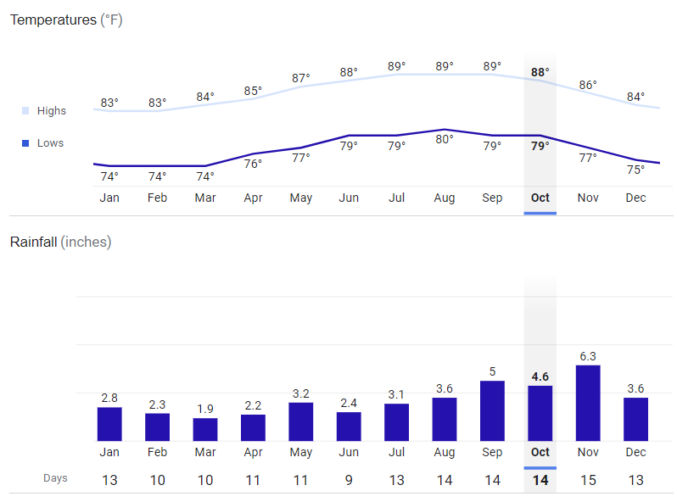
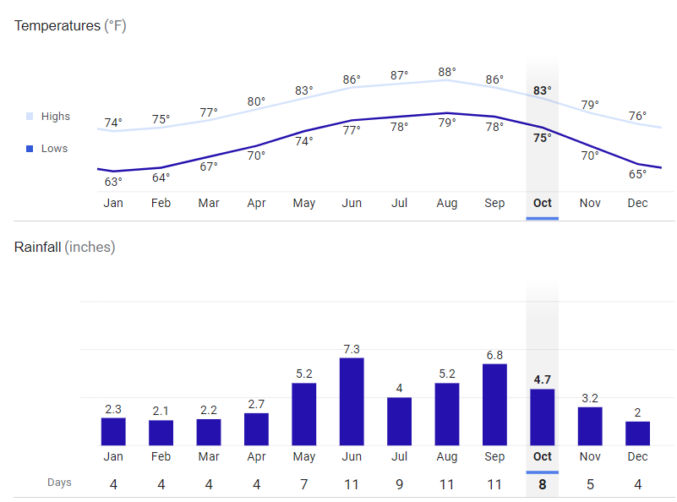
Weather
The best time to go to the Caribbean is during the winter months when the temperature isn’t too high and rainfall is low. Below are average temperatures and rainfall by month for the Bahamas, Turks & Caicos, and Sint Maarten.
The Bahamas
Turks & Caicos
Sint Maarten
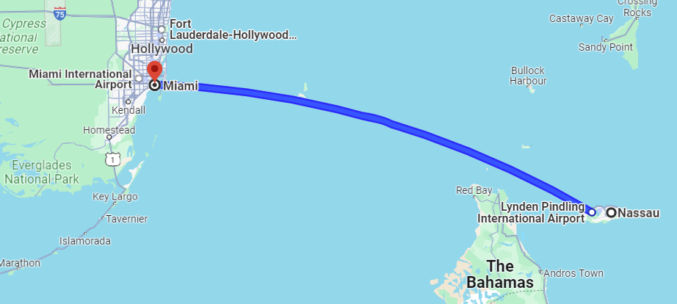
And since many cruises depart from Miami, it may be worth it to spend a few days in Miami before or after the cruise. The weather is Miami similar to that in the Caribbean.
Miami
Based on the graphs above, it would appear that February is the best time to go.
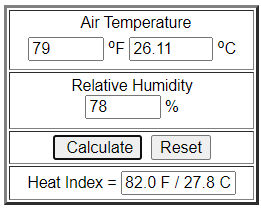
Humidity and Heat Index
Note that the Caribbean has a humid climate, and high humidity actually makes you feel hotter than in low humidity climates. The heat index is a measure of how hot you feel when taking into both temperature and humidity into consideration. Learn more.
In Nassau, Bahamas,
On average, September is the most humid month, at 81.0%.
On average, April is the least humid month, at 74.0%.
The average annual percentage of humidity is: 78%
According to this heat index calculator, if the temperature is 79 degrees and the humidity is 78%, then the heat index is 82 degrees Fahrenheit.
Flights
You can easily find flights from Miami to the Bahamas, Turks and Caicos, and Sint Maarten. Below are non-stop flights to each country, flight time, and cost for travel in February 2024.
Destination
Travel Time
Cost
Nassau, Bahamas
1 hr 10 min
$262
Sint Maarten
3 hr
$400
Turks and Caicos
2 hr
$200
Cruises
The Caribbean is a popular region for cruises. Many cruise lines go to all 3 countries mentioned above. But, cruise ships don’t necessarily dock at the specific islands mentioned above. Here are the cruise ship ports of call for each country.
Country
Port of Call
The Bahamas
Nassau City, New Providence Island
The Bahamas
Princess Cays
Turks & Caicos
Grand Turk
Sint Maarten
Sint Maarten
In particular, note that Grand Turk is an island in Turks & Caicos that is very far from Providenciales island where the best beach (Grace Bay Beach) is. You’d have to fly from Grand Turk to Grace Bay Beach.
If you are looking for a cruise ship that goes to these islands, you can do a search from sites like Cruiseweb.com where you can specify search criteria like
month (January, February)
ports of call (Nassau and Grand Turk)
etc
The cruise line that primarily goes to Grand Turk is Carnival. Following are some cruise itineraries that meet the criteria above.
Ship: Carnival Magic – 6-Night Cruise
Sun Feb 18, 2024 – Sat Feb 24, 2024
Date
Port
Arrival
Departure
Feb 18, 2024
Miami
—
3:30 PM
Feb 19, 2024
Fun Day At Sea
—
—
Feb 20, 2024
Grand Turk, Turks & Caicos
8:00 AM
5:00 PM
Feb 21, 2024
Amber Cove, Dominican Republic
8:00 AM
5:00 PM
Feb 22, 2024
Fun Day At Sea
—
—
Feb 23, 2024
Nassau
8:00 AM
4:00 PM
Feb 24, 2024
Miami
—
8:00 AM
Ship: Princess Cruises – 14-Night Cruise
Date
Port
Arrival
Departure
Feb 11, 2024
Fort Lauderdale (Port Everglades), Florida
—
3:00 PM
Feb 12, 2024
Princess Cays, Bahamas
9:00 AM
4:00 PM
Feb 13, 2024
Cruising
—
—
Feb 14, 2024
Ocho Rios, Jamaica
8:00 AM
4:00 PM
Feb 15, 2024
Georgetown, Grand Cayman, Cayman Islands
7:00 AM
4:00 PM
Feb 16, 2024
Cozumel, Mexico
10:00 AM
7:00 PM
Feb 17, 2024
Cruising
—
—
Feb 18, 2024
Fort Lauderdale (Port Everglades), Florida
7:00 AM
3:00 PM
Feb 19, 2024
Princess Cays, Bahamas
9:00 AM
4:00 PM
Feb 20, 2024
Cruising
—
—
Feb 21, 2024
San Juan, Puerto Rico
9:00 AM
10:00 PM
Feb 22, 2024
St. Thomas, U.S. Virgin Islands
8:00 AM
5:00 PM
Feb 23, 2024
Cruising
—
—
Feb 24, 2024
Cruising
—
—
Feb 25, 2024
Fort Lauderdale (Port Everglades), Florida
7:00 AM
—
Cruise Line Private Islands
Some cruise lines bought or made islands just for their passengers. Since the islands were custom-made for tourists, they have many tourist benefits that you may not find on other islands. Following are some notable islands.
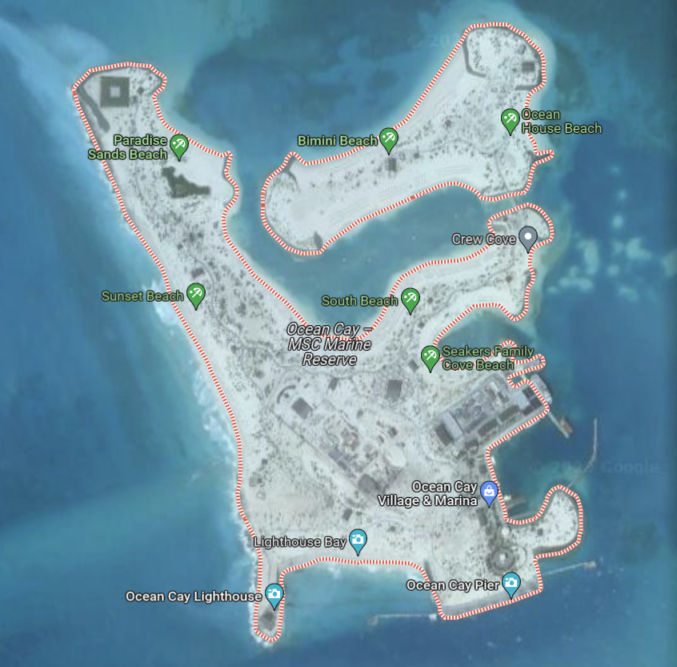
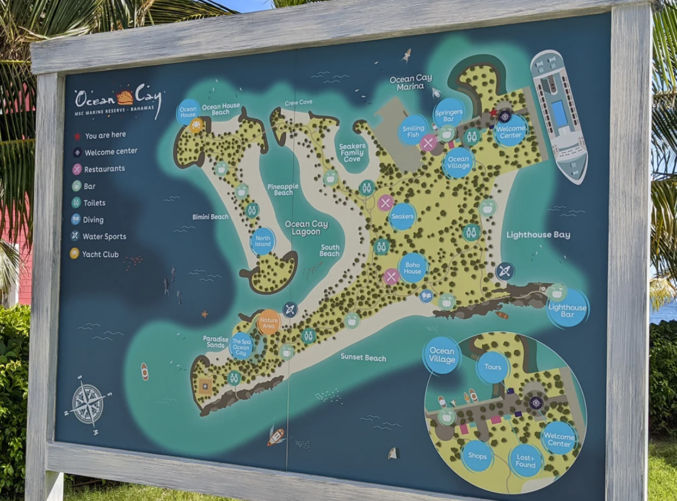
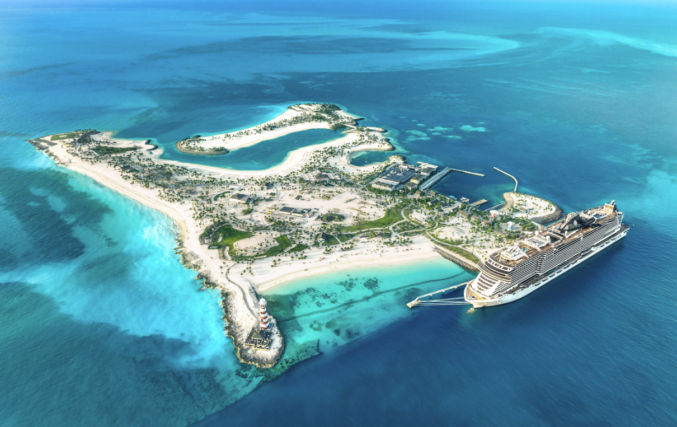
Ocean Cay, The Bahamas: MSC Cruises
This island is located on a former sand extraction site. MSC Cruises owns it. It’s located pretty close to Miami.
Google Maps’ satellite view shows a lot of beaches with turquoise water.
There’s a beach right by the port where the cruise ship docks. If you want calm water and are afraid of accidentally being pulled out to sea, you can swim between the two beaches at the lagoon.
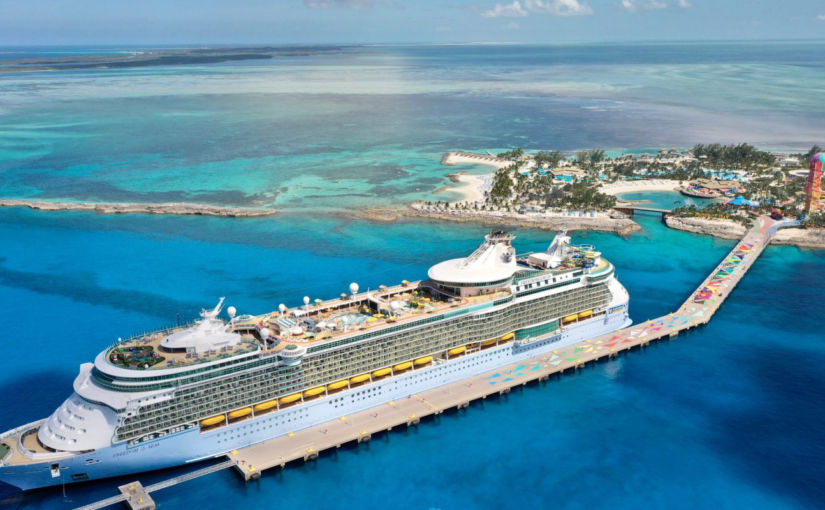
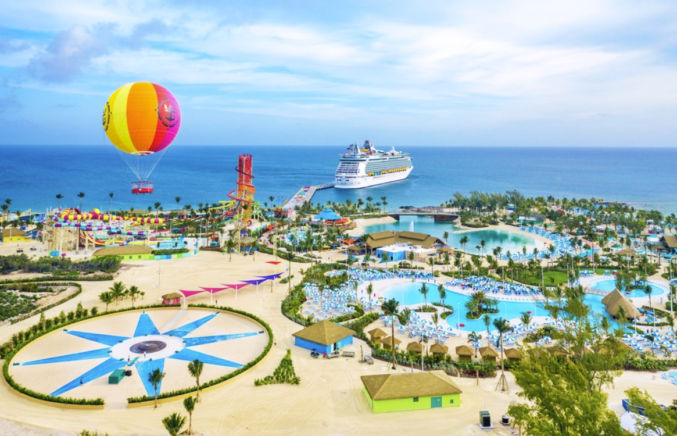
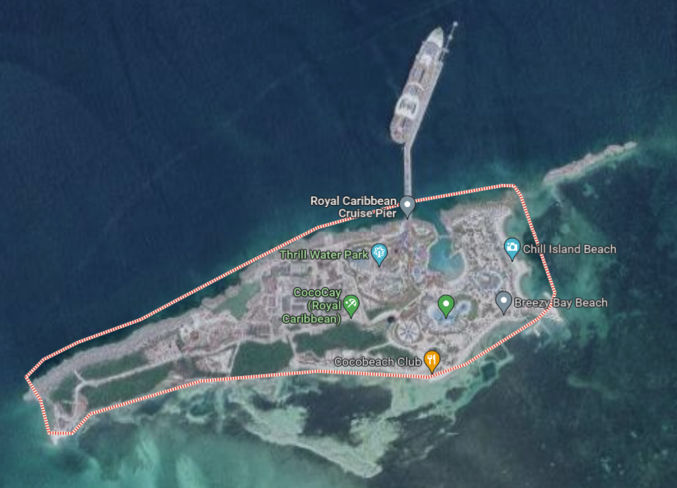
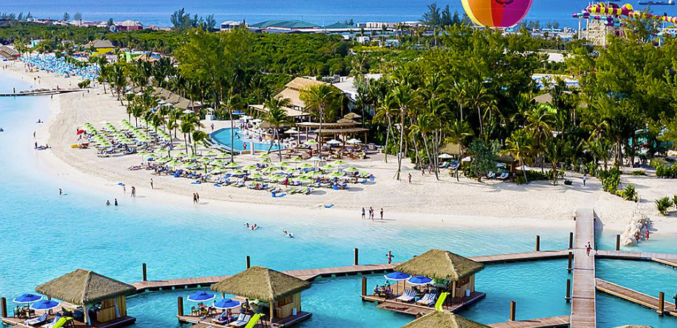
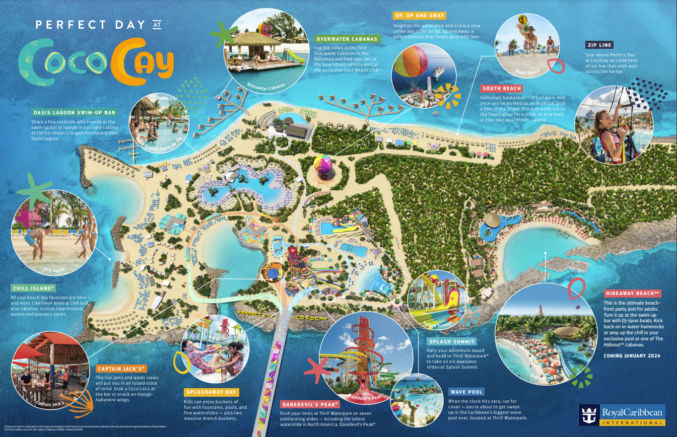
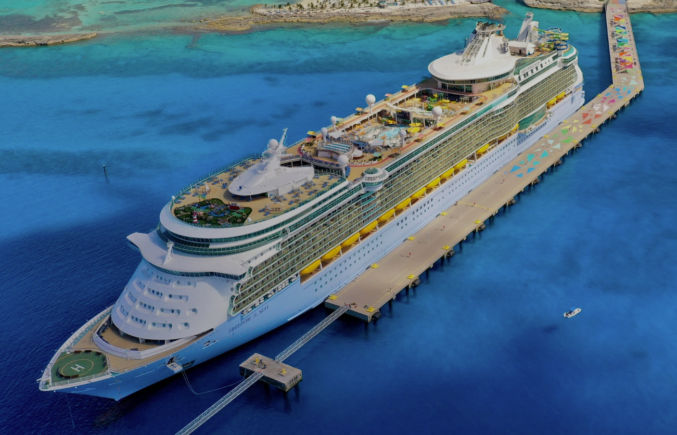
This island is owned by Royal Caribbean and is exclusively for Royal Caribbean guests. The Google Maps satellite view may make you think the water isn’t turquoise, but it’s deceiving. Many photos show that the water is actually very turquoise. Note that the pier can accommodate two ships, so if you want to avoid crowds, try to find a trip when only your ship will dock there.
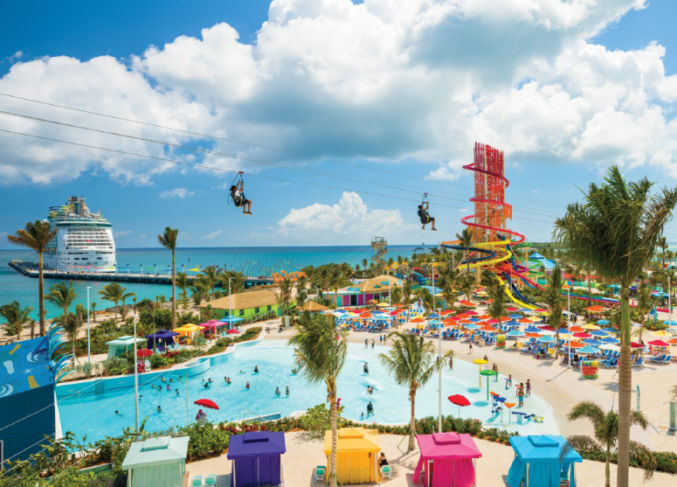
With so many activities and attractions, CocoCay looks more like an amusement park. Some activities and amenities include
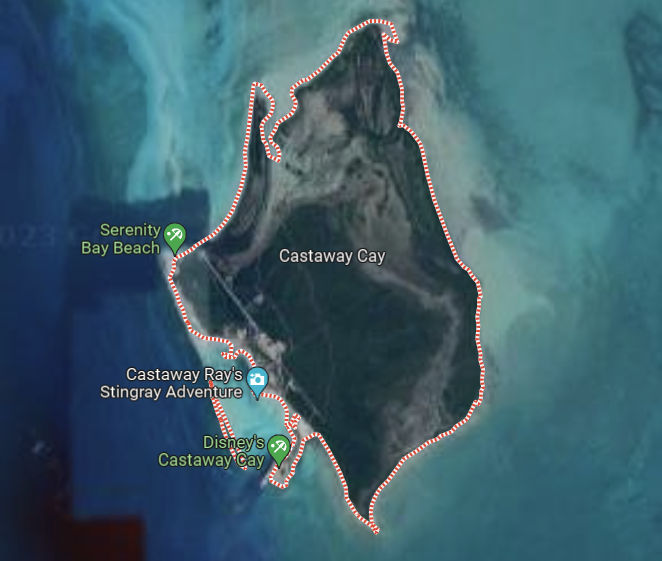
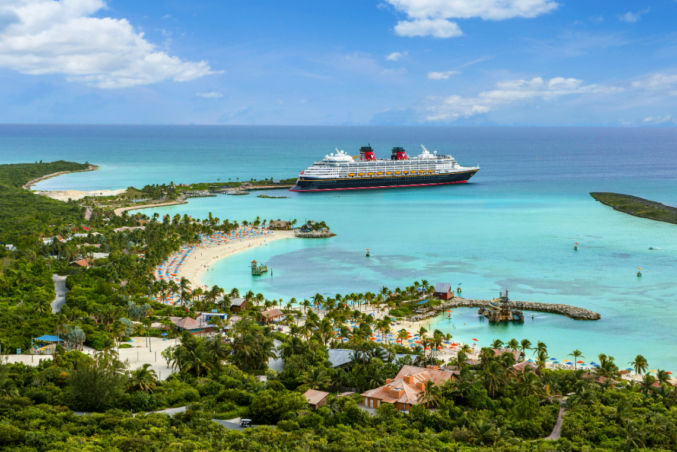
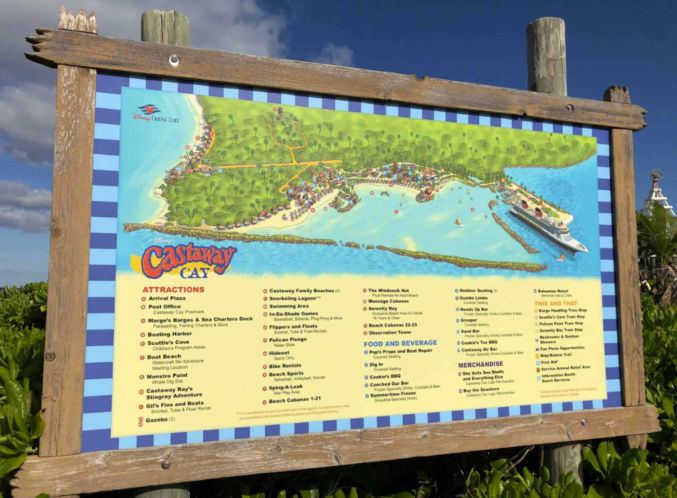
Castaway Cay is owned by Disney. Most of the island appears undeveloped. The water by the pier seems to be pretty turquoise.
According to the Disney map, the only developed area is by the pier. It’s nice how they have a breakwater barrier to keep the water calm and to block you from accidentally getting pulled out to sea.
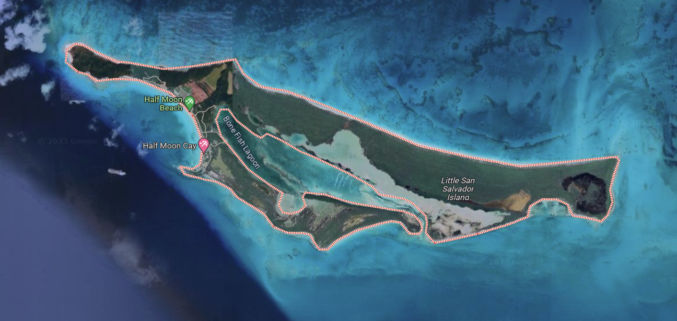
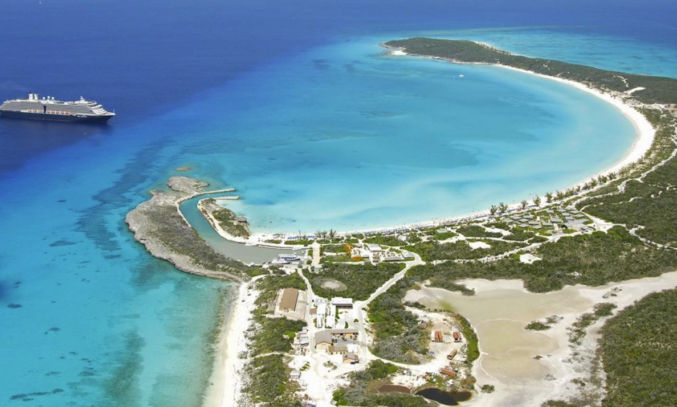
Half Moon Cay, Bahamas: Holland America Line
Below is a satellite view of Half Moon Cay, also called Little San Salvador. Only 3% of the island has been developed for cruise passengers. The color of the water looks pretty good. You will find a 2-mile-long powdery white sand beach and a rugged coastline beyond. There is a natural lagoon called Bone Fish Lagoon that is a breeding ground for sharks, turtles and bonefish.
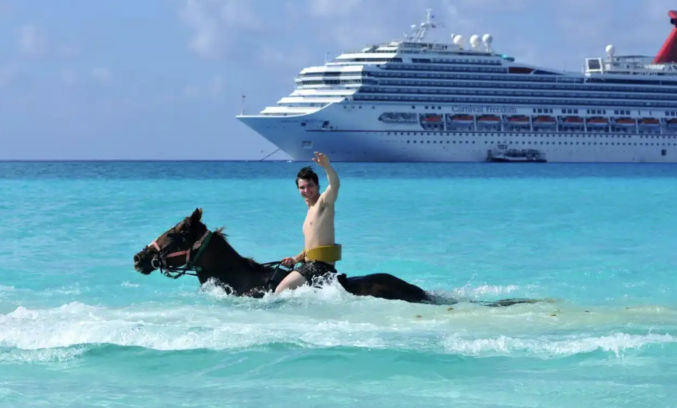
One interesting activity you can do there is ride a horse in the water.
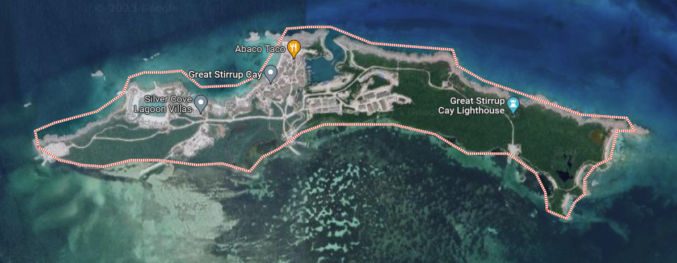
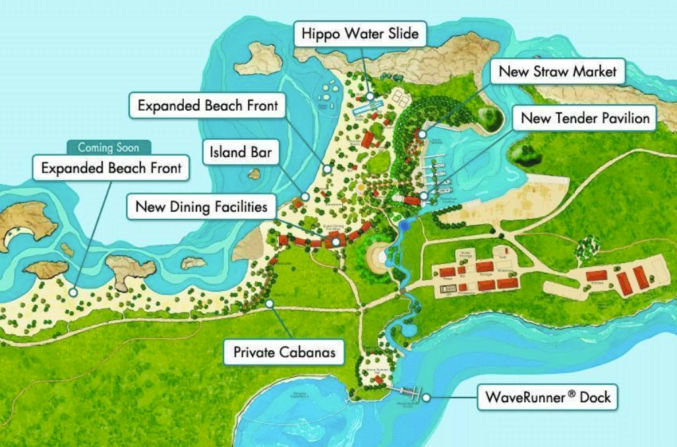
Great Stirrup Cay, Bahamas: Norwegian Cruise Line
Great Stirrup Cay is located next to Perfect Day CocoCay.
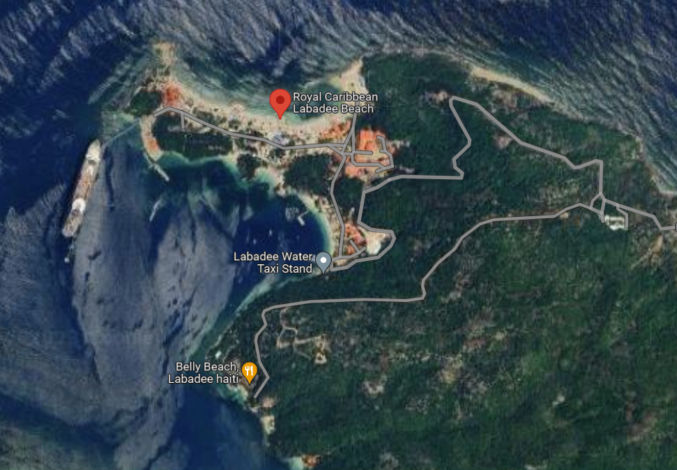
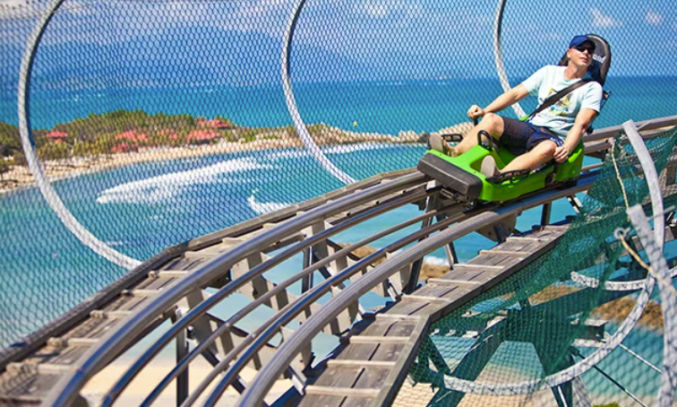
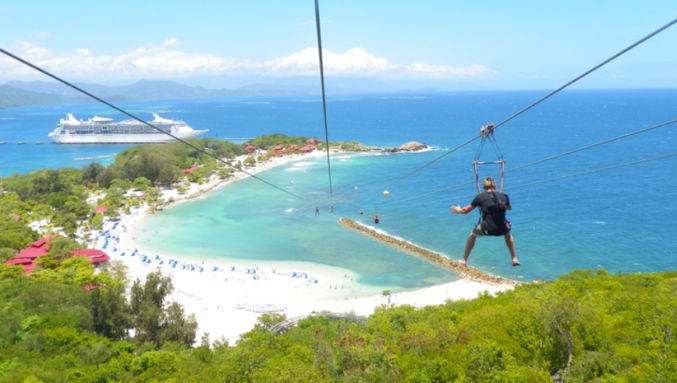
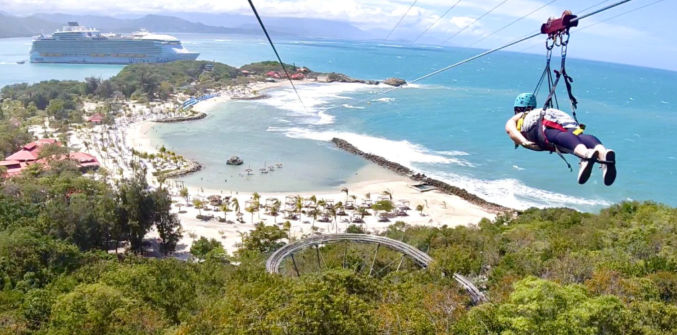
Labadee, Haiti: Royal Caribbean
This destination offers some interesting activities. You can go to the mountaintop for a ride on the alpine Dragon’s Tail Coaster. The thrilling descent begins with panoramic views of Labadee from 680 feet above the coastline atop Santa Maria’s lookout mountain. On the way down you’ll reach speeds of 30 miles per hour and zip through 360-degree twists and turns.
There is also a zip line and Superman-style flight line that both let you soar a half mile over the water.
Superman-style
Activities
There are many activities you can do when visiting Caribbean islands, including
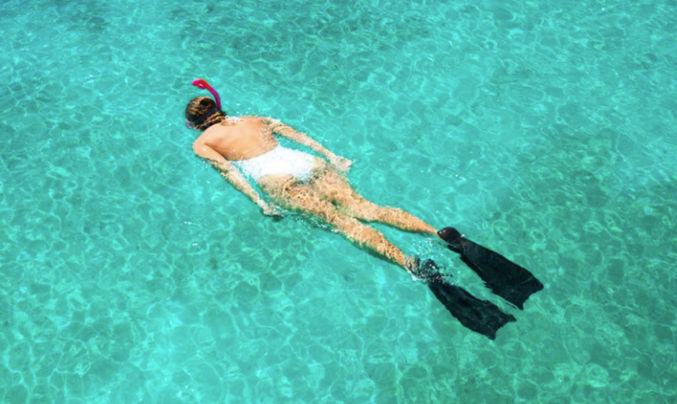
Snorkeling
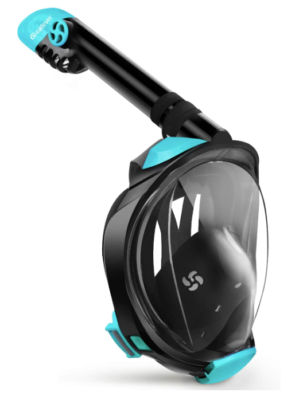
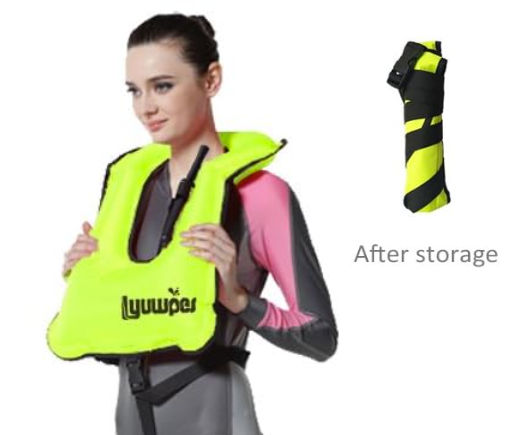
When snorkeling, it would seem better to wear a full-face snorkel mask and a snorkel vest. The mask will give you better visibility and you don’t have to keep your mouth closed. The snorkel vest will easily keep you afloat while allowing your face to be submerged in the water. A life jacket, unlike a snorkel vest, will keep your head above the water, which is not what you want for snorkeling.
Full-face snorkel maskSnorkel vest
Power snorkeling
Lounging in the water
Whether in a swimming pool or at the beach, these inflatable hammocks are great as they keep your head above the water but your body in it.
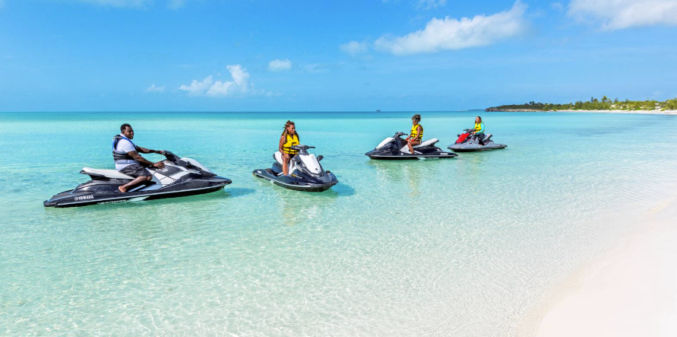
Jet ski tour
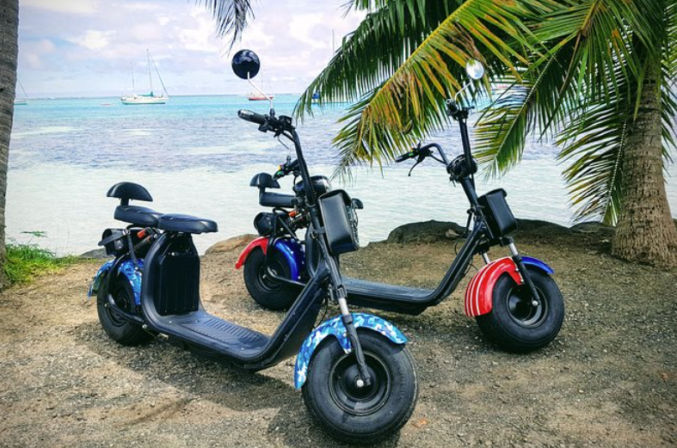
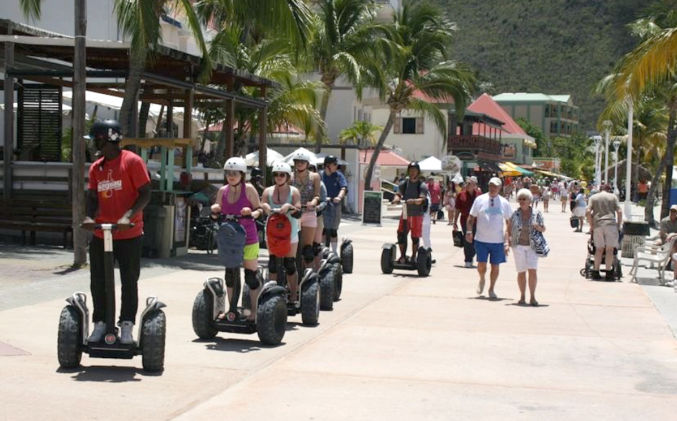
Explore the island by scooter
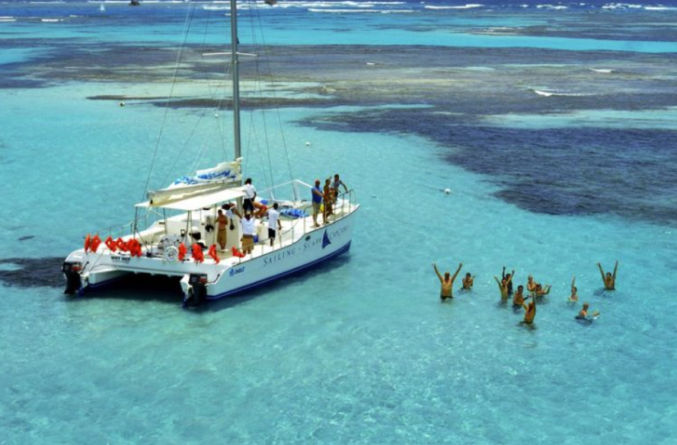
Catamaran tour
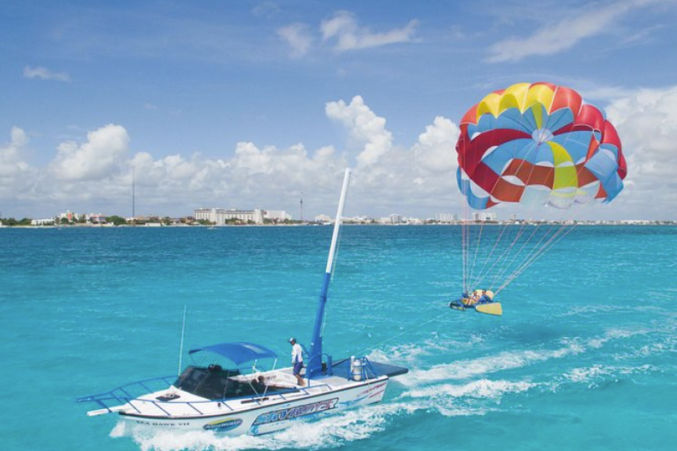
Parasailing
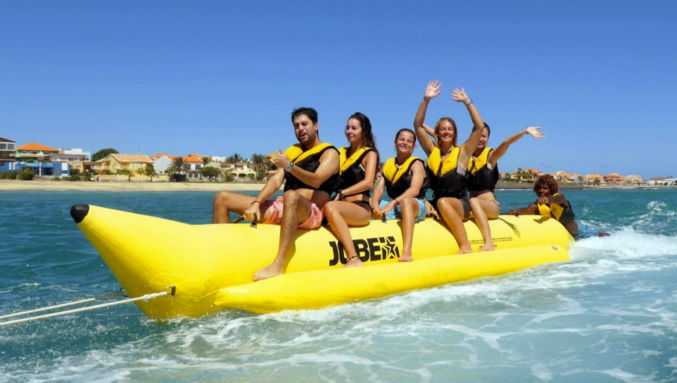
Ride a banana boat
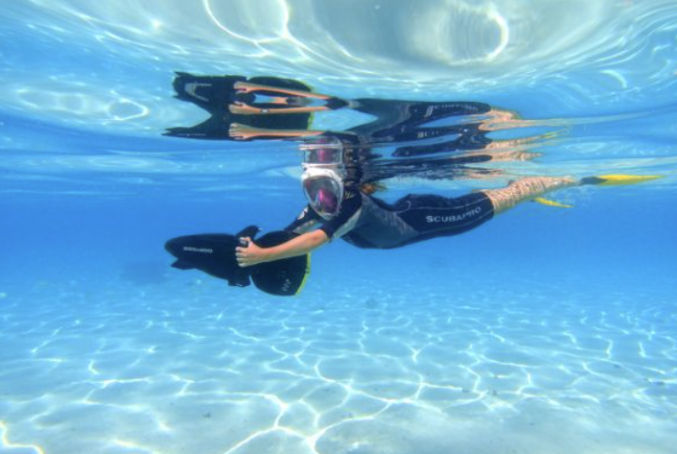
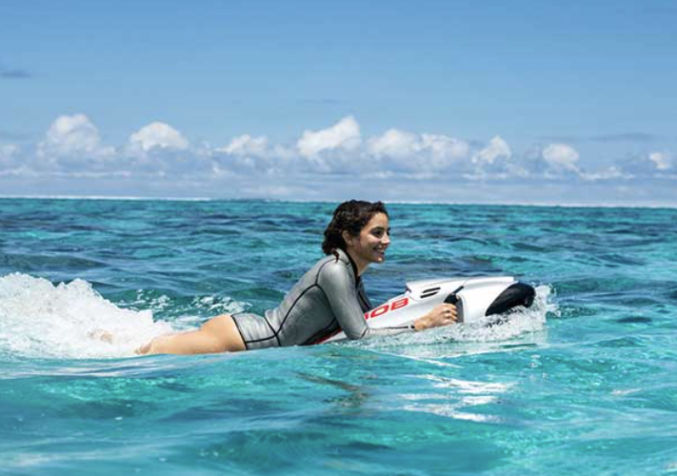
Cruise around in a seabob
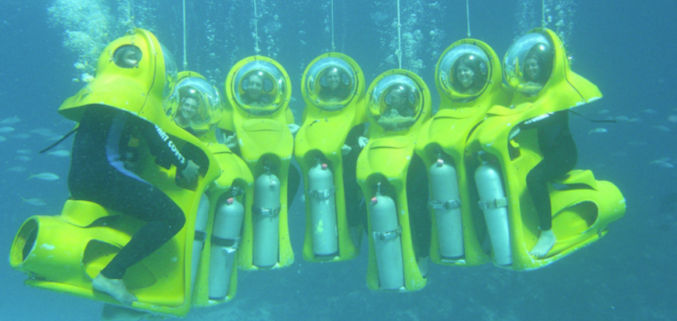
Mini Personal SUB
Other activities include
Snuba (with an “n”) diving
Scuba diving
Fishing
Horseback riding in the water
Dune buggy tour
Swimming
Playing at a water park with slides and wave pool
Exploring the island by foot, bike, scooter
Ziplining
Kayaking
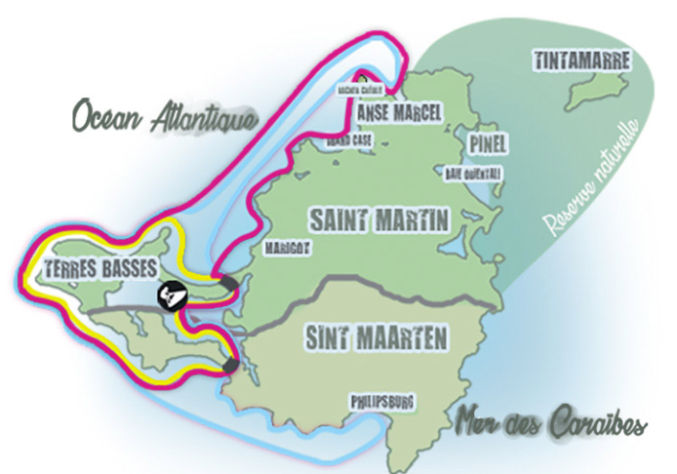
Sint Maarten/Saint Martin
This island of Sint Maarten/Saint Martin is shared by 2 nations. Sint Maarten is Dutch and Saint Martin is French. It is the smallest inhabited island in the world. The entire island is just 37 square miles.
Some things to do there include
Planespotting
At Maho beach, you can watch commercial jet planes fly really low over your head as they come in for a landing.
The Royal Islander Club Resort La Plage is located next to the airport landing strip and has access to the beach where planes directly fly over.
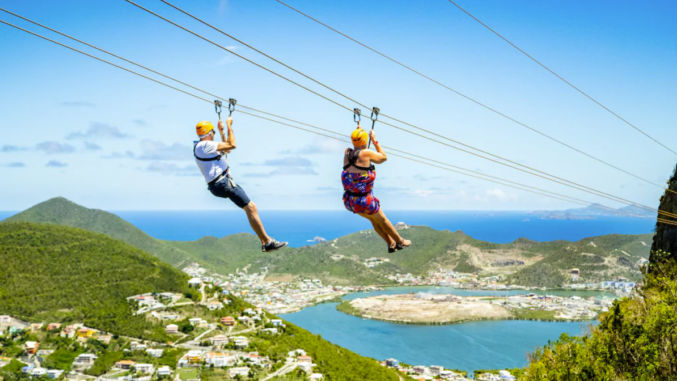
Soualiga Sky Explorer
The Sky Explorer is a chairlift attraction in St. Maarten. The ride is approximately 25 minutes long and takes riders to the top of Sentry Hill, the highest elevation in St. Maarten. The ride spans 2,997 feet and includes two lifts.
Flying Dutchman
The Flying Dutchman is the world’s steepest zip line! You’ll be attached to a flight line in a secure harnessed chair, launching you on the 1050-foot drop in elevation over 2800 feet to experience the ride of a lifetime.
Sentry Hill Zip Line
Schooner Ride
Melange Grill
This restaurant is similar to Brazilian BBQ and Korean BBQ.
Select your Appetizer
Choose your Salad
Enjoy a continuous flow of grilled meats and Seafood right at your table with an assortment of sauces and sides !!
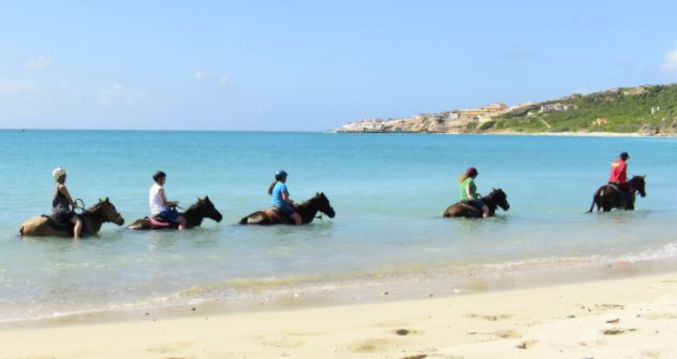
Horseback Riding (1-hour tour)
Lucky Stables at Seaside Nature Park offers a wide variety of tours and trail rides. Ride horses peacefully along one of the many trails that span this beautiful island. Or, ride into the sea with your horse and treat the animals to a cooling swim in the ocean!
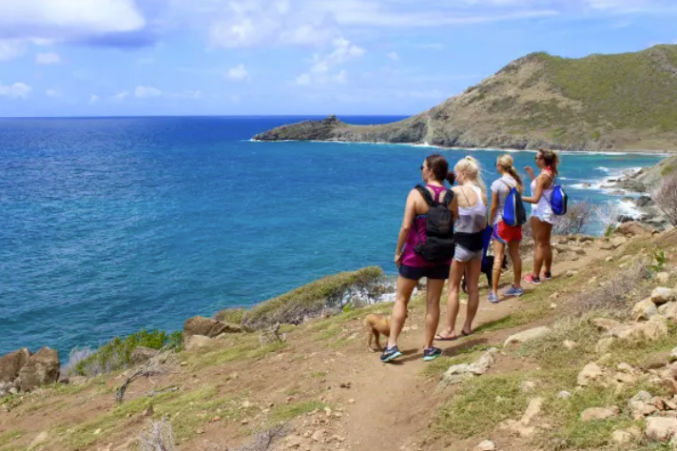
Hiking Tour
The many trails at Seaside Nature Park can be explored easily with some water and sturdy hiking shoes while sharing in the extensive knowledge of a professional guide about the flora, fauna and history of the park.
People have different preferences when it comes to vacation. Some may want to just be a beach bum. Others may want to just do casual sightseeing. For me, I want maximum activity options and clean, turquoise beaches with fine white sand. I also want to go on a cruise because that in and of itself is an experience full of on-board fun activities. Since it’s not possible to cruise to the best beach in the world, Grace Bay Beach in Turks and Caicos, and since Perfect Day at CocoCay is the most developed cruise-owned island full of convenient vacation activities, I think my preferred itinerary would include Perfect Day at CocoCay. And since Nassau is nearby, is a common cruise port of call, and is a popular destination, it would also be on my itinerary. Sint Maarten is one particular island with a lot of fun activities as well, but it may not be possible to find a cruise that goes to all 3 locations. Plus, spending one day at Sint Maarten is likely not long enough. So, I think my preferred itinerary would be
Flight: Home > Miami (spend 0 to 3 nights)
Cruise:
Miami
Nassau (Atlantic AquaVenture, Cottage Beach, Downtown)
Perfect Day at CocoCay
Day at Sea
Miami
Flight: Miami > Sint Maarten (2 or 3 nights) > Miami
Flight: Miami > Home (spend 0 to 3 nights)
Here’s one actual itinerary.
4 Night Bahamas & Perfect Day Cruise
Ship: Royal Caribbean Freedom of the Seas
Date
Port
Arrival
Departure
Mon, Feb 12, 2024
Miami
—
4:30 PM
Tue, Feb 13, 2024
Perfect Day at CocoCay
7:00 AM
5:00 PM
Wed, Feb 14, 2024
Cruising Day at Sea
Thu, Feb 15, 2024
Nassau, Bahamas
8:00 AM
5:00 PM
Fri, Feb 16, 2024
Miami
6:00 AM
—
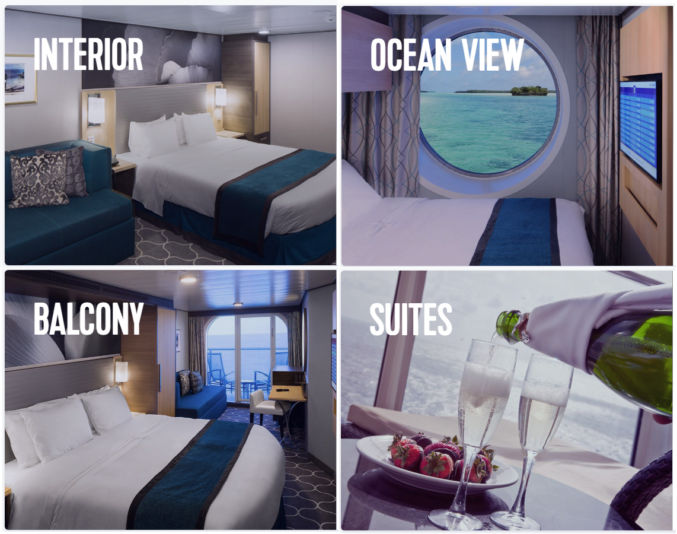
Pricing by Room Category:
Interior
$293
Outside View
$422
Balcony
$595
Suite
$961
Note that the balcony is pretty small.
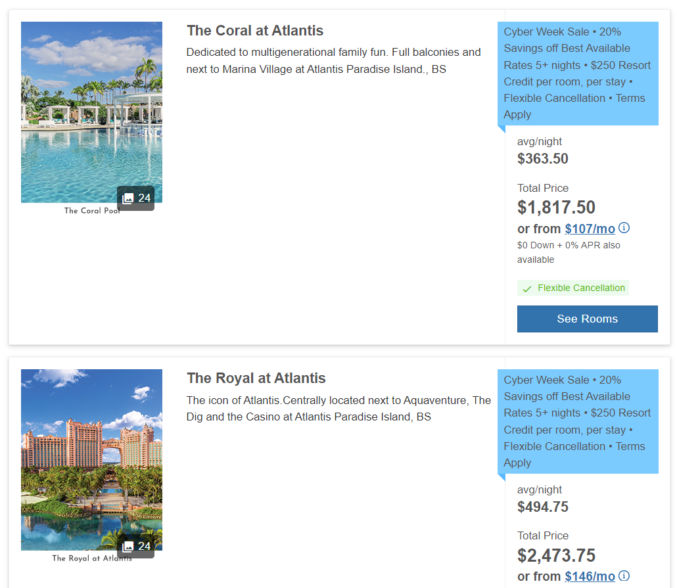
Atlantis Resort
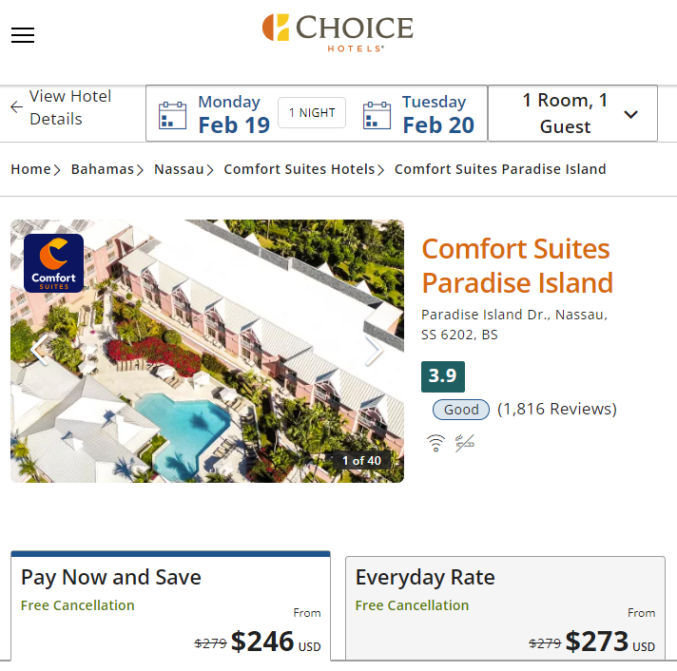
Hotel room: Minimum 2-night stay: $270 – $359 / night.
Day Pass: $190 / person
There’s a hack to get access to Atlantis without spending 2 nights and paying a high price. If you stay at the Comfort Suites on Paradise Island, Bahamas, you’ll have full access to Atlantis, which is just a 3-minute drive away. As an example, the cheapest cost to stay at Atlantis on February 19. 2024 is $363 / night with a minimum 4-night stay. The cost to stay at Comfort Suites on the same dates is just $246 with no 4-night-minimum restriction.
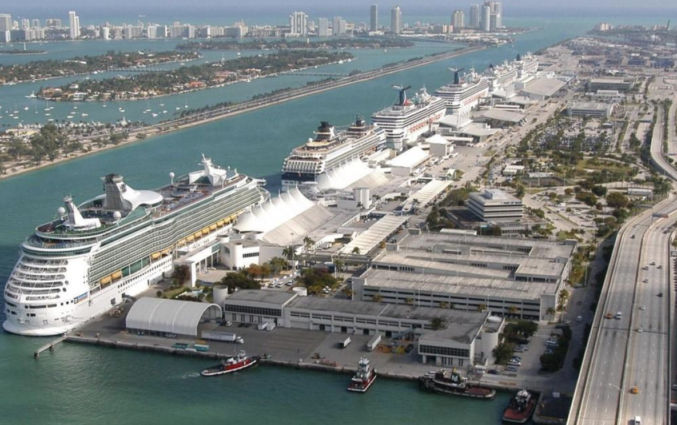
Cruise Ports
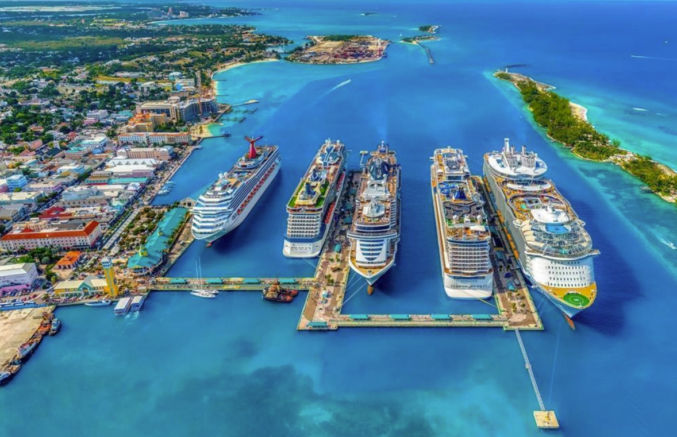
Some cruise ports can accommodate multiple ships at the same time. The more ships there are, the more crowded the place will be. Therefore, it’s preferable to choose a trip with the fewest ships at your scheduled ports of call.
Nassau
As you can see, the port at Nassau can accommodate up to 5 ships.
For the itinerary above, the ship “Freedom of the Seas” is scheduled to dock on Feb 14, 2024. The Nassau, Bahamas cruise terminal website shows the schedule by month. Here’s the schedule for February 2024. Unfortunately, it looks like the terminal will be full of ships that day.
Perfect Day at CocoCay
Perfect Day at CocoCay is owned by Royal Caribbean, so only their ships can dock there. The port is smaller. It can accommodate a maximum of 2 ships. For the itinerary above, the ship “Freedom of the Seas” is scheduled to dock on February 13, 2024. According to CruiseMapper.com, there will be 2 ships that day.
Miami
Since many cruises depart from Miami and Miami itself is an interesting destination, it makes sense to spend some time there before or after going on a cruise.
Following are some things to do when visiting Miami.
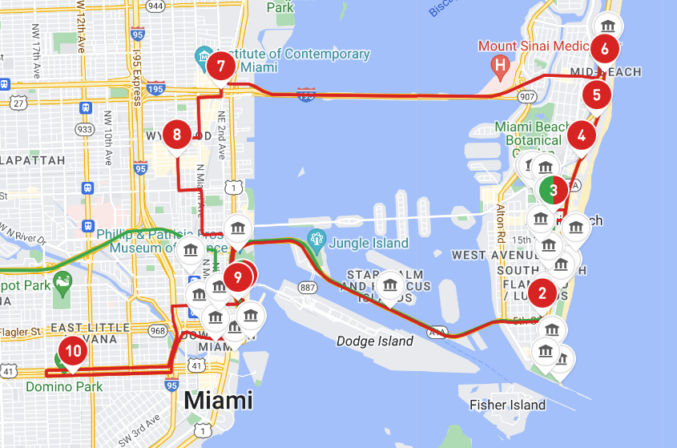
Miami Hop-On-Hop-Off Bus
Go on a double-decker, open-air hop-on-hop-off bus and be taken around many of the tourist spots. This is an easy way to see a lot and get a sense of the area. Afterwards, you can spend time at individual spots you are interested in. There are many tour bus operators. BigBus, shown below, is just one of them.
Unique outdoor destination featuring huge, colorful street murals by artists from around the globe.
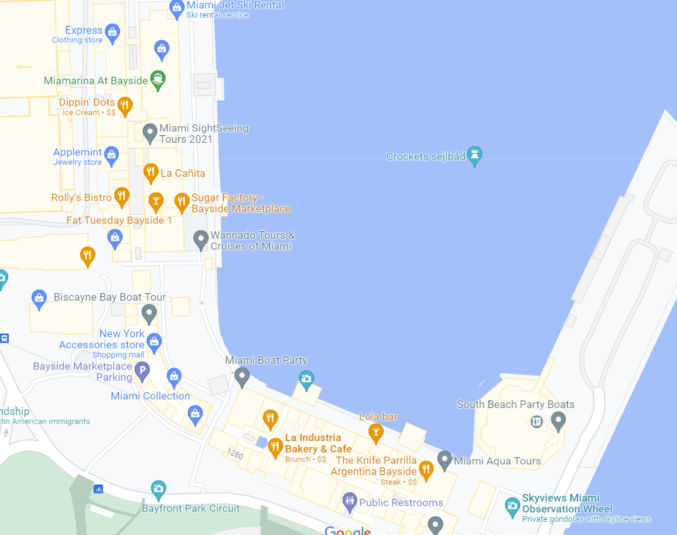
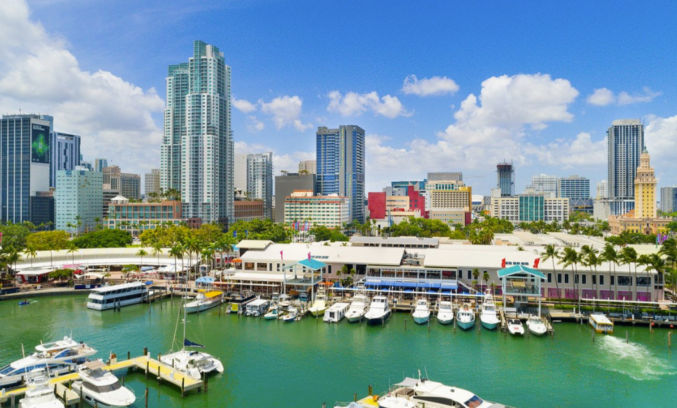
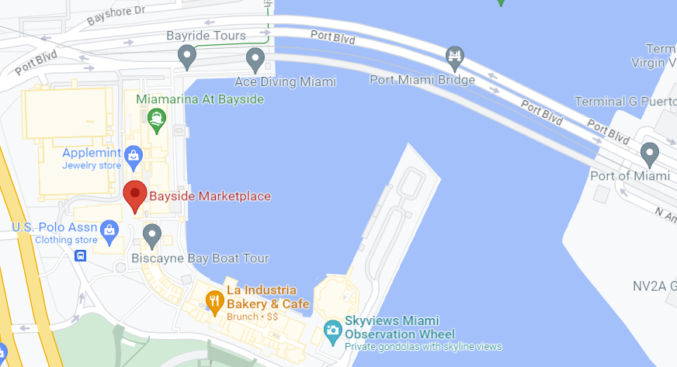
Bayside Marketplace
Enjoy a drink along the water (or on it), snagging a seat at one of Bayside Marketplace’s big-name restaurants or setting off on a sunset cruise touring Biscayne Bay’s islands.
Lock & Load Museum
Look at all sorts of guns and practice shooting some.
ARTECHOUSE MIAMI
Art + Technology Museum
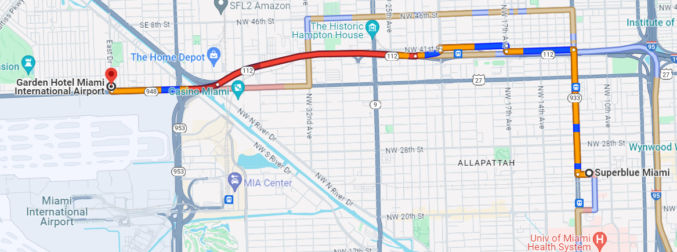
Superblue Miami Immersive Art Experience
Explore a mirrored labyrinth, see digital worlds immersed in seasonal flowers and waterfalls, and watch your own heartbeat as it glows with 3,000 lights.
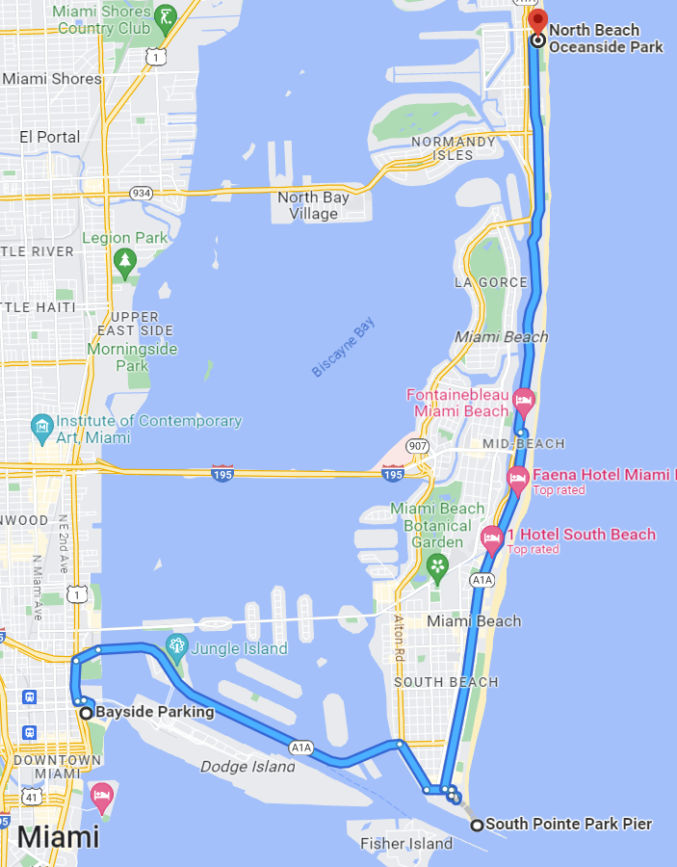
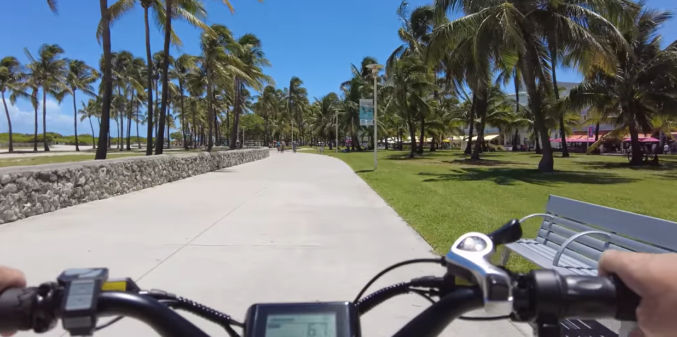
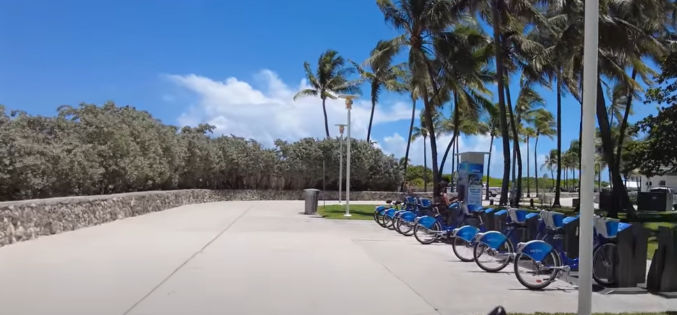
E-bikes are prohibited on all sidewalks in Miami Beach, including along the Beachwalk. They are also prohibited on South Pointe Park and Pier, Marina Baywalk, and Lincoln Road Mall.
However, Florida state law allows e-bikes to be operated in the same locations as regular bicycles. This means they can be ridden on: Roads, Bike lanes, Bike paths, Multi-use paths, Sidewalks.
If your e-bike is class 1 (or maybe 2) and limited to 20mph, you should be legally allowed on the beach.
Florida allows all classes of e-bikes, including Class 3 e-bikes — provided they don’t exceed speeds of 28 mph. The bike also can’t have an electric motor power with a wattage exceeding 750.
Miami Beach also has 11 miles of green bicycle lanes.
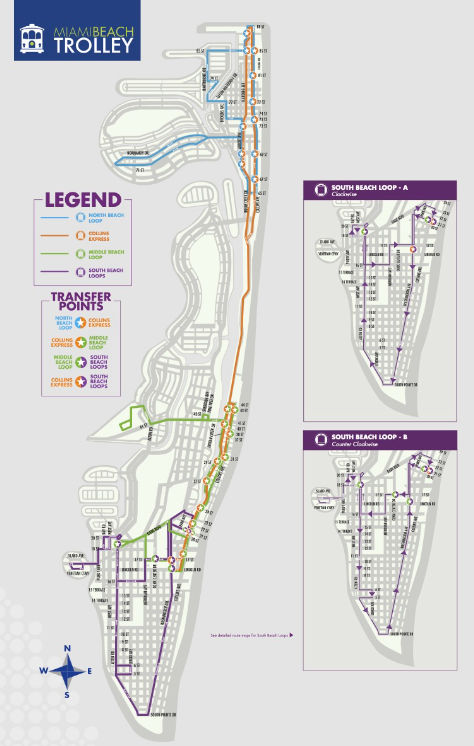
Free Miami Beach Trolley
From 8 a.m. to 11 p.m., 7 days a week at approximately 20-minute average service frequency along each route.
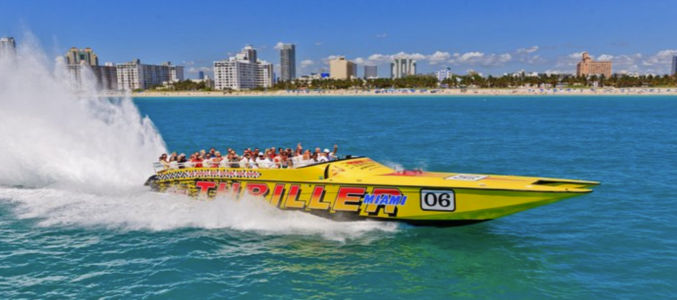
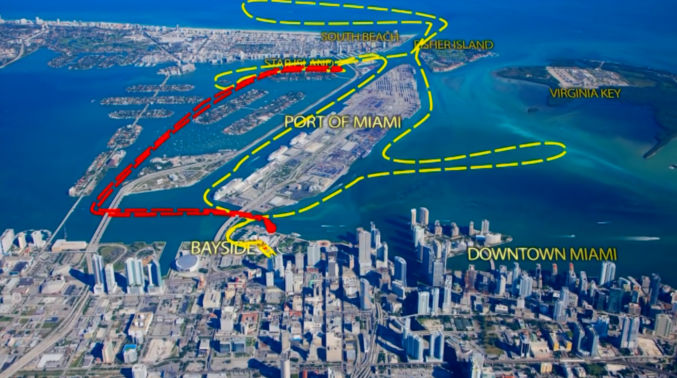
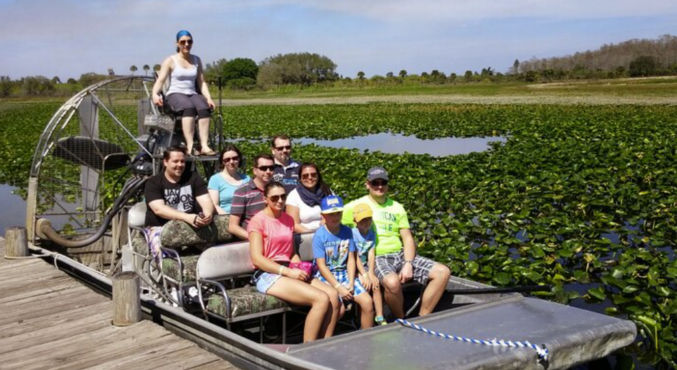
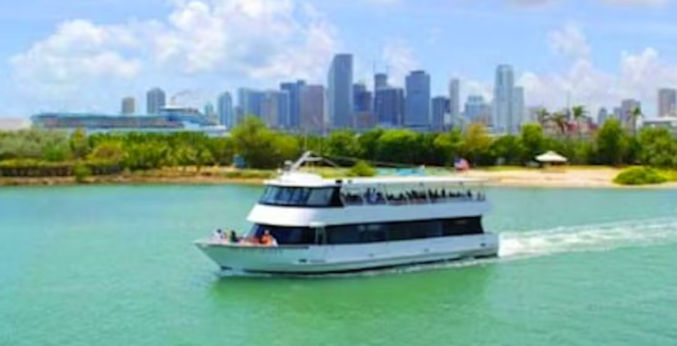
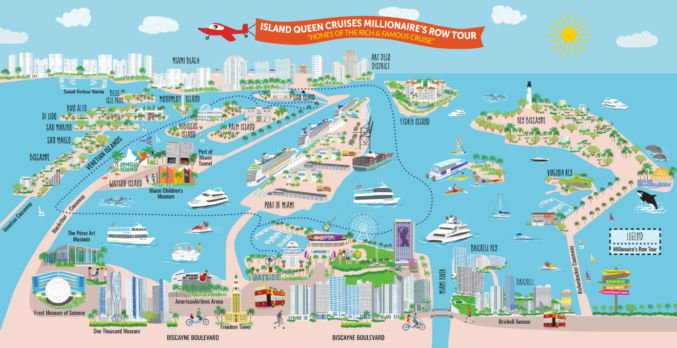
Explore Miami aboard a fully-narrated bilingual sightseeing cruise along scenic Biscayne Bay – a top-rated thing to do in Miami! Cruise around Biscayne Bay and see the spectacular coastal sites including the beautiful downtown Miami skyline, the Port of Miami, Fisher Island, Miami Beach and “Millionaire’s Row™” – the Homes of the Rich and Famous™.
This is a science museum, aquarium and planetarium. The cutting-edge 250-seat Frost Planetarium takes you on visual joyrides that both thrill and educate. Though it might seem like you’re really hurtling through space or weaving through a coral reef or DNA strand, that ultra-real immersive experience is the result of a 16-million-color 8K visual system using six 3D-capable projectors and surround sound. The dome is tilted forward at 23.5 degrees, allowing its 67-foot span to fill your field of vision as if you’re flying—imagery comes at you from above, below and the peripheral edges, creating a nearly 360-degree view of whatever world you’re in.
Española Way is a historic street in Miami Beach, Florida. It’s located between 14th and 15th Streets, between Washington Avenue and Pennsylvania Avenue. It’s a pedestrian-only street with shops, galleries, restaurants, and bars.
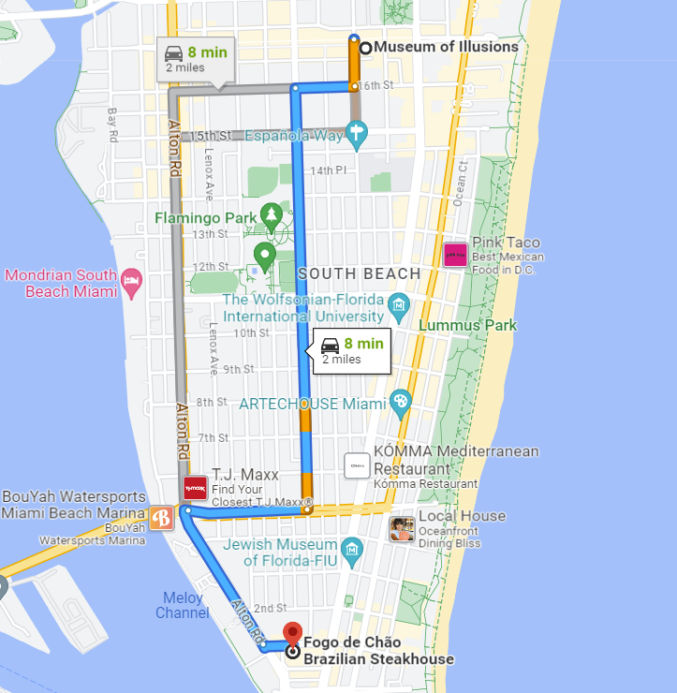
Experience stunning 3D illusions and art at the Museum of Illusions in Miami. Capture memorable, interactive photos and have fun with friends and family.
Lincoln Road Shopping District
Miami Beach’s Lincoln Road is one of the most unique shopping districts in the world, full of stunning architecture, world-class culture and destination retail stores spanning 8 blocks.
If you’re a non-technical person who is part of a marketing team working for a company that depends a lot on a website, chances are you will often need to ask a team of web developers to make website updates for you. Your particular website may not be easily updated using a content management system (CMS), and even if it could, many non-technical people would rather just send an email to request their website changes. Asking developers to update a website is fine, but only if the update requests are clear. Otherwise, the requestors risk wasting their time and other people’s as well. Unfortunately, the reality is most people don’t know how to clearly communicate their change requests. There are many website annotation tools that claim to be able to simplify the communication process, but in real-world situations, I haven’t found any that were good enough. Plus, adding a new tool requires learning something new, which many people are unwilling to do or don’t have time for.
In this post, I’ll share one approach that non-technical people can use to easily and clearly communicate website change requests to minimize misunderstandings, delays, and lots of back-and-forth messages. And since most people already know and are comfortable using MS Word or Google Docs, this approach only requires a word processor.
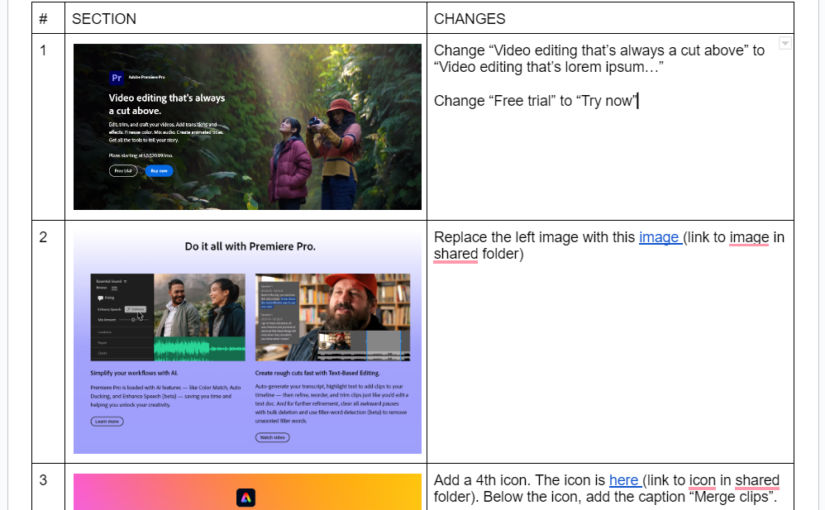
Since a picture is worth a thousand words, it’ll be a lot easier to show a screenshot of a section of a web page rather than try to explain the section using words. And since you may want to move some sections around, it’s helpful to number each section. And since you may collaborate with other people in requesting website changes, we’ll use MS Word or Google Docs for our change requests. I’m going to use Google Docs because I find it easier to use.
Create a new Google doc
Give it a name like “Adobe Premier Product Page Changes”.
Change the page margins to 0.25″ on all sides
Under View, uncheck “Show print layout” if it is checked.
At the top of the doc, put the URL to the page, e.g. https://www.adobe.com/products/premiere.html
Insert a table containing 3 columns and 20 rows.
In row 1, cell 1, enter “#”
In row 1, cell 2, enter “SECTION”
In row 1, cell 3, enter “CHANGES”
In the first column, enter a consecutive number in each cell starting from 1 and make it narrow enough just for the numbers
Take a screenshot of each section and paste them in the middle column
In the right column, describe your change request.
When terrorists attacked the United States on 9/11 by flying airplanes into the Twin Towers, they killed around 3,000 civilians. In response, the U.S. killed the terrorists, including Osama bin Laden. It took time, but it was done by following the rules of war and by carefully avoiding the killing of innocent civilians.
In October of 2023, Hamas, a Sunni Islamist political and militant organization currently governing the Gaza Strip of the Palestinian territories headquartered in Gaza City, attacked Israel by killing around 1300 civilians and taking about 200 hostages. Israel, the US, and the EU designate Hamas as a terrorist organization, similar to the terrorist organization Al-Qaeda led by Osama bin Laden which was responsible for 9/11.
In response to Hamas’ attack on Israel, Israel responded by
calling Palestinian civilians in the Gaza Strip and giving them 10 minutes to evacuate to avoid being bombed
dropping 6000 bombs on dense residential buildings in Gaza
cutting off electricity, food, water, and fuel to residents of Gaza
blocking the border so that Gaza civilians can’t evacuate
preventing humanitarian aid from entering the Gaza Strip until the Israeli hostages are released
So far, the result of Israel’s response attack was the death of over 1000 civilians, a big percentage of which were women and children who had nothing to do with Hamas’ attack on Israel. (Update: As of Nov 3, over 9000 Gaza civilians have been killed by Israel).
While it is understandable and completely reasonable for Israel to defend itself and to retaliate when attacked, you’ll notice a big difference in how Israel and the US deal with “terrorists”. Unlike the US, which carefully avoided civilian casualties when going after Al-Qaeda, Israel appears to follow the rule of “an eye for an eye” rather than the international rules of war. The fact that Israel bombed so many buildings while people were sleeping and gave them only 10 minutes to leave is completely outrageous. Israel’s argument was that they were targeting members of Hamas, but for every member of Hamas killed, Israel probably killed 30 or so civilians. To make matters worse, Israel has blocked humanitarian aid from reaching those civilians as if Israel wants the civilians to suffer and die. In the video below, the president of Israel said that the entirety of Gaza, including civilians, was responsible for Hamas attacking Israel. He argues that civilians should have stopped Hamas. His mindset justifies the killing of civilians, including at least 1,000 children. Sadly, when Israel makes these outrageous statements, the international community, including the U.S., says and does nothing. It seems as though Israel is using this opportunity to ethnically cleanse Gaza of Palestinians under the guise of “self-defense”.
Conclusion
The Israeli government has clearly violated the rules of war and its actions are just as bad as the terrorist group Hamas, which they blame for starting the war.
Land Dispute
Everyone knows that the Palestinians have been living in Palestine for a long time. Since Jews in Europe were hated by others, treated unfairly, and even killed, they wanted a land of their own. So, they argued that they should go create their own state in Palestine for 2 reasons:
they believe that God said it was their land according to the Jewish bible
their ancestors lived there 2000 years ago
Both of these reasons are a joke. If someone came knocking on your door and said that they were going to take all or half of your house or your backyard for the reasons above, no one in their right mind, including a reputable court of law, would agree to it. Unfortunately, with the help of the British, Jews were able to just take land from the Palestinians and create the nation of Israel.
What Hamas Should Have Done
What Hamas did on Oct 7 was clearly inexcusable. There’s no justification for the killing of innocent civilians. It’s no wonder why some countries label Hamas a terrorist organization. When violence is used to achieve a goal, it’s hard to get support from the international community. What Hamas should have done is like what the Jews did when they took Palestinian land in the first place. The Jews would not have been successful without the help of the British. Likewise, Palestinians will not be successful without powerful and influential allies. Those allies could be neighboring states like Egypt, Syria, Lebanon, Jordan, Saudi Arabia, Iran, etc. When you have that type of support, war can be avoided. Israel would be under pressure to negotiate and Israel’s allies like the US would support talks over war. If Israel refuses to talk, then the Palestinian alliance could announce that they will peacefully reclaim the land that the Israelis took from them under their “right of return“. Upon exercising their “right of return, if the Israelis fight the Palestinians and people are killed, then the Israelis will be at fault. At that point, the alliance can give an ultimatum to Israel that if Israel doesn’t participate in peace talks to resolve land and governance disputes, then the alliance will retaliate for the people Israel killed. Israel would be surrounded by an alliance of countries supporting Palestine, and Israel would know that they would lose. Under these circumstances, the US and the West would find it difficult to justify supporting a war against an alliance of Arab states.
One-state or Two-state Solution
Some people support a one-state solution where both Jews and Palestinians share the same land. Others support a two-state solution like there sort of is now. I think a one-state solution is necessary to force the Jews and Palestinians to get along. It may take some time, but eventually they will get along. In the US, African Americans and Whites didn’t get along, but eventually they did. To be fair, the government in a one-state solution would have to comprise 50% Jews and 50% Palestinians.
As for the conflict between Saudi Arabia and Iran, they need to put aside their religious differences (Sunni vs Shia) while supporting Palestine.


