


In this tutorial, I will explain how to create an animated travel map route from point A to point B using Pinnacle Studio.
1. Create two map images
We’re going to need to create 2 images.
- an image without a route
- an image with a route
This tutorial assumes you know how to create such images. I took a screenshot of Google Maps for the map background and used Photoshop to add balloon markers and location labels and to create the smooth route curves.


2. Add images to video tracks
- Open Pinnacle Studio
- Click the Edit tab
- Click the Library tab
- Drag the two images to the library pane
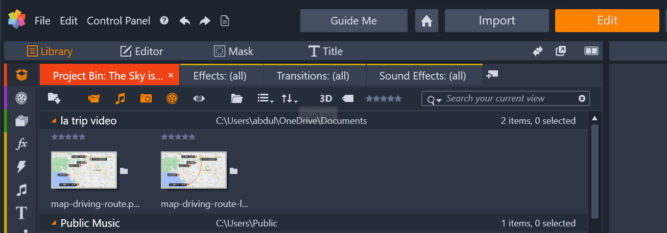
Then, drag
- the image with the line to AV track 1
- the image without the line to AV track 2
By default, the clips will be 3 seconds long. I prefer to drag them so they are 10 seconds long.

3. Create the animation
- Drag the playhead to the beginning of the image clips

- Double-click on the image on AV track 1
- Click the “Effect” tab
- Click the “2D-3D” tab
- Double-click “2D Editor Advanced”

- For “Select Preset”, choose “No Preset”

Scroll down. Under “Cropping, we’re going to edit the cropping properties as follows:
- if the line will mostly animate toward the bottom, drag the Top % slider until the line first completely disappears.
- if the line will mostly animate toward the top, drag the Bottom % slider until the line first completely disappears.
- if the line will mostly animate toward the right, drag the Left % slider until the line first completely disappears.
- if the line will mostly animate toward the left, drag the Right % slider until the line first completely disappears.
The clip in AV track 1 shows a black mask partially covering the image as you drag the slider.

Drag the slider, you’ll notice the line starts to disappear in the preview window.

Scroll back up in the 2D Editor Advanced pane and click on the diamond icon to turn on keyframing.

- Drag the playhead to the point on the clip where you want the line to be finished. This will also change the speed of the “animation” as the cropping will go quicker if you end it earlier. I just dragged it to near the end of the clip.
- Scroll back down and drag the slider to the left until the line first appears in full

- Preview the animation in the preview window.
- If the animation looks good, you can export it.
One idea is to partially overlay a video clip of you driving while describing your trip.
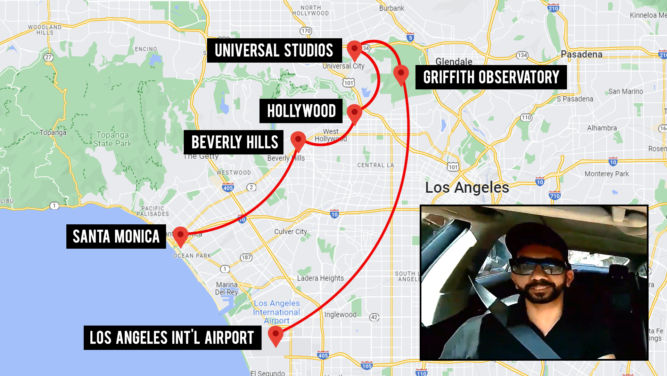
Another idea is to overlay the map route animation at 50% opacity over a video of the trip.
In the example above, I used the following two images.


To create the composite video, I used Corel VideoStudio and put the route animation video on an overlay track.

Double-clicking the overlay clip opens the clip’s settings. I clicked the “Blending” tab and then set the opacity to 50%.

I then had to slow down the speed of the route animation so its duration would be close to or match that of the airplane clips.
- Right-click on the route animation clip
- Speed > Speed/Time-lapse…

- Change duration (in my case, I chose 20 seconds)

UPDATE
It’s actually easier to create the route animation on a Mac using Keynote. See these video tutorials.