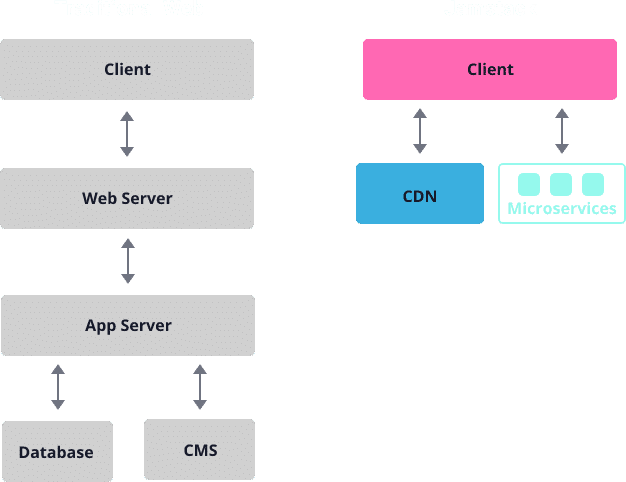
Jamstack is the new standard architecture for the web. Using Git workflows and modern build tools, pre-rendered content is served to a CDN and made dynamic through APIs and serverless functions. Technologies in the stack include JavaScript frameworks, Static Site Generators, Headless CMSs, and CDNs.
Jamstack benefits
Jamstack offers many benefits over traditional web stack.
- Security
Published text files are HTML, CSS and JavaScript only. No server-side scripts like PHP - Scalability
As website traffic grows, scaling is much easier when your website amounts to a bunch of static HTML files that can be served from a CDN. - Performance
Static HTML files don’t require server-side processing. Files can be served from a CDN. - Maintainability
It’s much easier to maintain a simple server that hosts static files rather than application and database servers. The heavy lifting of building the static files is done before deployment resulting in stable production files. - Portability
Since Jamstack sites are pre-generated, the production files are simple static files which can be hosted anywhere on any simple host. - Developer experience
Jamstack sites are built on widely available tools and conventions making it easier for developers to learn and develop.
Jamstack is a term that was coined by two developers who pioneered the architecture while working at Netlify. This post will explain how to set up a web development, build and release system using the following components
- Hugo (static site generator)
- GitHub (version control)
- Netlify (CI/CD + serverless web hosting)
- Netlify CMS (content management system)
- imageKit.io (image optimization and CDN)
UPDATE: An alternative to Netlify is Render. Unlike Netlify, which is limited to static sites, Render supports web apps (Node.js, PHP, etc) like Heroku. Render is like Netlify + Heroku.
Web development workflow
Let’s say you have a website at example.com. This workflow will depend on having a GitHub repo with 2 branches (main and develop) and 2 sites hosted on Netlify, one for production (www.example.com) and one for staging (staging.example.com). The staging site will have site-wide password protection using an option in Netlify.
The workflow using this setup is very common:
- Edit web page files locally, e.g. using VisualStudio Code
- Commit and push changes to
developbranch in private GitHub repo - Any commit to the
developbranch in GitHub auto-triggers a build to generate and deploy static files to a staging site in Netlify (staging.example.com) - Preview changes in a password-protected, external staging URL
- Merge and push changes from
developbranch tomainbranch. This will auto-trigger a build to generate and deploy static files to a production site in Netlify - View published changes in production (www.example.com)
Note
- If you need to make an edit, you can make it directly in GitHub as well.
- If you’d like to provide a CMS for your pages (usually for non-technical people), you can use Netlify CMS.
Create GitHub repository and branches
Let’s first create a GitHub repo. We’ll call it example.com and make it private since we don’t want competitors seeing our potentially confidential information. Within this repo, we’ll have 2 branches.
main(for www.example.com / production)develop(for staging.example.com / development)
GitHub’s default branch is called main so we’ll use that name for the production branch.

Install Hugo
Since I’m writing this post on a Windows 11 laptop, I will follow the instructions here. For other OSs, follow the instructions here.
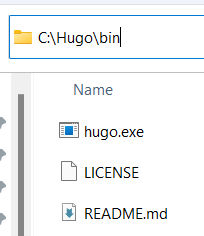
- Create some folders (
C:\Hugo\SitesandC:\Hugo\bin) - Download the Windows executable from the Hugo Releases page (in my case, I’ll go with the extended version to make sure I have all the features I may need – hugo_extended_0.97.3_Windows-64bit.zip)
- Extract the executable to
C:\Hugo\bin. You will end up with 3 files like this.
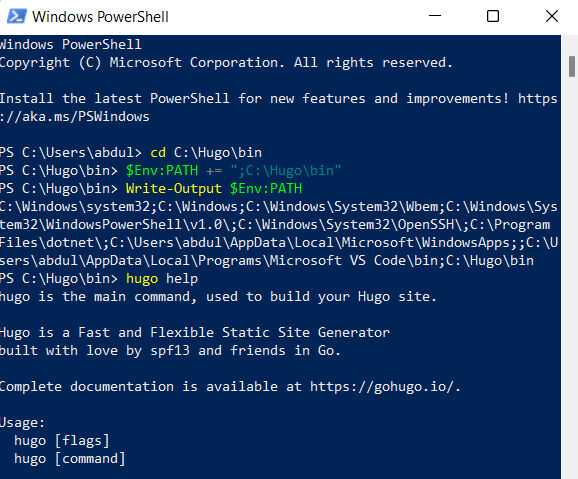
- Add the executable to the PATH
- open Windows PowerShell
- change to the C:\Hugo\bin folder
- append
C:\Hugo\binto the existing PATH by entering$Env:PATH += ";C:\Hugo\bin"
- Verify the update by outputting the PATH value using the command
Write-Output $Env:PATH
- Verify the executable by running the command
hugo help. You should see output like below.
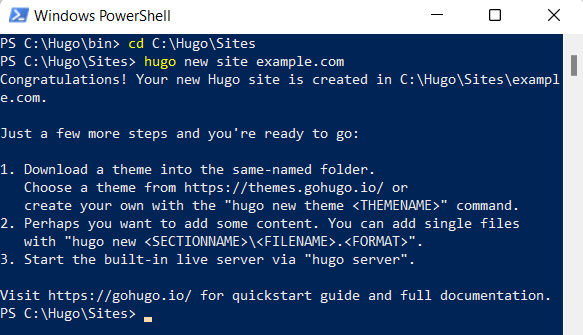
Create a new site
Now that Hugo is installed, we can use it to create a new site. Run the following commands.
cd C:\Hugo\Sites
hugo new site example.com
You should then see output indicating a new site was created.
In the Hugo/Sites folder, you should see files and folders as shown below.
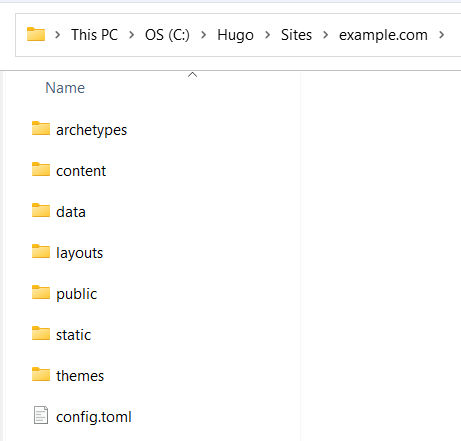
Here’s what the folders are for.
├── archetypes (templates for different content types)
├── config.toml (top level configuration file)
├── content (this is where content goes in HTML or markdown format)
├── data (for local and remote dynamic content, e.g. JSON data)
├── layouts (layouts for pages (list pages, home page) and partials, etc)
├── static (images, CSS, JavaScript, etc)
└── themes (for themes)
Install a theme
Now, you can browse themes, install one and make customizations to it. In my case, I will create a theme from scratch.
Create a new theme
Run the command hugo new theme exampleTheme to create a theme called “exampleTheme”.
C:\Hugo\Sites\example.com> hugo new theme exampleTheme
Creating theme at C:\Hugo\Sites\example.com\themes\exampleTheme
C:\Hugo\Sites\example.com>
This will create an exampleTheme subfolder in the themes folder. The folder structure should look like this:
.
├── archetypes
│   └── default.md
├── config.toml
├── content
├── data
├── layouts
├── resources
│   └── _gen
│       ├── assets
│       └── images
├── static
└── themes
    └── exampleTheme
        ├── LICENSE
        ├── archetypes
        │   └── default.md
        ├── layouts
        │   ├── 404.html
        │   ├── _default
        │   │   ├── baseof.html
        │   │   ├── list.html (for the list page / index of blog posts)
        │   │   └── single.html
        │   ├── index.html (home page)
        │   └── partials
        │       ├── footer.html
        │       ├── head.html
        │       └── header.html
        ├── static
        │   ├── css
        │   └── js
        └── theme.toml
Note the following files:
themes/exampleTheme/layouts/index.html
this is the home page layoutthemes/exampleTheme/layouts/single.html
this is the layout for a single page type, e.g. blog postthemes/exampleTheme/layouts/list.html
this is the layout for a list of page types, e.g. blog posts
When you start development, you want to run hugo server to have Hugo detect file changes and reload your local browser for you. In the output below, we see that the local server is at http://localhost:1313. If I go to that URL, I will see a blank screen since I haven’t created any web pages yet.
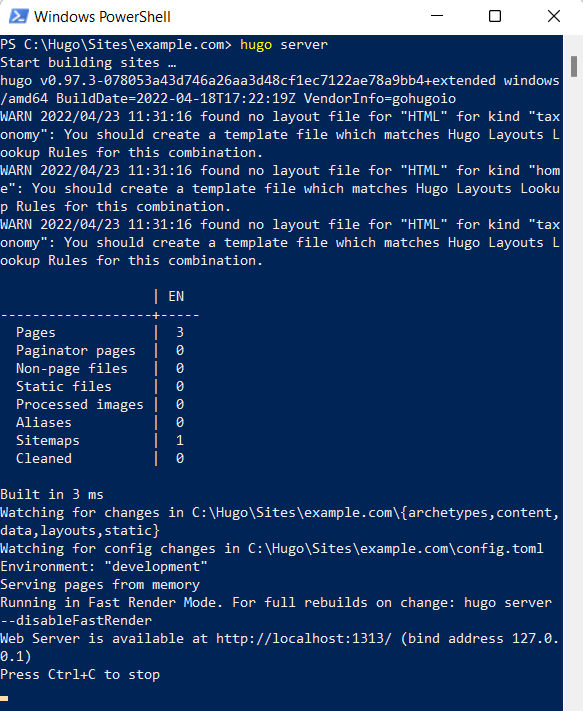
Notice also in the output that there are some warnings because we’re missing some files. They will be fixed.
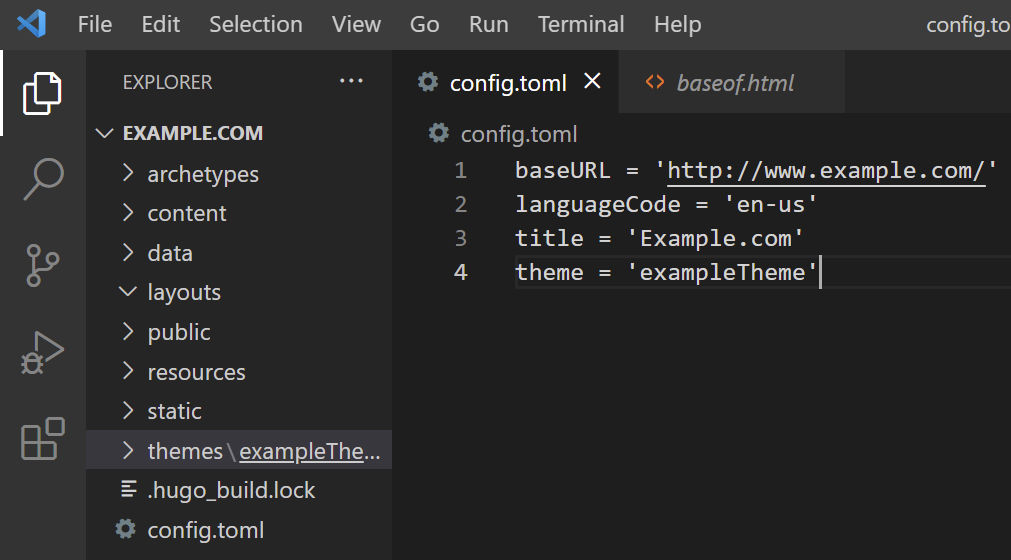
Edit config file
I’m using VisualStudio Code to edit files. First, I’ll update the config.toml file by changing the base URL and title. In order to use the new theme we created, we need to reference it in the config file by adding theme = 'exampleTheme' to it.
Most websites have a main menu for navigating from one page to another. The menu links are common to all pages. Let’s define them in the config file by adding the following to it.
[menu]
  [[menu.main]]
    name = "Home"
    url = "/"
    weight = 1
  [[menu.main]]
    name = "Posts"
    url = "/posts/"
    weight = 2
  [[menu.main]]
    name = "Tags"
    url = "/tags/"
    weight = 3
Layouts & partials
If you open the theme’s layouts folder, you’ll see some default layouts and some partials layouts. The base layout (baseof.html) is the parent-most layout. As you can see in the screenshot below, the base layout has
- some partials
- a main block
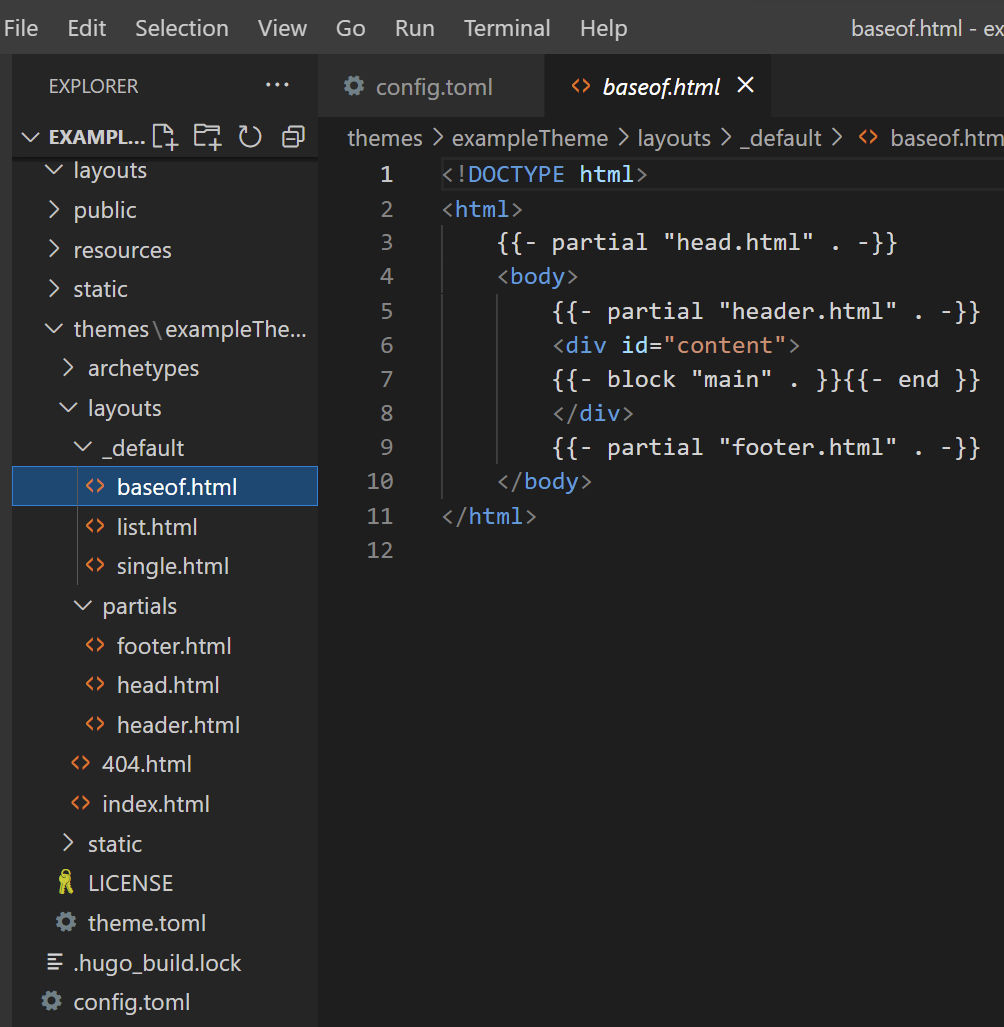
The list (list.html) and single (single.html) layouts will use the base (baseof.html) layout. The contents of the list and single layouts will go in the main block of the base layout.
The base layout includes partials for the
- head section (
head.html) - header section (
header.html) - footer section (
footer.html)
of every page. Partials are like include files. They are small, context-aware components that can be used economically to keep your templating DRY. These are standard sections of most websites which is why they’ve been auto-generated. If you don’t want to use a particular section, you can remove it from the base layout or leave it as is as those partial files are empty by default.
Now, let’s fill out the layouts and partials.
head.html partial
Open example.com/themes/exampleTheme/layouts/partials/head.html in a text editor. This will be the place for metadata like the document title, character set, styles, scripts, and other meta information. Paste the following
<head>
    <meta charset="utf-8">
    <meta name="viewport" content="width=device-width, initial-scale=1">
    <link rel="stylesheet" href="https://cdn.jsdelivr.net/npm/[email protected]/dist/css/bootstrap.min.css">
    <link rel="stylesheet" type="text/css" href="/css/style.css">
    {{ $title := print .Site.Title " | " .Title }}
    {{ if .IsHome }}{{ $title = .Site.Title }}{{ end }}
    <title>{{ $title }}</title>
</head>
There are two CSS files. We can create an empty style.css file and put it at example.com/themes/exampleTheme/static/css.
For the page title, we will show the site title (taken from config.toml) if we are on the home page, otherwise, we’ll show the site title followed by the page title of the page we’re on.
header.html partial
Normally in a website’s header you will find navigation links. Open example.com/themes/exampleTheme/layouts/partials/header.html
and paste the following
<div id="nav-border" class="container">
    <nav id="nav" class="nav justify-content-center">
        {{ range .Site.Menus.main }}
        <a class="nav-link" href="{{ .URL }}">
        {{ $text := print .Name | safeHTML }}
        {{ $text }}
        </a>
        {{ end }}
    </nav>
</div>
Note how the navigation link names and URLs are coming from the config.toml file we updated earlier. The keyword range causes the template to loop over the items in .Site.Menus.main array. Alternatively, you could just hardcode the nav links directly in the header.html file.
footer.html partial
For the footer, let’s just add a basic copyright disclaimer.
<p class="footer text-center">Copyright (c) {{ now.Format "2006"}} Example.com</p>The current year will be displayed automatically. If you are wondering why “2006”, you can find out more about it here.
script.html partial
Most websites have some JavaScript. The Hugo auto-generated partial files didn’t include a script partial for JavaScript that should be loaded on all pages. Let’s create one at example.com/themes/exampleTheme/layouts/partials/script.html and paste the following code. Later on, we can add other scripts like jQuery to it.
<script src="https://cdnjs.cloudflare.com/ajax/libs/modernizr/2.8.3/modernizr.min.js" integrity="sha256-0rguYS0qgS6L4qVzANq4kjxPLtvnp5nn2nB5G1lWRv4=" crossorigin="anonymous"></script>
<script src="script.js"></script>
Like style.css, we’ll also need to add a script.js file and put it at example.com/themes/exampleTheme/static/js.
metadata.html partial
Let’s create one more partial to display metadata about each post, e.g. date and tags. Each blog post will have front matter containing key-value pairs specific to each post, e.g.
---
author: "John Doe"
title: "My First Post"
date: "2006-02-01"
tags: ["foo", "bar"]
---
The keys can be referenced as variables in our new partial. Create a new file example.com/themes/exampleTheme/layouts/partials/metadata.html and paste the following code.
{{ $dateTime := .PublishDate.Format "2006-01-02" }}
{{ $dateFormat := .Site.Params.dateFormat | default "Jan 2, 2006" }}

<time datetime="{{ $dateTime }}">{{ .PublishDate.Format $dateFormat }}</time>
{{ with .Params.tags }}
    {{ range . }}
        {{ $href := print (absURL "tags/") (urlize .) }}
        <a class="btn btn-sm btn-outline-dark tag-btn" href="{{ $href }}">{{ . }}</a>
    {{ end }}
{{ end }}
baseof.html layout
As mentioned earlier, the base layout was auto-generated by Hugo. But, since we created a script.html partial for JavaScript files and code that needs to load on all pages, let’s add that partial to the base layout. Open example.com/themes/exampleTheme/layouts/_default/baseof.html and add script.html after footer.html so that JavaScript does not block page rendering.
<!DOCTYPE html>
<html>
    {{- partial "head.html" . -}}
    <body>
        {{- partial "header.html" . -}}
        <div id="content">
        {{- block "main" . }}{{- end }}
        </div>
        {{- partial "footer.html" . -}}
        {{- partial "script.html" . -}}
    </body>
</html>
list.html layout
This layout will be used to display a list of blog posts. As explained earlier, the content in this file will define the main block of the baseof.html layout. We’ll create a simple layout for listing blog posts. Open example.com/themes/exampleTheme/layouts/_default/list.html and paste the following code.
{{ define "main" }}
<h1>{{ .Title }}</h1>
{{ range .Pages.ByPublishDate.Reverse }}
<p>
    <h3><a class="title" href="{{ .RelPermalink }}">{{ .Title }}</a></h3>
    {{ partial "metadata.html" . }}
    <a class="summary" href="{{ .RelPermalink }}">
        <p>{{ .Summary }}</p>
    </a>
</p>
{{ end }}
{{ end }}
Note how this layout contains a reference to {{ define "main" }} because we are defining the main block of the base layout. We’re referencing .Summary because we only want to show a summary of each blog post.
single.html layout
This layout will be used to display a single page or blog post. As explained earlier, the content in this file will define the main block of the baseof.html layout. We’ll create a simple single-post layout. Open example/themes/exampleTheme/layouts/_default/single.html and copy and paste the code below.
{{ define "main" }}
<h1>{{ .Title }}</h1>
{{ partial "metadata.html" . }}
<br><br>
{{ .Content }}
{{ end }}
Notice how we are including the metadata.html partial in this layout. Unlike in the list partial, which references the Summary variable, this single partial references the Content variable because we want to show the entire blog post content.
Home page layout
The home page layout is at example.com/themes/exampleTheme/layouts/index.html. Since we’re loading Bootstrap CSS, we can use the Jumbotron component to render a hero section. Paste the following.
{{ define "main" }}
<div id="home-jumbotron" class="jumbotron text-center">
  <h1 class="title">{{ .Site.Title }}</h1>
</div>
{{ end }}
404 layout
Hugo auto-generated an empty 404.html layout in our theme. Since Hugo comes with a default 404, we can delete this one or customize it, if we want.
Write your first blog post
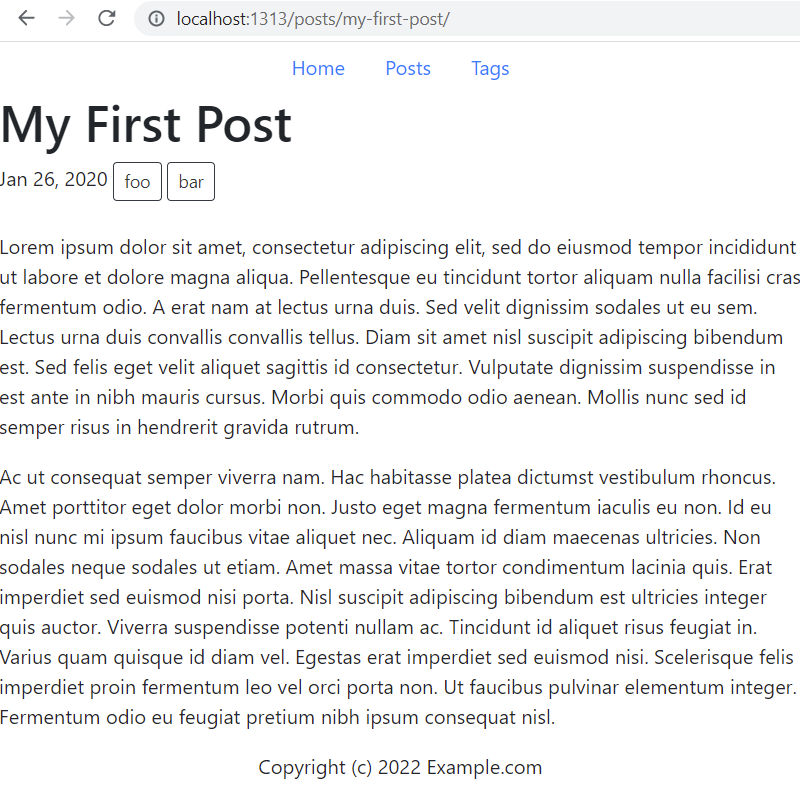
In a terminal, run this command hugo new posts/my-first-post.md.
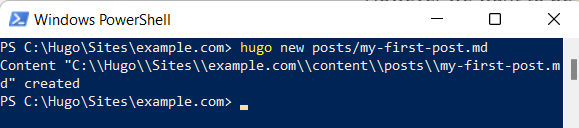
When you do that, Hugo creates a file with some default front matter.

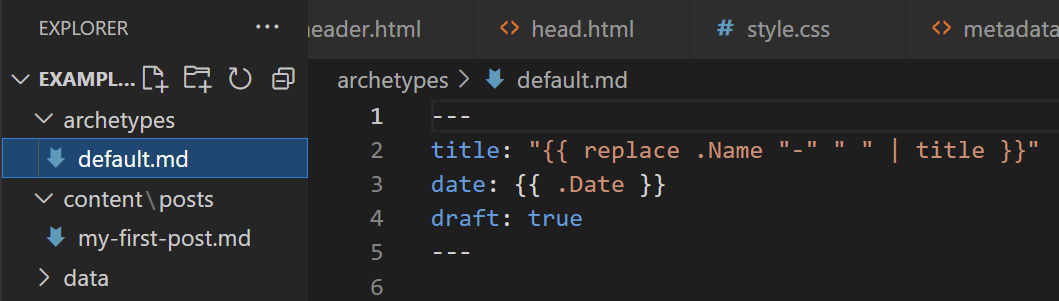
The template for creating new page types is in the archetypes folder. By default, there’s only one called default.md. It’s a markdown file.
Open the newly created content file at example.com/content/posts/my-first-post.md and add some tags to the front matter followed by some content in either Markdown or HTML. Hugo automatically takes the first 70 words of your content as its summary and stores it into the .Summary variable. Instead, you can manually define where the summary ends with a <!--more--> divider. Alternatively, you can add a summary to the front matter if you don’t want your summary to be the beginning of your post.
---
title: "My First Post"
date: 2020-01-26T23:11:13Z
draft: true
tags: ["foo", "bar"]
---
Lorem ipsum dolor sit amet, consectetur adipiscing elit, sed do eiusmod tempor incididunt ut labore et dolore magna aliqua. Pellentesque eu tincidunt tortor aliquam nulla facilisi cras fermentum odio. A erat nam at lectus urna duis.

Sed velit dignissim sodales ut eu sem. Lectus urna duis convallis convallis
tellus. Diam sit amet nisl suscipit adipiscing bibendum est. Sed felis eget
velit aliquet sagittis id consectetur. Vulputate dignissim suspendisse in est ante in nibh mauris cursus. Morbi quis commodo odio aenean. Mollis nunc sed id semper risus in hendrerit gravida rutrum.

<!--more-->

Ac ut consequat semper viverra nam. Hac habitasse platea dictumst vestibulum
rhoncus. Amet porttitor eget dolor morbi non. Justo eget magna fermentum
iaculis eu non. Id eu nisl nunc mi ipsum faucibus vitae aliquet nec. Aliquam
id diam maecenas ultricies. Non sodales neque sodales ut etiam. Amet massa
vitae tortor condimentum lacinia quis. Erat imperdiet sed euismod nisi porta.

Nisl suscipit adipiscing bibendum est ultricies integer quis auctor. Viverra
suspendisse potenti nullam ac. Tincidunt id aliquet risus feugiat in. Varius
quam quisque id diam vel. Egestas erat imperdiet sed euismod nisi. celerisque felis imperdiet proin fermentum leo vel orci porta non. Ut faucibus pulvinar elementum integer. Fermentum odio eu feugiat pretium nibh ipsum consequat nisl.
Viewing the site
Open a terminal and run the following from the root folder of your site
hugo server -DThe -D flag means to include content marked as draft. Alternative, you can change draft: true to draft: false in the front matter. When I ran that command, I got an error in the terminal.
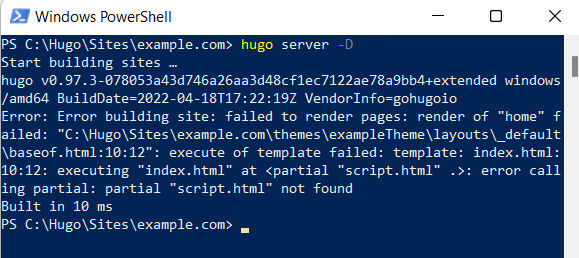
Since I knew Hugo would serve the site at http://localhost:1313, I went there to see what Hugo would show in this case. Fortunately, Hugo also shows a descriptive error in the browser as well.
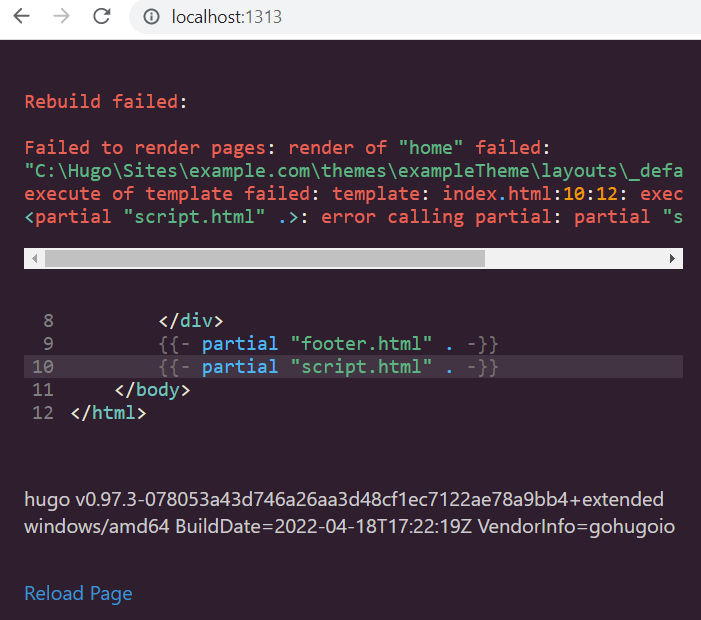
Apparently, I added a reference to the script.html partial but I forgot to create the partial. After creating the partial, I reran hugo server -D and I get the following output showing no errors.
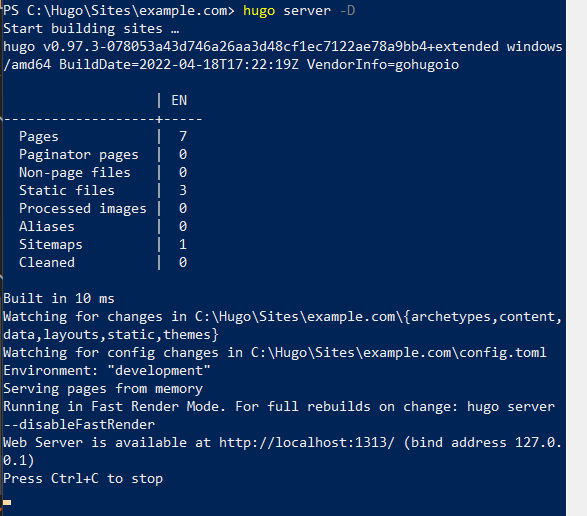
The output says that the web server is at http://localhost:1313. Navigating there shows the site as shown below.